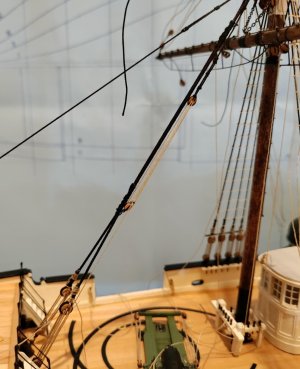
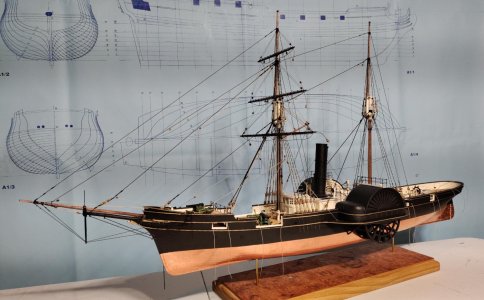
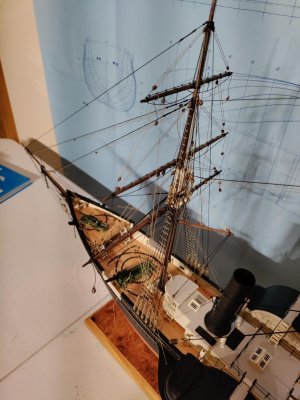
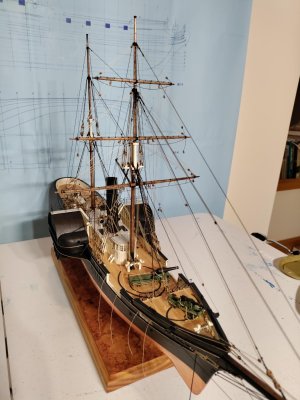
USRC Harriet Lane Model Shipways 1:96 scale circa 1863

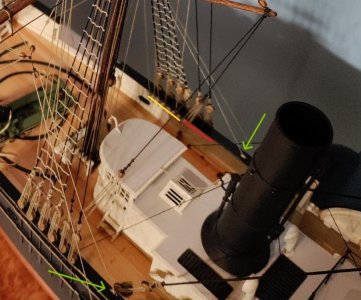
I submit the yellow and green lines (not the DC subway lines) are either/or, you don't need both. Preventer-stays are mostly a warship thing, something to back-up the main part in case of battle damage.
She was refit, ending up in the configuration you're modeling, at a Navy depot, so she may have been rigged Navy-style, but if they didn't need to make extensive repairs to her rig, they most likely just put it back to rights as it was, which was more merchant ship than warship, considering her designer/builder.
The green line (fore-stay) allows for a more substantial sail than the yellow line does, and if done Navy-style, would have been doubled, side-by-side. un-snaked, so a heads'l could be hanked on.
Thank you, Jerry! As usual, a gold mine of knowledge! I just decided to follow Webb's design for America, The preventer stay is there, so it is on my Harriet Lane.

Blessings.
Chuck
 
A lot of the time on my builds I hit a wall with some of these rigging choices and the books all offer different alternatives and frequently I can't find the belaying points. So, I just do what seems like it would work if you were in the crew and had to deal with it. Besides (unless you're Jerry Todd, who's gonna know?)
Pete! I agree 100%.
 
What ho, shipmates!

Some days ago, post #578 (Tuesday) I said I would post "tomorrow" about the period accurate standing rigging for the head stays for those current or future builders. Of course, I meant "tomorrow" figuratively.

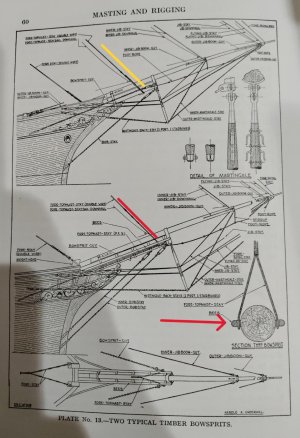
If you want to more accurately rig the head of your Harriet Lane, there are four main points. First, Jerry correctly (surprise) pointed out that the foretopmast stay could pass through bees on the bowsprit. (In red below.) That stay could also be rigged as I have done it. (See yellow line below.) Second, all of the stays forward of the foretopmast stay pass through the jibboom. Second, you will need to add a second pin to the martingale about half way up under which will pass the jib stay (to port or starboard - I don't have the poop - @JerryTodd may of some of the clipper ship crew) and the foretopgallant stay to the other side. Of course they key will be to plan for this work in advance. It will take some care to do it, but it is perfectly possible to drill through the jibboom so that appropriately sized rigging line can pass through. You will also need to add additional attachment points to the hull on both sides.

Here is an image from Underhill. As we all know a picture is worth a thousand . . .

Underhill bowsprits.jpg

Here's how it might look (BTW the white line is the foretopgallant mast stay): You see on the martingale where the orange and white lines would pass under a pin like the inner and outer martingale stays pass under a pin at the bottom of the martingale. Builder's note: Get yourself some 28 gauge annealed steel wire. It makes a perfect sized pin that can be bent slightly downward so the stays don't slip off. Happy building!

Accurate Head Rigging.jpg
 
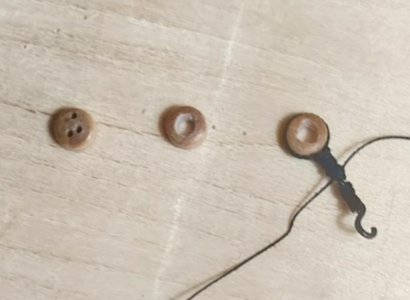
Another note: make sure to stock up on better blocks, deadeyes and rigging line. I say this here because most of the deadeyes that came with the ship and many of the extras I bought (before I discovered Dry Dock) were quite substandard. Meaning, the eyes were in random places on both sides of the deadeyes if you can believe it. That left me with a nice supply to use for making hearts! Working from smaller to larger bits with my Dremel, I was able to bore out the centers of the deadeyes and have a nice scale friendly, if not scale accurate, heart that also had a groove in which to place the stays. Pics of process below:

Hearts 1.jpgHearts 2.jpgUnderhill hearts.jpg

When I finally got around to the last attempt at the head rigging, I eye-spiced the lanyards. Well done, Chuck! Not that you can see it. I did not seize the lanyard, however. I imagine that someone with a lot of talent and all of their fingers could do it at scale, but I couldn't having neither of these qualities.

Blessings.
Chuck
 
And now, shipmates, the fun part!

I have tried to hyper detail my version of Harriet Lane. I had a huge boost with @JerryTodd 's guns and a wonderful muse in @Peter Gutterman 's lovely version of Harriet Lane.

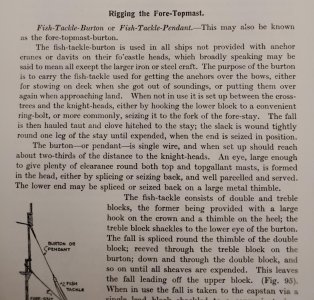
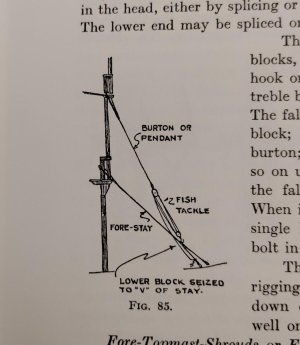
As you already know, I went with period accurate methods of slinging the yards. I decided that she could use pendant tackle, like an anchor fish tackle, so I added that following Underhill.Underhill fish 1.jpgUnderhill fish 2.jpgFish tackle.jpg
 
Well, shipmates, that's all for tonight. "Tomorrow," primarily for current and future builders, I'll focus on the need to plan carefully for the number and location of belaying pins, eyebolts and cleats for all of the lines should you chose to really add detail to your Harriet Lane. I thought I had planned ahead, but there are several lines on the foremast sharing a belaying pin :eek: and even some lines that had to be made fast to the bits because of the lack of pins or, frankly, the impossibility (for me) of belaying the lines any other way ROTF

Blessings. Peace. Gratitude.
Chuck
Familiar problem. I kept adding cleats, tying down to bitts, wherever, etc.,etc. Seems like there are always more lines to tie down than there are belaying points. probably a rigging Murphy's Law.
 
Familiar problem. I kept adding cleats, tying down to bitts, wherever, etc.,etc. Seems like there are always more lines to tie down than there are belaying points. probably a rigging Murphy's Law.
Shipmates! Thank you for sticking with me throughout this build and for you emojis of approbation!

Pete! Glad it's not just me ROTF On the other hand, I don't want poor Murphy to take all the blame here. In my case, the problem was underestimation because I didn't fully think through just how many belaying points I needed. Again, planning and planning in advance.

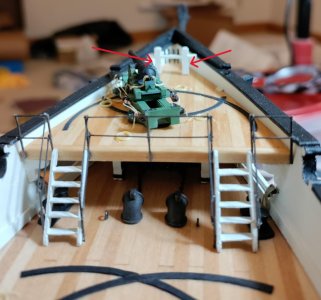
I had in mind doing all of the things I did on the foremast and the things I will do on the main mast, but I didn't have those things in mind when I started the build. Consequently, I was adding the belaying points late. Taking the bitts from forward aft - the foremost bitts came to mind after I built the raised deck and thought about the need to belay the jib stay inhaul and outhaul lines. I also thought, in a very fuzzy way, about the head sail running lines to the jib stay and the maintop mast stay. What I did not foresee was how hard it was going to be to actually belay the lines given the size and location of the fore bitts.

If I were to do it again, I would add cleats to the sides of the bitts for the jib stay in and outhaul lines. See red arrows in pic below.
Cleat locations fore bitts.jpg

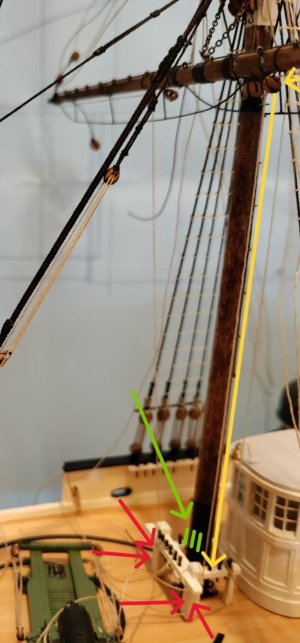
For the foremast bitts, I should have done the same thing. Part of the problem was having the bitts close enough to the mast so that the bitts didn't seem to intrude into the space for the gun. So, with the spatial relationships in mind, I did not make the bitts wider or longer so accommodate more belaying pins and ease of belaying the lines for that matter. Not having enough space for pins the necessary pins, cleats the port and starboard and on the forward side of the bitts would have been useful for belaying the lines from the upper ends of the running rigging for the jib stay and foremast stay and the sheets. Red arrows for additional cleats. Yellow arrow for the track of the sheets. Another solution would have been the addition of cleats to the mast. Cleats on the aft side of the mast would have been nearly impossible to rig (IMHO), BUT at least 270 degrees of the mast from a point on the port side to an identical point on the starboard side could have been used for cleats and spared the use of the belaying pins so that no line shared a pin with another line. See green notations and arrow.

Foremast Bitts.jpg

Why I should have known better. Below is my running rigging plan for the foremast. I should have created this plan in writing before I started work on the masts. I didn't create the plan until after the the fore bitts were done and the foremast was finished. Now, the right way to have done it was additional pins in a spider band around the mast. I thought about this, but I couldn't figure out how to make the spider band with my stone age tools and lack of experience with creating parts from brass and soldering them together. Almost embarrassing now when I think about Paul's work @dockattner and the fantastically delicate work of @shipbuilder . I have no real excuse for not going with cleats instead of a spider band. In any event, just based on my rigging plan, I needed 16 points to belay all of the lines that run down from the yards on the foremast. As built, my fore bitts only have 14 belaying pins and 4 of those are not functional because of how thick I built the attachment points from the bitts to the legs that run aft. So, I was 6 belaying pins short in the end.

Chuck's fore mast running rigging plan.jpg


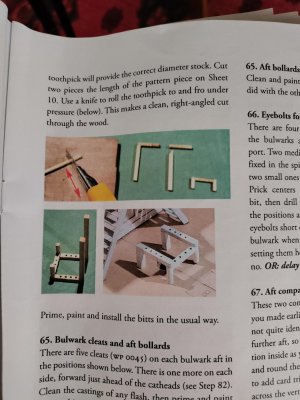
As to to the mainmast bitts, I was slightly thoughtful. I added cleats, but I didn't follow the plans which call for a configuration of the bitts identical to the foremast bitts. So, I lost 8 belaying pins. I did it my own way so that I could more easily access the bolts on deck for attaching the lower blocks for the main boom and main gaff halliards. I lost the most convenient belaying points for the topsail and t'gallant sail yard braces. First pic is what the kit says to do. Second pic, what I did. Yellow arrows show the added cleats. Red arrow shows where I should have added an additional cleats. Also, I could have added cleats to the mast as discussed above. On the main mast, the cleats could have been placed on the forward side of the mast an made easy attachment points for the brace lines. See pic 3 in green. Orange arrows point out the deck eyebolts I was trying to maintain easy access to. As you can see, there is plenty of room between the main mast and the ladders to the top of the deckhouse to manage belaying the braces.

Kit main bitts.jpgChucks main bitts configuration.jpgMain mast cleat locations.jpg

That's all for now, shipmates!

Blessings. Peace. Gratitude.
Chuck
 
Shipmates! Thank you for sticking with me throughout this build and for you emojis of approbation!

Pete! Glad it's not just me ROTF On the other hand, I don't want poor Murphy to take all the blame here. In my case, the problem was underestimation because I didn't fully think through just how many belaying points I needed. Again, planning and planning in advance.

I had in mind doing all of the things I did on the foremast and the things I will do on the main mast, but I didn't have those things in mind when I started the build. Consequently, I was adding the belaying points late. Taking the bitts from forward aft - the foremost bitts came to mind after I built the raised deck and thought about the need to belay the jib stay inhaul and outhaul lines. I also thought, in a very fuzzy way, about the head sail running lines to the jib stay and the maintop mast stay. What I did not foresee was how hard it was going to be to actually belay the lines given the size and location of the fore bitts.

If I were to do it again, I would add cleats to the sides of the bitts for the jib stay in and outhaul lines. See red arrows in pic below.
View attachment 501728

For the foremast bitts, I should have done the same thing. Part of the problem was having the bitts close enough to the mast so that the bitts didn't seem to intrude into the space for the gun. So, with the spatial relationships in mind, I did not make the bitts wider or longer so accommodate more belaying pins and ease of belaying the lines for that matter. Not having enough space for pins the necessary pins, cleats the port and starboard and on the forward side of the bitts would have been useful for belaying the lines from the upper ends of the running rigging for the jib stay and foremast stay and the sheets. Red arrows for additional cleats. Yellow arrow for the track of the sheets. Another solution would have been the addition of cleats to the mast. Cleats on the aft side of the mast would have been nearly impossible to rig (IMHO), BUT at least 270 degrees of the mast from a point on the port side to an identical point on the starboard side could have been used for cleats and spared the use of the belaying pins so that no line shared a pin with another line. See green notations and arrow.

View attachment 501731

Why I should have known better. Below is my running rigging plan for the foremast. I should have created this plan in writing before I started work on the masts. I didn't create the plan until after the the fore bitts were done and the foremast was finished. Now, the right way to have done it was additional pins in a spider band around the mast. I thought about this, but I couldn't figure out how to make the spider band with my stone age tools and lack of experience with creating parts from brass and soldering them together. Almost embarrassing now when I think about Paul's work @dockattner and the fantastically delicate work of @shipbuilder . I have no real excuse for not going with cleats instead of a spider band. In any event, just based on my rigging plan, I needed 16 points to belay all of the lines that run down from the yards on the foremast. As built, my fore bitts only have 14 belaying pins and 4 of those are not functional because of how thick I built the attachment points from the bitts to the legs that run aft. So, I was 6 belaying pins short in the end.

View attachment 501736


As to to the mainmast bitts, I was slightly thoughtful. I added cleats, but I didn't follow the plans which call for a configuration of the bitts identical to the foremast bitts. So, I lost 8 belaying pins. I did it my own way so that I could more easily access the bolts on deck for attaching the lower blocks for the main boom and main gaff halliards. I lost the most convenient belaying points for the topsail and t'gallant sail yard braces. First pic is what the kit says to do. Second pic, what I did. Yellow arrows show the added cleats. Red arrow shows where I should have added an additional cleats. Also, I could have added cleats to the mast as discussed above. On the main mast, the cleats could have been placed on the forward side of the mast an made easy attachment points for the brace lines. See pic 3 in green. Orange arrows point out the deck eyebolts I was trying to maintain easy access to. As you can see, there is plenty of room between the main mast and the ladders to the top of the deckhouse to manage belaying the braces.

View attachment 501737View attachment 501738View attachment 501741

That's all for now, shipmates!

Blessings. Peace. Gratitude.
Chuck
Good morning Chuck. Ahhh those should have, could have, didn’t moments in life and with little ship building. I have plenty of them……. I share your pain with rigging plans especially when we deviate from the the kit instructions to create a more comprehensive rigging outcome. Those mast cleats are often neglected ROTF . Anyway, you are creating a stunning Harriet Lane- mighty impressive. Cheers Grant
 
Grant! Too right! Painful!

More of the "I wish I had . . ." is coming. The title is "Belaying Pins Along the Bulwarks" or another half-baked thought by The Gavel ROTF

Appreciate you looking in on my build, Grant. I thank you kindly for the compliments!

Blessings. Peace. Gratitude.
Chuck
 
Last edited:
What ho, shipmates!

Note - this is truly a unique kit from @Model Shipways . There are no other available kits of ships of the USN sidewheelers. Although there are kits featuring the riverine boats and the rightly ubiquitous Monitor, the only other kit that was available of a USN ship of historical distinction was Blue Jacket's Kearsarge in 1:96 scale. Alas, if you slept on that one, like I did :eek:, you are, like I am, SOL.:(

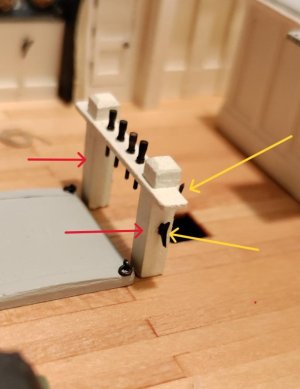
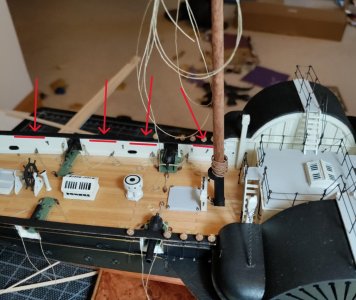
So, half-baked. Because I knew I was going to add a lot to the rigging, I did think about the need for belaying pins along the bulwarks in the area of the main mast. I put these in, but I probably should have made them longer. I guess there were two things on my mind. First, I only had a certain number of the "right kind" of belaying pins (sourced from Blue Jacket Shipcrafters) and I was too impatient to wait for more (although I ordered more today to fill an empty hole in the pin rail.) Second, and this is probably pure hind sight, I don't think I could have accessed the pins because of the amount of rigging, including the guys for the funnel. In this pic, you see the belaying pins I added (yellow line) and where I might have added more (red line). The greed arrows show the addition of cleats to the main rail to belay the aftermost fore tack lines, Looking at the picture now, I see that the red line should be a bit farther aft because of the path of the vang lines. But you get the idea.

On another note the kit does not call for any belaying points other than the fore and main mast bitts. I find it surprising, if not heretical ROTF, that there would be no pin rails on a ship like Harriet Lane. If the beautiful people @Model Shipways were ever to redesign this kit (or, please Dear Lord) offer the kit in a larger scale (1:48 would be my preference ;) and wouldn't it be awesome to see the guns from my favorite arms dealer @JerryTodd on such a ship!) there should be pin rails. Or is it just me?

Forward belaying pin locations.jpg

Now, when I say half-baked, I mean: If I needed pin rails forward, why didn't I make pin rails aft? That's right sports fans. I did not place any pin rails aft. Why? Well you may ask. It was easier to do forward because the main rail had enough overlap inboard that I could tuck and glue the pin rail underneath the main rail. Aft, I have almost no overlap. Without the overlap I was not sure that the pin rails would hold up under the stresses of belaying lines to the pins. So, I left them off and opted for cleats in the bulwarks. As we know from my prior post, this was probably not the best solution. I deleted 2 - 4 attachment points surrounding the base of the main mast. That was the key problem. In any event, current or future builders of this unique kit, you are hereby commanded to add cleats to the mast! And, if you desire, pin rails to the bulwarks aft. Here's a pic with potential locations in red.

Aft belaying pin locations.jpg

The most forward location is, perhaps, the most useful given it's proximity to the mast. Certainly, the lines for the top sail yard and t'gallant sail yard could be belayed to this location port and starboard.

Well, shipmates, thus much for the "I wish I had . . . " chapter for today. As a teaser, I will say that thinking through what I wish I had done has made me much more thoughtful about what I am about to do with the main boom and gaff and the extra pair of boats. But more on that later.

Cheers!

Blessings.
Chuck
 
What ho, shipmates!

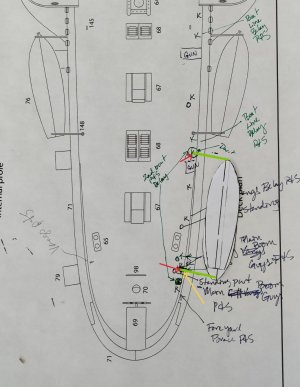
I wasn't planning to post in this order, but I find myself needing some advice on davit placement for the 2nd boats to port and starboard. Below is a pic of the plans and my paper mock up of the overhead profile of the 2nd boat. As Paul suggested long long ago . . ., it will be a double ended boat, so different (as Paul suggested) from the 1st boat. It is also about 3 scale feet longer. The green lines suggest the davits. The thin red arrows point to the locations of the davits on the deck. You'll note the inward slope of the bulwarks that begins in the are of the aftermost davit. Here the question: davit in the deck, or davit through the bulwark (see yellow arrow). You needn't hurry to respond. I still have to make all of the boats and the davits ROTF

2nd Boat Davit Placement.jpg

Blessings.
Chuck
 
HI chuck,
I have been enjoying watching the progress on your Harriet Lane and she looks beautiful.

Bill
Bill! Thank you very much, kind Sir! It's starting to come together, IMHO. Actually, when I finished the foremast rigging (save the braces - and oh boy was I tempted :D) I experienced a kind of energy let down. I thought take a pause. Brief. Looking at all of the wonderful work going on has pumped me full of energy. We're in the home stretch. More or less.

What do you think about the aftermost davit placement, Bill? I'm not even sure that it will be an issue because I don't really know that the inward slope on my Harriet Lane will be an issue.

Blessings.
Chuck
 
@JerryTodd - Jerry! I was hoping for your expertise on this one.:p
Sorry, I've been going in circles with a new web-host and not paying attention...

The type of davit most common in photos of CW ships are "radial davits," like this kit. Some had a single or double block made into the top end, some, like shown, had an eye for a block to be attached. The typically sat in sockets on the channels, or the side of the hull, with a strap or a ring holding them part way up, all so they can pivot. It was less common to mount them on deck or through the cap-rail. Up through the war They normally held one boat per pair. The big ones holding two, even three boats, are post war training ship things - training ships do a lot of boat work.
1740008734524.png

Boats have been typically carried on the quarters, since quarter davits came into fashion in the 1790's. Most pictures I see of the Lane show her carrying four boats, 25ish foot cutters from the looks of them which is some 50+ feet of boat hanging in davits on either side. She may have had a gig or jolly-boat (16 footer maybe) hanging off the stern on up on the house. IMO, the davits should be mounted outboard the bulwark something like in the pic of the Housatonic. Note there's a lot of length against the hull because, and especially in your case, there' not a good way to run a support line from them and up the mast, they need to support themselves. You can't get that needed leverage mounting them inboard on the deck.

1740011401921.jpeg
 
Back
Top