I suppose, if you decide to cut them to length, you could run the cross-section through 12" mitre saw (widow maker). Just kidding.Hallo Kurt,
interesting question, by accident I discussed the same yesterday evening with some modeling friends here in Vienna.
View attachment 154206 View attachment 154207
Originally I was too lazy during construction to cut all planks to the absolute correct length, and my intention was from the beginning, to cut / sand them to the correct same length at the end of the section construction. In the meantime, I like the look, that the planks do not have the same length.
Honestly I do not know in moment, how I will decide at the end........ let us see - and I am open for comments and a discussion about the pros and cons
-

Win a Free Custom Engraved Brass Coin!!!
As a way to introduce our brass coins to the community, we will raffle off a free coin during the month of August. Follow link ABOVE for instructions for entering.
-

PRE-ORDER SHIPS IN SCALE TODAY!
The beloved Ships in Scale Magazine is back and charting a new course for 2026!
Discover new skills, new techniques, and new inspirations in every issue.
NOTE THAT OUR FIRST ISSUE WILL BE JAN/FEB 2026
You are using an out of date browser. It may not display this or other websites correctly.
You should upgrade or use an alternative browser.
You should upgrade or use an alternative browser.
USS BONHOMME RICHARD - POF - Cross Section in Pear - 1:48 - by Uwe
Many Thanks to all for your comments, suggestions and also the likes received - much appreciated
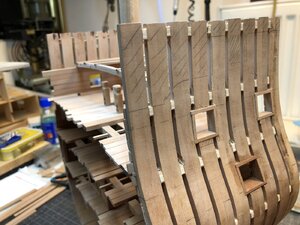
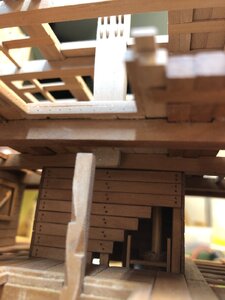
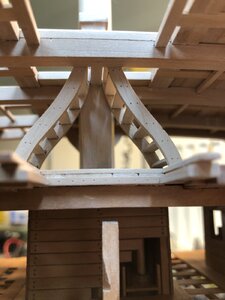
For preparation (and dry fit) I prepared the next (and last) beams - one of the next steps will also be the cutting of the frames in order to get the final form of the hull.
For this I will need the final level of the deck
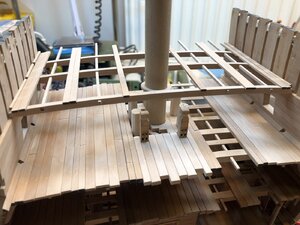
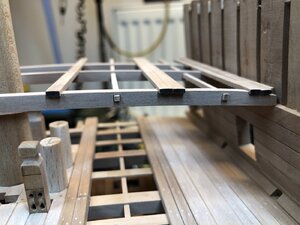
The appr. cutting line of the frames is marked with a pencil
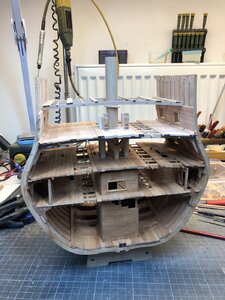
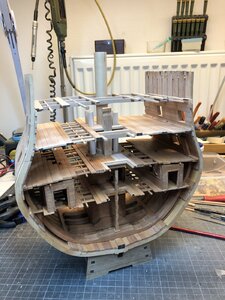
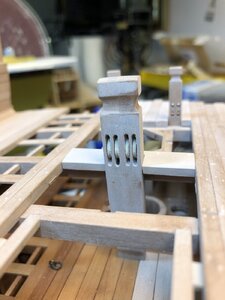
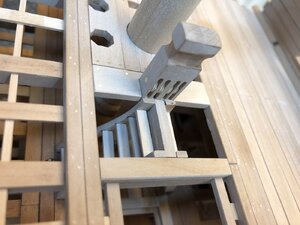
in addition I was able to make the jeer bitts with four wooden sheaves, mounted on a brass axis - now I am able to finalize also the area around the stairs etc.
Many thanks for visiting my log and your interest .... to be continued .....
For preparation (and dry fit) I prepared the next (and last) beams - one of the next steps will also be the cutting of the frames in order to get the final form of the hull.
For this I will need the final level of the deck


The appr. cutting line of the frames is marked with a pencil


in addition I was able to make the jeer bitts with four wooden sheaves, mounted on a brass axis - now I am able to finalize also the area around the stairs etc.


Many thanks for visiting my log and your interest .... to be continued .....
It is really looking good Uwe.
Well done mate.
Well done mate.
Fantastic
Kurt Konrath
Kurt Konrath
Uwe, if you have more wine at your gatherings, maybe the look of the ends won't matter!
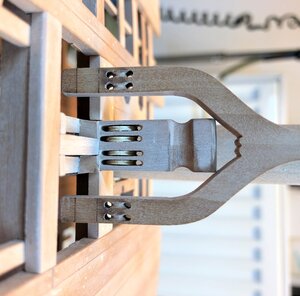
Yesterday evening I was think about to leave the other sheer bitts like they are, or also to install "real" sheaves
The imagination of sheaves was not bad, and if ropes would go through nobody would recognize
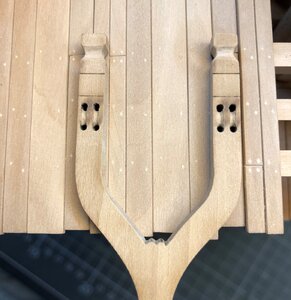
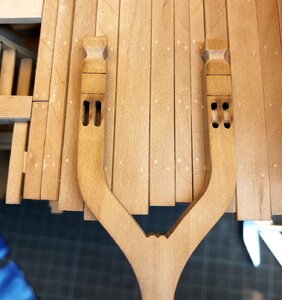
but I compared it with the other one I did last weeken
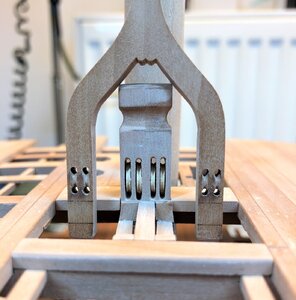
I decided to do it also and install in the slots wooden sheaves.
Honestly I do not really know, if at this time already metal sheaves were used, or wooden sheaves!
Maybe somebody knows the historical correct technical information???.......
Often modeler are using sheaves out of brass, which I could have done also, but I decided to try to make such wooden wheels without any special power tools.
In the following I want to show my way how I did it in the different working steps, so somebody else could use the same method, or tell us a better way - open for suggestions, comments and critics as always
Making of wooden sheaves:
cut out the slots with a 1mm wide small chisel - I love these small chisels, which are often in use in my workshop
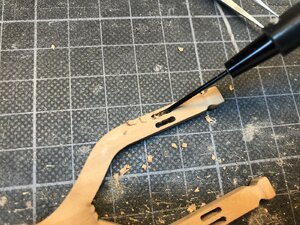
close up of the slots
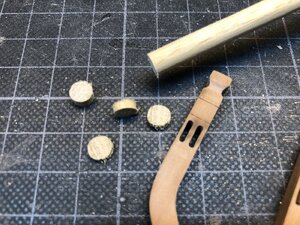
as base material I used a round rod and cut with the saw some disks
drilling the center holes - the metal screw etc. you know very well from Proxxon or Dremel, usually used for a circular saw or grinding blade
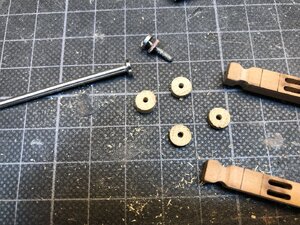
one disk fixed
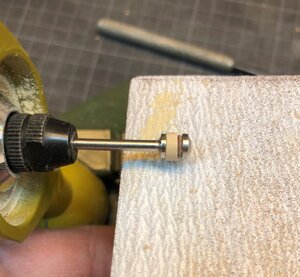
The Proxxon drill is horizontal fixed in a drill stand - sanding the surface of the disk with running the drill
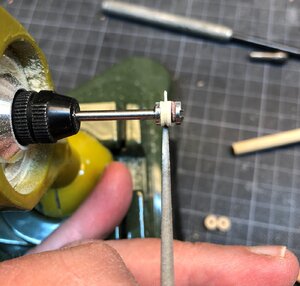
afterwards I used a round file and sanded the recess
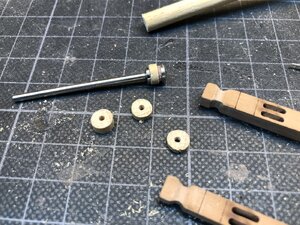
four pieces prepared with the recesses, but still too thick to match into the slots
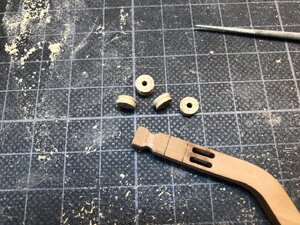
after some (hand) sanding they got the correct thickness to fit into the slots
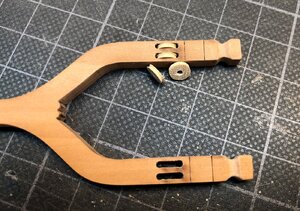
and the final result
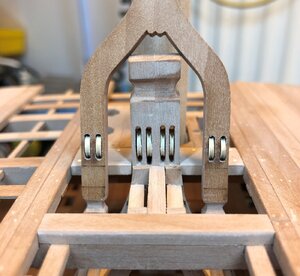
Here you can switch between the two versions - I think it was worth to do so


Many Thanks for your interest - HAPPY MODELING
The imagination of sheaves was not bad, and if ropes would go through nobody would recognize

but I compared it with the other one I did last weeken

I decided to do it also and install in the slots wooden sheaves.
Honestly I do not really know, if at this time already metal sheaves were used, or wooden sheaves!
Maybe somebody knows the historical correct technical information???.......
Often modeler are using sheaves out of brass, which I could have done also, but I decided to try to make such wooden wheels without any special power tools.
In the following I want to show my way how I did it in the different working steps, so somebody else could use the same method, or tell us a better way - open for suggestions, comments and critics as always
Making of wooden sheaves:
cut out the slots with a 1mm wide small chisel - I love these small chisels, which are often in use in my workshop

close up of the slots

as base material I used a round rod and cut with the saw some disks

drilling the center holes - the metal screw etc. you know very well from Proxxon or Dremel, usually used for a circular saw or grinding blade

one disk fixed

The Proxxon drill is horizontal fixed in a drill stand - sanding the surface of the disk with running the drill

afterwards I used a round file and sanded the recess

four pieces prepared with the recesses, but still too thick to match into the slots

after some (hand) sanding they got the correct thickness to fit into the slots

and the final result

Here you can switch between the two versions - I think it was worth to do so


Many Thanks for your interest - HAPPY MODELING
Kurt Konrath
Kurt Konrath
Yes, it looks very good with real pulleys installed!
But as you said, when rigging is installed, will you be able to see the pulleys at all?
Maybe just do a temporary rigging install to see what the would look like and compare them with threads installed.
But as you said, when rigging is installed, will you be able to see the pulleys at all?
Maybe just do a temporary rigging install to see what the would look like and compare them with threads installed.
There will be no rigging on this section, without Mast and yards...... maybe only some „deco“ rigging ..... i will seeYes, it looks very good with real pulleys installed!
But as you said, when rigging is installed, will you be able to see the pulleys at all?
Maybe just do a temporary rigging install to see what the would look like and compare them with threads installed.
Hi Uwe,
Love your wooden sheaves.
As far as I know sheaves were from brass or Lignum vitae, which we call in Dutch pokhout.
Pokhout is a tropical self lubricating hardwood.
From what period it was used I don t know but in Vasa there are already brass sheaves in use. For your time frame it should be more then ok.
Thanks for showing. It looks more better with the sheaves. You have to check the diameter on the both outside, maybe there is no space for the rope. It looks a little bit tightly. Karl maybe is not wrong. In the third 74-Book Page 117 - 123 are shown sheaves in bronze. For the Bonhomme Richard it should also be correct. The Mono should clear this point.
Thanks for the tutorial. I can't believe you actually manually chiseled out openings for sheaves. Where did you get those miniature chisels?Yesterday evening I was think about to leave the other sheer bitts like they are, or also to install "real" sheaves
The imagination of sheaves was not bad, and if ropes would go through nobody would recognize
View attachment 155282
but I compared it with the other one I did last weeken
View attachment 155283
I decided to do it also and install in the slots wooden sheaves.
Honestly I do not really know, if at this time already metal sheaves were used, or wooden sheaves!
Maybe somebody knows the historical correct technical information???.......
Often modeler are using sheaves out of brass, which I could have done also, but I decided to try to make such wooden wheels without any special power tools.
In the following I want to show my way how I did it in the different working steps, so somebody else could use the same method, or tell us a better way - open for suggestions, comments and critics as always
Making of wooden sheaves:
cut out the slots with a 1mm wide small chisel - I love these small chisels, which are often in use in my workshop
View attachment 155285
close up of the slots
View attachment 155284
as base material I used a round rod and cut with the saw some disks
View attachment 155286
drilling the center holes - the metal screw etc. you know very well from Proxxon or Dremel, usually used for a circular saw or grinding blade
View attachment 155287
one disk fixed
View attachment 155288
The Proxxon drill is horizontal fixed in a drill stand - sanding the surface of the disk with running the drill
View attachment 155289
afterwards I used a round file and sanded the recess
View attachment 155290
four pieces prepared with the recesses, but still too thick to match into the slots
View attachment 155291
after some (hand) sanding they got the correct thickness to fit into the slots
View attachment 155292
and the final result
View attachment 155293
Here you can switch between the two versions - I think it was worth to do so
View attachment 155283 View attachment 155293
Many Thanks for your interest - HAPPY MODELING
- Joined
- Jul 9, 2019
- Messages
- 497
- Points
- 323

Fantastic work, Uwe!and the final result

Many thanks for your kind words......Thanks for the tutorial. I can't believe you actually manually chiseled out openings for sheaves. Where did you get those miniature chisels?
For the standard work I use the chisels from Hasegawa, which I used for these slots
Plane and Chisels ?
Ok making my list of things I need to take the plunge to wood. About the only things I need are a good quailty plane and a chisel set. I know Micro Mark and Model Expo tool quality is sometimes questionable. Are there any US modeling tool suppliers that carry better quailty woodworking tools...
shipsofscale.com
Purchased shortly ago / sthg new in your workshop -> present it here
I hve one of these its great. You will need a fan to blow away dust. Dead easy to use and pack up. just go slow on cutting.
shipsofscale.com
- Joined
- Jun 12, 2020
- Messages
- 48
- Points
- 93

I am enjoying following your build. Is there a reason for installing the shot locker window with the sliding shutter on the opposite side to the way its shown on the drawings?Not much happened, but I want to show it - in moment more the thinking and planning what to do next
The last three wall elements were fixed - the deck planking is only prepared but not fixed - I have to decide where I want to install the planking and in which areas not. Depends also where later the other store rooms will have to be installed - see later photos
View attachment 134161
View attachment 134162
View attachment 134163
These are the temporary pattern sheets for the two store rooms on this deck - I will make them in the same way like before, with some 0,5mm pear veneer as a basis - hope to this during the weekend
View attachment 134164
Only to get a feeling how it will look like
View attachment 134165
View attachment 134166
View attachment 134167
Many thanks for your interest .... to be continued .....
Many Thanks for the interest - there was only one reason -> Mistake and Error !!! well seen !!!!I am enjoying following your build. Is there a reason for installing the shot locker window with the sliding shutter on the opposite side to the way its shown on the drawings?
I was looking at an other building log and the photos there and was not checking the drawings in detail - when it happened it was too late to change the location
And also btw a warm welcome here on board of our forum !!! Do you also build this kit model?I am enjoying following your build. Is there a reason for installing the shot locker window with the sliding shutter on the opposite side to the way its shown on the drawings?
If yes, why not showing it here in our forum - would be great to see another one
- Joined
- Jun 12, 2020
- Messages
- 48
- Points
- 93

Yes, I am building a version of the model and realised I made a mistake with the shot locker - I used the 2mm thick timber for the walls and I did not have enough for the cabin sides. I used the 1mm timber instead. It still looks ok.And also btw a warm welcome here on board of our forum !!! Do you also build this kit model?
If yes, why not showing it here in our forum - would be great to see another one
Think about - to show yours also in a building log - with these logs others can get more information and also impression how to make the model and maybe bash it.....would be greatYes, I am building a version of the model and realised I made a mistake with the shot locker - I used the 2mm thick timber for the walls and I did not have enough for the cabin sides. I used the 1mm timber instead. It still looks ok.


