I am too, but I would normally use a Dremel, and hand-held it will be very difficult to keep them square and true, yet maintain the proper profile. Using files would be even more difficult. I think that if I bought the kit, the one tool I would have to invest in, if nothing else, would be a spindle sander. Harbor freight has one for $150, but it's a monster for my small shop, which these days is normally my den.
-

Win a Free Custom Engraved Brass Coin!!!
As a way to introduce our brass coins to the community, we will raffle off a free coin during the month of August. Follow link ABOVE for instructions for entering.
-

PRE-ORDER SHIPS IN SCALE TODAY!
The beloved Ships in Scale Magazine is back and charting a new course for 2026!
Discover new skills, new techniques, and new inspirations in every issue.
NOTE THAT OUR FIRST ISSUE WILL BE JAN/FEB 2026
You are using an out of date browser. It may not display this or other websites correctly.
You should upgrade or use an alternative browser.
You should upgrade or use an alternative browser.
USS BONHOMME RICHARD - POF - Cross Section in Pear - 1:48 - by Uwe
I just glued all the frames in the jig and sanded them by hand, on the inside of the frames I used a small hand drill, I am building two at the same time for my Grandsons, here is the link to my build, hope this helps you,
https://shipsofscale.com/sosforums/...cross-section-in-cherry-1-48-by-neptune.3773/
best regards John,
https://shipsofscale.com/sosforums/...cross-section-in-cherry-1-48-by-neptune.3773/
best regards John,
Thanks, John. I will spend some time looking at your build thread and tips.I just glued all the frames in the jig and sanded them by hand, on the inside of the frames I used a small hand drill, I am building two at the same time for my Grandsons, here is the link to my build, hope this helps you,
https://shipsofscale.com/sosforums/...cross-section-in-cherry-1-48-by-neptune.3773/
best regards John,
I don't have a drill press, either. But that's a good point: I could get one cheaper than the spindle sander, and it still works as a sander.Hello Signet, it is not absolutely necessary to buy a spindle sander, if you have a drill press you can also buy these grinding rolls.
I know I started this, but let's not muck up Uwe's incredible build log with this, okay? I really do appreciate all the comments, though.
But be aware - for the section model, which is midship section not so much work for the frames are necessary.
To use a spindle sander would be fine, drill press with sanding spindles would be also working, but really for this section a Dremel with a small sanding drum will do the work easily...... and sanding with a sandpaper fixed to a sanding block would do it also without bigger problems. The laser char and also the small adjustments are possible with normal handheld tools.....
I can summarize, that for the Bonhomme Richard 95% of the work was done by hand or maximum a Dremel (I am using Proxxon, but that is the same in prinziple)
Trust me -> you do not need for this model very specialized tools !
Here I suggest to invest the money f.e. in a set of very good needle files - much more important.
Maybe one "power" tool, which I use more or less daily is my discsander..... mainly for accurate lengthening and sanding in 90° f.e. planks and stripes
I have ordered and received the Bonhomme Richard cross section model, complete, in pear, and will get to open it on Christmas day. Also getting some power sanding equipment, etc. that I think will be helpful (maybe not necessary, but I'm 78 so time is somewhat of the essence).
Uwe, although you've posted comments, there hasn't been any new progress pictures since June. Are you actively working on this model, or has Real Life interrupted?
Also, I have a question concerning deck and outer planking. Do you know what "pattern" of deck planking would have been used on this ship? The plans don't seem to show any actual deck plank length or spacing. I used Four Step Butt Planking on my Victory cross section, and personally like the pattern. But I don't know that a French ship in 1765 would have been planked that way. I realize that with a cross section model, and especially with portions of the hull and/or deck cut away, there will not be too many full length planks, but there will be some, and I want to have the pattern in mind when laying them out. Possibly even use actual but locations to end planks, rather than random ones.
Last edited by a moderator:
I interrupted the work on the section and made in between the Le Coureur in the group buildI have ordered and received the Bonhomme Richard cross section model, complete, in pear, and will get to open it on Christmas day. Also getting some power sanding equipment, etc. that I think will be helpful (maybe not necessary, but I'm 78 so time is somewhat of the essence).
Uwe, although you've posted comments, there hasn't been any new progress pictures since June. Are you actively working on this model, or has Real Life interrupted?
Also, I have a question concerning deck and outer planking. Do you know what "pattern" of deck planking would have been used on this ship? The plans don't seem to show any actual deck plank length or spacing. I used Four Step Butt Planking on my Victory cross section, and personally like the pattern. But I don't know that a French ship in 1765 would have been planked that way. I realize that with a cross section model, and especially with portions of the hull and/or deck cut away, there will not be too many full length planks, but there will be some, and I want to have the pattern in mind when laying them out. Possibly even use actual but locations to end planks, rather than random ones.
LE COUREUR - french Lugger 1776 - POF kit from CAF in 1:48 by Uwe
Today I want to start my building log of the Le Coureur But before I want to summarize the existing information available here on SOS A detailed Kit Review you can find here: https://shipsofscale.com/sosforums/threads/le-coureur-french-lugger-pof-kit-in-scale-1-48-by-caf.6002/ The...
shipsofscale.com
and some weeks ago the HMS Granado section
HMS GRANADO (1742) - midship section - POF by CAF in 1:48 - by Uwe
Some days ago I started working on a new project - HMS GRANADO - bomb vessel midship section - POF by @CAFmodel in 1:48 I made already a detailed kit review, where you can find more detailed Information abou the content and also the specialities of this kit, like the correct framing, the...
shipsofscale.com
My intention is to restart once the Bonhomme Richard section during next year, but we will see.
The deck pattern is more a theoretical definition and maybe more important if you build a complete ship. At the time of the shipwrights they used planks which were available at the shipyard or the timber suppliers. Most important was, that butt joints of planks should not lay down on the same beam close to each other. So for me it is often not a regular 3, 4 or 5 butt joint planking - let say that there should be 4 or 5 planks in between two butt joints on top of the same beam.
Building only a midship section model like this one you can choose it individual - nobody, also not Jean Boudriot did know exactly where the butt joints were in reality. So choose the length of your planks like you have by hand and make the butt joints on top of beams - have several planks in between
Most important is in my opinion, that you make the nailing pattern correctly, so technically correct
In the following you can find the excerpts of the Boudriot drawings showing the decks
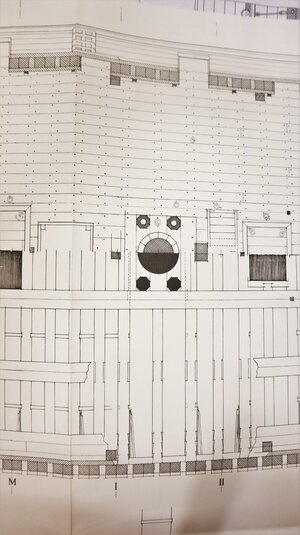
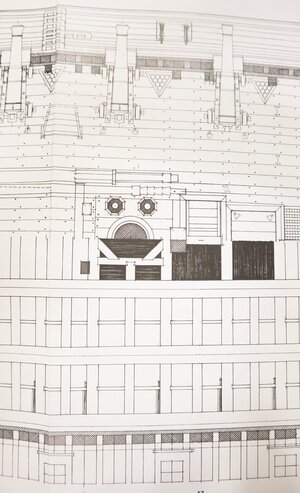
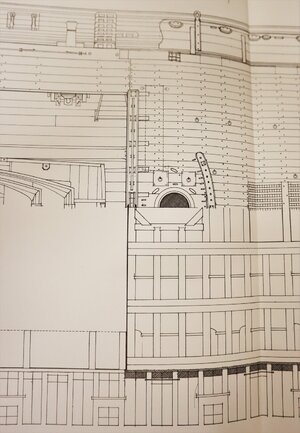
I see you are very busy. It is amazing that you can do so many projects yet maintain such an incredible skill and detail level. I really like the way you research and consider every move and alternative before proceeding. In that, we are somewhat alike.I interrupted the work on the section and made in between the Le Coureur in the group build
LE COUREUR - french Lugger 1776 - POF kit from CAF in 1:48 by Uwe
Today I want to start my building log of the Le Coureur But before I want to summarize the existing information available here on SOS A detailed Kit Review you can find here: https://shipsofscale.com/sosforums/threads/le-coureur-french-lugger-pof-kit-in-scale-1-48-by-caf.6002/ The...shipsofscale.com
and some weeks ago the HMS Granado section
HMS GRANADO (1742) - midship section - POF by CAF in 1:48 - by Uwe
Some days ago I started working on a new project - HMS GRANADO - bomb vessel midship section - POF by @CAFmodel in 1:48 I made already a detailed kit review, where you can find more detailed Information abou the content and also the specialities of this kit, like the correct framing, the...shipsofscale.com
My intention is to restart once the Bonhomme Richard section during next year, but we will see.
It is also very interesting comparing the HMS Granado and the Bonhomme Richard cross sections, and seeing the differences. Like the square iron nails versus copper pegs.
I realize that especially on a cross section model, the plank spacing may not be important unless it violates the "nearness" rules. But I found with my HMS Victory cross section that even when seeing a few of the joints, my eye extruded a pattern from it, and I found it irritating if it was not consistent or logical (and there are only so many plank patterns IF constant length planks are used. When including cutouts to show detail on a model such as this, IDEALLY planks would be added as when building, and where internal detail is desired to be visible, one would just leave those planks off, rather than "cut" them to suit. Unfortunately, that is not very practical, as the construction spacings are too large. An engineering drawing method would be to "cut" out those areas with circles, arcs or other curved lines, contrasting them from construction cuts. The method you use, on planking but also on the rooms inside, is a very good compromise, "hinting" at construction cuts, being square, but space to logically show the internal structure.
Concerning finish, did you use an oil or varnish or what on your frame and planking? Were you able to apply the finish, then plank over those finished areas and have the planking glue adhere well?
First of all many thanks for your kind words about my work.Concerning finish, did you use an oil or varnish or what on your frame and planking? Were you able to apply the finish, then plank over those finished areas and have the planking glue adhere well?
On the Bonhomme Richard section, which is pear wood, I used tung oil for the treatment of the wood.
The glueing after the oil treatment is possible, but slightly reduces adhesion force - also good to sand a little bit the surface before using glue - on the Bonhomme I used water based wood glue for 99%.
What I realized in the meantime, that the wood was darkened in the meantime. Maybe I can make in the next days some photos of the actual appearance, so you can see what I mean.

Since the Le Coureur I am using something different. It is Cloe Schnellschleifgrundierung


G1 Schnellschleif-Grundierung
Eigenschaften: Farblose Grundierung, sehr füllkräftig, schnell trocknend, für rohe oder gebeizte Hölzer.Verbrauch: 1 Liter reicht für ca. 8 m² je AnstrichTrockenzeit: ...
 www.clou-shop.eu
I got once the tipp by @Jeronimo and realized in the meantime, that this treatment is also used f.e. by @Thomas Marocke on his La Belle
La Belle - Caf Model 1:48 by Thomas Marocke [COMPLETED BUILD]
Thomas... I think I found the router bits you pictured. They are Proxxon, correct ? https://www.proxxon.com/us/micromot/tools-router-bits.php Thanks Daniel
shipsofscale.com
Franz. 18pdr. Ship Cannon 1779 by Jeronimo
74 Gun Ship New construction and reconstruction of the section of the second gundeck. The cannon stayed the same, only the locking of the cannon barrel / mount Lafette was changed. Karl Google Tranlator
shipsofscale.com
I've used Formsby tung oil myself in the past, and was pleased with it. This was on furniture, but still. I think I read here that tung oil must be applied again every so many years, but haven't found that myself.First of all many thanks for your kind words about my work.
On the Bonhomme Richard section, which is pear wood, I used tung oil for the treatment of the wood.
The glueing after the oil treatment is possible, but slightly reduces adhesion force - also good to sand a little bit the surface before using glue - on the Bonhomme I used water based wood glue for 99%.
What I realized in the meantime, that the wood was darkened in the meantime. Maybe I can make in the next days some photos of the actual appearance, so you can see what I mean.
View attachment 277313
Thanks, I will check out the links for this product. They call it a sanding sealer, and mention it is used before a paint or varnish topcoat, but that doesn't mean it's not appropriate by itself for our purposes. I would expect it to finish smoother, but wonder if it provides the same protection as an oil.Since the Le Coureur I am using something different. It is Cloe Schnellschleifgrundierung
View attachment 277314
Anyhow, thanks again for your responses. Look forward to when you continue when this kit. Perhaps by then I will be at a point with my kit to use the additional information.
Hope to see your building log soon......I've used Formsby tung oil myself in the past, and was pleased with it. This was on furniture, but still. I think I read here that tung oil must be applied again every so many years, but haven't found that myself.
Thanks, I will check out the links for this product. They call it a sanding sealer, and mention it is used before a paint or varnish topcoat, but that doesn't mean it's not appropriate by itself for our purposes. I would expect it to finish smoother, but wonder if it provides the same protection as an oil.
Anyhow, thanks again for your responses. Look forward to when you continue when this kit. Perhaps by then I will be at a point with my kit to use the additional information.
When I was younger I was told something about oiling wood furniture that has always stuck with me:I've used Formsby tung oil myself in the past, and was pleased with it. This was on furniture, but still. I think I read here that tung oil must be applied again every so many years, but haven't found that myself.
"Oil it once a day for a week. Once week for a month. Once a month for a year. Once a year for the rest of your life."
Not sure how we would apply this to our ships...
Glenn
I believe that applies to regular linseed oil. The first furniture I built was of walnut, Danish modern style, and I used linseed oil. It seemed to lose a bit of luster over time, so I refreshed it as required with more linseed oil. I think the more modern oils don't require that. As much, at least. I rebuild and refinished a reproducing piano in 1979, with about 6 thin coats of Formsby Tung Oil, and that finish looks as good today as ever, with only dusting.When I was younger I was told something about oiling wood furniture that has always stuck with me:
"Oil it once a day for a week. Once week for a month. Once a month for a year. Once a year for the rest of your life."
Not sure how we would apply this to our ships...
Glenn
In reading Thomas Marocke's article, it seems that he is using the sanding sealer you mentioned as just that, a sanding sealer, and mentions that some areas appear blotchy after application. He then sprays on a lacquer finish by the same company as a final finish. I don't want to get involved with the lacquer, so may stick to the tung oil.
I am not spraying the sanding sealer , but use a good quality brush - and not use the second finishIn reading Thomas Marocke's article, it seems that he is using the sanding sealer you mentioned as just that, a sanding sealer, and mentions that some areas appear blotchy after application. He then sprays on a lacquer finish by the same company as a final finish. I don't want to get involved with the lacquer, so may stick to the tung oil.
Take also a look at @Jeronimo ´s models .....
f.e. the last 74 gun ship section
74 GunShip 1/36 by Jeronimo [COMPLETED BUILD]
Hello John. I am glad that you like my models. Karl more:
shipsofscale.com
Oh, wow, thanks for that link! I've been looking for information on the mast construction of the Bonhomme Richard. I hated to see that plain dowel sticking up without some information about its construction and features.I am not spraying the sanding sealer , but use a good quality brush - and not use the second finish
Take also a look at @Jeronimo ´s models .....
f.e. the last 74 gun ship section
74 GunShip 1/36 by Jeronimo [COMPLETED BUILD]
Hello John. I am glad that you like my models. Karl more:shipsofscale.com
And needless to say, his build is spectacular!
I think, that additional information about the mast construction would be to much to expect from a kit, which is not showing the complete mast, but only a stump..... I hated to see that plain dowel sticking up without some information about its construction and features.
More information about the complete mast by itself you can find in the monograph by Jean Boudriot
Planset review - Bonhomme Richard 1779" - 26 plates in scale 1:48 - by Jean Boudriot translated by David H. Roberts
Review: Planset: "Bonhomme Richard 1779" - scale 1:48 by Jean Boudriot translated by David H. Roberts Hardcover: 90 pages Publisher: Boudriot (Jean), France (January 1988) Language: English, French or Italian Package Dimensions: 12.8 x 9.8 x 1.6 inches Shipping Weight: 4.7 pounds...
shipsofscale.com
and if you are looking for a the mast structure, means the elements the mast was constructed in reality you could take a look at the explanations in the 3.rd book of the 74-gun ship series also by Jean Boudriot
Book review - Book Review: "THE 74-GUN SHIP - Volume 3 - MASTS - SAILS - RIGGING" (Set of 4 Volumes) - by Jean Boudriot
Book Review: THE 74-Gun SHIP / THE SEVENTY-FOUR GUN SHIP A Practical Treatise on the Art of Naval Architecture 4 Volume Set (Set of 4 volumes) Overview of the Content of all 4 Volumes Here: Volume 3 - MASTS - SAILS - RIGGING by Jean Boudriot english translation by David H. Roberts...
shipsofscale.com
or maybe in the drawing set
Planset review - THE 74-GUN SHIP" (31 + 11 plans) in scale 1:48 (or 1:72) by Jean Boudriot and Timbering plans by JC Lemineur
Planset Review: "THE 74-GUN SHIP" (31 + 11 plans) in scale 1:48 (or 1:72) 31 plans by Jean Boudriot and 11 Timbering plans by JC Lemineur The drawing set is available in scale 1:72 or in scale 1:48 - my set (showing here) is in scale 1:48 complete Drawing set or only the newer...
shipsofscale.com
Maybe something is also shown in this book by Lees
Book review - The Masting and Rigging of English Ships of War, 1625-1860" by James Lees
An other cornerstone in each private library describing the mast, spars and the complex rigging work should be The Masting and Rigging of English Ships of War, 1625-1860 By James Lees Publisher: Naval Institute Press; 2nd Rev edition (October 1984) Pages: 212 ISBN-10: 0870219480...
shipsofscale.com
That's certainly true, but Jeronimo's incredible 1/36 scale scratch-build of a 74 is exactly what I had been looking for:I think, that additional information about the mast construction would be to much to expect from a kit, which is not showing the complete mast, but only a stump.
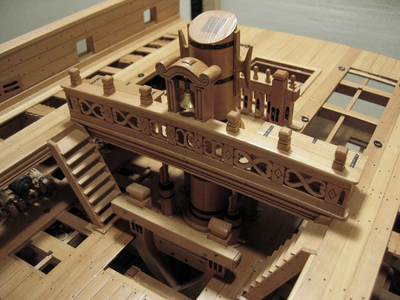
While not the detail structural information I'd like, it shows what can be done with a short stub of a main mast, and is exactly what I wanted to do. I just didn't have details as to the construction and attachments. I doubt I will make a new multi-part mast, as I don't have a lathe; I'll probably just score divisions between different parts and maybe stain some portions differently. But as you can see above, it definitely adds to the appearance of the detail.
I have a PDF version of these books, but it is apparently missing the plate on mast construction.More information about the complete mast by itself you can find in the monograph by Jean Boudriot
I do have Longridge's Anatomy of Nelson's Ships, and it has an excellent detail of the main mast, with sections and details along every part of it. But I didn't know if it would apply to a smaller, French ship.Maybe something is also shown in this book by Lees
Book review - The Masting and Rigging of English Ships of War, 1625-1860" by James Lees
An other cornerstone in each private library describing the mast, spars and the complex rigging work should be The Masting and Rigging of English Ships of War, 1625-1860 By James Lees Publisher: Naval Institute Press; 2nd Rev edition (October 1984) Pages: 212 ISBN-10: 0870219480...shipsofscale.com


