ThanksAll set!
-

Win a Free Custom Engraved Brass Coin!!!
As a way to introduce our brass coins to the community, we will raffle off a free coin during the month of August. Follow link ABOVE for instructions for entering.
-

PRE-ORDER SHIPS IN SCALE TODAY!
The beloved Ships in Scale Magazine is back and charting a new course for 2026!
Discover new skills, new techniques, and new inspirations in every issue.
NOTE THAT OUR FIRST ISSUE WILL BE JAN/FEB 2026
You are using an out of date browser. It may not display this or other websites correctly.
You should upgrade or use an alternative browser.
You should upgrade or use an alternative browser.
Hi
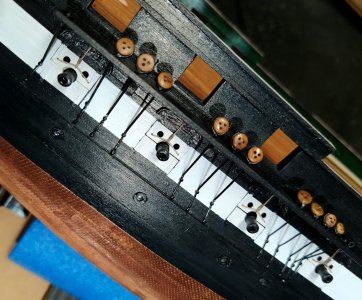
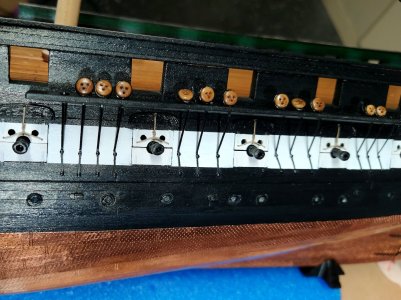
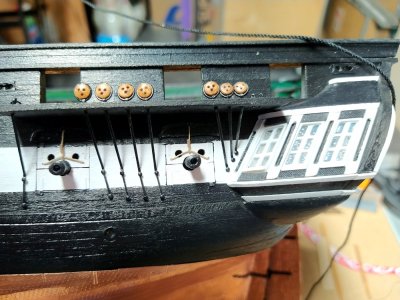
It's warming up down under and unfortunately I'm getting sidetracked and not spending much time in the shipyard. Since my last post I've completed the channels and mounted the deadeyes. This looked pretty straightforward but proved to be quite challenging.
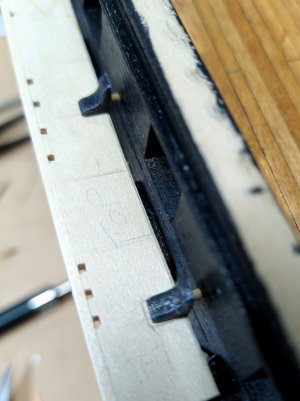
I'm always worried about the channels braking off when I tighten up the shrouds so I added wooden dowels and supports.
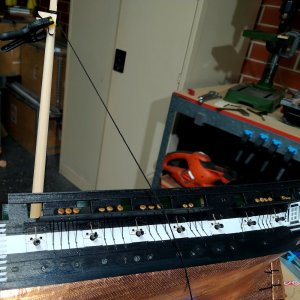
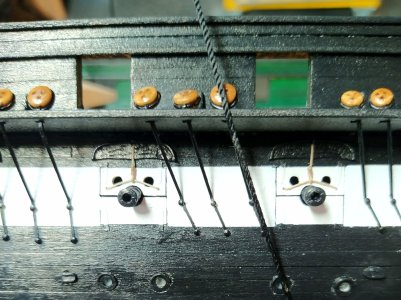
I used a rope tied to the top of the mast to line up the chain plates
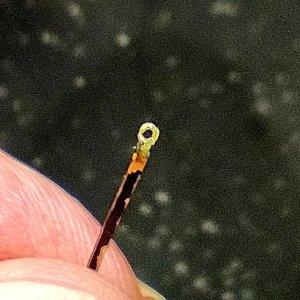
This is the problem I had with the chain plates, the PE holes are 0.45mm and the outside diameter is 1mm. Using the pins provided (0.6mm dia) and opening up the hole a little the chain plate split. In the end I purchased 0.5mm pins and opened the hole to 0.5mm. Another issue is the pins only go through the planks and do not hold the plates in place very well. If I was doing this again I would add reinforcing pieces under the planks where the pins go.
Tony
It's warming up down under and unfortunately I'm getting sidetracked and not spending much time in the shipyard. Since my last post I've completed the channels and mounted the deadeyes. This looked pretty straightforward but proved to be quite challenging.

I'm always worried about the channels braking off when I tighten up the shrouds so I added wooden dowels and supports.


I used a rope tied to the top of the mast to line up the chain plates

This is the problem I had with the chain plates, the PE holes are 0.45mm and the outside diameter is 1mm. Using the pins provided (0.6mm dia) and opening up the hole a little the chain plate split. In the end I purchased 0.5mm pins and opened the hole to 0.5mm. Another issue is the pins only go through the planks and do not hold the plates in place very well. If I was doing this again I would add reinforcing pieces under the planks where the pins go.


Tony
Last edited:
Very fine work at scale, Tony!
Beautiful work!Hi
It's warming up down under and unfortunately I'm getting sidetracked and not spending much time in the shipyard. Since my last post I've completed the channels and mounted the deadeyes. This looked pretty straightforward but proved to be quite challenging.
View attachment 487520
I'm always worried about the channels braking off when I tighten up the shrouds so I added wooden dowels and supports.
View attachment 487522
View attachment 487523
I used a rope tied to the top of the mast to line up the chain plates
View attachment 487521
This is the problem I had with the chain plates, the PE holes are 0.45mm and the outside diameter is 1mm. Using the pins provided (0.6mm dia) and opening up the hole a little the chain plate split. In the end I purchased 0.5mm pins and opened the hole to 0.5mm. Another issue is the pins only go through the planks and do not hold the plates in place very well. If I was doing this again I would add reinforcing pieces under the planks where the pins go.
View attachment 487526
View attachment 487525View attachment 487524
Tony
Looking really nice. I like your idea of a backing for the chain links. I might do that before I put in my deck. Also possibly at the level of the channels as well.Hi
It's warming up down under and unfortunately I'm getting sidetracked and not spending much time in the shipyard. Since my last post I've completed the channels and mounted the deadeyes. This looked pretty straightforward but proved to be quite challenging.
View attachment 487520
I'm always worried about the channels braking off when I tighten up the shrouds so I added wooden dowels and supports.
View attachment 487522
View attachment 487523
I used a rope tied to the top of the mast to line up the chain plates
View attachment 487521
This is the problem I had with the chain plates, the PE holes are 0.45mm and the outside diameter is 1mm. Using the pins provided (0.6mm dia) and opening up the hole a little the chain plate split. In the end I purchased 0.5mm pins and opened the hole to 0.5mm. Another issue is the pins only go through the planks and do not hold the plates in place very well. If I was doing this again I would add reinforcing pieces under the planks where the pins go.
View attachment 487526
View attachment 487525View attachment 487524
Tony
Good morning Tony. Brilliant. I really like the look and feel of your ship. It is realistic, giving an impression of a scaled down ship vs a model. @Jack Jäger is the master of this and you are following suite. So cool. Cheers GrantHi
It's warming up down under and unfortunately I'm getting sidetracked and not spending much time in the shipyard. Since my last post I've completed the channels and mounted the deadeyes. This looked pretty straightforward but proved to be quite challenging.
View attachment 487520
I'm always worried about the channels braking off when I tighten up the shrouds so I added wooden dowels and supports.
View attachment 487522
View attachment 487523
I used a rope tied to the top of the mast to line up the chain plates
View attachment 487521
This is the problem I had with the chain plates, the PE holes are 0.45mm and the outside diameter is 1mm. Using the pins provided (0.6mm dia) and opening up the hole a little the chain plate split. In the end I purchased 0.5mm pins and opened the hole to 0.5mm. Another issue is the pins only go through the planks and do not hold the plates in place very well. If I was doing this again I would add reinforcing pieces under the planks where the pins go.
View attachment 487526
View attachment 487525View attachment 487524
Tony
- Joined
- Oct 17, 2020
- Messages
- 1,691
- Points
- 488

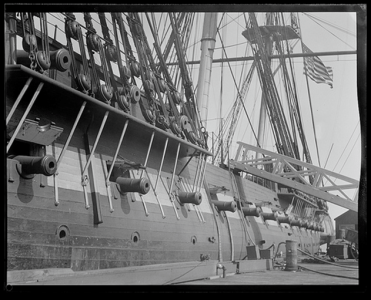
Hi Thony, can these images help you? I hope to do a goodHi
It's warming up down under and unfortunately I'm getting sidetracked and not spending much time in the shipyard. Since my last post I've completed the channels and mounted the deadeyes. This looked pretty straightforward but proved to be quite challenging.
View attachment 487520
I'm always worried about the channels braking off when I tighten up the shrouds so I added wooden dowels and supports.
View attachment 487522
View attachment 487523
I used a rope tied to the top of the mast to line up the chain plates
View attachment 487521
This is the problem I had with the chain plates, the PE holes are 0.45mm and the outside diameter is 1mm. Using the pins provided (0.6mm dia) and opening up the hole a little the chain plate split. In the end I purchased 0.5mm pins and opened the hole to 0.5mm. Another issue is the pins only go through the planks and do not hold the plates in place very well. If I was doing this again I would add reinforcing pieces under the planks where the pins go.
View attachment 487526
View attachment 487525View attachment 487524
Tony
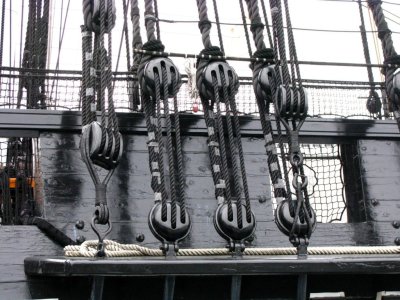
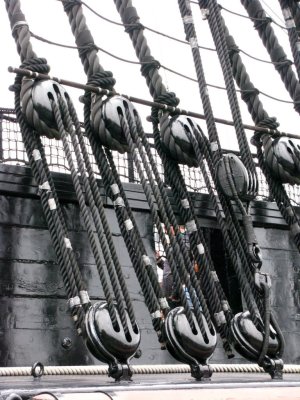
Hello Tony, I lost track of your ship for a while. Glad I'm back on it and it is a beautiful ship indeed.Hi
It's warming up down under and unfortunately I'm getting sidetracked and not spending much time in the shipyard. Since my last post I've completed the channels and mounted the deadeyes. This looked pretty straightforward but proved to be quite challenging.
View attachment 487520
I'm always worried about the channels braking off when I tighten up the shrouds so I added wooden dowels and supports.
View attachment 487522
View attachment 487523
I used a rope tied to the top of the mast to line up the chain plates
View attachment 487521
This is the problem I had with the chain plates, the PE holes are 0.45mm and the outside diameter is 1mm. Using the pins provided (0.6mm dia) and opening up the hole a little the chain plate split. In the end I purchased 0.5mm pins and opened the hole to 0.5mm. Another issue is the pins only go through the planks and do not hold the plates in place very well. If I was doing this again I would add reinforcing pieces under the planks where the pins go.
View attachment 487526
View attachment 487525View attachment 487524
Tony
Very fine work at scale, Tony!
Beautiful work!
Looking really nice. I like your idea of a backing for the chain links. I might do that before I put in my deck. Also possibly at the level of the channels as well.
Hello Tony, I lost track of your ship for a while. Glad I'm back on it and it is a beautiful ship indeed.
Thanks for your feedback and complements they're very much appreciated.Amazing build!!
Thanks Grant, this is my first attempt at painting a hull. I'm pleased with the results but I think it's more luck than skill.Good morning Tony. Brilliant. I really like the look and feel of your ship. It is realistic, giving an impression of a scaled down ship vs a model. @Jack Jäger is the master of this and you are following suite. So cool. Cheers Grant
Tony
Thanks for the photos I especially like the older picture before the restoration.Hi Thony, can these images help you? I hope to do a good View attachment 487707
View attachment 487705
View attachment 487706
Hi time for a update.
Today I've finished the forward guns, I played around with a few ideas and this is what I came up with.
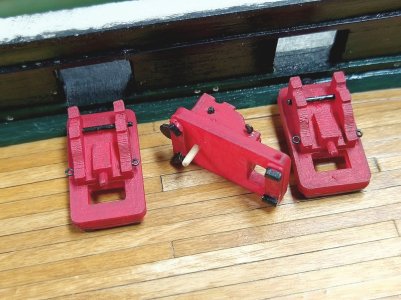
All the carriages have wooden pins to hold them in place, I don't trust glue on the wheels to hold.
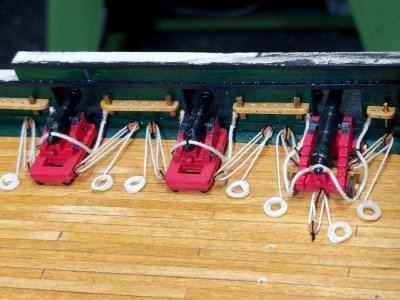
I've tried to keep the blocks as small as possible in the end I made my own. I wanted to use hooks on the tackles but I couldn't make them small enough and the cannons looked better without them. Next time I'll purchase some small P.E. ones
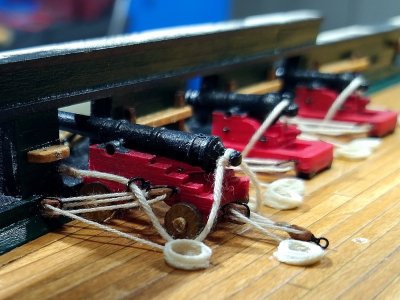
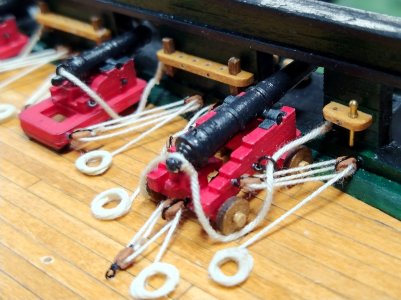
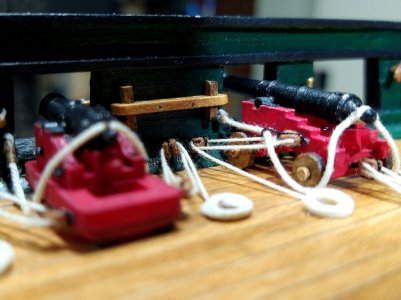
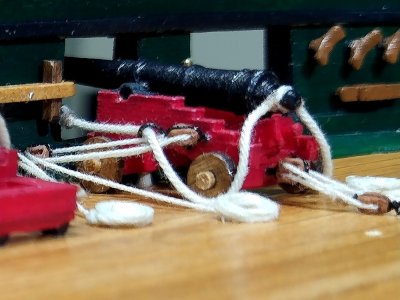
6 down 16 to go, now I know what to do it should be a lot easier.
For some reason the red on the carriages is not represented very well due to the camera on my phone.
Tony
Today I've finished the forward guns, I played around with a few ideas and this is what I came up with.

All the carriages have wooden pins to hold them in place, I don't trust glue on the wheels to hold.

I've tried to keep the blocks as small as possible in the end I made my own. I wanted to use hooks on the tackles but I couldn't make them small enough and the cannons looked better without them. Next time I'll purchase some small P.E. ones


6 down 16 to go, now I know what to do it should be a lot easier.
For some reason the red on the carriages is not represented very well due to the camera on my phone.
Tony
Nice work on the tiny blocks, Tony! No hooks seems like the proper call...
Great craftsmanship Tony. I am curious about the shade of the red color though, mind you I am color challenged but it seems too bright.
Thanks for the feedback, I'll be checking out some P.E. hooks for my next build.Nice work on the tiny blocks, Tony! No hooks seems like the proper call...
Tony
Thanks for the compliment, I used a standard red acrylic paint. For some reason my phone has a problem with this colour.Great craftsmanship Tony. I am curious about the shade of the red color though, mind you I am color challenged but it seems too bright.
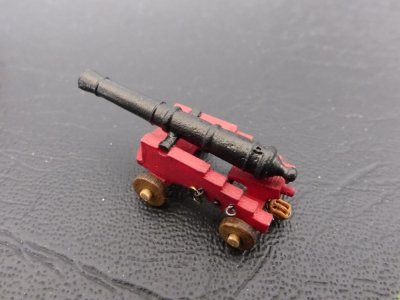
This photo was taken with a camera in natural light the colour is still a bit bright but much better.
Tony
Thanks, I am watching your progress, what a wonderful ship. One day I would love to include that amount of detail.Beautiful work Tony. Can I ask the size of the blocks? I will try to make my own too.
My blocks are around 3mm*2mm for the singles and 3mm*3mm for the doubles.
Tony
- Joined
- Jan 26, 2017
- Messages
- 1,337
- Points
- 493

Thank you.Thanks, I am watching your progress, what a wonderful ship. One day I would love to include that amount of detail.
My blocks are around 3mm*2mm for the singles and 3mm*3mm for the doubles.
Tony


