Vasa - 1:65 DeAgostini [COMPLETED BUILD]

Well, Paul, I believe this is real life, and now we ARE friends. I like the childlike simplicity of “Oh, you love STARWARS?!! ME TOO! Let’s blow-up the Millennium Falcon!” Common interest, common ground, and humor to boot!

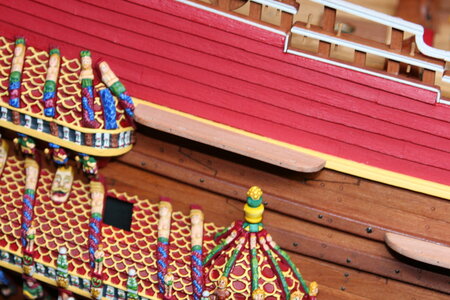
In answer to your question, the channels are designed to shed water, so they should be tapered in cross-section - thickest where they join the hull, and more likely parallel to the surface of the water. I’m not pulling all of this from Witsen, or any other early treatise on shipbuilding, but my own reasoned observations of original ship models.

Speaking to my point, yesterday, about close observation of original dockyard models, check out this video that offers granular clarity of every last detail:


Unquestionably, all three are works of art, but.. they’re not perfect. Perfection is a fiction of the obsessive compulsive set, like myself, who needlessly flagellate ourselves because our hand-painted lines wavered a little TOO much in their overall consistency.
 
Last edited:
Hello Paul,

A wonderful elderly friend sent me a photo today of a ship that he asked me about. After following your excellent log there was no doubt in my mind which vessel it was. I thoroughly enjoyed discussing it with him and telling him about your model.

I have attached the photo. I know you have extensively researched and have possibly seen many shots from the port side aft. I didn’t go back through your log to check all the photos and images but I’ll post this anyway.

64775015-BF81-4744-B27B-EE415D3426D4.png
 
To my fellow Vasa builders...

Here is something posted to the ModelSpace forum by user suey on November 24, 2020. It is an email from Fred Hocker. The ModelSpace forum is a public forum so I trust it is permitted that I might copy it here...

I think I know where the confusion lies. We have two major books on Vasa. One is a single-volume history (200 pages) of all aspects of the ship for a popular audience, with lots of color photos. The English version of this is called Vasa: A Swedish Warship. It is available in a revised edition (the original edition of 2011 sold out, and we updated it when we reprinted). So if you order this book, you will get the revised (2nd) edition.

The other book is Vasa I: The archaeology of a Swedish warship. This is the first volume (400 pages) of a multi-volume series of scientific reports, and concentrates on the how the ship was found and excavated. The next volume (which we usually call Vasa II) focuses on how the ship was rigged and sailed. It presents all of the finds of blocks, deadeyes, rope, sails, etc. as well as a reconstruction of the rig. This book will appear in two parts, with the first part in the layout process now. Covid has slowed down the production process somewhat, but we hope it will appear next spring.


(AND NOW COPIED FROM A SECOND EMAIL)
From reading the posts (I am a guest but not a member), it appears that the book you are all talking about is what we call Vasa II, the second volume of a projected six-volume scientific monograph about all aspects of the ship. Volume II is about the rigging, and so is of central interest to model builders. Could you post the following, please:

Vasa II, covering all of the rigging finds, the reconstruction of the rigging, and evaluation of how a ship like Vasa might be sailed, is currently in the layout process, but this has been delayed by the Covid pandemic. As it now stands, Vasa II will appear in two parts, in order to make it manageable (the total work is over 500 pages long with over 500 illustrations). The first part, covering the presentation of the archaeological remains in eleven chapters, should appear next year if the production process can recover from the disruption caused by the pandemic. The second part, which will be more integrated discussions of the rigging and sailing process, will then go through a faster layout and printing process, since the design and formatting work will already have been done. Part 1 will be physically larger, but part 2 will be accompanied by large scale (we are hoping 1:50) drawings of the reconstructed rig. The books will be available from the museum directly, but it will be easier to order them from the publisher (Nordic Academic Press) and their international distributors. Once we have a firm date for the book launch, I will provide the relevant information to this forum and others.

The eleven chapters in Part 1 are:
1. Introduction
2. Rigging elements fastened to the hull (chainwales, bitts and knights, catheads, fixed blocks and fairleads)
3. Spars (masts, yards and fittings fastened to them, such as sling cleats)
4. Tops
5. Tackles (deadeyes, euphroes, blocks, parrels, fairleads)
6. Cordage
7. Sails
8. Capstans and windlass
9. Anchors (including anchor buoys)
10. Steering
11. Navigation (compasses, bittacle, timekeeping, sounding leads)

Part 2 will cover:
12. Reconstruction of the rig as a whole
13. Sailing environment and performance
14. Economics and logistics of supplying the sails and rigging
15. The process of rigging the ship
16. Sailing the ship
17. Experience of sailing a modern reconstruction of this rig (Kalmar Nyckel)
18. Conclusions

Cheers,
Fred


Many folks have been waiting for this publication for many years and I'm confident Mr. Hocker is weary of getting asked (and likely frustrated by the delays himself). Like countless builders over the past decade I was hoping Vasa II would be published in time for my rigging work. A search of the publisher's website turned up nothing. Alas...
 
Last edited:
Hello Friends,

Thank you for the likes and encouragement since my last progress report. It is a blessing to share my work with such a kind and generous group.

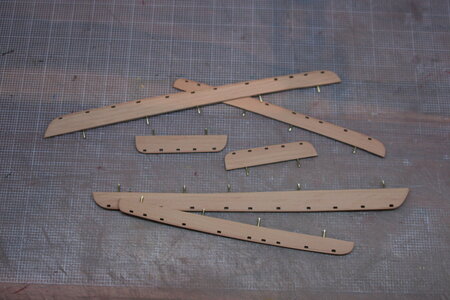
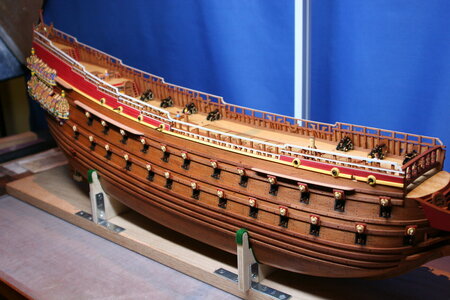
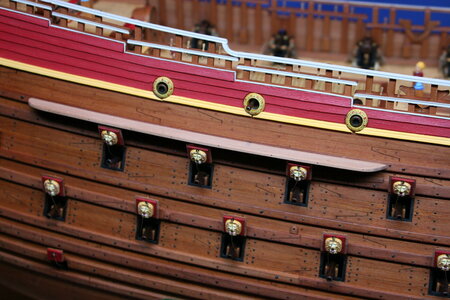
In an effort to find things to do that didn't involve painting tiny metal bits (which is frankly what I should be doing right now) I turned my attention to the channels (chain wales). These were not terribly difficult to fabricate though I was concerned about getting them securely attached to the ship. My solution was a series of brass pins which appears to have worked quite well. I believe they will withstand the future stresses that will be placed on them.

IMG_7259.JPG

IMG_7260.JPG

IMG_7261.JPG

IMG_7262.JPG

I'm going to add a few more 'nails' along the edges. And the next time I make channels I'm going to make them with planks. I'm not completely satisfied with these but they are going to be largely covered up with deadeyes and rigging so I'm going to leave them as is in the name of making progress.

Next, I attempted to create chain plates and attach them to deadeyes but that was a failure so I have ordered some materials for another swing at it.

As I thought through that process, however, I realized I needed to know where the masts/cross trees would be in order to orient chain plates properly aligned with the future shrouds. That, of course, forced me to research how to shape masts. Fortunately this forum is chock-a-block full of masts and yardarms so it was not difficult to find lots of information. In the end I became convinced that Kurt's (@DARIVS ARCHITECTVS) technique on La Couronne was something I could do. Thanks also, Kurt, for your offline tutorial.

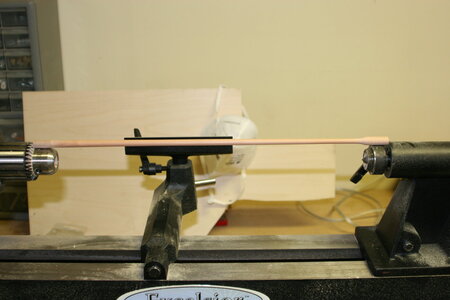
Here is what I ended up with fresh off the mini-lathe:

IMG_7263.JPG


IMG_7265.JPG


IMG_7266.JPG

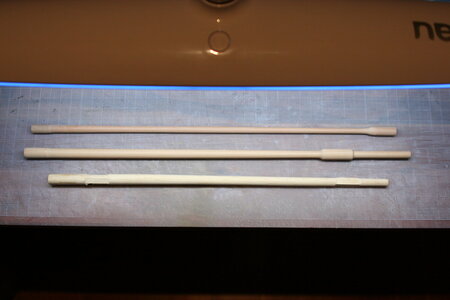
At the top you see my sprit mast (bowsprit). It still needs to be cut to length.

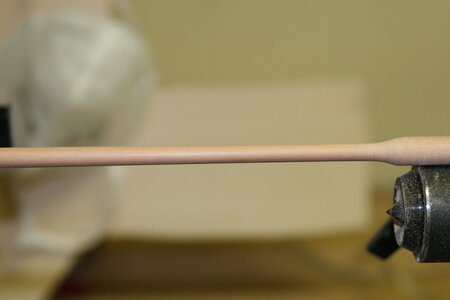
The mast in the middle is the lower element of the foremast. That odd bulge is a section that needs to be turned into a square in cross section.

The bottom dowel is one of my practice sticks for learning how to shape the masts as well as how to create the square portion (which thus far has eluded me). I suppose the best tool for this would be a mill. I tried to used a channel cutting router bit in a drill press (left) but that didn't work - and I tried to just file in the square shape (right) and that didn't work either. I'm open to your suggestions!

By the way, I found shaping these masts to be fantastically satisfying. I know you have all done this before and they aren't that big of a deal (just takes time) but having them turn out after many failed attempts on trial pieces was pretty cool.

Some of you are doing marvelous things on your respective builds. It is a joy to watch you work. The detailing is just breathtaking!
 
Last edited:
With regards to the actual plates - there is a method whereby these are made of rope. I will hopefully be starting on those this coming week, If this is successful, it might be an option.
 
Hello Friends,

Thank you for the likes and encouragement since my last progress report. It is a blessing to share my work with such a kind and generous group.

In an effort to find things to do that didn't involve painting tiny metal bits (which is frankly what I should be doing right now) I turned my attention to the channels (chain wales). These were not terribly difficult to fabricate though I was concerned about getting them securely attached to the ship. My solution was a series of brass pins which appears to have worked quite well. I believe they will withstand the future stresses that will be placed on them.

View attachment 266122

View attachment 266123

View attachment 266124

View attachment 266125

I'm going to add a few more 'nails' along the edges. And the next time I make channels I'm going to make them with planks. I'm not completely satisfied with these but they are going to be largely covered up with deadeyes and rigging so I'm going to leave them as is in the name of making progress.

Next, I attempted to create chain plates and attach them to deadeyes but that was a failure so I have ordered some materials for another swing at it.

As I thought through that process, however, I realized I needed to know where the masts/cross trees would be in order to orient chain plates properly aligned with the future shrouds. That, of course, forced me to research how to shape masts. Fortunately this forum is chock-a-block full of masts and yardarms so it was not difficult to find lots of information. In the end I became convinced that Kurt's (@DARIVS ARCHITECTVS) technique on La Couronne was something I could do. Thanks also, Kurt, for your offline tutorial.

Here is what I ended up with fresh off the mini-lathe:

View attachment 266126


View attachment 266127


View attachment 266128

At the top you see my sprit mast (bowsprit). It still needs to be cut to length.

The mast in the middle is the lower element of the foremast. That odd bulge is a section that needs to be turned into a square in cross section.

The bottom dowel is one of my practice sticks for learning how to shape the masts as well as how to create the square portion (which thus far has eluded me). I suppose the best tool for this would be a mill. I tried to used a channel cutting router bit in a drill press (left) but that didn't work - and I tried to just file in the square shape (right) and that didn't work either. I'm open to your suggestions!

By the way, I found shaping these masts to be fantastically satisfying. I know you have all done this before and they aren't that big of a deal (just takes time) but having them turn out after many failed attempts on trial pieces was pretty cool.

Some of you are doing marvelous things on your respective builds. It is a joy to watch you work. The detailing is just breathtaking!
Lots of colour now appearing in your ship and looking beautiful.
I also used pins for the chainwales which I think should hold fine.
Masts also looking good with some fancy lathe work, unfortunately no lathe in my modest workshop.
 
Hello Friends,

Thank you for the likes and encouragement since my last progress report. It is a blessing to share my work with such a kind and generous group.

In an effort to find things to do that didn't involve painting tiny metal bits (which is frankly what I should be doing right now) I turned my attention to the channels (chain wales). These were not terribly difficult to fabricate though I was concerned about getting them securely attached to the ship. My solution was a series of brass pins which appears to have worked quite well. I believe they will withstand the future stresses that will be placed on them.

View attachment 266122

View attachment 266123

View attachment 266124

View attachment 266125

I'm going to add a few more 'nails' along the edges. And the next time I make channels I'm going to make them with planks. I'm not completely satisfied with these but they are going to be largely covered up with deadeyes and rigging so I'm going to leave them as is in the name of making progress.

Next, I attempted to create chain plates and attach them to deadeyes but that was a failure so I have ordered some materials for another swing at it.

As I thought through that process, however, I realized I needed to know where the masts/cross trees would be in order to orient chain plates properly aligned with the future shrouds. That, of course, forced me to research how to shape masts. Fortunately this forum is chock-a-block full of masts and yardarms so it was not difficult to find lots of information. In the end I became convinced that Kurt's (@DARIVS ARCHITECTVS) technique on La Couronne was something I could do. Thanks also, Kurt, for your offline tutorial.

Here is what I ended up with fresh off the mini-lathe:

View attachment 266126


View attachment 266127


View attachment 266128

At the top you see my sprit mast (bowsprit). It still needs to be cut to length.

The mast in the middle is the lower element of the foremast. That odd bulge is a section that needs to be turned into a square in cross section.

The bottom dowel is one of my practice sticks for learning how to shape the masts as well as how to create the square portion (which thus far has eluded me). I suppose the best tool for this would be a mill. I tried to used a channel cutting router bit in a drill press (left) but that didn't work - and I tried to just file in the square shape (right) and that didn't work either. I'm open to your suggestions!

By the way, I found shaping these masts to be fantastically satisfying. I know you have all done this before and they aren't that big of a deal (just takes time) but having them turn out after many failed attempts on trial pieces was pretty cool.

Some of you are doing marvelous things on your respective builds. It is a joy to watch you work. The detailing is just breathtaking!
In regards to the channels, so the kit didn't come with these wooden L brackets that you can glue between the channels and the hull? In addition to what you did, I also glued those L brackets to my ship as well(mine is not the Vasa).
 
Hi Paul,

Great work as always. Oh no sorry there is room for improvement :cool:
You can add the "allemanseindje" to your seat of not so ease.
It is just a little piece of rope with untwisted end tight to the railing and hang down through the toilet into the water. See below how it is done on Batavia.
View attachment 264694
I wonder what that rope is used for. I love your build you have set the standard here Paul.
 
Hello Friends,

Thank you for the likes and encouragement since my last progress report. It is a blessing to share my work with such a kind and generous group.

In an effort to find things to do that didn't involve painting tiny metal bits (which is frankly what I should be doing right now) I turned my attention to the channels (chain wales). These were not terribly difficult to fabricate though I was concerned about getting them securely attached to the ship. My solution was a series of brass pins which appears to have worked quite well. I believe they will withstand the future stresses that will be placed on them.

View attachment 266122

View attachment 266123

View attachment 266124
Make sure your chain wales are angled just below horizontally flat, so they shed water toward the outboard. This is a very subtle angle and often missed by modelers.
 
In regards to the channels, so the kit didn't come with these wooden L brackets that you can glue between the channels and the hull? In addition to what you did, I also glued those L brackets to my ship as well(mine is not the Vasa).
Kits often forget the knees that support the channels. I have to make some from scratch for my current build. I forgot to install them on La Couronne. If the compression for between the chainplates and shrouds is even, reinforcement of the joint where the channels are attached to the hull is not necessary. Mine were just glued on with my last build. However, most experienced modelers pin theirs like Paul did, and detail oriented builders make the knees to support them as well.
 
Hello Friends,

Thank you for the likes and encouragement since my last progress report. It is a blessing to share my work with such a kind and generous group.

In an effort to find things to do that didn't involve painting tiny metal bits (which is frankly what I should be doing right now) I turned my attention to the channels (chain wales). These were not terribly difficult to fabricate though I was concerned about getting them securely attached to the ship. My solution was a series of brass pins which appears to have worked quite well. I believe they will withstand the future stresses that will be placed on them.

View attachment 266122

View attachment 266123

View attachment 266124

View attachment 266125

I'm going to add a few more 'nails' along the edges. And the next time I make channels I'm going to make them with planks. I'm not completely satisfied with these but they are going to be largely covered up with deadeyes and rigging so I'm going to leave them as is in the name of making progress.

Next, I attempted to create chain plates and attach them to deadeyes but that was a failure so I have ordered some materials for another swing at it.

As I thought through that process, however, I realized I needed to know where the masts/cross trees would be in order to orient chain plates properly aligned with the future shrouds. That, of course, forced me to research how to shape masts. Fortunately this forum is chock-a-block full of masts and yardarms so it was not difficult to find lots of information. In the end I became convinced that Kurt's (@DARIVS ARCHITECTVS) technique on La Couronne was something I could do. Thanks also, Kurt, for your offline tutorial.

Here is what I ended up with fresh off the mini-lathe:

View attachment 266126


View attachment 266127


View attachment 266128

At the top you see my sprit mast (bowsprit). It still needs to be cut to length.

The mast in the middle is the lower element of the foremast. That odd bulge is a section that needs to be turned into a square in cross section.

The bottom dowel is one of my practice sticks for learning how to shape the masts as well as how to create the square portion (which thus far has eluded me). I suppose the best tool for this would be a mill. I tried to used a channel cutting router bit in a drill press (left) but that didn't work - and I tried to just file in the square shape (right) and that didn't work either. I'm open to your suggestions!

By the way, I found shaping these masts to be fantastically satisfying. I know you have all done this before and they aren't that big of a deal (just takes time) but having them turn out after many failed attempts on trial pieces was pretty cool.

Some of you are doing marvelous things on your respective builds. It is a joy to watch you work. The detailing is just breathtaking!

Your chain whales look wonderful and pinning them to the hull is the best solution for strength. When it comes to shaping the mast cutting the square section and blending it to the round was very tricky for me on my HMS Fly. Starting out with round stock I just used a hand file and tried to make sure the diagonal distance of the square part was at least equal to but not less than than the diameter of the round stock which means you mark off the square portion and do it first. Of course a bench top lathe is the best way to go for the remaining taper. If you want a truly equal sided square then you will have to be able to rotate to each face 90 deg. exactly (I don't know how to do that without special clamping tools and a protractor). The only other way I know to do this is to start with square stock of the correct dimension then turn the rest down with your lathe. Well you could build the square separate from the taper then pin and glue them together but that doesn't sound very desirable.
 
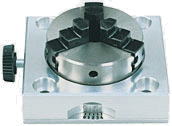
For squaring the mast, I use the Proxxon milling machine MF70 and the dividing attachment:
I highly recommend this milling machine if you are going to use it for wood. I don't know how it does with metal.
37110_24264.png
 
Last edited by a moderator:
In regards to the channels, so the kit didn't come with these wooden L brackets that you can glue between the channels and the hull? In addition to what you did, I also glued those L brackets to my ship as well(mine is not the Vasa).
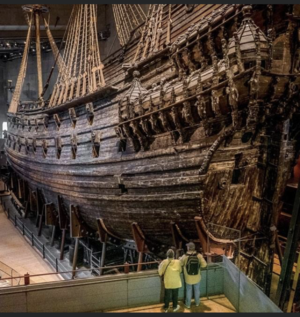
You know, I stopped using the kit parts a while ago, but I went and looked and they are not part of the kit. Noteworthy is the simple fact that the angle brackets you describe don't show up on the museum ship or the 1:10 model so I'm going to say they were not used on the Wasa (?).

Make sure your chain wales are angled just below horizontally flat, so they shed water toward the outboard. This is a very subtle angle and often missed by modelers.
Marc (@Hubac’s Historian) warned me about that detail and I'm close but not perfect. He also suggested the channel should be tapered to aid in shedding water. I don't see that taper on the museum ship so it might be a later addition???

Your chain whales look wonderful and pinning them to the hull is the best solution for strength. When it comes to shaping the mast cutting the square section and blending it to the round was very tricky for me on my HMS Fly. Starting out with round stock I just used a hand file and tried to make sure the diagonal distance of the square part was at least equal to but not less than than the diameter of the round stock which means you mark off the square portion and do it first. Of course a bench top lathe is the best way to go for the remaining taper. If you want a truly equal sided square then you will have to be able to rotate to each face 90 deg. exactly (I don't know how to do that without special clamping tools and a protractor). The only other way I know to do this is to start with square stock of the correct dimension then turn the rest down with your lathe. Well you could build the square separate from the taper then pin and glue them together but that doesn't sound very desirable.
Ha. I seriously thought about your last suggestion (making the mast in sections) but didn't think I could pull it off. I did try to file in the square ahead of time but without a jig or proper clamping it did not go well. Stay tuned - I have been imagining a solution...but I need to experiment a bit more before attempting it on my semi-finished mast.

For squaring the mast, I use the Proxxon milling machine MF70 and the dividing attachment:
I highly recommend this milling machine if you are going to use it for wood. I don't know how it does with metal.
37110_24264.png
Yes. I believe the mill would be the way to go. I keep running into opportunities to use one. Looks like I may need to amend my Christmas list...
 
Back
Top