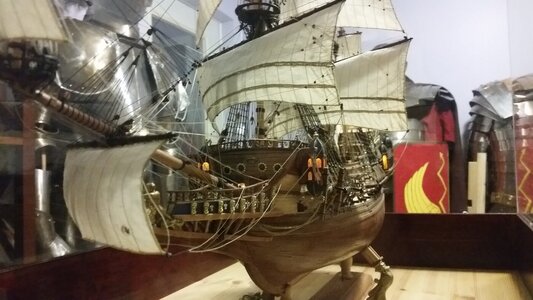
What is that white rod or pipe doing coming out of the midship going up to the top of the photo?
-

Win a Free Custom Engraved Brass Coin!!!
As a way to introduce our brass coins to the community, we will raffle off a free coin during the month of August. Follow link ABOVE for instructions for entering.
-

PRE-ORDER SHIPS IN SCALE TODAY!
The beloved Ships in Scale Magazine is back and charting a new course for 2026!
Discover new skills, new techniques, and new inspirations in every issue.
NOTE THAT OUR FIRST ISSUE WILL BE JAN/FEB 2026
You are using an out of date browser. It may not display this or other websites correctly.
You should upgrade or use an alternative browser.
You should upgrade or use an alternative browser.
VASA 490 Build Log - Billing Boats, 1:75 [COMPLETED BUILD]
Very nice Kurt. Looks like the picture Paul sent me in my post #784. Would you mind sending me a macro shot of the joining at the bonnet?Drabbler and bonnet on La Couronne main and fore course sails.
View attachment 317051
Very nice Kurt. Looks like the picture Paul sent me in my post #784. Would you mind sending me a macro shot of the joining at the bonnet?
This may serve as a good example of bonnet lacing and the difficulty of making an accurate seam on a ship of small scale. Bear in mind this was my first attempt at lacing since it was my first ship. The sail pieces were separate piece of cloth in this case. I wanted to make the lacing exactly as it was sewn on real sails. So, the top lacing is that attempt. All the stitches were tiny, in an attempt to match the small scale. The problem was that having bolt ropes on the edges of both the course and the bonnet with the lacing sewn over the top of all that proved to be bulky and out of scale for a 1:100 scale model. The glue stiffened edges of the sail cloth overlapped and puckered a bit. It was also stiff and not very smooth. You can barely see the loops in the lacing at the top of the seam. Accurate stitching of lacing should really only be attempted on a 1:48 scale model.
I changed the technique for both lacings for the drabbler on the seams below. In this seam, the sail cloth was one piece and the the seam was simulating on the sail cloth. Leaving out the bolt ropes, and just sewing a the seam looked more compact and neater. Instead, the bolt ropes were simulated by two horizontal straight lines of machine sewn tan thread. The lacing loop seam was make in the same pattern as lacing on a real sail, but now the fact that the cloth was one piece, and the bolt ropes were omitted made the entire seam appear less congested with line. The horizontal lacing loops on the front of the sail and the vertical lines of the lacing on the rear side of the sail are easier to see. At a distance, this method appeared more realistic, despite the seam being more simulated instead of faithfully reproduced.
All seams were made by hand with sewing thread and this process took a few days because it was slow. See my La Couronne build log for more details HERE.
Front side of fore course. These pictures are grainy because they were shot with a cell phone through the Plexiglas and with a magnification of x3.
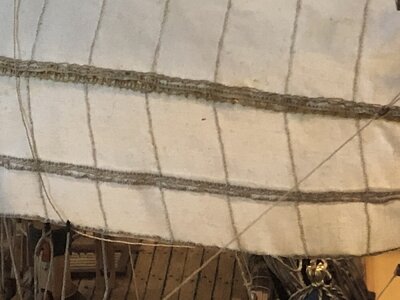
Rear side of main course. The martnet triangular blocks are 3mm wide, so you can see that the scale of this model is rather small.
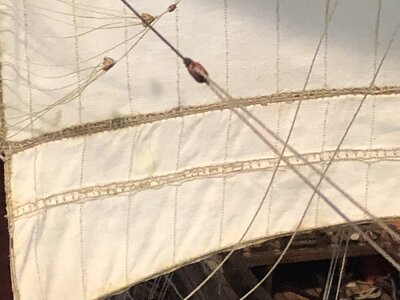
The lacing of the top seams follows the stitching precisely as shown here. The coarseness of the cloth and oversized bolt ropes for this scale contributed to a rather bulky and messy appearance of the lacing.
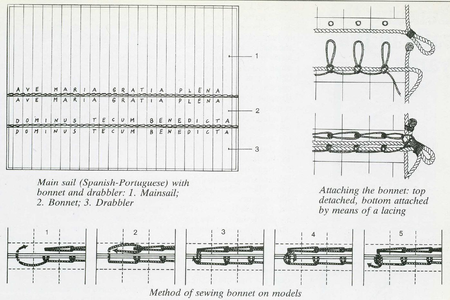
Last edited:
Thanks Kurt, I have a whole new level of appreciation for your work on this. There is a remarkable resemblance to Kirill's picture of this (see post 791) on a real ships bonnet.This may serve as a good example of bonnet lacing and the difficulty of making an accurate seam on a ship of small scale. Bear in mind this was my first attempt at lacing since it was my first ship. The sail pieces were separate piece of cloth in this case. I wanted to make the lacing exactly as it was sewn on real sails. So, the top lacing is that attempt. All the stitches were tiny, in an attempt to match the small scale. The problem was that having bolt ropes on the edges of both the course and the bonnet with the lacing sewn over the top of all that proved to be bulky and out of scale for a 1:100 scale model. The glue stiffened edges of the sail cloth overlapped and puckered a bit. It was also stiff and not very smooth. You can barely see the loops in the lacing at the top of the seam. Accurate stitching of lacing should really only be attempted on a 1:48 scale model.
I changed the technique for both lacings for the drabbler on the seams below. In this seam, the sail cloth was one piece and the the seam was simulating on the sail cloth. Leaving out the bolt ropes, and just sewing a the seam looked more compact and neater. Instead, the bolt ropes were simulated by two horizontal straight lines of machine sewn tan thread. The lacing loop seam was make in the same pattern as lacing on a real sail, but now the fact that the cloth was one piece, and the bolt ropes were omitted made the entire seam appear less congested with line. The horizontal lacing loops on the front of the sail and the vertical lines of the lacing on the rear side of the sail are easier to see. At a distance, this method appeared more realistic, despite the seam being more simulated instead of faithfully reproduced.
All seams were made by hand with sewing thread and this process took a few days because it was slow. See my La Couronne build log for more details HERE.
Front side of fore course. These pictures are grainy because they were shot with a cell phone through the Plexiglas and with a magnification of x3.
View attachment 317056
Rear side of main course. The martnet triangular blocks are 3mm wide, so you can see that the scale of this model is rather small.
View attachment 317057
The lacing of the top seams follows the stitching precisely as shown here. The coarseness of the cloth and oversized bolt ropes for this scale contributed to a rather bulky and messy appearance of the lacing.
View attachment 317068
This is Votive model... they used to be hanged under the roof in the Сhurch...What is that white rod or pipe doing coming out of the midship going up to the top of the photo?
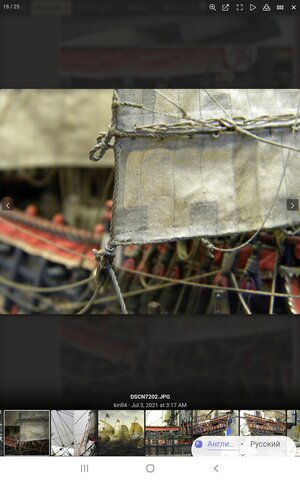
Indeed!Thanks Kurt, I have a whole new level of appreciation for your work on this. There is a remarkable resemblance to Kirill's picture of this (see post 791) on a real ships bonnet.
Specially in the upper part, where bolt ropes fitted!
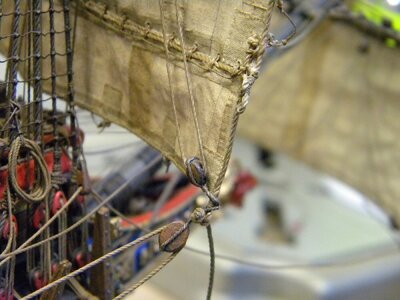
Studied one more time that metods of sewing bonnets, which proposed by Mondfeld ( one - make real lacing, and another - imitation by sewing...), in the posts above... and both looks quite easy to make and resonable in appearance , will be almost 100% simulation of real ones!!!
Need to try it on the next model...
when I did it, I made each loop separately, and fix it in the bolt rope by CA, than made additional imitation of lacing line ,visually connecting loops as on the picture ... but now I think, it would be better to do it exactly as Mondfeld shown in the book...Everything make by one line...


Last edited:
Daniel, Nice wok on the sails --
Thank you John.Daniel, Nice wok on the sails --
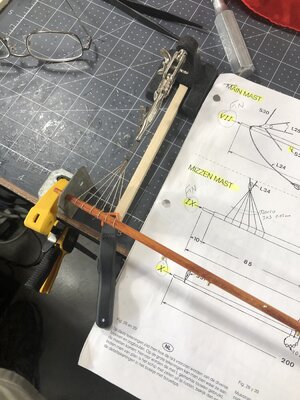
Here are a few quick shots of my efforts at yard and sail rigging. This being the mizzen lateen style sail. I think it's called the driver on more modern square riggers.
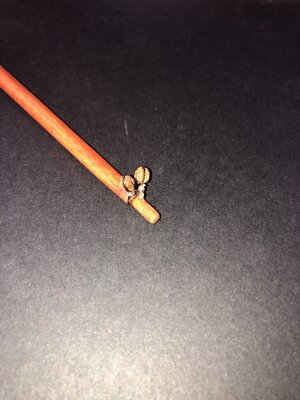
I decided to use the kit supplied lug bolts (in their natural brass) to act as pulleys for the buntlines. You can see the crow's feet preassembly jig.
A word about robands, specifically the reef knot used to tie them securely off. Is it just me or is this seemingly simple knot sometimes difficult to execute properly? Once I get into the rhythm of tying them then no problem but walk away and come back it's like I have to learn it all over again. I probably shouldn't admit something like that but hey, you all are like family.
Notice I had to install a small walnut pin to keep the two blocks on what will be the low side of this yard. The blocks will be under tension and would just slip off without it.
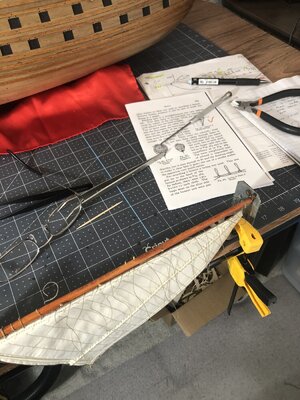


Good afternoon,
Continuing on with the mizzen sails and spars rigging. The finished lateen sail showing the roband connections followed by a tight in shot of the robands.
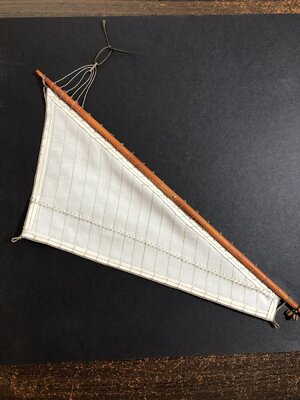
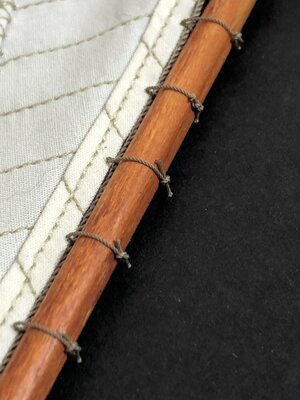
Next up is my method of channeling the buntlines with a loop at the bottom of the sails.
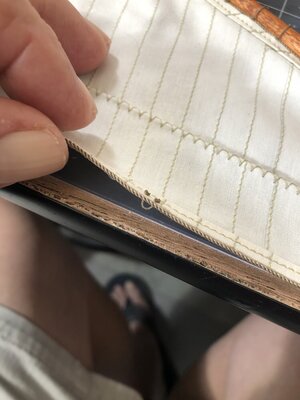
And finally, for today preassembly of the mizzen topsail, also showing the bottom spar which the topsail attaches to but itself will not support another lower sail because there resides the lateen sail which the topsail cannot attach to. It took me a moment to realize that last fact.
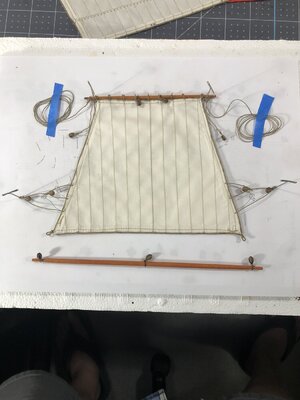
My head is just swimming in all the ways the sails and rigging can come together. For some reason installation of the parrel beads is the next challenge I am anticipating being a challenge. Hope you all enjoy.
Continuing on with the mizzen sails and spars rigging. The finished lateen sail showing the roband connections followed by a tight in shot of the robands.


Next up is my method of channeling the buntlines with a loop at the bottom of the sails.

And finally, for today preassembly of the mizzen topsail, also showing the bottom spar which the topsail attaches to but itself will not support another lower sail because there resides the lateen sail which the topsail cannot attach to. It took me a moment to realize that last fact.

My head is just swimming in all the ways the sails and rigging can come together. For some reason installation of the parrel beads is the next challenge I am anticipating being a challenge. Hope you all enjoy.
Head swimming...agreed!
VERY clean workmanship!
Thats first class work. 
- Joined
- Jan 9, 2020
- Messages
- 10,566
- Points
- 938

I agree with Brian, Daniel - it is very high-quality work. The robands look like they belong there, while the stitching is so clean and precise. However, the biggest impression left on me was the scale - everything looks to be perfectly in scale - and with rigging - that is one huge achievement! Nope - you can protest as much as you want, rigging is your forte! 


- Joined
- Apr 20, 2020
- Messages
- 6,245
- Points
- 738

Dear DanielGood afternoon,
Continuing on with the mizzen sails and spars rigging. The finished lateen sail showing the roband connections followed by a tight in shot of the robands.
View attachment 319741View attachment 319742
Next up is my method of channeling the buntlines with a loop at the bottom of the sails.
View attachment 319743
And finally, for today preassembly of the mizzen topsail, also showing the bottom spar which the topsail attaches to but itself will not support another lower sail because there resides the lateen sail which the topsail cannot attach to. It took me a moment to realize that last fact.
View attachment 319745
My head is just swimming in all the ways the sails and rigging can come together. For some reason installation of the parrel beads is the next challenge I am anticipating being a challenge. Hope you all enjoy.
your work on the sails is very accurate and proportional, well done my friend


