Thank you so much Paul. You know I studied about the mainsail clewline for a long time looking mostly at the 1:10 model and there it was looking somewhat slack on the model, so I just tried to simulate it. It also appears that the bowline for that sail has no real home when furled and just kind of gets flipped over the rail onto the deck.What's not to love Daniel! This is simply spectacular work providing SO MUCH eye candy. I could stare at these images for hours just trying to make sense of it all - and I know what I'm looking at. Sad to hear about the brace you cut - but at least that's more accessible than some other lines you could have severed.
Looking at your picture I just realized what happens to the mainsail sheet when the clew is lifted to the yard. I can't help but wonder if it should be slack rather than tight? Of course, I have no idea myself but surely someone on the forum could render an informed opinion...
Again, your work is simply stunning Daniel. Congratulations!
-

Win a Free Custom Engraved Brass Coin!!!
As a way to introduce our brass coins to the community, we will raffle off a free coin during the month of August. Follow link ABOVE for instructions for entering.
-

PRE-ORDER SHIPS IN SCALE TODAY!
The beloved Ships in Scale Magazine is back and charting a new course for 2026!
Discover new skills, new techniques, and new inspirations in every issue.
NOTE THAT OUR FIRST ISSUE WILL BE JAN/FEB 2026
You are using an out of date browser. It may not display this or other websites correctly.
You should upgrade or use an alternative browser.
You should upgrade or use an alternative browser.
VASA 490 Build Log - Billing Boats, 1:75 [COMPLETED BUILD]
Splendid work Daniel! Rigging those last lines for the lateen and the mizzen mast is always the toughest. Forget about using your fingers, it's all tool use at that stage.
Thanks Kurt, I do recall reading one of your commentaries and procedure of difficult rigging on your La Couronne.Forget about using your fingers
Make one of these, Daniel. The fork tool, combined with a long needle nosed pliers or long tweezers, is invaluable for belaying.
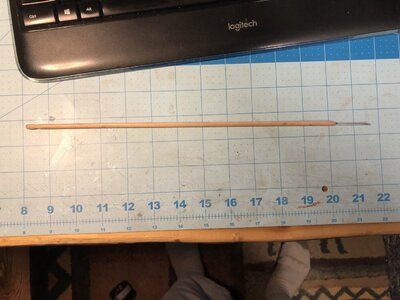
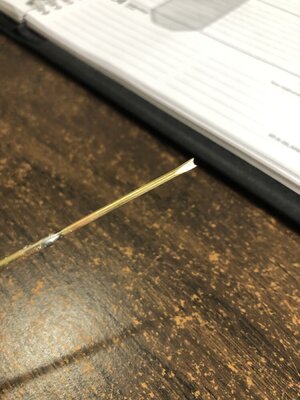
Break an eye off the end of a leather needle, file and polish it to form a shallow fork, and CA glue it into the end of a long dowel. You can reach through shrouds to the far side of the deck to belay line to a belaying pin before running that line up into the masts for any running rigging line when access is very tight. If is specifically used for pushing the standing part under and around the bottom end of a belaying pin, or around the top of a belaying pin while keeping controlling line tension using another tool in your other hand.
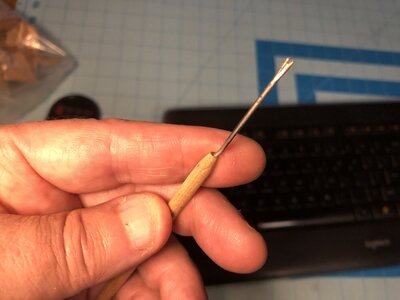

Break an eye off the end of a leather needle, file and polish it to form a shallow fork, and CA glue it into the end of a long dowel. You can reach through shrouds to the far side of the deck to belay line to a belaying pin before running that line up into the masts for any running rigging line when access is very tight. If is specifically used for pushing the standing part under and around the bottom end of a belaying pin, or around the top of a belaying pin while keeping controlling line tension using another tool in your other hand.

Yes, thanks Kurt I'm on it. I have used wood strakes, but they don't work all that well. With what you have one can rotate slightly while maneuvering the line into position.

Good morning Daniel. I always await for your updates with anticipation- and yet again you exceed my expectation. Beautiful work. The rigging on the Vasa is insane and you just owned it. Thanks for the tool tips and Kurts little jigg looks invaluable. I am going to order these and make one of Kurts as well. Cheers GrantGood Sunday afternoon everyone. It has been 3 weeks since my last post and I have some progress to show. My focus has been the sails and rigging along the main mast, as you will see there is a maze of rigging between the main and mizzen mast. For me the most difficult part by far has been access to the fall or tie off locations (mostly at the belay pins). Actual tie off is a matter of spot gluing, holding lines with tweezers (often a pair in each hand), and trying not to snag adjacent lines which I seem to do constantly. first is an overview between the two masts. Notice the main topgallant halyard and its associated crows foot attachment to the lower stay line. I did not follow critical path and had to install this halyard after I had all the mainsail and main topsail rigging in place. I had to undo the lower braces and backstays to get in there. I shall not make that mistake again with the foremast halyards; they will go on next.
View attachment 330602
I have combined rigging methods from the Vasa Museum plans, the museum model, and Billings plans. I am still experimenting with partial furling of the main course, a work in progress. For now, I have the bowlines rolled up and marked their tie down locations with blue tape. Paul @dockattner I accidently cut one of the main topsail braces which set me back an hour and a half, a first for me so far.
Next some close in shots. I have not made rope hanks yet so no close ups of that yet.
View attachment 330622View attachment 330623View attachment 330624
Next notice the big empty space between the fore and main mast...well the fore topsail yard and fore topgallant yard halyards get to go in next.
One other note about the sails, my intent now is to place all the rest of the sails without any furling.
View attachment 330625
lastly, I highly recommend the 10" tweezers and extended clippers for anyone attempting this kind of rigging. They really came in handy.
View attachment 330626
I sure thank you all for checking in and happy modelling to you.
Great work Daniel! 
Thank you, Mark,Your Vasa is looking superb Daniel, what a lot of rigging work! Well done
Thank you very much Heinrich.I can only chime in with the comments before me. From the exquisitely tailored mouse to the superb rigging and appearance of the full sails, I can only say one word: MAJESTIC!
Thank you, Grant.Good morning Daniel. I always await for your updates with anticipation- and yet again you exceed my expectation. Beautiful work. The rigging on the Vasa is insane and you just owned it. Thanks for the tool tips and Kurts little jigg looks invaluable. I am going to order these and make one of Kurts as well. Cheers Grant
Thank you, Dean.Great work Daniel!
Good morning,
I wanted to post this important step in the Vasa's running rigging, being placement of the halyards, which hold the foremast topgallant and topsail yards. Previously I had commented where I had left this step out until it was too late concerning the placement of the main mast topgallant halyard and had to go in and remove some of the exterior bracing between the main and mizzen mast to install it. I also placed ahead of time some required single and double sheeves along the main stays. For now, I have the halyards temporarily tied off with maybe 75% of the tension needed just to hold its shape. The trick here will be to apply just enough tension in the halyard lines to look good and not pull the main forward stays to badly out of their original straight alignment.
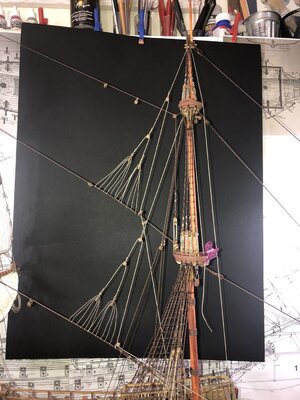
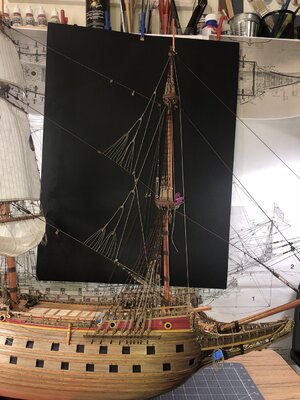
Once again, I'm following the Vasa Museum drawings and model where practical and the Billings as a base to start with.
Thanks for looking in and happy modeling.
I wanted to post this important step in the Vasa's running rigging, being placement of the halyards, which hold the foremast topgallant and topsail yards. Previously I had commented where I had left this step out until it was too late concerning the placement of the main mast topgallant halyard and had to go in and remove some of the exterior bracing between the main and mizzen mast to install it. I also placed ahead of time some required single and double sheeves along the main stays. For now, I have the halyards temporarily tied off with maybe 75% of the tension needed just to hold its shape. The trick here will be to apply just enough tension in the halyard lines to look good and not pull the main forward stays to badly out of their original straight alignment.


Once again, I'm following the Vasa Museum drawings and model where practical and the Billings as a base to start with.
Thanks for looking in and happy modeling.
Fantastic Daniel! I still get a slight twitch recalling when I was completing these halyards. Looks like you mastered them!
Thanks Paul. At this point with the exception of creating a base for the Vasa to sit on, I don't think there is anything left that is new to me to do. It's all a matter of doing the same things over and over till it's finished. Having said that, making the lantern on the stern and setting the flags will be something new yet to come.
- Joined
- Jan 9, 2020
- Messages
- 10,566
- Points
- 938

Dear Daniel. This is lovely work my friend. I can only imagine what a tricky balance that must be to get that tension just right. You, Paul and Peter are setting new standards for the rigging of the VASA - something you can be immensely proud of!
Thats looking beautiful, well done so far.
Daniel,Good morning,
I wanted to post this important step in the Vasa's running rigging, being placement of the halyards, which hold the foremast topgallant and topsail yards. Previously I had commented where I had left this step out until it was too late concerning the placement of the main mast topgallant halyard and had to go in and remove some of the exterior bracing between the main and mizzen mast to install it. I also placed ahead of time some required single and double sheeves along the main stays. For now, I have the halyards temporarily tied off with maybe 75% of the tension needed just to hold its shape. The trick here will be to apply just enough tension in the halyard lines to look good and not pull the main forward stays to badly out of their original straight alignment.
View attachment 332394View attachment 332395
Once again, I'm following the Vasa Museum drawings and model where practical and the Billings as a base to start with.
Thanks for looking in and happy modeling.
Your Vasa and her rigging looks very nice!!!
Keep balance of strait halliards-straight crowfeets and straight stay could be realy serious task !
If I may, I would reccomend to use some counter weight temporary secured in crowfeet halliard area, when You will continue balancing them to make halliards tight...
it will help to keep relevant stays straight under tension and crowfeets as well in process....
There need to play with counter weight on crowfeets side and pulling force of the halliard runng from other side to keep relevant stay remains straigh or slightly curved upward.
When You reach desired "strait" shape of the halliard lines including crowfeets lines and stay itself, which need to be very lightly curved upward, than crowfeets need to be coated with "extra liquid"( other type of CA couldnt work well) type of CA,
better to do it in a few passes, without fanatism, apply everynnext layer after previous one dried complitely...Approx 3 times would be sufficient...
As soon all crowfeets with CA dried, they will keep their straihteness by itself and weight from both sides coud be removed...hope stays also remains straight
I used more or less similar technique on my model on this stage of running rigging...with difference , that I pulled each crowfeet through the stay and loaded it individualy and later on made simulation of knotting crowfeets to the stay...
All the best!
Kirill
Last edited:


