-

Win a Free Custom Engraved Brass Coin!!!
As a way to introduce our brass coins to the community, we will raffle off a free coin during the month of August. Follow link ABOVE for instructions for entering.
-

PRE-ORDER SHIPS IN SCALE TODAY!
The beloved Ships in Scale Magazine is back and charting a new course for 2026!
Discover new skills, new techniques, and new inspirations in every issue.
NOTE THAT OUR FIRST ISSUE WILL BE JAN/FEB 2026
- Home
- Forums
- Ships of Scale Group Builds and Projects
- Bluenose PoF Group Build
- Bluenose Group Build Logs
You are using an out of date browser. It may not display this or other websites correctly.
You should upgrade or use an alternative browser.
You should upgrade or use an alternative browser.
YUANQING BLUENOSE - Peter Voogt [COMPLETED BUILD]
- Thread starter Peter Voogt
- Start date
- Watchers 74
Dear Peter. This is not good news! I wish you the best and soonest recovery possible. Just remember that it does take time, so allow yourself ample time for that.
Get well soon Peter, hopefully before your holidays.
Thanks Heinrich, Maarten en Mark. Much appreciate!Recover soon Peter
Regards, Peter
Well well well: the Dutch customs have pleased Peter. The 1st delivery of Dry Dock remained on the shelf there for almost 7 weeks. Now only 1 week. Delivered yesterday by PostNL. 
That gave me some extra energy to do something with these deadeyes.
So the point was that the supplied 7 mm and 5 mm were too large, IMHO. And certainly related to the 1:1 sizes. But as I have already stated, the pure conversion from 1:1 to 1:72 is not the ultimate result. I also have to consider the rest of the parts. And what my eyes, fingers and tweezers can handle.
In this case also the thickness of the shrouds. And that these were lined with canvas around the top deadeyes. I'm going to imitate that with serving of those ropes, just like around the masthead and then whiten them. With the new arrived blocks, you will see these ratios:

-The top deadeyes will be made 'drop shaped'.
-The rope for the topmast shroud will be made with 0.35 mm rope, so that is less substantial. And maybe served with a spliced, single thread serafil. I need to do another test with that.
So I can choose from:
1: 4x 5 mm with 1 x 4 mm in between
2: 4x 4 mm with 1x 3 mm in between
But I also have to take into account the dimensions of the chainplates.
Keeping these 2 old photos in mind:
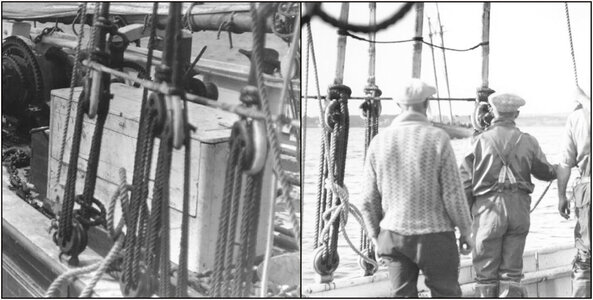
this has become my choice"
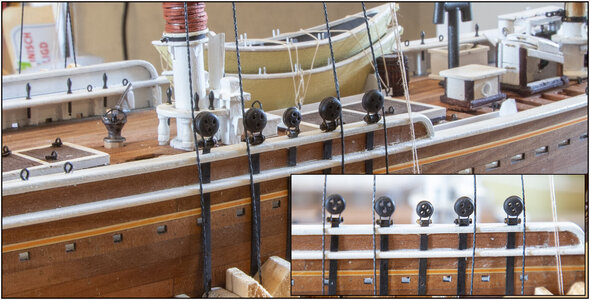
4x 5 mm with 1x 4mm. The 4 mm block looks smaller, but: 'The smaller the parts, the larger 1 mm appears.'
Around the middle 4 mm block I made the braces myself from my 0.4 mm metal wire. The lack of small brackets is therefore not a problem. The M0.6 mm bolts that came in also come off in terms of scale. I will try to reduce the space between the deadeye and the tube of the chainplate.
Related to 1:1 to hefty deadeyes, but given the entire sizing on the entire model, I'm going to be satisfied with that.
Regards, Peter
That gave me some extra energy to do something with these deadeyes.
So the point was that the supplied 7 mm and 5 mm were too large, IMHO. And certainly related to the 1:1 sizes. But as I have already stated, the pure conversion from 1:1 to 1:72 is not the ultimate result. I also have to consider the rest of the parts. And what my eyes, fingers and tweezers can handle.
In this case also the thickness of the shrouds. And that these were lined with canvas around the top deadeyes. I'm going to imitate that with serving of those ropes, just like around the masthead and then whiten them. With the new arrived blocks, you will see these ratios:

-The top deadeyes will be made 'drop shaped'.
-The rope for the topmast shroud will be made with 0.35 mm rope, so that is less substantial. And maybe served with a spliced, single thread serafil. I need to do another test with that.
So I can choose from:
1: 4x 5 mm with 1 x 4 mm in between
2: 4x 4 mm with 1x 3 mm in between
But I also have to take into account the dimensions of the chainplates.
Keeping these 2 old photos in mind:

this has become my choice"

4x 5 mm with 1x 4mm. The 4 mm block looks smaller, but: 'The smaller the parts, the larger 1 mm appears.'
Around the middle 4 mm block I made the braces myself from my 0.4 mm metal wire. The lack of small brackets is therefore not a problem. The M0.6 mm bolts that came in also come off in terms of scale. I will try to reduce the space between the deadeye and the tube of the chainplate.
Related to 1:1 to hefty deadeyes, but given the entire sizing on the entire model, I'm going to be satisfied with that.
Regards, Peter
Last edited:
I like your approach here Peter. We can becomes slaves to scale corrections and end up with something that is either not 'doable' or is unappealing esthetically. Choosing what looks right is the way to go, especially if the goal is home display. Great work as always - looking forward to seeing more of your beautiful work.
- Joined
- Jan 9, 2020
- Messages
- 10,566
- Points
- 938

Very very wise words, Paul!I like your approach here Peter. We can becomes slaves to scale corrections and end up with something that is either not 'doable' or is unappealing esthetically. Choosing what looks right is the way to go, especially if the goal is home display. Great work as always - looking forward to seeing more of your beautiful work.
I like your approach here Peter. We can becomes slaves to scale corrections and end up with something that is either not 'doable' or is unappealing esthetically. Choosing what looks right is the way to go, especially if the goal is home display. Great work as always - looking forward to seeing more of your beautiful work.
Indeed, wise words!Very very wise words, Paul!
My father told me: “Wisdom comes with age”
Well, now I am 65 and almost building for 2 years on this BN, he (and you) is (are) right.
- Joined
- Sep 3, 2021
- Messages
- 5,198
- Points
- 738

Your choice is esthetically appealing to ones eyes. Also when comparing the old pictures with your choice of deadeyes and ropes, I can't and won't dispute your decision making.
And as you already mentioned, going any smaller might also mean handling issues, especially at (y)our age.
And as you already mentioned, going any smaller might also mean handling issues, especially at (y)our age.
Thanks, Johan. “To measure is to know, to see is to believe.” This way I can convince myself …….Your choice is esthetically appealing to ones eyes. Also when comparing the old pictures with your choice of deadeyes and ropes, I can't and won't dispute your decision making.
And as you already mentioned, going any smaller might also mean handling issues, especially at (y)our age.
Regards, Peter
Started making the braces around the deadeyes.
Just took some pictures of the different stages and the tools.
Because everything is bolted together with the M0.6 bolt, I started clamping a 0.65 mm nail in the vice. The eyes that I make around it then have a little over dimension.
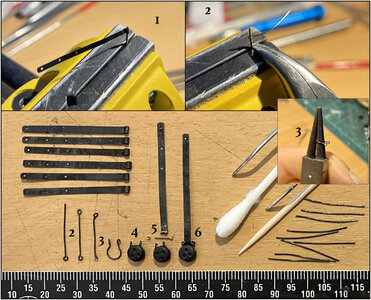
1: the eyes on the chainplates formed around the nail. They were made for the M0.8 bolts;
2: cut pieces of 19 mm from the 0.4 mm wire and twisted an eye on each side. The eyes pinched flat between the pliers to give the bolt and nut some 'flat meat' later on;
3: bend the bracket in radius with the round-point pliers;
4: bent around the 4 mm deadeye. Positioning the eyes with the toothpick in the right position;
5: picked the M0.6x5 bolt and nut;
6: screwed together and tensioned the deadeye in position. I first put the bolt through the 2 eyes. Set it upright and put the nut on the threaded end with the tweezers. With the cotton swab you can then apply pressure in a flat way and give the nut the first turns. Give you the first twist with the tweezers ..... big chance that you have to look for the nut somewhere ......... . After the first turns, tighten further with the tweezers and cut off the protruding piece of threaded end. A little blackening and ......... tada.
It was a smart tip to work on a towel. Then the parts don't jump that far away.........
I'm going to prepare 20 pieces now.
Regards, Peter
Just took some pictures of the different stages and the tools.
Because everything is bolted together with the M0.6 bolt, I started clamping a 0.65 mm nail in the vice. The eyes that I make around it then have a little over dimension.

1: the eyes on the chainplates formed around the nail. They were made for the M0.8 bolts;
2: cut pieces of 19 mm from the 0.4 mm wire and twisted an eye on each side. The eyes pinched flat between the pliers to give the bolt and nut some 'flat meat' later on;
3: bend the bracket in radius with the round-point pliers;
4: bent around the 4 mm deadeye. Positioning the eyes with the toothpick in the right position;
5: picked the M0.6x5 bolt and nut;
6: screwed together and tensioned the deadeye in position. I first put the bolt through the 2 eyes. Set it upright and put the nut on the threaded end with the tweezers. With the cotton swab you can then apply pressure in a flat way and give the nut the first turns. Give you the first twist with the tweezers ..... big chance that you have to look for the nut somewhere .........
It was a smart tip to work on a towel. Then the parts don't jump that far away.........
I'm going to prepare 20 pieces now.
Regards, Peter
Last edited:
Of course I tested that, Stephan.Hope the .4 mm wire is strong enough to hold the shroud.
- Joined
- Sep 3, 2021
- Messages
- 5,198
- Points
- 738

Very extensive work instructions.Started making the braces around the deadeyes.
Just took some pictures of the different stages and the tools.
Because everything is screwed together with the M0.6 bolt, I started clamping a 0.65 mm nail in the vice. The eyes that I make around it then have some space.
View attachment 333201
1: the eyes on the chainplates formed around the nail. They were made for the M0.8 bolts;
2: cut pieces of 19 mm from the 0.4 mm wire and twisted an eye on each side. The eyes pinched flat between the pliers to give the bolt and nut some 'flat meat' later on;
3: bend the bracket in radius with the round-point pliers;
4: bent around the 4 mm deadeye. Positioning the eyes with the toothpick in the right position;
5: picked the M0.6x5 bolt and nut;
6: screwed together and tensioned the deadeye in position. I first put the bolt through the 3 eyes. Set it upright and put the nut on the threaded end with the tweezers. With the cotton swab you can then apply pressure in a flat way and give the nut the first turns. Give you the first twist with the tweezers ..... big chance that you have to look for the nut somewhere .......... After the first turns, tighten further with the tweezers and cut off the protruding piece of threaded end. A little blackening and ......... tada.
It was a smart tip to work on a towel. Then the parts don't jump that far away.........
I'm going to prepare 20 pieces now.
Regards, Peter
All too frequently I find myself browsing your build log, looking for tips and tricks. Luckily they can be found abundantly.
Thank, Johan. While I'm figuring it out, I might as well share what a possibility is to make.Very extensive work instructions.
All too frequently I find myself browsing your build log, looking for tips and tricks. Luckily they can be found abundantly.
Regards, Peter
The Covid is as good as suppressed. Just a nasty cough. Since last Thursday, the Admiral has also tested positive. But luckily she is also on the mend. She had just had her booster. But again made some hours for the BN.
Made the 20 brackets around the deadeyes, attached to the chainplates and dry-fit in place. To get an impression of the dimensions:

I am satisfied with this image in terms of block size.
The space between the blocks and the top of the chainplates can also be eliminated:
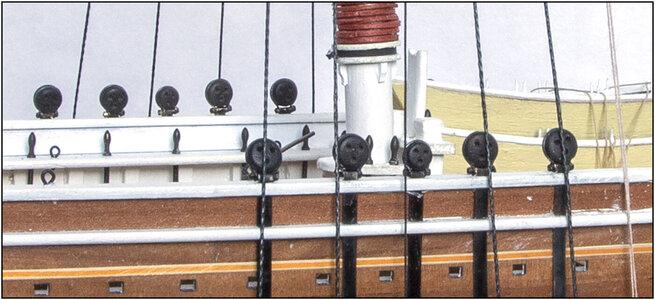
The 'curl' at the top of the chainplate made in such a way that it turns inwards everywhere and puts the block more or less in the middle of the rail.
The bolts are inserted from the front and the nut at the back.
A few blackening here and there and then get to work to secure the chainplates to the hull.
Regards, Peter
Made the 20 brackets around the deadeyes, attached to the chainplates and dry-fit in place. To get an impression of the dimensions:

I am satisfied with this image in terms of block size.
The space between the blocks and the top of the chainplates can also be eliminated:

The 'curl' at the top of the chainplate made in such a way that it turns inwards everywhere and puts the block more or less in the middle of the rail.
The bolts are inserted from the front and the nut at the back.
A few blackening here and there and then get to work to secure the chainplates to the hull.
Regards, Peter
Thanks, Mark. Do my best …….Very neat and tidy work Peter, it's going to be a beauty. It already is
Regards, Peter
Placing the chainplates.
Based on my sources:

Eisnor interprets it clearly differently, in line with the shrouds like on the old ships. Lankford and Jenson put them vertically. Then they according to the position of the frames. With another difference for the middle one, that for the side stay of the upper masts. Straight or slightly oblique. Who knows may say ..........
Then YuanQing follows the Jenson dwawings. Vertical, perpendicular to the waterline. This can also be seen with the BN-II.
Chapelle signs this:
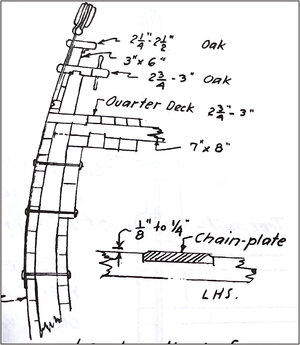
A faceted edge along the sides and inlaid in the hull. Those details got a bit too far for me.
Getting started with this:
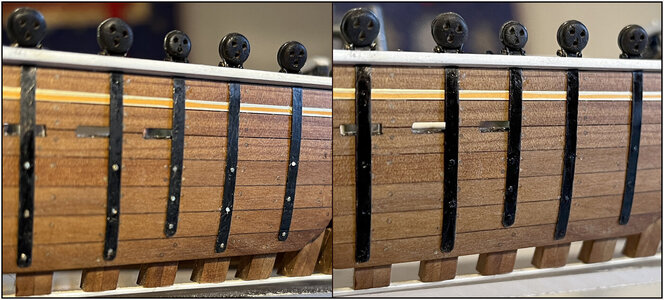
I had found very small nails in my stash. But even the smallest head sticking out of the irons quickly becomes too big. Therefore, recessed head nails were placed in the holes (imitation).
Then blackened the nails and the irons with the ink that I also used for the port side of the hull.
The building of the hull is now done. 2 more pictures:
The starboard side:

The port side:
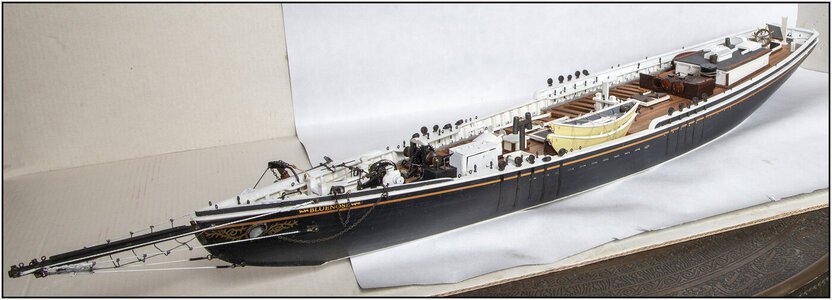
And gives both sides of the hull a little clean-up and polish.
Can I continue with the masts.
Regards, Peter
Based on my sources:

Eisnor interprets it clearly differently, in line with the shrouds like on the old ships. Lankford and Jenson put them vertically. Then they according to the position of the frames. With another difference for the middle one, that for the side stay of the upper masts. Straight or slightly oblique. Who knows may say ..........
Then YuanQing follows the Jenson dwawings. Vertical, perpendicular to the waterline. This can also be seen with the BN-II.
Chapelle signs this:

A faceted edge along the sides and inlaid in the hull. Those details got a bit too far for me.
Getting started with this:

I had found very small nails in my stash. But even the smallest head sticking out of the irons quickly becomes too big. Therefore, recessed head nails were placed in the holes (imitation).
Then blackened the nails and the irons with the ink that I also used for the port side of the hull.
The building of the hull is now done. 2 more pictures:
The starboard side:

The port side:

And gives both sides of the hull a little clean-up and polish.
Can I continue with the masts.
Regards, Peter
Last edited:
- Joined
- Sep 3, 2021
- Messages
- 5,198
- Points
- 738

With respect to the chainplates, I guess there's something to say for either option.
Since the YQ kit comes with slots in the bulwarks and monkeyrail, which are aligned such that the chainplates need to be near vertical, it's almost a moot point. Although, I would have loved to see how you would have made new rails with the chain plate slots relocated to match Eisnors' interpretation. I know you could...
Again, a pleasure to read your post and see the results of a rainy day spend at your office.
Thanks, Johan. With this parts, I think Eisnor is not right. So, if you like them, it’s up to you. But you have just installed the rails.With respect to the chainplates, I guess there's something to say for either option.
Since the YQ kit comes with slots in the bulwarks and monkeyrail, which are aligned such that the chainplates need to be near vertical, it's almost a moot point. Although, I would have loved to see how you would have made new rails with the chain plate slots relocated to match Eisnors' interpretation. I know you could...
Again, a pleasure to read your post and see the results of a rainy day spend at your office.
Regards, Peter
- Joined
- Sep 3, 2021
- Messages
- 5,198
- Points
- 738

No way I'm going to re-do the rails!Thanks, Johan. With this parts, I think Eisnor is not right. So, if you like them, it’s up to you. But you have just installed the rails.
Regards, Peter

