-

Win a Free Custom Engraved Brass Coin!!!
As a way to introduce our brass coins to the community, we will raffle off a free coin during the month of August. Follow link ABOVE for instructions for entering.
-

PRE-ORDER SHIPS IN SCALE TODAY!
The beloved Ships in Scale Magazine is back and charting a new course for 2026!
Discover new skills, new techniques, and new inspirations in every issue.
NOTE THAT OUR FIRST ISSUE WILL BE JAN/FEB 2026
- Home
- Forums
- Ships of Scale Group Builds and Projects
- Bluenose PoF Group Build
- Bluenose Group Build Logs
You are using an out of date browser. It may not display this or other websites correctly.
You should upgrade or use an alternative browser.
You should upgrade or use an alternative browser.
YUANQING BLUENOSE - Peter Voogt [COMPLETED BUILD]
- Thread starter Peter Voogt
- Start date
- Watchers 74
Good morning Peter. I certainly echo the sentiments of the fellow members- this is an outstanding BN. I have often wondered why the middle chain plate is shorter than the others. After your research you would know? Cheers GrantOh dear ...... a schooner with a square rigged staysail .....
View attachment 334424
To be able to determine the length of the shrouds and the part that will be served, I first made a plastic mold to fix the mast in the center in the transverse direction.
Then a temporary front and rear stay installed to keep the mast in the correct position in the longitudinal direction.
On the starboard and port side I made a paper mold where I attached the top deadeyes:
View attachment 334425
I have sanded these top deadeyes in a teardrop shape, as seen in previous old pictures. Not the physical drop, because that is round because of its cohesion. This is the shape of the drop that is just hanging from its attachment point. The visible ones are not yet the final ones. I've now got the hang of sanding. When the stock is replenished I will make the final ones.
Placed the shrouds around the deadeyes and fastened with a knot:
View attachment 334426
The end of the folded lines is determined and marked as well as the part to be served. (The jig has risen a bit due to the tension of the lines.)
Forward with adjusting and serving the shrouds.
Regards, Peter
Thanks Mark. To answer questions from time to time, I also regularly check my own build log. And then I also see things of myself that I sometimes think..... mmmmmmm ......Very nice work Peter. Watching your modelling techniques and skills has taught me to treat each step and phase of my own modelling efforts with far more thought and diligence. Great work
Regards, Peter
Thanks Grant. The shorter chain plate is for the side stay of the top mast and has to absorb less force. Therefore also a bit thinner line and smaller deadeye:Good morning Peter. I certainly echo the sentiments of the fellow members- this is an outstanding BN. I have often wondered why the middle chain plate is shorter than the others. After your research you would know? Cheers Grant
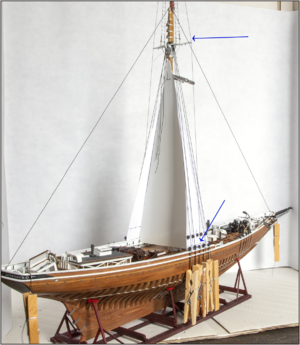
Regards, Peter
Last edited:
- Joined
- Oct 17, 2020
- Messages
- 1,691
- Points
- 488

Hi Peter, can they help you?Thanks Grant. The shorter chain plate is for the side stay of the top mast and has to absorb less force. Therefore also a bit thinner line and smaller deadeye:
View attachment 334811
Regards, Peter
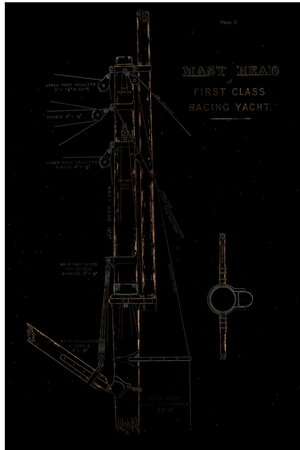
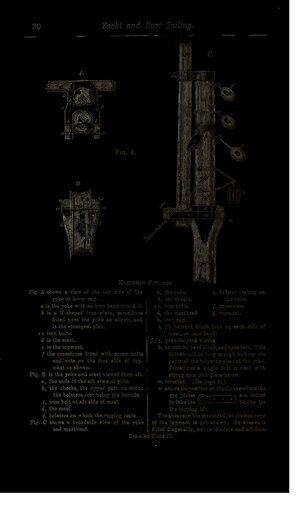
Thanks, Frank. Such detailed drawing are always welcom. I will change them in Photoshop into white with black lines.
Regards, Peter
- Joined
- Oct 17, 2020
- Messages
- 1,691
- Points
- 488

if you need it, I have a good text on the subjectThanks, Frank. Such detailed drawing are always welcom. I will change them in Photoshop into white with black lines.
Regards, Peter
The foremast is also almost ready to paint. Most of the job is done. And Chapelle got me also a lot of information.if you need it, I have a good text on the subject
Regards, Peter
Making Sails in a Crazy Way:
After serving the 10 parts on the end of the shrouds where the deadeyes come, I could apply them definitively around the top of the lower main mast.
I only will place the main mast after I have put some other things on it. Because now I have easy access on it.
The 1st thing that qualifies for this is the furled Main Topsail. There is a good example of this in The Saga:
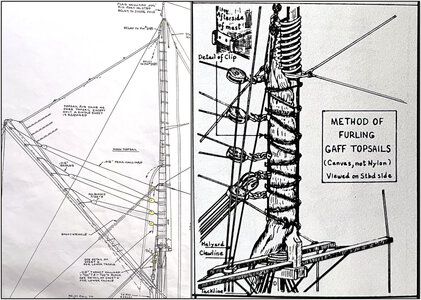
On the left the example of MS Lankford with all the details to be applied and on the right the sail furled behind the head of the lower mast.
There are already quite a few examples about making model sails. Soon Stephan, Maarten and I will get together to compare different types of fabric and see what is possible.
The BN didn't have thick canvas sails. There was also racing to be done. So lighter/thinner sails. That means on the model ......... very thin sails.
During my Covid I used 'quite a few' tissues. And then a small voice said: they are thin and strong ........
Just did a little test with it:
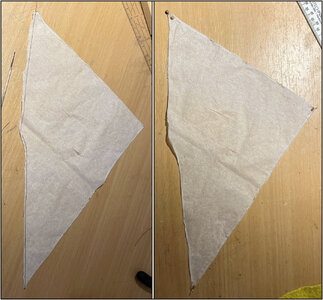
Similar to what you see in the left image, I started by applying a thin line around the sides. That line is from Serafil 120/2 0,15mm / .006". I ran this line through a paper glue stick and glued it to the paper. Then folded the edge.
But ..... the tissues consist of 3 layers. When turning, you only glue 1 layer.
So the tissue layers were taken apart and a 2nd attempt with only 1 single layer. You can see that in the left image. Then applied the necessary blocks to the corners, see the right picture. The folded edges are not very neat with this test sail. But I think you won't see it when folded. And with the experience I have now, the next one will be quite tidier.
After a few hours, this was the result:
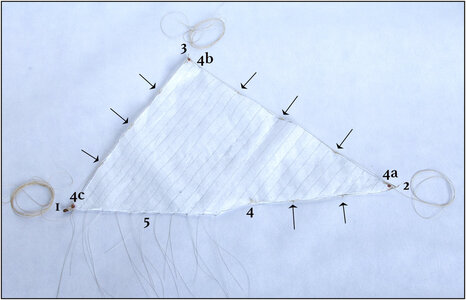
1: a 3mm /.11” single block for lifting up the sail through the 3 mm block on top of the upper mast with the Main Topsail Halliard;
2: a split with a spilt line, for the Main Topsail Tack;
3: a split with a split line, the Main Topsail Sheet;
4: a split with a split line, the start of de Main Topsail Clew Line. This line bundles up the sail when it is not used. It goes through the 2,5 mm / .10” singles blocks 4a, 4b and 4c and the split eyes (see little arrows) and then to a belaying pin on deck;
5: pointed 10 holes with a needle for the 10 mast-hoop lines.
Drawn the sails parts with a pencil. But you probably won't see them again.
Next step: tie the sail to the mast hoops with the ten double lines. And then see if the sail is thin enough to fold behind the mast.
Regards, Peter
After serving the 10 parts on the end of the shrouds where the deadeyes come, I could apply them definitively around the top of the lower main mast.
I only will place the main mast after I have put some other things on it. Because now I have easy access on it.
The 1st thing that qualifies for this is the furled Main Topsail. There is a good example of this in The Saga:

On the left the example of MS Lankford with all the details to be applied and on the right the sail furled behind the head of the lower mast.
There are already quite a few examples about making model sails. Soon Stephan, Maarten and I will get together to compare different types of fabric and see what is possible.
The BN didn't have thick canvas sails. There was also racing to be done. So lighter/thinner sails. That means on the model ......... very thin sails.
During my Covid I used 'quite a few' tissues. And then a small voice said: they are thin and strong ........
Just did a little test with it:

Similar to what you see in the left image, I started by applying a thin line around the sides. That line is from Serafil 120/2 0,15mm / .006". I ran this line through a paper glue stick and glued it to the paper. Then folded the edge.
But ..... the tissues consist of 3 layers. When turning, you only glue 1 layer.
So the tissue layers were taken apart and a 2nd attempt with only 1 single layer. You can see that in the left image. Then applied the necessary blocks to the corners, see the right picture. The folded edges are not very neat with this test sail. But I think you won't see it when folded. And with the experience I have now, the next one will be quite tidier.
After a few hours, this was the result:

1: a 3mm /.11” single block for lifting up the sail through the 3 mm block on top of the upper mast with the Main Topsail Halliard;
2: a split with a spilt line, for the Main Topsail Tack;
3: a split with a split line, the Main Topsail Sheet;
4: a split with a split line, the start of de Main Topsail Clew Line. This line bundles up the sail when it is not used. It goes through the 2,5 mm / .10” singles blocks 4a, 4b and 4c and the split eyes (see little arrows) and then to a belaying pin on deck;
5: pointed 10 holes with a needle for the 10 mast-hoop lines.
Drawn the sails parts with a pencil. But you probably won't see them again.
Next step: tie the sail to the mast hoops with the ten double lines. And then see if the sail is thin enough to fold behind the mast.
Regards, Peter
Last edited:
Good evening Peter. I’m no sail expert and I love new ideas. I am concerned tho…..how sustainable is the material over time will it not decay- and will it furl realistically ? I am assuming you plan to furl all the sails as I cannot see this “tissue material” looking good on set sails. I guess I will have to wait and see what magic you will make. Cheers GrantMaking Sails in a Crazy Way:
After serving the 10 parts on the end of the shrouds where the deadeyes come, I could apply them definitively around the top of the lower main mast.
I only will place the main mast after I have put some other things on it. Because now I have easy access on it.
The 1st thing that qualifies for this is the furled Main Topsail. There is a good example of this in The Saga:
View attachment 335350
On the left the example of MS Lankford with all the details to be applied and on the right the sail furled behind the head of the lower mast.
There are already quite a few examples about making model sails. Soon Stephan, Maarten and I will get together to compare different types of fabric and see what is possible.
The BN didn't have thick canvas sails. There was also racing to be done. So lighter/thinner sails. That means on the model ......... very thin sails.
During my Covid I used 'quite a few' tissues. And then a small voice said: they are thin and strong ........
Just did a little test with it:
View attachment 335351
Similar to what you see in the left image, I started by applying a thin line around the sides. That line is from Serafil 120/2 0,15mm / .006". I ran this line through a paper glue stick and glued it to the paper. Then folded the edge.
But ..... the tissues consist of 3 layers. When turning, you only glue 1 layer.
So the tissue layers were taken apart and a 2nd attempt with only 1 single layer. You can see that in the left image. Then applied the necessary blocks to the corners, see the right picture. The folded edges are not very neat with this test sail. But I think you won't see it when folded. And with the experience I have now, the next one will be quite tidier.
After a few hours, this was the result:
View attachment 335352
1: a 3mm /.11” single block for lifting up the sail through the 3 mm block on top of the upper mast with the Main Topsail Halliard;
2: a split with a spilt line, for the Main Topsail Tack;
3: a split with a split line, the Main Topsail Sheet;
4: a split with a split line, the start of de Main Topsail Clew Line. This line bundles up the sail when it is not used. It goes through the 2,5 mm / .10” singles blocks 4a, 4b and 4c and the split eyes (see little arrows) and then to a belaying pin on deck;
5: pointed 10 holes with a needle for the 10 mast-hoop lines.
Drawn the sails parts with a pencil. But you probably won't see them again.
Next step: tie the sail to the mast hoops with the ten double lines. And then see if the sail is thin enough to fold behind the mast.
Regards, Peter
- Joined
- Oct 17, 2020
- Messages
- 1,691
- Points
- 488

Hi Pietro, sorry you tried this fabric. The "poplin" is a light cotton fabric with a fresh and dry feel, shiny, compact even if softMaking Sails in a Crazy Way:
After serving the 10 parts on the end of the shrouds where the deadeyes come, I could apply them definitively around the top of the lower main mast.
I only will place the main mast after I have put some other things on it. Because now I have easy access on it.
The 1st thing that qualifies for this is the furled Main Topsail. There is a good example of this in The Saga:
View attachment 335350
On the left the example of MS Lankford with all the details to be applied and on the right the sail furled behind the head of the lower mast.
There are already quite a few examples about making model sails. Soon Stephan, Maarten and I will get together to compare different types of fabric and see what is possible.
The BN didn't have thick canvas sails. There was also racing to be done. So lighter/thinner sails. That means on the model ......... very thin sails.
During my Covid I used 'quite a few' tissues. And then a small voice said: they are thin and strong ........
Just did a little test with it:
View attachment 335351
Similar to what you see in the left image, I started by applying a thin line around the sides. That line is from Serafil 120/2 0,15mm / .006". I ran this line through a paper glue stick and glued it to the paper. Then folded the edge.
But ..... the tissues consist of 3 layers. When turning, you only glue 1 layer.
So the tissue layers were taken apart and a 2nd attempt with only 1 single layer. You can see that in the left image. Then applied the necessary blocks to the corners, see the right picture. The folded edges are not very neat with this test sail. But I think you won't see it when folded. And with the experience I have now, the next one will be quite tidier.
After a few hours, this was the result:
View attachment 335352
1: a 3mm /.11” single block for lifting up the sail through the 3 mm block on top of the upper mast with the Main Topsail Halliard;
2: a split with a spilt line, for the Main Topsail Tack;
3: a split with a split line, the Main Topsail Sheet;
4: a split with a split line, the start of de Main Topsail Clew Line. This line bundles up the sail when it is not used. It goes through the 2,5 mm / .10” singles blocks 4a, 4b and 4c and the split eyes (see little arrows) and then to a belaying pin on deck;
5: pointed 10 holes with a needle for the 10 mast-hoop lines.
Drawn the sails parts with a pencil. But you probably won't see them again.
Next step: tie the sail to the mast hoops with the ten double lines. And then see if the sail is thin enough to fold behind the mast.
Regards, Peter
My experience with the tissues: after use and fried, they are small clumps.Good evening Peter. I’m no sail expert and I love new ideas. I am concerned tho…..how sustainable is the material over time will it not decay- and will it furl realistically ? I am assuming you plan to furl all the sails as I cannot see this “tissue material” looking good on set sails. I guess I will have to wait and see what magic you will make. Cheers Grant
My idea is to furl 7 out of 8 sails.
What it will look like will be also a surprise to me as well. I consider it as a test. If it doesn't look good, it’s off very quickly.
What will it look like in a while? Sometimes I find an (unused) tissue in my pocket, even after a wash. It still doesn't look bad.
And in a few years? We say in the Netherlands: Who then lives, then takes care.
Regards, Peter
Last edited:
Perhaps……. But most the woven fabrics are too coarse. For sure for 1:72. Next weekend we will compare a lot of examples. And there is a company in England with over 150 different very fine fabrics.Hi Pietro, sorry you tried this fabric. The "poplin" is a light cotton fabric with a fresh and dry feel, shiny, compact even if soft
And shiny …… out of order.
Regards, Peter
Last edited:
Good afternoon Peter- let’s hold thumbs. If anyone can pull this off it would be you. Awaiting with eager anticipationMy experience with the tissues: after use and fried, they are small clumps.Now I use 1 of the 3 layers, so an even smaller prop.
My idea is to furl 7 out of 8 sails.
What it will look like will be also a surprise to me as well. I consider it as a test. If it doesn't look good, it’s off very quickly.
What will it look like in a while? Sometimes I find an (unused) tissue in my pocket, even after a wash. It still doesn't look bad.
And in a few years? We say in the Netherlands: Who then lives, then takes care.
Regards, Peter
So far few reactions ........ but I can imagine that. What will that be...... 
First of all, it's just interesting to understand and see how the rigging of that topsail works: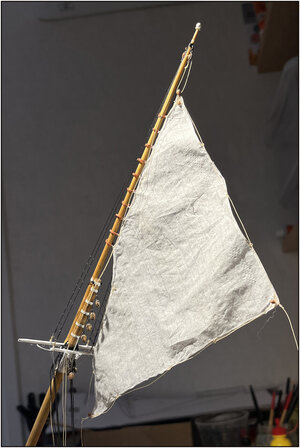
Here I tied the 10 mast hoops to the sail.
And then it started to fold the sail.. First lowered the 10 hoops together at the bottom of the top mast and fold the sail in zig-zag between them. Then pull the clew line slowly to get everything together:
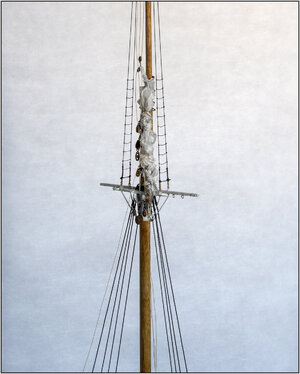
After final placement, the lines at the top are put under tension.
In detail: bunched the sail from top to bottom with a line around the top of the lower mast:
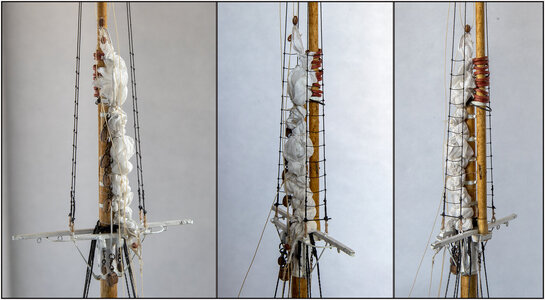
The sail is on starboard behind the mast so that the halliard of the gaff can still run 4 blocks. The line that sticks out at 1/3 of the bottom is the sheet and will go to the end of the gaff of the main sail.
All in all, I don't think it's wrong. Especially when I see it from a normal viewing distance.
Regards, Peter
First of all, it's just interesting to understand and see how the rigging of that topsail works:

Here I tied the 10 mast hoops to the sail.
And then it started to fold the sail.. First lowered the 10 hoops together at the bottom of the top mast and fold the sail in zig-zag between them. Then pull the clew line slowly to get everything together:

After final placement, the lines at the top are put under tension.
In detail: bunched the sail from top to bottom with a line around the top of the lower mast:

The sail is on starboard behind the mast so that the halliard of the gaff can still run 4 blocks. The line that sticks out at 1/3 of the bottom is the sheet and will go to the end of the gaff of the main sail.
All in all, I don't think it's wrong. Especially when I see it from a normal viewing distance.
Regards, Peter
Last edited:
I saw your post during the typing. So you don't have to wait long ......Awaiting with eager anticipation
Very convincing furled sail!
Hello Peter. You pulled it off. The way the furl is done certainly lets us see all your detail which I am a huge fan off. I am assuming you will have all the sail’s furled ? Cheers GrantSo far few reactions ........ but I can imagine that. What will that be......
First of all, it's just interesting to understand and see how the rigging of that topsail works:View attachment 335520
Here I tied the 10 mast hoops to the sail.
And then it started to fold the sail.. First lowered the 10 hoops together at the bottom of the top mast. Then pull the clew line slowly to get everything together:
View attachment 335521
After final placement, the lines at the top are put under tension.
Then bunch the sail from top to bottom with a line around the top of the lower mast:
View attachment 335522
The sail is on starboard behind the mast so that the halliard of the gaff can still run 4 blocks. The line that sticks out at 1/3 of the bottom is the sheet and will go to the end of the gaff of the main sail.
All in all, I don't think it's wrong. Especially when I see it from a normal viewing distance.
Regards, Peter
Thanks, Paul. Much appreciated from a 'furled sail making' colleague.Very convincing furled sail!
Regards, Peter

