Very impressive work Peter. Looking forward to your furled sail.
-

Win a Free Custom Engraved Brass Coin!!!
As a way to introduce our brass coins to the community, we will raffle off a free coin during the month of August. Follow link ABOVE for instructions for entering.
-

PRE-ORDER SHIPS IN SCALE TODAY!
The beloved Ships in Scale Magazine is back and charting a new course for 2026!
Discover new skills, new techniques, and new inspirations in every issue.
NOTE THAT OUR FIRST ISSUE WILL BE JAN/FEB 2026
- Home
- Forums
- Ships of Scale Group Builds and Projects
- Bluenose PoF Group Build
- Bluenose Group Build Logs
You are using an out of date browser. It may not display this or other websites correctly.
You should upgrade or use an alternative browser.
You should upgrade or use an alternative browser.
YUANQING BLUENOSE - Peter Voogt [COMPLETED BUILD]
- Thread starter Peter Voogt
- Start date
- Watchers 74
Thanks, Johan. I was nice to see each other and to discuss the state of the building process of both BN’s.Saw this in real life tonight and let me tell you, it's a lot smaller than you think it is.
The level of detail is astonishing and the details also do justice to the 1:72 scale of the model.
(And I haven't said anything about the sails, yet.)
Regard, Peter
Thanks, Maarten. I do my best, but the next is the Main Sail and that means……. It’s big, also in scale 1:72Very impressive work Peter. Looking forward to your furled sail.
Regards, Peter
Good morning Peter this looks great, I love this detail and am always impressed to show this again in scale.
Thanks, Tobias. Much appreciated!Good morning Peter this looks great, I love this detail and am always impressed to show this again in scale.
Regards, Peter
- Joined
- Sep 3, 2021
- Messages
- 5,197
- Points
- 738

I thoroughly enjoyed the hospitilaity of you and your Admiral, it sure was an enjoyable evening.Thanks, Johan. I was nice to see each other and to discuss the state of the building process of both BN’s.
Regard, Peter
After falling over the edge of a flat earth and not engaging in model ship building or SoS for many months, having gone back to precision pistol single hand shooting and reloading for best precision of my Winchester 94 30-30 carbine, I enjoyed looking back at your progress in the build log with the care that you p;ut into your BN. You are dedicated to fine results which you will attain.
Rich (PT-2)
Rich (PT-2)
Hi Rich.After falling over the edge of a flat earth and not engaging in model ship building or SoS for many months, having gone back to precision pistol single hand shooting and reloading for best precision of my Winchester 94 30-30 carbine, I enjoyed looking back at your progress in the build log with the care that you p;ut into your BN. You are dedicated to fine results which you will attain.
Rich (PT-2)
What a relief to hear from you again. And to see you are back on the forum.
Thank you for the compliments, I really appreciate that.
Regards, Peter
Last edited:
The Main Sail: With the Theme: Why easy when it can be done difficult. 
First made a mold from paper with some cutting and pasting that fit:
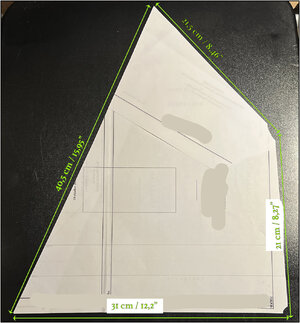
With the dimensions I came up with. That means: it's a Big sail!
However, the tissues are not so big that I can make the sail in 1 piece. Or I have to look for 'elephant tissues'.
That is why the sail is composed of 3 parts.
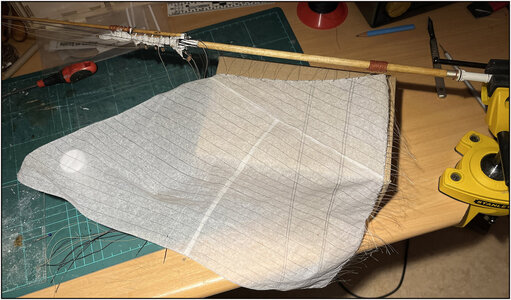
In my enthusiasm to knot I forgot to take a picture of the prepared sail.
Here after attaching the first mast hoop.
I laid the seams in such a way that they do not come together as a thick spot when storing them on the boom later, but that the seams are distributed over the entire width. (Yes, it's all about the details!)
In terms of seams, this is of course not desirable for a fully stretched sail. But with my 'furled sail' you (probably) no longer see that.
I applied the stitching of the tracks with pencil on both sides. I think they will be (partly) visible.
The sail tied to all 16 mast hoops:
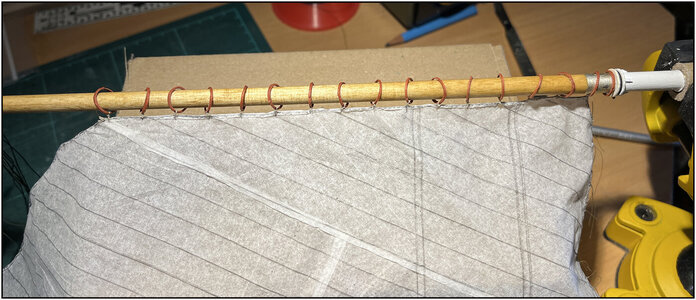
At the foot the loose spare hoop.
The next step was to attach the boom to the mast with the single line parrel with the beads:

The bottom left / rear corner of the sail, with the brass corner reinforcement, made of thin copper foil, secured to the clew band. The bottom right / front corner is (temporarily) secured with the tack to the appropriate eye bolt.
Now I can get started with securing the bottom of the sail to the boom:
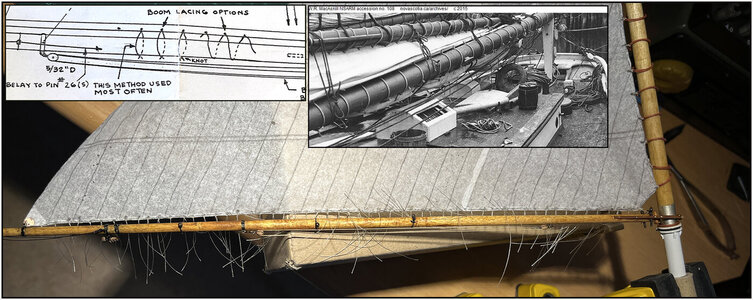
MS Lankford shows 2 possibilities, see the drawing insert on the left. According to the old photos this happened with all loose straps / 'boom lacings' with knots diagonally at the bottom, see the photo insert on the right. Fixing it with a meandering line is customary when attaching the top of the sail to the gaff.
Now I can start with the knotting of the 54 lacings. And make sure I don't tie the boom tackle in them.
So far everything according to plan.........
Rergsards, Peter

First made a mold from paper with some cutting and pasting that fit:

With the dimensions I came up with. That means: it's a Big sail!
However, the tissues are not so big that I can make the sail in 1 piece. Or I have to look for 'elephant tissues'.
That is why the sail is composed of 3 parts.

In my enthusiasm to knot I forgot to take a picture of the prepared sail.
Here after attaching the first mast hoop.
I laid the seams in such a way that they do not come together as a thick spot when storing them on the boom later, but that the seams are distributed over the entire width. (Yes, it's all about the details!)
In terms of seams, this is of course not desirable for a fully stretched sail. But with my 'furled sail' you (probably) no longer see that.
I applied the stitching of the tracks with pencil on both sides. I think they will be (partly) visible.
The sail tied to all 16 mast hoops:

At the foot the loose spare hoop.
The next step was to attach the boom to the mast with the single line parrel with the beads:

The bottom left / rear corner of the sail, with the brass corner reinforcement, made of thin copper foil, secured to the clew band. The bottom right / front corner is (temporarily) secured with the tack to the appropriate eye bolt.
Now I can get started with securing the bottom of the sail to the boom:

MS Lankford shows 2 possibilities, see the drawing insert on the left. According to the old photos this happened with all loose straps / 'boom lacings' with knots diagonally at the bottom, see the photo insert on the right. Fixing it with a meandering line is customary when attaching the top of the sail to the gaff.
Now I can start with the knotting of the 54 lacings. And make sure I don't tie the boom tackle in them.
So far everything according to plan.........
Rergsards, Peter
Last edited:
Oh my...
- Joined
- Sep 3, 2021
- Messages
- 5,197
- Points
- 738

And mind you, in reality it's much smaller than you think...Oh my...
- Joined
- Oct 17, 2020
- Messages
- 1,691
- Points
- 488

orry Pietro, for the sails that I know the seams of the felzi are 2, I see 1, is it from design? Thank youThe Main Sail: With the Theme: Why easy when it can be done difficult.
First made a mold from paper with some cutting and pasting that fit:
View attachment 338128
With the dimensions I came up with. That means: it's a Big sail!
However, the tissues are not so big that I can make the sail in 1 piece. Or I have to look for 'elephant tissues'.
That is why the sail is composed of 3 parts.
View attachment 338129
In my enthusiasm to knot I forgot to take a picture of the prepared sail.
Here after attaching the first mast hoop.
I laid the seams in such a way that they do not come together as a thick spot when storing them on the boom later, but that the seams are distributed over the entire width. (Yes, it's all about the details!)
In terms of seams, this is of course not desirable for a fully stretched sail. But with my 'furled sail' you (probably) no longer see that.
I applied the stitching of the tracks with pencil on both sides. I think they will be (partly) visible.
The sail tied to all 16 mast hoops:
View attachment 338130
At the foot the loose spare hoop.
The next step was to attach the boom to the mast with the single line parrel with the beads:
View attachment 338131
The bottom left / rear corner of the sail, with the brass corner reinforcement, made of thin copper foil, secured to the clew band. The bottom right / front corner is (temporarily) secured with the tack to the appropriate eye bolt.
Now I can get started with securing the bottom of the sail to the boom:
View attachment 338132
MS Lankfort shows 2 possibilities, see the drawing insert on the left. According to the old photos this happened with all loose straps / 'boom lacings' with knots diagonally at the bottom, see the photo insert on the right. Fixing it with a meandering line is customary when attaching the top of the sail to the gaff.
Now I can start with the knotting of the 54 lacings. And make sure I don't tie the boom tackle in them.
So far everything according to plan.........
Rergsards, Peter
Size does (not) matter .......And mind you, in reality it's much smaller than you think...
- Joined
- Sep 3, 2021
- Messages
- 5,197
- Points
- 738

Yeah right... Strikethrough "(not)" is the better option.Size does (not) matter .......
You are correct Frank. But drawing 2 pencil lines in less the 0,4mm is ........ to much to detail in scale 1:72 ...... When drawing 2 lines, it would be out off scale.orry Pietro, for the sails that I know the seams of the felzi are 2, I see 1, is it from design? Thank you
Regards, Peter
- Joined
- Oct 17, 2020
- Messages
- 1,691
- Points
- 488

Thanks for answering me Pietro.You are correct Frank. But drawing 2 pencil lines in less the 0,4mm is ........ to much to detail in scale 1:72 ...... When drawing 2 lines, it would be out off scale.
Regards, Peter
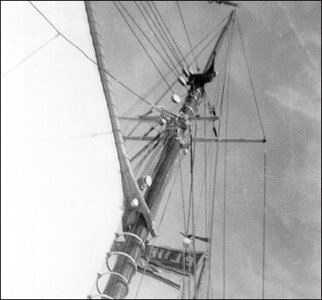
After securing the sail on the boom, it was time for the gaff. There I secured the sail with a pendulum lacing, as this photo from the Nova Scotia Archive shows:
And then it was exciting whether the size of the sail was right. This is just the ONLY pictures of my BN with a fully rigged Main Sail, because the next step is to store the sail furled on the boom:
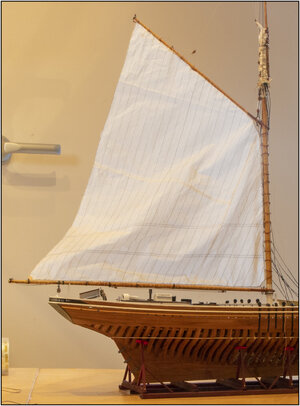
The gaff must be pulled slightly more obliquely to tighten the sail. But I won't do that anymore. It’s a temporary rigging of the sail.
The secured sail on the boom with the 54 loose straps:
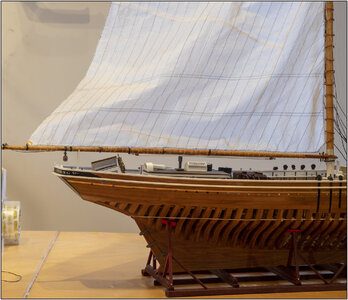
Fixed on the gaff:
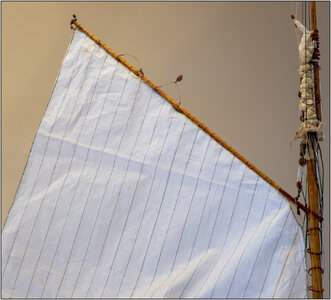
A little more detail at the mast corner:
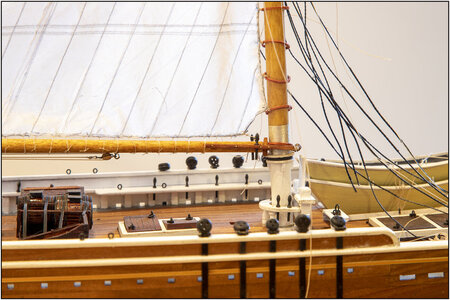
The ropes are not cut at the knot, because the loose ends are the handle parts to tied and untied the straps.
And the corner at the gaff jaws:
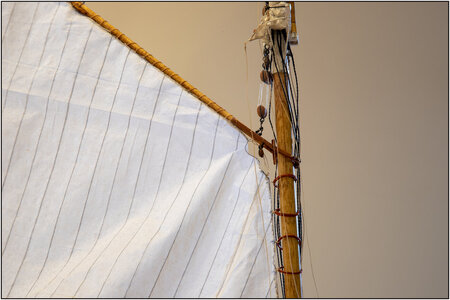
The 'spectacle iron' on the gaff stands not quite right, it is only temporarily fixed.
Then I now go for the storage of the furled sail on the boom ....... So far everything according to plan.........
Regards, Peter

And then it was exciting whether the size of the sail was right. This is just the ONLY pictures of my BN with a fully rigged Main Sail, because the next step is to store the sail furled on the boom:

The gaff must be pulled slightly more obliquely to tighten the sail. But I won't do that anymore. It’s a temporary rigging of the sail.
The secured sail on the boom with the 54 loose straps:

Fixed on the gaff:

A little more detail at the mast corner:

The ropes are not cut at the knot, because the loose ends are the handle parts to tied and untied the straps.
And the corner at the gaff jaws:

The 'spectacle iron' on the gaff stands not quite right, it is only temporarily fixed.
Then I now go for the storage of the furled sail on the boom ....... So far everything according to plan.........
Regards, Peter
Last edited:
JUST DON'T SNEEZE!So far everything according to plan.........
With a little breath from my nose she tacked and sailed ahead of the wind ……JUST DON'T SNEEZE!


