Hi Peter. Was wondering what you used to drill the 0.5 mm holes? Pin vise? Any suggestions on the best bits to use and where to buy them? They look great and I'd like to do this to mine as well. Thanks and Merry ChristmasI made some extra samples for the treenails. The size of 0,5 mm gives me the best view.
Supported by the Saga-info:
The outside of the treenails was 1 3/8" = 1.375" = 34,925 mm.
On scale 1:72 34,925 mm = 0,485 mm = 0,019".
In the drilled holes of 0,5 mm, a toothpick pointed in the Drawplate 22 fits well.
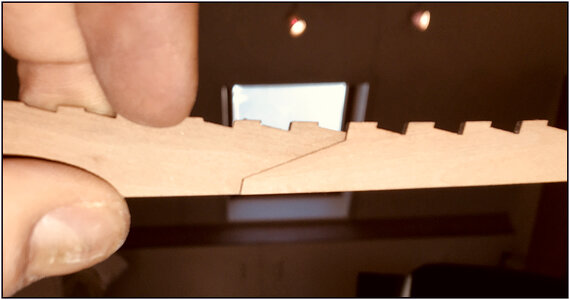
With this result on the finished frame 1, fitted in the keel:
View attachment 213563
I accentuated the treenails with the tip of a auto-pencil which is using 0.5mm fillings:
View attachment 213566
It is depending how flat the light floods over te frame to see more of less of the treenail it self or the accent.
The front and the back of the frame has 1 layer of mat varnish.
I also made a sample with the inside of the hole blackening with the pencil, but it gives no much extra on the view.
Regards, Peter
-

Win a Free Custom Engraved Brass Coin!!!
As a way to introduce our brass coins to the community, we will raffle off a free coin during the month of August. Follow link ABOVE for instructions for entering.
-

PRE-ORDER SHIPS IN SCALE TODAY!
The beloved Ships in Scale Magazine is back and charting a new course for 2026!
Discover new skills, new techniques, and new inspirations in every issue.
NOTE THAT OUR FIRST ISSUE WILL BE JAN/FEB 2026
- Home
- Forums
- Ships of Scale Group Builds and Projects
- Bluenose PoF Group Build
- Bluenose Group Build Logs
You are using an out of date browser. It may not display this or other websites correctly.
You should upgrade or use an alternative browser.
You should upgrade or use an alternative browser.
YUANQING BLUENOSE - Peter Voogt [COMPLETED BUILD]
- Thread starter Peter Voogt
- Start date
- Watchers 74
- Joined
- Nov 6, 2022
- Messages
- 243
- Points
- 113

Awesome for you to lay off the attack so quickly! If Robert E. Lee was in America, it would have to be dismantled like all the other statues and memorials of our war against each other. History is history, let it live. My daughter from Zoetermeer is here for Christmas Holiday...small world.
Hi Joe. I started with the ‘drilling and filling’, but after some frames I only used the technical pencil to impress the wood for a imitation treenail. For the hull planks I have drilled them all with the little electric Dremel and fitted them with the pointed toothpicks.Hi Peter. Was wondering what you used to drill the 0.5 mm holes? Pin vise? Any suggestions on the best bits to use and where to buy them? They look great and I'd like to do this to mine as well. Thanks and Merry Christmas
I buy my drill bits on AlieExpress:
—> Drill Bits <—
I got the range from 0,3 till 1,0 mm.
Regards, Peter
Last edited:
Thanks for you post, Dale. But I can't understand this quote:Awesome for you to lay off the attack so quickly! If Robert E. Lee was in America, it would have to be dismantled like all the other statues and memorials of our war against each other. History is history, let it live. My daughter from Zoetermeer is here for Christmas Holiday...small world.
Building 6 years over 2 time periodes is not quickly and I have never found a attack on my build.Awesome for you to lay off the attack so quickly!
But perhaps as a Dutch I do not understand some typical American pronunciations.
That’s correct. If you don't look at the past, you have no future. You can interpret that history and place it in the correct context.History is history, let it live.
That’s very nice. Which her ‘Prettige Feestdagen en een Gelukkig Nieuwjaar’. But that also for you and your beloved.My daughter from Zoetermeer is here for Christmas Holiday...small world.
Regards, Peter
Good morning Peter, I had some catching up to do, your BN is getting more and more beautiful. Really beautiful work you are doing. Merry Christmas to you and the family.
Thanks for the compliments, Tobias.Good morning Peter, I had some catching up to do, your BN is getting more and more beautiful. Really beautiful work you are doing. Merry Christmas to you and the family.
Regards, Peter
December 24th and 25th are a bit special for my BN.
On December 25th 2020 the first parts of the keel where glued together:
On December 24th 2021 I completed my first year of building with completing the deck beams:
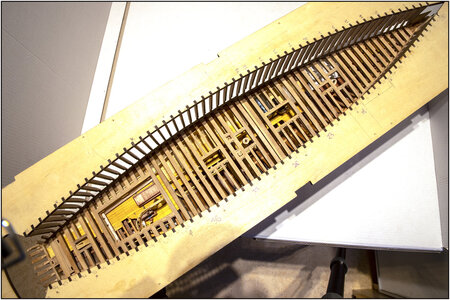
And now on December 24th 2022, I completed my second year of building with I the temporary placing the fore mast to align the shrouds and deadeyes:
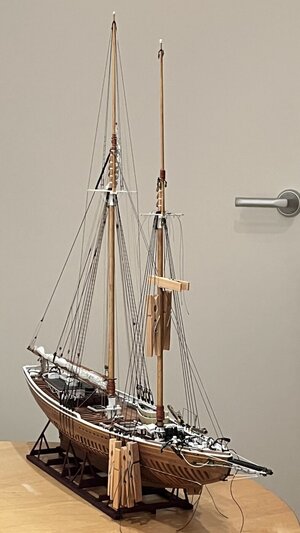
Up to the 3th year.
Regards, Peter
On December 25th 2020 the first parts of the keel where glued together:

On December 24th 2021 I completed my first year of building with completing the deck beams:

And now on December 24th 2022, I completed my second year of building with I the temporary placing the fore mast to align the shrouds and deadeyes:

Up to the 3th year.
Regards, Peter
Last edited:
Thanks as always Peter. You're a wealth of knowledge and experience to a fledgling shipwright like meHi Joe. I started with the ‘drilling and filling’, but after some frames I only used the technical pencil to impress the wood for a imitation treenail. For the hull planks I have drilled them all with the little electric Dremel and fitted them with the pointed toothpicks.
I buy my drill bits on AlieExpress:
—> Drill Bits <—
I got the range from 0,3 till 1,0 mm.
Regards, Peter
It's bad raining weather here, so I did something on the BN.
At the main mast I measuring the shrouds, determining the position of the deadeyes, which part I have to be served and which part I have to make white, in separate steps:
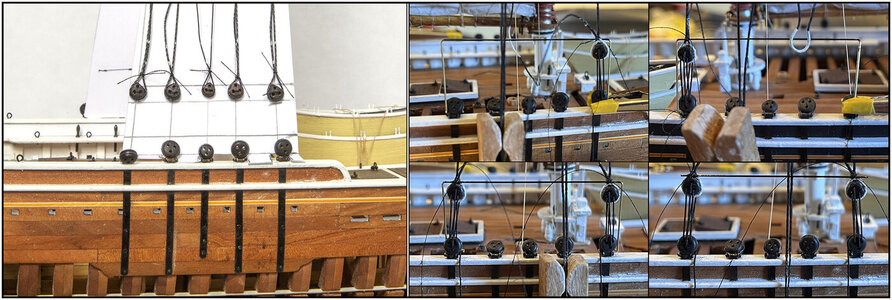
First:
photo left: made a paper template on which I had attached the deadeyes. Then the shrouds around it and marked the part to be coated with some white ink.
Afterwards:
photo on the right: a bracket made of brass, on which the shrouds were attached with the deadeyes, determined which part had to be made white and then fixed the whole thing definitively.
With the experience of those shrouds on the main mast, I can now skip a few steps by measuring some parts:
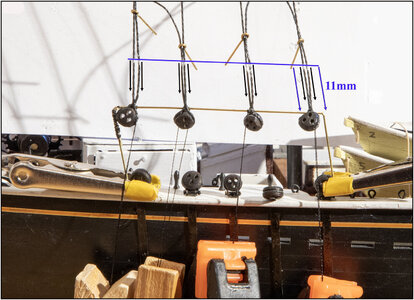
Placed the brass brackets, where the horizontal part will soon be cut off as the sheer pole, and measured the length of the shrouds and the position of the deadeyes on them and temporarily fixed them. Those eye pins are very helpful by keeping both parts together and manage the shrouds to hold them in position. Before serving I remove them.
At the blue line I put white markers on the lines. Between those white markings I will now serve the lines.
After that I will measure 11 mm/.43" inwards from both ends of the served part and mark that again. Between those 2 marks I paint it white.
Now let's see if theory goes hand in hand with practice.
Regards, Peter.
At the main mast I measuring the shrouds, determining the position of the deadeyes, which part I have to be served and which part I have to make white, in separate steps:

First:
photo left: made a paper template on which I had attached the deadeyes. Then the shrouds around it and marked the part to be coated with some white ink.
Afterwards:
photo on the right: a bracket made of brass, on which the shrouds were attached with the deadeyes, determined which part had to be made white and then fixed the whole thing definitively.
With the experience of those shrouds on the main mast, I can now skip a few steps by measuring some parts:

Placed the brass brackets, where the horizontal part will soon be cut off as the sheer pole, and measured the length of the shrouds and the position of the deadeyes on them and temporarily fixed them. Those eye pins are very helpful by keeping both parts together and manage the shrouds to hold them in position. Before serving I remove them.
At the blue line I put white markers on the lines. Between those white markings I will now serve the lines.
After that I will measure 11 mm/.43" inwards from both ends of the served part and mark that again. Between those 2 marks I paint it white.
Now let's see if theory goes hand in hand with practice.
Regards, Peter.
- Joined
- Sep 4, 2022
- Messages
- 127
- Points
- 113

Annd-d . . . you even bellywrinkled the left upright of that brass bracket.It's bad raining weather here, so I did something on the BN.
At the main mast I measuring the shrouds, determining the position of the deadeyes, which part I have to be served and which part I have to make white, in separate steps:
View attachment 347473
First:
photo left: made a paper template on which I had attached the deadeyes. Then the shrouds around it and marked the part to be coated with some white ink.
Afterwards:
photo on the right: a bracket made of brass, on which the shrouds were attached with the deadeyes, determined which part had to be made white and then fixed the whole thing definitively.
With the experience of those shrouds on the main mast, I can now skip a few steps by measuring some parts:
View attachment 347472
Placed the brass brackets, where the horizontal part will soon be cut off as the sheer pole, and measured the length of the shrouds and the position of the deadeyes on them and temporarily fixed them. Those eye pins are very helpful by keeping both parts together and manage the shrouds to hold them in position. Before serving I remove them.
At the blue line I put white markers on the lines. Between those white markings I will now serve the lines.
After that I will measure 11 mm/.43" inwards from both ends of the served part and mark that again. Between those 2 marks I paint it white.
Now let's see if theory goes hand in hand with practice.
Regards, Peter.
But the four eyepins?
No, deliberately slanted the bracket to position the deadeyes properly in line with the shrouds.Annd-d . . . you even bellywrinkled the left upright of that brass bracket.
But the four eyepins?
The eye pins are on the picture in one position but I shifted them several times up and down. A video would show it, but I have nothing with video’s.
Regards, Peter
Thanks, Heinrich. Indeed, time flies…… but as long as it flies …….. you can build models.A wonderful call-back to history of Year 1 and Year 2, Peter. I cannot believe how quickly these two years had gone. Best of luck with the third year - not that you need it, but by way of speaking!
Regards, Peter
- Joined
- Sep 3, 2021
- Messages
- 5,197
- Points
- 738

What a beautiful journey...December 24th and 25th are a bit special for my BN.
On December 25th 2020 the first parts of the keel where glued together:
View attachment 347263
On December 24th 2021 I completed my first year of building with completing the deck beams:
View attachment 347264
And now on December 24th 2022, I completed my second year of building with I the temporary placing the fore mast to align the shrouds and deadeyes:
View attachment 347262
Up to the 3th year.
Regards, Peter
- Joined
- Sep 3, 2021
- Messages
- 5,197
- Points
- 738

An open door, if anything, but this build log of yours has become required reading for anyone committed to building a Bluenose model, either POB or POF, both in terms of research and build quality.It's bad raining weather here, so I did something on the BN.
At the main mast I measuring the shrouds, determining the position of the deadeyes, which part I have to be served and which part I have to make white, in separate steps:
View attachment 347473
First:
photo left: made a paper template on which I had attached the deadeyes. Then the shrouds around it and marked the part to be coated with some white ink.
Afterwards:
photo on the right: a bracket made of brass, on which the shrouds were attached with the deadeyes, determined which part had to be made white and then fixed the whole thing definitively.
With the experience of those shrouds on the main mast, I can now skip a few steps by measuring some parts:
View attachment 347472
Placed the brass brackets, where the horizontal part will soon be cut off as the sheer pole, and measured the length of the shrouds and the position of the deadeyes on them and temporarily fixed them. Those eye pins are very helpful by keeping both parts together and manage the shrouds to hold them in position. Before serving I remove them.
At the blue line I put white markers on the lines. Between those white markings I will now serve the lines.
After that I will measure 11 mm/.43" inwards from both ends of the served part and mark that again. Between those 2 marks I paint it white.
Now let's see if theory goes hand in hand with practice.
Regards, Peter.
What a beautiful journey...
Thanks for your very kind words, Johan.An open door, if anything, but this build log of yours has become required reading for anyone committed to building a Bluenose model, either POB or POF, both in terms of research and build quality.
Regards, Peter
Hi Peter,There is always time for veering .........
After the HorsePower (HP) of the muscle cars, the WindPower (WP) of the ships last week, I had some time for MusclePower:
View attachment 346084
Cycled this afternoon with my road bicycle on the Tacx Neo-2 trainer behind my iMac through the Yorkshire Dales.
For the cycle-insiders: 35 km, 621 alto-meters, at the end the climb to Fleet Moss with a max of 19,3%, avrg. 1,88 w/kg.
Not bad for a BN-builder aged 65.(As a say this to myself
)
Regards, Peter
Maybe you have to start cycling with Nigel @NMBROOK, he was climbing Mont Ventoux from his living room.
The first SoS bicycle race.
True storyAn open door, if anything, but this build log of yours has become required reading for anyone committed to building a Bluenose model, either POB or POF, both in terms of research and build quality.


