Good morning Peter. I hope you and your family had an outstanding Christmas. A wonderful journey your BN has taken. Onto year 3- looking forward to it. Cheers GrantDecember 24th and 25th are a bit special for my BN.
On December 25th 2020 the first parts of the keel where glued together:
View attachment 347263
On December 24th 2021 I completed my first year of building with completing the deck beams:
View attachment 347264
And now on December 24th 2022, I completed my second year of building with I the temporary placing the fore mast to align the shrouds and deadeyes:
View attachment 347262
Up to the 3th year.
Regards, Peter
-

Win a Free Custom Engraved Brass Coin!!!
As a way to introduce our brass coins to the community, we will raffle off a free coin during the month of August. Follow link ABOVE for instructions for entering.
-

PRE-ORDER SHIPS IN SCALE TODAY!
The beloved Ships in Scale Magazine is back and charting a new course for 2026!
Discover new skills, new techniques, and new inspirations in every issue.
NOTE THAT OUR FIRST ISSUE WILL BE JAN/FEB 2026
- Home
- Forums
- Ships of Scale Group Builds and Projects
- Bluenose PoF Group Build
- Bluenose Group Build Logs
You are using an out of date browser. It may not display this or other websites correctly.
You should upgrade or use an alternative browser.
You should upgrade or use an alternative browser.
YUANQING BLUENOSE - Peter Voogt [COMPLETED BUILD]
- Thread starter Peter Voogt
- Start date
- Watchers 74
We can start the S.V.C.C. : the SoS Virtual Cycling Community,Hi Peter,
Maybe you have to start cycling with Nigel @NMBROOK, he was climbing Mont Ventoux from his living room.
The first SoS bicycle race.
 . But I think that’s very very off-topic.
Regards, Peter
True story
Good morning, Grant. Thanks for all of this.Good morning Peter. I hope you and your family had an outstanding Christmas. A wonderful journey your BN has taken. Onto year 3- looking forward to it. Cheers Grant
Hopefully your Christmas was also great with your family and/or friends.
I hope to post some interesting contributions in my BN 3rd year.
Regards, Voogt
Hi Peter, just catching up with your model again now after a long break. As always, your modelling standards are impeccable and you set a very high bar for the rest of us. I think 2023 will see the completion of your Bluenose and what a pleasant journey it has been 

Thanks for your compliments, Mark. I think you are right with the 2023 prediction for the completion.Hi Peter, just catching up with your model again now after a long break. As always, your modelling standards are impeccable and you set a very high bar for the rest of us. I think 2023 will see the completion of your Bluenose and what a pleasant journey it has been
Regards, Peter
After marking the parts to be served, the shrouds were removed from the mast and those 8 parts served.
Then made the markings between which I have to make them white:
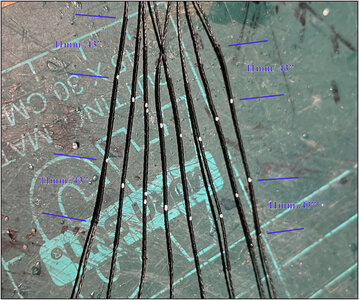
The markings at 11mm/.43" from both sides.
Waited a while before painting it white. Because check-check double-check, first put everything back on the mast and then see if everything is still correct.
The shrouds are finally fitted around the mast:
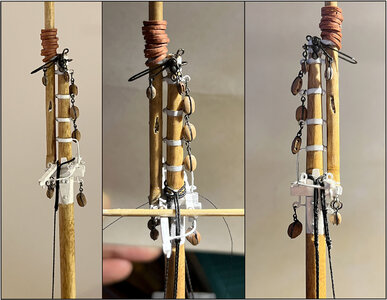
Left: the front swifter in place and temporarily secured around both deadeyes.
Middle: after the 2 starboard middle rigging, it was the turn of the 2 on port. That is the 3rd layer around the mast head. To neatly apply the seizing close to the mast, slightly lift the shrouds up the spreader bars with a toothpick.
Right: after the 3 seizings I could also tighten them temporarily. And on top the last swifter.
After checking whether the part to be whitened where still correct, made them white and first attached the two deadeyes to the front swifter. The ends here also with 3 seizings:
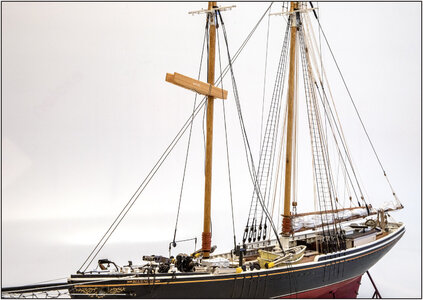
And the front swifter fixed on the 2 brackets that will later become sheer poles. This allowed me to align and fix the foremast evenly in the transverse direction.
After the necessary hours:
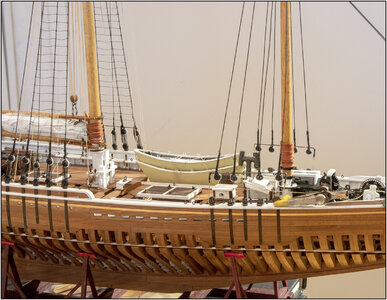
All 8 shrouds secured on both brackets.
The attentive reader may notice that I now apply a different order.
At the main mast I only made the shrouds to size and painted white after I had finished the whole mast with boom, gaff, sail etc.
Now I'm going to cut the sheer poles loose from the bracket, take the mast off the deck again and continue rigging.
Why different now? Just to try something different. See if that works too: rigging the deadeyes aligned at the sheer pole. So far no problems (yet).
But first show this stage at our D.B.B.S. meeting tomorrow.
Regards, Peter
Then made the markings between which I have to make them white:

The markings at 11mm/.43" from both sides.
Waited a while before painting it white. Because check-check double-check, first put everything back on the mast and then see if everything is still correct.
The shrouds are finally fitted around the mast:

Left: the front swifter in place and temporarily secured around both deadeyes.
Middle: after the 2 starboard middle rigging, it was the turn of the 2 on port. That is the 3rd layer around the mast head. To neatly apply the seizing close to the mast, slightly lift the shrouds up the spreader bars with a toothpick.
Right: after the 3 seizings I could also tighten them temporarily. And on top the last swifter.
After checking whether the part to be whitened where still correct, made them white and first attached the two deadeyes to the front swifter. The ends here also with 3 seizings:

And the front swifter fixed on the 2 brackets that will later become sheer poles. This allowed me to align and fix the foremast evenly in the transverse direction.
After the necessary hours:

All 8 shrouds secured on both brackets.
The attentive reader may notice that I now apply a different order.
At the main mast I only made the shrouds to size and painted white after I had finished the whole mast with boom, gaff, sail etc.
Now I'm going to cut the sheer poles loose from the bracket, take the mast off the deck again and continue rigging.
Why different now? Just to try something different. See if that works too: rigging the deadeyes aligned at the sheer pole.
But first show this stage at our D.B.B.S. meeting tomorrow.
Regards, Peter
You demonstrate remarkable patience Peter. I think this is because you enjoy the process as much as the finished product. I am able to do the same thing in fits and spurts, but you seem to be able to sustain that for the long haul. An excellent example to follow.
Thanks, Paul. I think your are right: the process is great fun and to find out if you went 'right around the corner', you can also go left?You demonstrate remarkable patience Peter. I think this is because you enjoy the process as much as the finished product. I am able to do the same thing in fits and spurts, but you seem to be able to sustain that for the long haul. An excellent example to follow.
That used to be with math too. You could usually solve a theorem in 2 ways. After one way, you knew right away if you had it right through the other.
Regards, Peter
Good morning Peter. You are the attention to detail master. Cheers GrantAfter marking the parts to be served, the shrouds were removed from the mast and those 8 parts served.
Then made the markings between which I have to make them white:
View attachment 349284
The markings at 11mm/.43" from both sides.
Waited a while before painting it white. Because check-check double-check, first put everything back on the mast and then see if everything is still correct.
The shrouds are finally fitted around the mast:
View attachment 349283
Left: the front swifter in place and temporarily secured around both deadeyes.
Middle: after the 2 starboard middle rigging, it was the turn of the 2 on port. That is the 3rd layer around the mast head. To neatly apply the seizing close to the mast, slightly lift the shrouds up the spreader bars with a toothpick.
Right: after the 3 seizings I could also tighten them temporarily. And on top the last swifter.
After checking whether the part to be whitened where still correct, made them white and first attached the two deadeyes to the front swifter. The ends here also with 3 seizings:
View attachment 349285
And the front swifter fixed on the 2 brackets that will later become sheer poles. This allowed me to align and fix the foremast evenly in the transverse direction.
After the necessary hours:
View attachment 349286
All 8 shrouds secured on both brackets.
The attentive reader may notice that I now apply a different order.
At the main mast I only made the shrouds to size and painted white after I had finished the whole mast with boom, gaff, sail etc.
Now I'm going to cut the sheer poles loose from the bracket, take the mast off the deck again and continue rigging.
Why different now? Just to try something different. See if that works too: rigging the deadeyes aligned at the sheer pole.So far no problems (yet).
But first show this stage at our D.B.B.S. meeting tomorrow.
Regards, Peter
- Joined
- Sep 3, 2021
- Messages
- 5,197
- Points
- 738

Again, after having seen this build in real life again, pictures just don't do justice to this beauty.After marking the parts to be served, the shrouds were removed from the mast and those 8 parts served.
Then made the markings between which I have to make them white:
View attachment 349284
The markings at 11mm/.43" from both sides.
Waited a while before painting it white. Because check-check double-check, first put everything back on the mast and then see if everything is still correct.
The shrouds are finally fitted around the mast:
View attachment 349283
Left: the front swifter in place and temporarily secured around both deadeyes.
Middle: after the 2 starboard middle rigging, it was the turn of the 2 on port. That is the 3rd layer around the mast head. To neatly apply the seizing close to the mast, slightly lift the shrouds up the spreader bars with a toothpick.
Right: after the 3 seizings I could also tighten them temporarily. And on top the last swifter.
After checking whether the part to be whitened where still correct, made them white and first attached the two deadeyes to the front swifter. The ends here also with 3 seizings:
View attachment 349285
And the front swifter fixed on the 2 brackets that will later become sheer poles. This allowed me to align and fix the foremast evenly in the transverse direction.
After the necessary hours:
View attachment 349286
All 8 shrouds secured on both brackets.
The attentive reader may notice that I now apply a different order.
At the main mast I only made the shrouds to size and painted white after I had finished the whole mast with boom, gaff, sail etc.
Now I'm going to cut the sheer poles loose from the bracket, take the mast off the deck again and continue rigging.
Why different now? Just to try something different. See if that works too: rigging the deadeyes aligned at the sheer pole.So far no problems (yet).
But first show this stage at our D.B.B.S. meeting tomorrow.
Regards, Peter
Thanks, Grant. That’s a tittle I had not jet earned.Good morning Peter. You are the attention to detail master. Cheers Grant
Regards, Peter
Thanks, Johan.Again, after having seen this build in real life again, pictures just don't do justice to this beauty.
Regards, Peter
The shipyard has been shut down for a while due to work being carried out. surgery on our dog's knee. But now back to work with the foremast.
Cut the brackets so it are sheer poles:
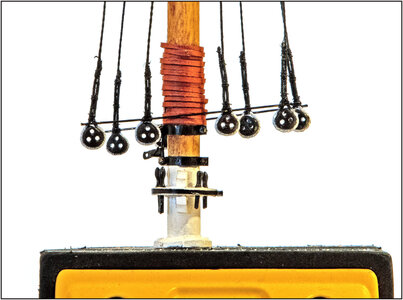
Put the mast in the vice to build it with topsail, boom, gaff etc.
First I'm going to work with the topsail again. The rigging is more extensive than at the main mast. I try to explain that with the drawings of MS/Lankford:
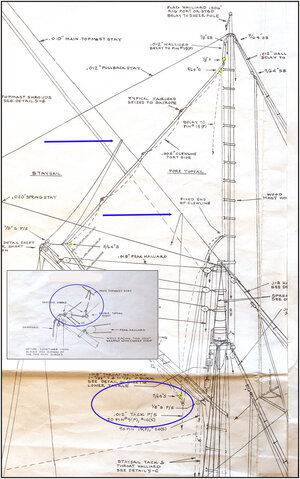
The sail must be able to be fed on the starboard and port side. It must be possible to get it over the topmast stay to be able to hang with the underside next to the peak halliard.
The sheet and the tack are double. The 2 blue arrows show how they fall over the stay.
All this, in contrast to the topsail on the main mast, which is only fed in 1 position.
As with the main mast, I store the sail on the mast and the gaff is also lowered. The tacks therefore come close to the mast and run on both sides of the stay and peak halliard to the mast foot.
The sheets get their maximum length to the end of the gaff, through 2 blocks at the claw and then to their belaying pins on the nail bank at the shrouds.
The lines of the Fisherman Staysail and its lines also run on the drawings. But that sail is stowed below deck. I have already fitted the halliard with its hook block and secured it to an eye on the nail bank next to that mast.
The sheet of this sail with a hook will still be attached to the foremast.
All in all, it gets a little complex. But the application goes step by step and I will try to visualize that clearly.
First the topsail made again from 1 layer of tissue:
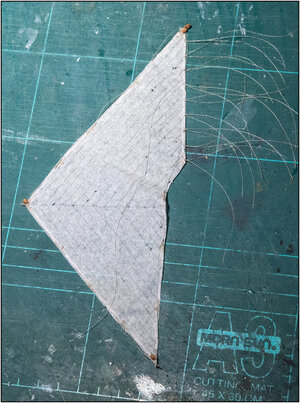
-on the 3 corners on the inside the 2.5mm/.10" blocks with the Serafil 120/2 0.15 mm/.006" clewline already through it;
-on top the 3mm/.11" block for the halliard;
-on the other 2 corners a loop for the sheets and tacks.
-on the side the 9 strings to attach the sail to the mast hoops.
Regards, Peter
Cut the brackets so it are sheer poles:

Put the mast in the vice to build it with topsail, boom, gaff etc.
First I'm going to work with the topsail again. The rigging is more extensive than at the main mast. I try to explain that with the drawings of MS/Lankford:

The sail must be able to be fed on the starboard and port side. It must be possible to get it over the topmast stay to be able to hang with the underside next to the peak halliard.
The sheet and the tack are double. The 2 blue arrows show how they fall over the stay.
All this, in contrast to the topsail on the main mast, which is only fed in 1 position.
As with the main mast, I store the sail on the mast and the gaff is also lowered. The tacks therefore come close to the mast and run on both sides of the stay and peak halliard to the mast foot.
The sheets get their maximum length to the end of the gaff, through 2 blocks at the claw and then to their belaying pins on the nail bank at the shrouds.
The lines of the Fisherman Staysail and its lines also run on the drawings. But that sail is stowed below deck.
The sheet of this sail with a hook will still be attached to the foremast.
All in all, it gets a little complex. But the application goes step by step and I will try to visualize that clearly.
First the topsail made again from 1 layer of tissue:

-on the 3 corners on the inside the 2.5mm/.10" blocks with the Serafil 120/2 0.15 mm/.006" clewline already through it;
-on top the 3mm/.11" block for the halliard;
-on the other 2 corners a loop for the sheets and tacks.
-on the side the 9 strings to attach the sail to the mast hoops.
Regards, Peter
Thanks, Stephan.The sails keep impressing me. They're so fragile.
The dog okay now?
She had a torn ACL/kruisband and had a bone correction to stabilize it. (TPLO) She is using her injured leg more and more on the few meters she is now allowed to walk.
Regards, Peter
- Joined
- Aug 8, 2019
- Messages
- 5,573
- Points
- 738

Spoil her a lot, she's deserve it.Thanks, Stephan.
She had a torn ACL/kruisband and had a bone correction to stabilize it. (TPLO) She is using her injured leg more and more on the few meters she is now allowed to walk.
Regards, Peter
- Joined
- Jan 9, 2020
- Messages
- 10,566
- Points
- 938

I hope the pooch is recovering quickly. I have 10 times more sympathy for dogs than humans when it comes to sickness or ill health - they are more deserving (like @Steef66 Stephan said). I ended up once sleeping for three months on the floor of our dining room (downstairs) to keep my Yorkshire terrier company after a hip operation. Only after she was allowed to climb stairs again, did I return to the bedroom. 

They're family!I hope the pooch is recovering quickly. I have 10 times more sympathy for dogs than humans when it comes to sickness or ill health - they are more deserving (like @Steef66 Stephan said). I ended up once sleeping for three months on the floor of our dining room (downstairs) to keep my Yorkshire terrier company after a hip operation. Only after she was allowed to climb stairs again, did I return to the bedroom.
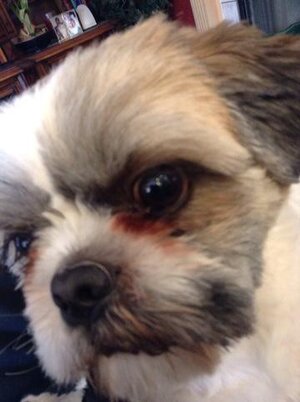
You are absolutely right, Heinrich. We have now slept for one week on the floor (me) or couch (Admiral). But the dog loved to sleep in her bench. It is now paying off that we have rewarded her from the beginning to lie down in that bench. It is now her familiar environment.I hope the pooch is recovering quickly. I have 10 times more sympathy for dogs than humans when it comes to sickness or ill health - they are more deserving (like @Steef66 Stephan said). I ended up once sleeping for three months on the floor of our dining room (downstairs) to keep my Yorkshire terrier company after a hip operation. Only after she was allowed to climb stairs again, did I return to the bedroom.
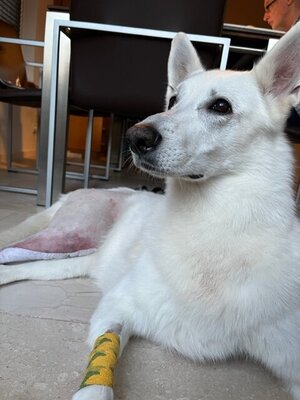
Her hip looks stable and uses her leg normally again. The hair on her leg is growing and the discoloration is already disappearing.
Regards, Peter


