A very nice assembly procedure that should work out well when the ribs are completed. RichAfter some questions on the Dutch forum, a picture how I glue the frames.
Working from frame 25, alternately a frame to the bow and to the stern.
Perhaps a overkill, but .....
View attachment 232806
-a frame with a clamp on the keel, to prevent it from being pulled down when further tightening;
- glued the ends of the frames into the jig and tensioned them in the frames with a slat. Under the jig a few frame boards because I have the jig on 2 aluminum profiles for perfectly flat. So the ends will not go lower then the underside of the jig;
-between the frames fit exactly 2 frame boards. Because some rafters are slightly curved (or not 90,000 degree angled overall) and now dry right next to each other.
Regards, Peter
-

Win a Free Custom Engraved Brass Coin!!!
As a way to introduce our brass coins to the community, we will raffle off a free coin during the month of August. Follow link ABOVE for instructions for entering.
-

PRE-ORDER SHIPS IN SCALE TODAY!
The beloved Ships in Scale Magazine is back and charting a new course for 2026!
Discover new skills, new techniques, and new inspirations in every issue.
NOTE THAT OUR FIRST ISSUE WILL BE JAN/FEB 2026
- Home
- Forums
- Ships of Scale Group Builds and Projects
- Bluenose PoF Group Build
- Bluenose Group Build Logs
You are using an out of date browser. It may not display this or other websites correctly.
You should upgrade or use an alternative browser.
You should upgrade or use an alternative browser.
YUANQING BLUENOSE - Peter Voogt [COMPLETED BUILD]
- Thread starter Peter Voogt
- Start date
- Watchers 74
Thanxs Rich,A very nice assembly procedure that should work out well when the ribs are completed. Rich
Step by step you see everybody invents there own details by the assembly.
Regards, Peter
During the installation of the frames, a "nose" broke off. Not surprising when the grain of the wood is crosswise. Put a new one:
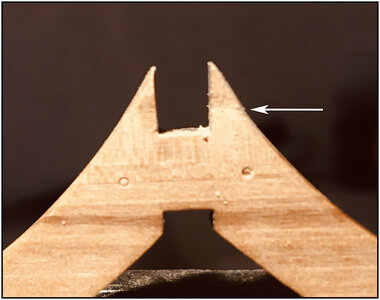
(Sorry, not sharp)
With the frames I am now halfway:

The noses fit nicely with the bevel in the rabbet:

During the drying periods in the framing-proces, I am looking to the next steps: the keelson and frame board.
Special to the nails in them.
In the manual I could not find much about them, but on the drawing 8.2, fig 7 and 8:

With the translated text:
“Use D186 copper wire to simulate copper nails. Drill holes with a 0.6 mm drill bit, then nail them, cut them, and grind them smoothly.”
I didn't really like the use of this copper wire that way:
1: to bling-bling;
2: every time after cutting a piece of wire, you have to point it a little bit before you can put it in the next hole;
3: They put it in the seam of the front and rear frame.
I dived into my stock and came across 0.7 mm iron nails.
I am quite fond of using the cup-burrs. Therefore:
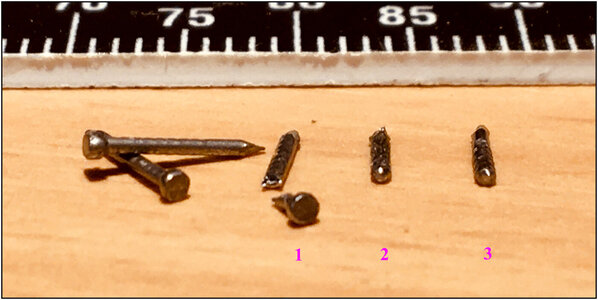
1: cut off the head (as much action as cutting the copper wire)
2: round off with the large cup-burr;
3: make a the inner cup with the smaller cup-burr;
4: the nails has already there point.
Test done:
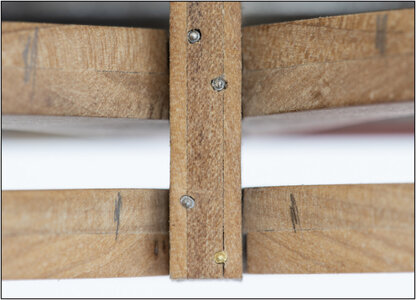
With 2 nails for each frame, in the front and the rear frame. A kind of wire ends with nut and washer.
On the bottom of the picture the first nail, made of a brass. That’s not what I liked. And why I not want to nail in een seam.
It's acceptable. I have to drill neat holes. And the real keelson is massieve and not laminated.
During the drying breaks of the rest of the frames I can now work about 200 nails.
Regards, Peter

(Sorry, not sharp)
With the frames I am now halfway:

The noses fit nicely with the bevel in the rabbet:

During the drying periods in the framing-proces, I am looking to the next steps: the keelson and frame board.
Special to the nails in them.
In the manual I could not find much about them, but on the drawing 8.2, fig 7 and 8:

With the translated text:
“Use D186 copper wire to simulate copper nails. Drill holes with a 0.6 mm drill bit, then nail them, cut them, and grind them smoothly.”
I didn't really like the use of this copper wire that way:
1: to bling-bling;
2: every time after cutting a piece of wire, you have to point it a little bit before you can put it in the next hole;
3: They put it in the seam of the front and rear frame.
I dived into my stock and came across 0.7 mm iron nails.
I am quite fond of using the cup-burrs. Therefore:

1: cut off the head (as much action as cutting the copper wire)
2: round off with the large cup-burr;
3: make a the inner cup with the smaller cup-burr;
4: the nails has already there point.
Test done:

With 2 nails for each frame, in the front and the rear frame. A kind of wire ends with nut and washer.
On the bottom of the picture the first nail, made of a brass. That’s not what I liked. And why I not want to nail in een seam.
It's acceptable. I have to drill neat holes. And the real keelson is massieve and not laminated.
During the drying breaks of the rest of the frames I can now work about 200 nails.
Regards, Peter
Last edited:
Looking good Peter, nice progress!During the installation of the frames, a "nose" broke off. Not surprising when the grain of the wood is crosswise. Put a new one:
View attachment 233088
(Sorry, not sharp)
With the frames I am now halfway:
View attachment 233089
The noses fit nicely with the bevel in the rabbet:
View attachment 233090
During the drying periods in the framing-proces, I am looking to the next steps: the keelson and frame board.
Special to the nails in them.
In the manual I could not find much about them, but on the drawing 8.2, fig 7 and 8:
View attachment 233091
With the translated text:
“Use D186 copper wire to simulate copper nails. Drill holes with a 0.6 mm drill bit, then nail them, cut them, and grind them smoothly.”
I didn't really like the use of this copper wire that way:
1: to bling-bling;
2: every time after cutting a piece of wire, you have to point it a little bit before you can put it in the next hole;
3: They put it in the seam of the front and rear frame.
I dived into my stock and came across 0.7 mm iron nails.
I am quite fond of using the cup-burrs. Therefore:
View attachment 233092
1: cut off the head (as much action as cutting the copper wire)
2: round off with the large cup-burr;
3: make a the inner cup with the smaller cup-burr;
4: the nails has already there point.
Test done:
View attachment 233093
With 2 nails for each frame, in the front and the rear frame. A kind of wire ends with nut and washer.
On the bottom of the picture the first nail, made of a brass. That’s not what I liked.
It's acceptable. I have to drill neat holes.
During the drying breaks of the rest of the frames I can now work about 200 nails.
Regards, Peter
Thanxs Dean. AL-FI kept whispering in my earLooking good Peter, nice progress!
Regards, Peter
It starts out as a whisper, but can become a shout if you don't listen...ha ha!Thanxs Dean. AL-FI kept whispering in my ear
Regards, Peter
Looks like you have it "nailed" with your creative approach. RichIt starts out as a whisper, but can become a shout if you don't listen...ha ha!
Hi Rich. I like the ‘creative appproch’. I can ad CA to AL-FI, but other readers will have to go through the report to know it has nothing to do with glueLooks like you have it "nailed" with your creative approach. Rich
Regards, Peter
Last edited:
Phoe ............. the frames are done. You have to turn off your mind a little bit, but at the end:


And the traditional Cathedral, special fort @Jimsky :
:
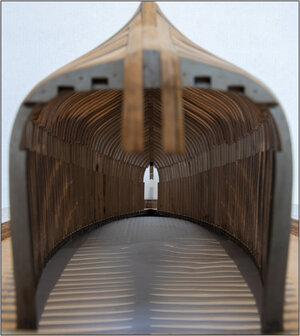
In a other build-log, someone alerted to the silhouette at the end .....
Moments later, a film was shown. Some stills:
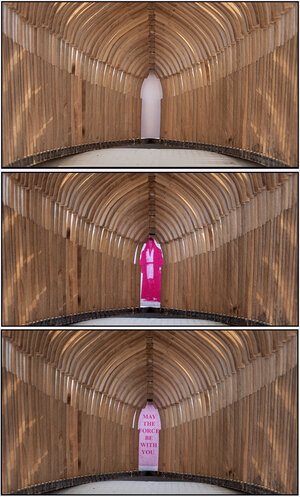
Perhaps Darth Vader fits more. But I am more of the 'Positive Site'.
Up to the bow and stern parts.
Regards, Peter


And the traditional Cathedral, special fort @Jimsky

In a other build-log, someone alerted to the silhouette at the end .....
Moments later, a film was shown. Some stills:

Perhaps Darth Vader fits more. But I am more of the 'Positive Site'.
Up to the bow and stern parts.
Regards, Peter
Last edited:
- Joined
- Oct 28, 2018
- Messages
- 760
- Points
- 403

TaTaTa-Tatada_Tatada (the music is missing) (John Williams)
en te voice of Obi-Wan Kenobi (used the phrase throughout his life)
Beautiful Peter
en te voice of Obi-Wan Kenobi (used the phrase throughout his life)
Beautiful Peter
Thanxs for the responseTaTaTa-Tatada_Tatada (the music is missing) (John Williams)
en te voice of Obi-Wan Kenobi (used the phrase throughout his life)
Beautiful Peter
You have to do something to keep communication and the interaction with your followers alive
Regards, Peter
Peter, congrats on your milestone! "Just awesome! 
... and when at last the work is done, don't sit down, it's time to dig another one...

... and when at last the work is done, don't sit down, it's time to dig another one...
Well done and evenly placed frames will provide the solid and flowing formwork for the hull planking to follow. Rich (PT-2)Peter, congrats on your milestone! "Just awesome!
... and when at last the work is done, don't sit down, it's time to dig another one...
Congrats on the first milestone...now for the fun of working down inside the frames! 
Peter, congrats on your milestone! "Just awesome!
... and when at last the work is done, don't sit down, it's time to dig another one...
Well done and evenly placed frames will provide the solid and flowing formwork for the hull planking to follow. Rich (PT-2)
Thanks you all, for the reply’s and likes.Congrats on the first milestone...now for the fun of working down inside the frames!
Now some work on the outside and then down to the inside ...... Keelson, frame boards, beams ......
Down and out
It can't be helped but there's a lot of it about
Regards, Peter
- Joined
- Oct 28, 2018
- Messages
- 760
- Points
- 403

You are well informed Heinrich,Beautiful work Peter! The wooden cathedral indeed exhibits a church-like ambience! not unlike that of the Onze-Lieve-Vrouwe. I am waiting for the organist to open up that 3780-pipe Stumpfler.
Onze Lieve Vrouwe (Tower) is located in my hometown Amersfoort
Beautiful work Peter! The wooden cathedral indeed exhibits a church-like ambience! not unlike that of the Onze-Lieve-Vrouwe. I am waiting for the organist to open up that 3780-pipe Stumpfler.
Thanks Heinrich and Henk.You are well informed Heinrich,
Onze Lieve Vrouwe (Tower) is located in my hometown Amersfoort
I was thinking about the Müller organ in the St Bavo in Haarlem with more then 5000 pipes. With something special: the black keys are double. Because the sharp and the flat are different from intonation. And then playing: Suite Gothique from Leon Boellmann, specially the Toccata.
Regards, Peter
Last edited:
- Joined
- Apr 20, 2020
- Messages
- 6,242
- Points
- 738

my dear friendPhoe ............. the frames are done. You have to turn off your mind a little bit, but at the end:
View attachment 233582
View attachment 233583
And the traditional Cathedral, special fort @Jimsky:
View attachment 233584
In a other build-log, someone alerted to the silhouette at the end .....
Moments later, a film was shown. Some stills:
View attachment 233585
Perhaps Darth Vader fits more. But I am more of the 'Positive Site'.
Up to the bow and stern parts.
Regards, Peter
it's looks beautiful, great job

Thank you, Shota.my dear friend
it's looks beautiful, great job

Regards, Peter

