Wow! Excellent photos of a phenomenal build! Congrats Peter, you really have built the BN model to set the bar! 
-

Win a Free Custom Engraved Brass Coin!!!
As a way to introduce our brass coins to the community, we will raffle off a free coin during the month of August. Follow link ABOVE for instructions for entering.
-

PRE-ORDER SHIPS IN SCALE TODAY!
The beloved Ships in Scale Magazine is back and charting a new course for 2026!
Discover new skills, new techniques, and new inspirations in every issue.
NOTE THAT OUR FIRST ISSUE WILL BE JAN/FEB 2026
- Home
- Forums
- Ships of Scale Group Builds and Projects
- Bluenose PoF Group Build
- Bluenose Group Build Logs
You are using an out of date browser. It may not display this or other websites correctly.
You should upgrade or use an alternative browser.
You should upgrade or use an alternative browser.
YUANQING BLUENOSE - Peter Voogt [COMPLETED BUILD]
- Thread starter Peter Voogt
- Start date
- Watchers 74
Thanks for the compliments, Dean.Wow! Excellent photos of a phenomenal build! Congrats Peter, you really have built the BN model to set the bar!
Sure, I ‘set a bar’. But please for all the others BN builders: it’s not THE bar and it’s not THE standerd, (or all the other nice qualifications I saw passing by.)
Please go on with the build of your BN’s and keep on posting in your build-log’s. For sure I like every build, because you are building. And when my build is inspiring you to raise your bar for a detail of a part, then that just makes me very happy.
Regards, Peter
- Joined
- Oct 11, 2021
- Messages
- 740
- Points
- 403

Thanks for the compliments, Dean.
Sure, I ‘set a bar’. But please for all the others BN builders: it’s not THE bar and it’s not THE standerd, (or all the other nice qualifications I saw passing by.)
Please go on with the build of your BN’s and keep on posting in your build-log’s. For sure I like every build, because you are building. And when my build is inspiring you to raise your bar for a detail of a part, then that just makes me very happy.
Regards, Peter
This one is THE standard and THE bar period!
Then we disagreeThis one is THE standard and THE bar period!
Regards, Peter
Made a start with the showcase by collecting the necessary materials.
On the OcCre site I found these profiles:
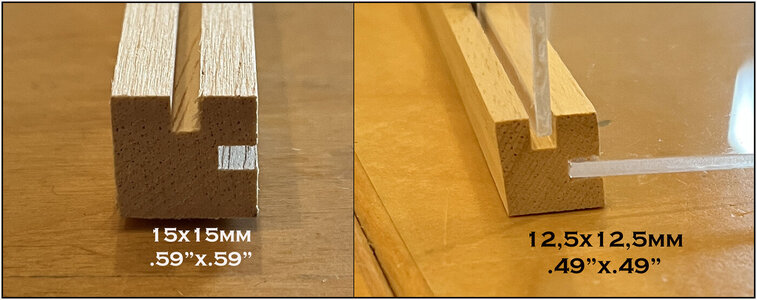
They are 15x15mm / .59"x.59" with 3mm / .12" rabbets.
That was just a bit too thick. Put through the thicknesser at a friend of mine to 12.5x12.5mm / .49"x.49". Not much off but just enough to make it more slender. On the right there is 2mm plexiglass. The corners are still chamfered.
OcCre also had these corner reinforcements:
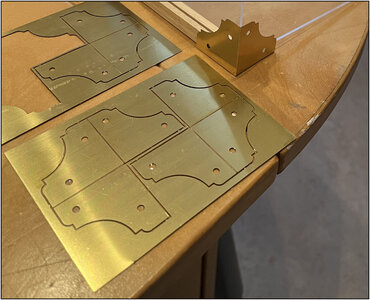
But on those coming up? It also depends on how that will look and how neatly I can make the corner joints.
Bought this from a large store for LED strips:

-3 meters of 2-tone white dimmable LED strip, 60 double LEDs per meter
-'controller'
-battery
I already had the remote control for the LED on the Robt. E Lee.
The LED strips can be cut every 10cm /3.94".
With the soft-tone LED's:
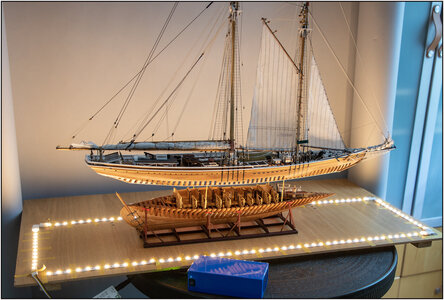
With the white LED's:
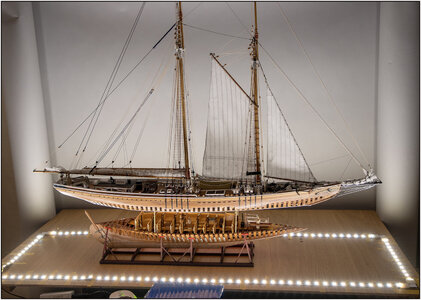
For my Bluenose that will be a rectangle of 80x20cm / 31.49"x7.88".
The LEDs draw sharply here, but gonne lie in the glass seam.
I fixed the LED strip on a temporary shelf to measure various sizes. I have to take into account the coupling pieces:
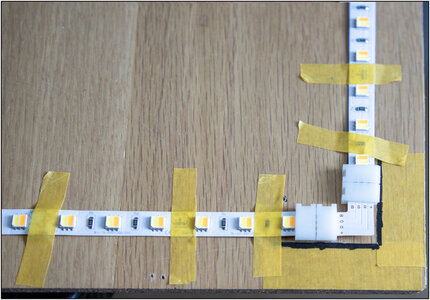
Schematically, an inner plate and the profile slats will be placed on the outside against the LEDs, so that a slot of 3 mm wide and 3 mm high is created.
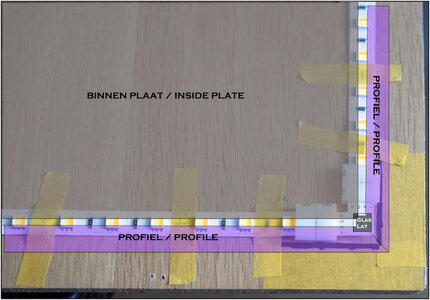
The glass plates will fall into this, with the glazing bars resting on the corner pieces. Rubber blocks are placed between the LEDs to prevent the weight of the glass from resting on the LEDs.
I now have to measure these parts, taking into account the width of the LEDs of 4.9mm / .19".
-the base plate on which the LED strips are glued.
-the inner plate that will fall over the ground bond of the LED strip until just slightly over the inside of the LEDs. And protrudes 3 mm above the LEDs.
-the profile on the outside that falls in a similar way to just slightly over the outside of the LEDs, also 3 mm above it.
-the thickness of the profile on the outside is as high as the thickness of the base plate and the inner plate.
Anyway, still a lot to measure and puzzle.
Regards, Peter
On the OcCre site I found these profiles:

They are 15x15mm / .59"x.59" with 3mm / .12" rabbets.
That was just a bit too thick. Put through the thicknesser at a friend of mine to 12.5x12.5mm / .49"x.49". Not much off but just enough to make it more slender. On the right there is 2mm plexiglass. The corners are still chamfered.
OcCre also had these corner reinforcements:

But on those coming up? It also depends on how that will look and how neatly I can make the corner joints.
Bought this from a large store for LED strips:

-3 meters of 2-tone white dimmable LED strip, 60 double LEDs per meter
-'controller'
-battery
I already had the remote control for the LED on the Robt. E Lee.
The LED strips can be cut every 10cm /3.94".
With the soft-tone LED's:

With the white LED's:

For my Bluenose that will be a rectangle of 80x20cm / 31.49"x7.88".
The LEDs draw sharply here, but gonne lie in the glass seam.
I fixed the LED strip on a temporary shelf to measure various sizes. I have to take into account the coupling pieces:

Schematically, an inner plate and the profile slats will be placed on the outside against the LEDs, so that a slot of 3 mm wide and 3 mm high is created.

The glass plates will fall into this, with the glazing bars resting on the corner pieces. Rubber blocks are placed between the LEDs to prevent the weight of the glass from resting on the LEDs.
I now have to measure these parts, taking into account the width of the LEDs of 4.9mm / .19".
-the base plate on which the LED strips are glued.
-the inner plate that will fall over the ground bond of the LED strip until just slightly over the inside of the LEDs. And protrudes 3 mm above the LEDs.
-the profile on the outside that falls in a similar way to just slightly over the outside of the LEDs, also 3 mm above it.
-the thickness of the profile on the outside is as high as the thickness of the base plate and the inner plate.
Anyway, still a lot to measure and puzzle.
Regards, Peter
Those Leds will make for a stunning presentation. Will you have any on the top of the display case shining down?
Wow. I can look at these all day.With the ultimate intended result: The Pull-Apart-Model:
View attachment 371035
View attachment 371036
Her imposing bow:
View attachment 371037
Whereby you can now also see the inside-bottom:
View attachment 371038
A little zoomed in and with some details.
The front:
View attachment 371039
The Middle:
View attachment 371040
The aft:
View attachment 371041
With the open Main Cabin to look inside:
View attachment 371042
View attachment 371043
More to come ......
Have you thought how you will accomplish the joinery? Are you just going to depend on the brass corners to hold the frames together?Made a start with the showcase by collecting the necessary materials.
On the OcCre site I found these profiles:
View attachment 372729
They are 15x15mm / .59"x.59" with 3mm / .12" rabbets.
That was just a bit too thick. Put through the thicknesser at a friend of mine to 12.5x12.5mm / .49"x.49". Not much off but just enough to make it more slender. On the right there is 2mm plexiglass. The corners are still chamfered.
OcCre also had these corner reinforcements:
View attachment 372730
But on those coming up? It also depends on how that will look and how neatly I can make the corner joints.
Bought this from a large store for LED strips:
View attachment 372731
-3 meters of 2-tone white dimmable LED strip, 60 double LEDs per meter
-'controller'
-battery
I already had the remote control for the LED on the Robt. E Lee.
The LED strips can be cut every 10cm /3.94".
With the soft-tone LED's:
View attachment 372732
With the white LED's:
View attachment 372733
For my Bluenose that will be a rectangle of 80x20cm / 31.49"x7.88".
The LEDs draw sharply here, but gonne lie in the glass seam.
I fixed the LED strip on a temporary shelf to measure various sizes. I have to take into account the coupling pieces:
View attachment 372734
Schematically, an inner plate and the profile slats will be placed on the outside against the LEDs, so that a slot of 3 mm wide and 3 mm high is created.
View attachment 372735
The glass plates will fall into this, with the glazing bars resting on the corner pieces. Rubber blocks are placed between the LEDs to prevent the weight of the glass from resting on the LEDs.
I now have to measure these parts, taking into account the width of the LEDs of 4.9mm / .19".
-the base plate on which the LED strips are glued.
-the inner plate that will fall over the ground bond of the LED strip until just slightly over the inside of the LEDs. And protrudes 3 mm above the LEDs.
-the profile on the outside that falls in a similar way to just slightly over the outside of the LEDs, also 3 mm above it.
-the thickness of the profile on the outside is as high as the thickness of the base plate and the inner plate.
Anyway, still a lot to measure and puzzle.
Regards, Peter
As always I'm fascinated by you imagineering. The LED's are a nice touch,
Jan
Jan
Hi Daniel. The LED’s shine from the bottom upwards through the vertical glasses and will radiate slightly to the side. That will certainly reflex a bit via the top flat glass and hopefully give some extra lighting from above. That’s the theory …….Those Leds will make for a stunning presentation. Will you have any on the top of the display case shining down?
Regards, Peter
Well, Grant, my build-log is open every day 24/7 ……… You are more than welcome.Wow. I can look at these all day.
Regards, Peter
Last edited:
Hi Phil.Have you thought how you will accomplish the joinery? Are you just going to depend on the brass corners to hold the frames together?
My starting point is everything mitered with double 45 dgr on all the profiles on all 4 corners. But that will require precise calculations for the dimensions of the glass that is in the recessed recesses. But I have all the time.
Have the brass corners come along just to be sure.
Regards, Peter
Hi Jan. Hopefully, what was conceived in theory will come true in practice.As always I'm fascinated by you imagineering. The LED's are a nice touch,
Jan
Regards, Peter
It'll be beautiful. Glass or acrylic? Either way, it'll be better than dust huh? Looking forward to seeing pics!Hi Phil.
My starting point is everything mitered with double 45 dgr on all the profiles on all 4 corners. But that will require precise calculations for the dimensions of the glass that is in the recessed recesses. But I have all the time.
Have the brass corners come along just to be sure.
Regards, Peter
Thanks for this nice words, Mark.Simply magnificent work Peter! The photos of your unique BN photos are sensational and, naturally, you have set a bar in excellence that leaves the rest of us in the shade
About this quote:
How can an elegant Bluenose that produced so little shade, cast it over so many Bluenose's from other builders?You have set a bar ……. that leaves the rest of us in the shade
They all deserve the high-light
 , please keep on adding your build-log’s!
Regards, Peter
Not much to mention, still preparing. An intermediate step to show the whole process.
Removed the connectors in the corners of the LED strips. Because of the thickness and width I would have to saw quite a few recesses in the inner plate and side profiles. The LED strip connected together with soldered wires:
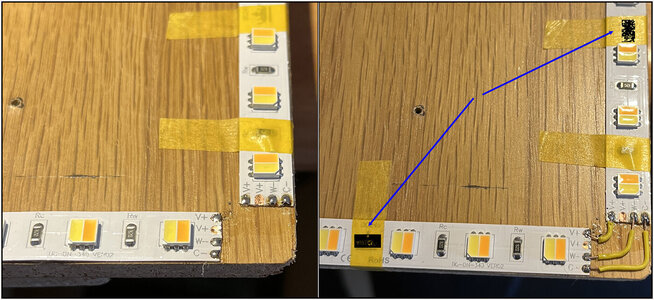
First some solder on the contact points, then the wires. The rubber blocks will later be added to the arrows to support the glass and that this glass does not press on the LEDs.
Saw a test with the showcase parts.
First made a number of square pieces of exactly 100mm/3.937" from 3mm perspex.
Then sawn 3 slats with the double corners.
Those parts put together:
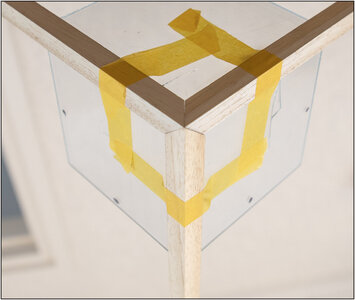
With some fine tuning I think it will work without metal corner pieces. Just the wood is more neat.
With 2 perspex squares per side in the 2 corners, I can measure the size of the glass = 2x the 100 mm of the two pieces of perspex + the space in between.
Now first saw the bottom plate so that I will use it as a starting point. A mm more or less will soon make a lot of difference when sawing the profiles and the size of the windows.
Regards, Peter
Removed the connectors in the corners of the LED strips. Because of the thickness and width I would have to saw quite a few recesses in the inner plate and side profiles. The LED strip connected together with soldered wires:

First some solder on the contact points, then the wires. The rubber blocks will later be added to the arrows to support the glass and that this glass does not press on the LEDs.
Saw a test with the showcase parts.
First made a number of square pieces of exactly 100mm/3.937" from 3mm perspex.
Then sawn 3 slats with the double corners.
Those parts put together:

With some fine tuning I think it will work without metal corner pieces. Just the wood is more neat.
With 2 perspex squares per side in the 2 corners, I can measure the size of the glass = 2x the 100 mm of the two pieces of perspex + the space in between.
Now first saw the bottom plate so that I will use it as a starting point. A mm more or less will soon make a lot of difference when sawing the profiles and the size of the windows.
Regards, Peter
Last edited:
This will be beautiful Peter! Look forward to the finished display. Also it’s a safer way to move the ship. 
I have yet to build a case for any of my ships.
I have yet to build a case for any of my ships.
Canoe21
Lawrence
Hello Peter, Your idea is very nice and a bit more fancy than the display cases that I have built, but then again you are much more skilled than I am, Well Done.
Regards Lawrence
Regards Lawrence
Thanks, Dean. Hopefully this week more time to spend on the display.This will be beautiful Peter! Look forward to the finished display. Also it’s a safer way to move the ship.
I have yet to build a case for any of my ships.
Regards, Peter


