Yes, I am a great fan of Escher. But what he made is far above of my skills.By the looks of it you also took lessons from Escher.
-

Win a Free Custom Engraved Brass Coin!!!
As a way to introduce our brass coins to the community, we will raffle off a free coin during the month of August. Follow link ABOVE for instructions for entering.
-

PRE-ORDER SHIPS IN SCALE TODAY!
The beloved Ships in Scale Magazine is back and charting a new course for 2026!
Discover new skills, new techniques, and new inspirations in every issue.
NOTE THAT OUR FIRST ISSUE WILL BE JAN/FEB 2026
- Home
- Forums
- Ships of Scale Group Builds and Projects
- Bluenose PoF Group Build
- Bluenose Group Build Logs
You are using an out of date browser. It may not display this or other websites correctly.
You should upgrade or use an alternative browser.
You should upgrade or use an alternative browser.
YUANQING BLUENOSE - Peter Voogt [COMPLETED BUILD]
- Thread starter Peter Voogt
- Start date
- Watchers 74
Thanxs, Jan. I also like to pay a little attention to the photos.Incredible work. The pictures show it well.
Jan
Thanxs, Paul. I appreciate this compliment from you!I agree with our colleagues - this is top-notch ship building Peter.
I love M.C. Escher!
Thank you very much, Dean. Just like with your NL, starting the planking set everything in a new perspective.Great job Peter! Now she starts to look like a ship, and begins to show her lines!
Hi Shota. For you also: Thanxs for this compliments!Dear Peter
I agree with our friends, you are doing wonderful work, The stage you came up with the model looks impressive and beautiful. well done
- Joined
- Oct 28, 2018
- Messages
- 760
- Points
- 403

Looks very nice with the planking, and as always beautiful photos.
On 555 Bulwalk.jpg and 556 Bulwalk.jpg I see a black line.
Do you use a guide to fix the planking?
If so how do you do this?
Gr
Henk
On 555 Bulwalk.jpg and 556 Bulwalk.jpg I see a black line.
Do you use a guide to fix the planking?
If so how do you do this?
Gr
Henk
(Besides my wrong typo in the file namesOn 555 Bulwalk.jpg and 556 Bulwalk.jpg I see a black line.
Do you use a guide to fix the planking?
If so how do you do this?
I first put them dry-fit on the frames and put marking lines with a pencil. But those can’t be seen.
Last edited:
- Joined
- Oct 28, 2018
- Messages
- 760
- Points
- 403

- Joined
- Jan 9, 2020
- Messages
- 10,566
- Points
- 938

@Henk Liebre Hello Henk. I do not want to answer on behalf of Peter, but I see that he is not online at the moment. If I am not mistaken, that is the saw line where the hull was sawn in two.
- Joined
- Oct 28, 2018
- Messages
- 760
- Points
- 403

Hello Heinrich
Of course
Dom Dom Dom
Not realized
Focus on my own build
Occasionally not sharp on a Sunday morning, first coffee again
Just indicate how sharp the line is, that it happens to a rope line
Thanks for your attention
Greetings
Henk
Of course
Dom Dom Dom
Not realized
Focus on my own build
Occasionally not sharp on a Sunday morning, first coffee again
Just indicate how sharp the line is, that it happens to a rope line
Thanks for your attention
Greetings
Henk
Last edited:
- Joined
- Sep 3, 2021
- Messages
- 5,199
- Points
- 738

I think Peter's doing it on purpose; I had extreme difficulty in getting the perspective right of one of his pictures: 554 Bulwalk.jpg. This morning again, even after three coffees...Hallo Heinrich
Natuurlijk
Dom Dom Dom
Niet gerealiseerd
Focus op mijn eigen build
Af en toe niet scherp op een zondagochtend, eerste koffie weer
Geef maar aan hoe scherp de lijn is, dat het een touwlijn overkomt
Bedankt voor uw aandacht
Groeten
Henk
Goes without saying though; excellent craftmanship and not just the saw cut of the hull.
- Joined
- Oct 28, 2018
- Messages
- 760
- Points
- 403

AgreeGoes without saying though; excellent craftmanship and not just the saw cut of the hull.
After coffee moments I translated my text again
Thanxs Heinrich, for answering the question. Some time offline, because of walking with my Admiral and the White Shepherd.
On the starboard side I have already filled the saw cut with a white strip. Which is then equal to the waterline stripe.
On that side I was already able to apply it because that side is not planked beyond the waterline. And to sand the strip smooth on the curve of the frames of the hull.
The port side will be planked. Then the strip comes in once the planks have been installed. I then sand the strip flat on the planking.
And yes, that means the saw will reappear soon. Because the planks also have to be sawn through again. They run longitudinally largely parallel to the sheer and not to the waterline. But only towards the keel flat.
For the port side I was forgotten to take pictures how I aligned the 2 parts. Now for the starboard side, I took some time.
Perhaps interesting for the other builders.
On the foredeck, 2 slats with the thickness of the scuppers, were inserted through the front and rear scuppers:
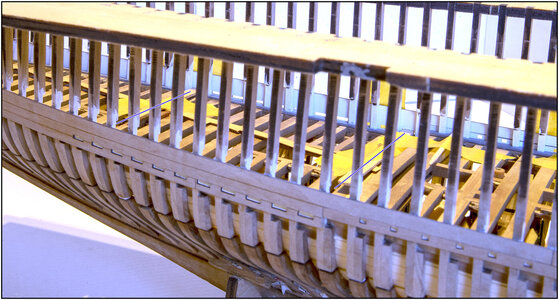
Those 2 slats rest on the waterways and fixed on the deck beams.
On the aft deck a few toothpicks poked through several square holes:
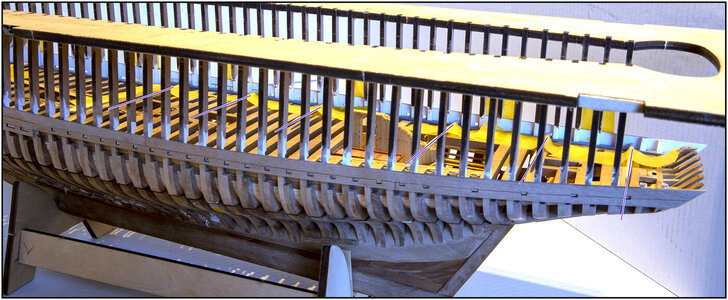
And also fixed with tape.
Then it looks like this on the outside:
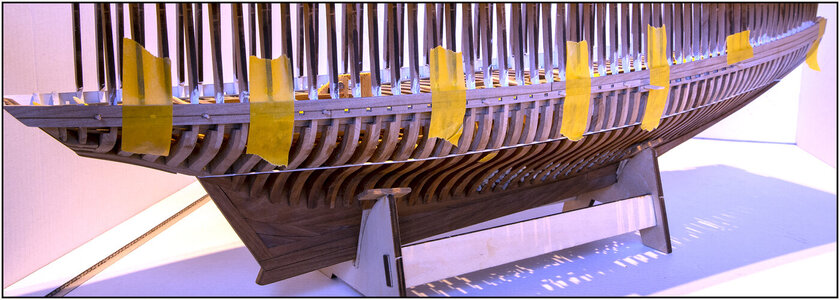
Then I can now mark the 2 parts on the frames so that I can apply the glue in the right place.
So Henk @Henk Liebre here's the black line in white. But I read you have already set up your other goggles.
PS:
About the wrong type of the file name: I meant that I had made a fault in typing the filename. Sorry for the confusion. (I changed the line.)
Regards, Peter
On the starboard side I have already filled the saw cut with a white strip. Which is then equal to the waterline stripe.
On that side I was already able to apply it because that side is not planked beyond the waterline. And to sand the strip smooth on the curve of the frames of the hull.
The port side will be planked. Then the strip comes in once the planks have been installed. I then sand the strip flat on the planking.
And yes, that means the saw will reappear soon. Because the planks also have to be sawn through again. They run longitudinally largely parallel to the sheer and not to the waterline. But only towards the keel flat.
For the port side I was forgotten to take pictures how I aligned the 2 parts. Now for the starboard side, I took some time.
Perhaps interesting for the other builders.
On the foredeck, 2 slats with the thickness of the scuppers, were inserted through the front and rear scuppers:

Those 2 slats rest on the waterways and fixed on the deck beams.
On the aft deck a few toothpicks poked through several square holes:

And also fixed with tape.
Then it looks like this on the outside:

Then I can now mark the 2 parts on the frames so that I can apply the glue in the right place.
So Henk @Henk Liebre here's the black line in white.

PS:
About the wrong type of the file name: I meant that I had made a fault in typing the filename. Sorry for the confusion. (I changed the line.)
Regards, Peter
Last edited:
The starboard side also features the 2 bulwarks parts:

This side is fitted with a total of 5 rows of planks. As shown in the manual by YuanQing for this open side.
I added some extra small boards on 2 places:
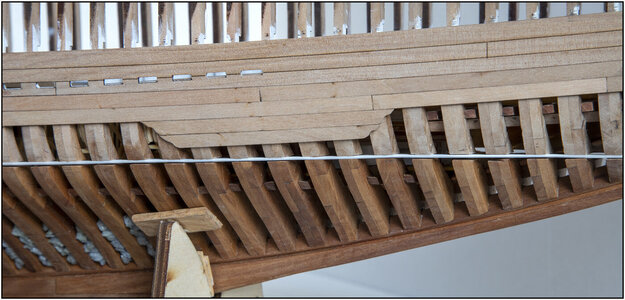
This is where the fore and mainmast chain plates are secured to the hull.
At 5 row of planks they would stick out or I would have to cut them off.
In the middle by the main mast, 1 plank because there will be another plank on the bulwark and the irons will find also rest over 7 rows.
Then I carry on my theme that I also kept in mind when building the inside of the ship: where support is desired, a few extra nibbled parts.
In the beginning there was a lot of discussion about the rabbet in the keel and whether or not a bevel is present. Here the result of the recessed fronts of the hull planks:
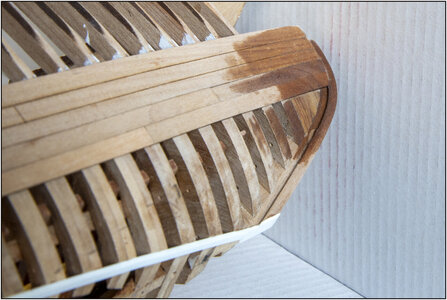
Made the parts wet for contrast. Now the planks slide in their entirety against the front of the rabbet. And has the extra 'meat' for good bonding.
The inside looks 2x square on the photo. But it's a \_| with the chamfer that is flush with the chamfer of the bow parts.
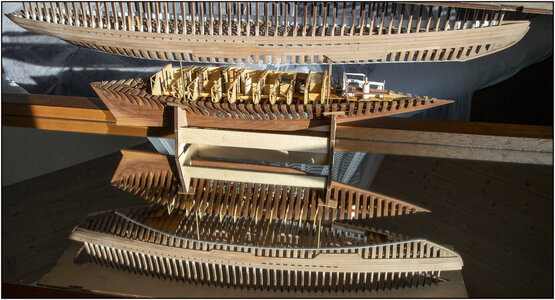
Because once again there was today a nice sun, I took some picture with the current state in the demo version:
And with the beautiful lines of the rear:
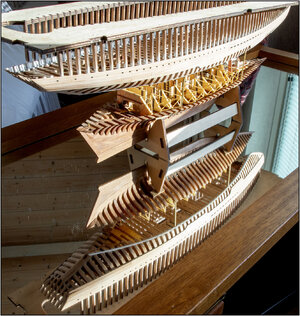
Razor light is unforgivable, but the sanding work still needs to be done.
Then it is now time to drill the holes for the treenails. And only after applying the treenails does the sanding follow.
Then there will be those who wonder: is that useful, do you see them? With the hull being painted?
I have already started painting with Ecoline. I had seen several examples of that. This does not give a flat layer of lacquer, but is more or less matt and still shows the necessary part of the wood structure.
In the book Witch in the Wind, De Villiers describes: "The vessel was then ready for painting: a prime coat, more sanding, then the blue-black finisch coat an the gilded trimwork".
I did some experiments with some mixing ratios of Black and Indigo blue:
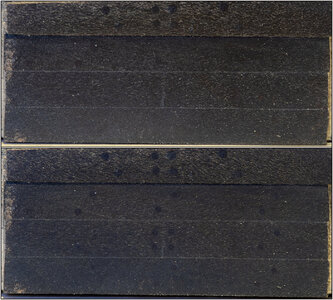
Of course the visible color depends on your monitor color setting.
- the top shelf with almost black;
- the bottom 3 boards with the blue black. Maybe I make them a shade more black;
-depending on the incidence of light, you do not or do see the treenails.
I first coated the bottom three boards and then sanded them almost to the wood. Worked the 2nd layer with my medium polishing block again until the treenails came through.
As far as I'm concerned: subtly present and visible.
I will first apply that to the 5-layer starboard side. Also to practice when I have to do the fully planked port side.
Regards, Peter

This side is fitted with a total of 5 rows of planks. As shown in the manual by YuanQing for this open side.
I added some extra small boards on 2 places:

This is where the fore and mainmast chain plates are secured to the hull.
At 5 row of planks they would stick out or I would have to cut them off.
In the middle by the main mast, 1 plank because there will be another plank on the bulwark and the irons will find also rest over 7 rows.
Then I carry on my theme that I also kept in mind when building the inside of the ship: where support is desired, a few extra nibbled parts.
In the beginning there was a lot of discussion about the rabbet in the keel and whether or not a bevel is present. Here the result of the recessed fronts of the hull planks:

Made the parts wet for contrast. Now the planks slide in their entirety against the front of the rabbet. And has the extra 'meat' for good bonding.
The inside looks 2x square on the photo. But it's a \_| with the chamfer that is flush with the chamfer of the bow parts.
Because once again there was today a nice sun, I took some picture with the current state in the demo version:

And with the beautiful lines of the rear:

Razor light is unforgivable, but the sanding work still needs to be done.
Then it is now time to drill the holes for the treenails. And only after applying the treenails does the sanding follow.
Then there will be those who wonder: is that useful, do you see them? With the hull being painted?
I have already started painting with Ecoline. I had seen several examples of that. This does not give a flat layer of lacquer, but is more or less matt and still shows the necessary part of the wood structure.
In the book Witch in the Wind, De Villiers describes: "The vessel was then ready for painting: a prime coat, more sanding, then the blue-black finisch coat an the gilded trimwork".
I did some experiments with some mixing ratios of Black and Indigo blue:

Of course the visible color depends on your monitor color setting.
- the top shelf with almost black;
- the bottom 3 boards with the blue black. Maybe I make them a shade more black;
-depending on the incidence of light, you do not or do see the treenails.
I first coated the bottom three boards and then sanded them almost to the wood. Worked the 2nd layer with my medium polishing block again until the treenails came through.
As far as I'm concerned: subtly present and visible.
I will first apply that to the 5-layer starboard side. Also to practice when I have to do the fully planked port side.
Regards, Peter
Last edited:
- Joined
- Sep 3, 2021
- Messages
- 5,199
- Points
- 738

Just unbelievably beautiful...The starboard side also features the 2 bulwarks parts:
View attachment 281962
This side is fitted with a total of 5 rows of planks. As shown in the manual by YuanQing for this open side.
I added some extra small boards on 2 places:
View attachment 281963
This is where the fore and mainmast chain plates are secured to the hull.
At 5 row of planks they would stick out or I would have to cut them off.
In the middle by the main mast, 1 plank because there will be another plank on the bulwark and the irons will find also rest over 7 rows.
Then I carry on my theme that I also kept in mind when building the inside of the ship: where support is desired, a few extra nibbled parts.
In the beginning there was a lot of discussion about the rabbet in the keel and whether or not a bevel is present. Here the result of the recessed fronts of the hull planks:
View attachment 281964
Made the parts wet for contrast. Now the planks slide in their entirety against the front of the rabbet. And has the extra 'meat' for good bonding.
The inside looks 2x square on the photo. But it's a \_| with the chamfer that is flush with the chamfer of the bow parts.
Because once again there was today a nice sun, I took some picture with the current state in the demo version:
View attachment 281965
And with the beautiful lines of the rear:
View attachment 281966
Razor light is unforgivable, but the sanding work still needs to be done.
Then it is now time to drill the holes for the treenails. And only after applying the treenails does the sanding follow.
Then there will be those who wonder: is that useful, do you see them? With the hull being painted?
I have already started painting with Ecoline. I had seen several examples of that. This does not give a flat layer of lacquer, but is more or less matt and still shows the necessary part of the wood structure.
In the book Witch in the Wind, De Villiers describes: "The vessel was then ready for painting: a prime coat, more sanding, then the blue-black finisch coat an the gilded trimwork".
I did some experiments with some mixing ratios of Black and Indigo blue:
View attachment 281967
Of course the visible color depends on your monitor color setting.
- the top shelf with almost black;
- the bottom 3 boards with the blue black. Maybe I make them a shade more black;
-depending on the incidence of light, you do not or do see the treenails.
I first coated the bottom three boards and then sanded them almost to the wood. Worked the 2nd layer with my medium polishing block again until the treenails came through.
As far as I'm concerned: subtly present and visible.
I will first apply that to the 5-layer starboard side. Also to practice when I have to do the fully planked port side.
Regards, Peter
It's looking a little plain and ordinary Peter. Any chance you could add some custom details to make it truly yours rather than just another BN?
- Joined
- Sep 3, 2021
- Messages
- 5,199
- Points
- 738

Paul,It's looking a little plain and ordinary Peter. Any chance you could add some custom details to make it truly yours rather than just another BN?
This comment might come back and haunt you one day, you know that, right?
Johan
- Joined
- Oct 28, 2018
- Messages
- 760
- Points
- 403

I hear you sayn the beginning there was a lot of discussion about the rabbet in the keel and whether or not a bevel is present. Here the result of the recessed fronts of the hull planks
Theory and practice come together again
And that's how it is
Nicely presented like this with the mirror
Nice to see the clean saw cut,I recognized it right away
Nice work
Thanxs, Heinrich. Nothing can complete the Sun.Beautiful pictorial effects in the natural light and using the mirror! Stunning!
Dankjewel, Johan. Just believe in what you see. No mindf….k at all.Just unbelievably beautiful...
I’ll see what I can do, Paul. Any suggestions? You are welcome.It's looking a little plain and ordinary Peter. Any chance you could add some custom details to make it truly yours rather than just another BN?
That’s for sure.Paul,
This comment might come back and haunt you one day, you know that, right?
Thanxs, Henk. You already know my classics. And a mirror never lies, it shows just what it is. Nothing more or less.I hear you say
Theory and practice come together again
And that's how it is
Nicely presented like this with the mirror
Nice to see the clean saw cut,I recognized it right away
Nice work
Thank you all for the visit, the likes, comments etc etc. It keeps me motivated!
Regards, Pete

