YUANQING BLUENOSE - Peter Voogt [COMPLETED BUILD]

Hello Peter, Happy Birthday, Sorry for the belated greeting but as normal I got caught up in another fog bank. I do however hope that you had a great say, and that you got the biggest piece of cake and that you received all of the new toys that you had hopped for and maybe a few more for good luck.
Regards Lawrence
Thanxs, Lawrence. No problem for the delay. Your welcom for the after party.
Regards, Peter
 
哦,我好像错过了什么,请接受我迟到的祝福,生日快乐
Translated: “Oh, I seem to have missed something, please accept my belated wishes, happy birthday.”

Thanxs for the wishes! No problem for the delay, the afterparty is still going on.
谢谢你的祝福! 延迟没问题,派对还在继续。(If the translation is right?)
Regards, Peter
 
After a relaxing holiday and a lot of good work by the physio, I picked up building again. The injury is largely gone. Then you appreciate the fact that you can sit and function normally. :)

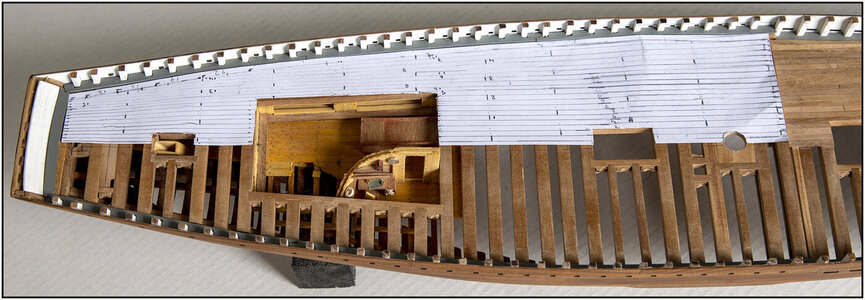
Before providing the cutouts on the foredeck with the additional planks, I first made a mold and design for the planking for the aft deck:
681 Aft.jpg
Based on this I could determine whether I still had enough long pear strips to make the necessary 12-beam planks.
If all goes well, it will work just fine. But then I shouldn't make too many mistakes with rejuvenating the planks.
Because, as can be seen, the planking partly follows the curve of the hull. The combination of planks must therefore rejuvenate in the curve from 2.6 mm to 1.5 mm.
At the deck transition from low to high I have 20 planks in width on the half deck. 13 come out against the back and 7 ends into the nibble strip.
In my contact with Dean @Dean62 I had asked him if he had any pear strips left from the construction of his BN. Because then I use pear wood that comes more or less from the same source.
In his "logistics system" he found 4 and offered to send them. Thanks, Mate! Thumbs-UpOkay Nice to have friends on the SoS!
Now to make a mold where I can put the combination of planks and cut/sand the rejuvenation in the curve. Because when cutting straight from 2.6 to 1.5 I don't get a round connection to the side.
Regards, Peter
 
After a relaxing holiday and a lot of good work by the physio, I picked up building again. The injury is largely gone. Then you appreciate the fact that you can sit and function normally. :)

Before providing the cutouts on the foredeck with the additional planks, I first made a mold and design for the planking for the aft deck:
View attachment 299461
Based on this I could determine whether I still had enough long pear strips to make the necessary 12-beam planks.
If all goes well, it will work just fine. But then I shouldn't make too many mistakes with rejuvenating the planks.
Because, as can be seen, the planking partly follows the curve of the hull. The combination of planks must therefore rejuvenate in the curve from 2.6 mm to 1.5 mm.
At the deck transition from low to high I have 20 planks in width on the half deck. 13 come out against the back and 7 ends into the nibble strip.
In my contact with Dean @Dean62 I had asked him if he had any pear strips left from the construction of his BN. Because then I use pear wood that comes more or less from the same source.
In his "logistics system" he found 4 and offered to send them. Thanks, Mate! Thumbs-UpOkay Nice to have friends on the SoS!
Now to make a mold where I can put the combination of planks and cut/sand the rejuvenation in the curve. Because when cutting straight from 2.6 to 1.5 I don't get a round connection to the side.
Regards, Peter
No worries, glad to help! ;)
Looks like you have a good plan in place.
 
After a relaxing holiday and a lot of good work by the physio, I picked up building again. The injury is largely gone. Then you appreciate the fact that you can sit and function normally. :)

Before providing the cutouts on the foredeck with the additional planks, I first made a mold and design for the planking for the aft deck:
View attachment 299461
Based on this I could determine whether I still had enough long pear strips to make the necessary 12-beam planks.
If all goes well, it will work just fine. But then I shouldn't make too many mistakes with rejuvenating the planks.
Because, as can be seen, the planking partly follows the curve of the hull. The combination of planks must therefore rejuvenate in the curve from 2.6 mm to 1.5 mm.
At the deck transition from low to high I have 20 planks in width on the half deck. 13 come out against the back and 7 ends into the nibble strip.
In my contact with Dean @Dean62 I had asked him if he had any pear strips left from the construction of his BN. Because then I use pear wood that comes more or less from the same source.
In his "logistics system" he found 4 and offered to send them. Thanks, Mate! Thumbs-UpOkay Nice to have friends on the SoS!
Now to make a mold where I can put the combination of planks and cut/sand the rejuvenation in the curve. Because when cutting straight from 2.6 to 1.5 I don't get a round connection to the side.
Regards, Peter
Sorry to hear about your injury Peter, I hope it wasn't too bad, but good that you're recovered again. I'm looking forward to the outcome of your deck planking efforts. I found deck planking an enjoyable part of the build and one that has quite a large impact on the overall look of the ship. Good luck Thumbsup
 
After a relaxing holiday and a lot of good work by the physio, I picked up building again. The injury is largely gone. Then you appreciate the fact that you can sit and function normally. :)

Before providing the cutouts on the foredeck with the additional planks, I first made a mold and design for the planking for the aft deck:
View attachment 299461
Based on this I could determine whether I still had enough long pear strips to make the necessary 12-beam planks.
If all goes well, it will work just fine. But then I shouldn't make too many mistakes with rejuvenating the planks.
Because, as can be seen, the planking partly follows the curve of the hull. The combination of planks must therefore rejuvenate in the curve from 2.6 mm to 1.5 mm.
At the deck transition from low to high I have 20 planks in width on the half deck. 13 come out against the back and 7 ends into the nibble strip.
In my contact with Dean @Dean62 I had asked him if he had any pear strips left from the construction of his BN. Because then I use pear wood that comes more or less from the same source.
In his "logistics system" he found 4 and offered to send them. Thanks, Mate! Thumbs-UpOkay Nice to have friends on the SoS!
Now to make a mold where I can put the combination of planks and cut/sand the rejuvenation in the curve. Because when cutting straight from 2.6 to 1.5 I don't get a round connection to the side.
Regards, Peter
A lot of planning in this first step after your vacation, Peter. I wonder how much time you spend the past week considering your options, the pros and cons, material availability, tools you need...
 
A lot of planning in this first step after your vacation, Peter. I wonder how much time you spend the past week considering your options, the pros and cons, material availability, tools you need...
You can say that, Johan. Especially about how I'm going to rejuvenate the planks. But I have not count the minutes/hours .......;)
In the end:
682 Verjongen1.jpg
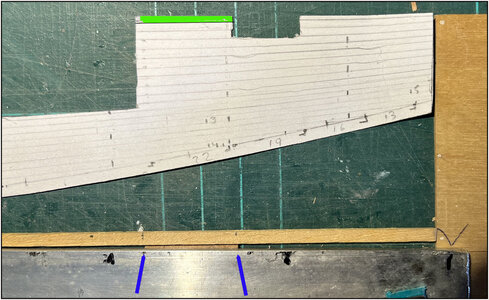
Place a beam to be bent on the side of an aluminum strip. Left connected to the outside and secured. Then on the right side, over a length of +/- 25 cm, bent slightly more than 1 mm down so that I got a smooth flowing curve. Because I have to go with my planks from 2.6 mm to 1.5 mm. Then a groove is made in the aluminum along the beam with a knife. That groove accentuated black to have a better view to file the curve along the black line.

683 Verjongen2.jpg
At the bottom of the picture the aluminum strip with the curve, but you have to have a good eye to see that in the photo. ;)
Cut a corner hook in a piece of plywood of 1mm.
Marked on the plywood where the plank connections come every 3-deck-beams. Depending on the position on the deck and therefore on the basis of my drawn template, I can now make an assembly of planks that I need per row. As with planking the hull, I don't use long planks because then I have a high chance of continuous grain at plank seams. But I'm probably going to cut some long planks in their entirety, then shorten them and interchange them.
Use a long plank as a test. Place this against the edge of the plywood with markings.

684 Verjongen3.jpg
The aluminum strip is on the left secured to the outside of the plank. Then secured the right side at just over 1 mm lower.
The aluminum strip fixes the plank well because my planks are just a bit thicker than 1 mm.
With a new sharp scalping blade then cut away the wood that goes from 0.0 to 1.1 mm along the aluminum strip.

685 Verjongen4.jpg
The small irregularities created by the wood fibers are sanded down on a long sanding block so that the curve will run nicely.
The curved cutted side is put to the outside en tested on my test sheet.
Now a few more test strips to see if I will get a nice fitted and flowing pattern.

There must be other ways to rejuvenate a plank. The ones I found were to cut the rejuvenation in a straight line. But I must have a curve in it, otherwise I will not get a rounded connection at the end of the circular waterways.
Regards, Peter
 
Last edited:
Too few photos and too much text. Nobody is going to understand this Peter. :)

But cleverly thought out for sure
 
After a relaxing holiday and a lot of good work by the physio, I picked up building again. The injury is largely gone. Then you appreciate the fact that you can sit and function normally. :)

Before providing the cutouts on the foredeck with the additional planks, I first made a mold and design for the planking for the aft deck:
View attachment 299461
Based on this I could determine whether I still had enough long pear strips to make the necessary 12-beam planks.
If all goes well, it will work just fine. But then I shouldn't make too many mistakes with rejuvenating the planks.
Because, as can be seen, the planking partly follows the curve of the hull. The combination of planks must therefore rejuvenate in the curve from 2.6 mm to 1.5 mm.
At the deck transition from low to high I have 20 planks in width on the half deck. 13 come out against the back and 7 ends into the nibble strip.
In my contact with Dean @Dean62 I had asked him if he had any pear strips left from the construction of his BN. Because then I use pear wood that comes more or less from the same source.
In his "logistics system" he found 4 and offered to send them. Thanks, Mate! Thumbs-UpOkay Nice to have friends on the SoS!
Now to make a mold where I can put the combination of planks and cut/sand the rejuvenation in the curve. Because when cutting straight from 2.6 to 1.5 I don't get a round connection to the side.
Regards, Peter
Hi Peter, excuse me if I tell you mine on the aesthetic aspect of the deck planking, apart from that it must please you which is the most important thing, the tiling of the individual do not see it very well
, it is more compatible to leave the same width from the center to the sides, sorry for my opinion
 
Last edited:
Hi Peter, excuse me if I tell you mine on the aesthetic aspect of the deck planking, apart from that it must please you which is the most important thing, the tiling of the individual do not see it very well
, it is more compatible to leave the same width from the center to the sides, sorry for my opinionView attachment 300161View attachment 300162
Nice to see the planking of a modern yacht. But by the Bluenose they did it different.
I believe I've documented that enough.
 
You can say that, Johan. Especially about how I'm going to rejuvenate the planks. But I have not count the minutes/hours .......;)
In the end:
View attachment 300142
Place a beam to be bent on the side of an aluminum strip. Left connected to the outside and secured. Then on the right side, over a length of +/- 25 cm, bent slightly more than 1 mm down so that I got a smooth flowing curve. Because I have to go with my planks from 2.6 mm to 1.5 mm. Then a groove is made in the aluminum along the beam with a knife. That groove accentuated black to have a better view to file the curve along the black line.

View attachment 300143
At the bottom of the picture the aluminum strip with the curve, but you have to have a good eye to see that in the photo. ;)
Cut a corner hook in a piece of plywood of 1mm.
Marked on the plywood where the plank connections come every 3-deck-beams. Depending on the position on the deck and therefore on the basis of my drawn template, I can now make an assembly of planks that I need per row. As with planking the hull, I don't use long planks because then I have a high chance of continuous grain at plank seams. But I'm probably going to cut some long planks in their entirety, then shorten them and interchange them.
Use a long plank as a test. Place this against the edge of the plywood with markings.

View attachment 300144
The aluminum strip is on the left secured to the outside of the plank. Then secured the right side at just over 1 mm lower.
The aluminum strip fixes the plank well because my planks are just a bit thicker than 1 mm.
With a new sharp scalping blade then cut away the wood that goes from 0.0 to 1.1 mm along the aluminum strip.

View attachment 300145
The small irregularities created by the wood fibers are sanded down on a long sanding block so that the curve will run nicely.
The curved cutted side is put to the outside en tested on my test sheet.
Now a few more test strips to see if I will get a nice fitted and flowing pattern.

There must be other ways to rejuvenate a plank. The ones I found were to cut the rejuvenation in a straight line. But I must have a curve in it, otherwise I will not get a rounded connection at the end of the circular waterways.
Regards, Peter
Bloody ingenious, that's what it is!
I am more than impressed with your process and am rather anxious to see if this will result in the curved and tapered deckplanks the way you imagine.
Since the topic of the curved and tapered deckplanks for the main deck of the Bluenose has been discussed before, I was of a half mind to have a try myself. After reading your process, no more; I am now committed to "straight and level" deckplanks on fore- and maindeck. I am sure I will have my share of issues with trying to fabricate the nibble planks...
 
Not much to report. Busy with other things.
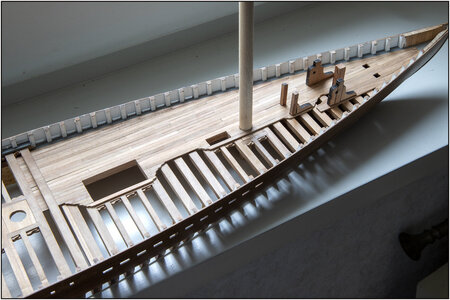
Before I start planking the aft deck, I finished the front deck with the nibblers around the openings in the deck:
686 FromtDeck.jpg
What is on the foredeck is dry-fit and will be aligned and straightened later when assembling those parts.
All objects placed on the deck are thus supported on at least one plank. Otherwise they would float half a plank thickness above the deck beams on the starboard side.
I sand the unevenness in the planks and provide the treenails when the aft deck is also ready.
Regards, Peter
 
Now for the first time I have time to play catch-up. I love your way of thinking obtaining the curvature of the side planking. Theoretically it should work and by now we know that you are a master at marrying theory and practice. I will sit and watch in leisure and in full confidence that all will be good!
 
Now for the first time I have time to play catch-up. I love your way of thinking obtaining the curvature of the side planking. Theoretically it should work and by now we know that you are a master at marrying theory and practice. I will sit and watch in leisure and in full confidence that all will be good!
You're in lucky, Heinrich. I was just doing the steps in the photo to clarify the theory. Here is the marriage :)
And for Stephan some more pictures and less text ;).
I also started here with the middle strip. And theoretically the chamfer should run on both sides, but.......
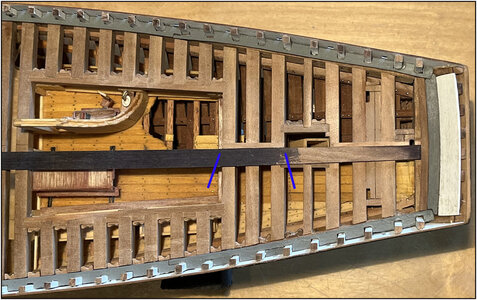
The back piece:
687 Tapper1.jpg
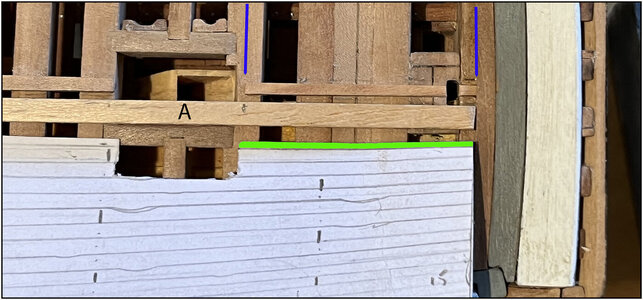
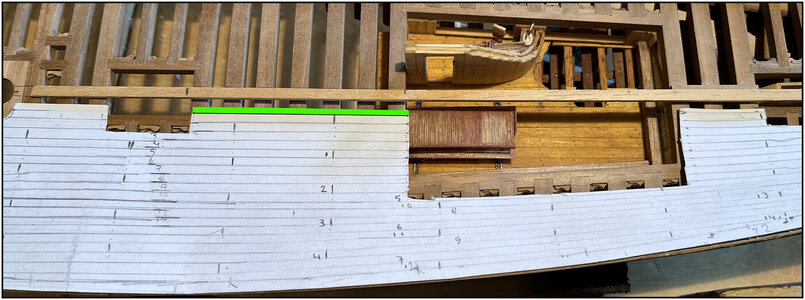
In yellow on the sheet the piece that comes on the back, behind the opening for the wheelhouse. It's 32mm long.
Markings for the length and position of the piece were made on a long batten (A).

688 Tapper2.jpg
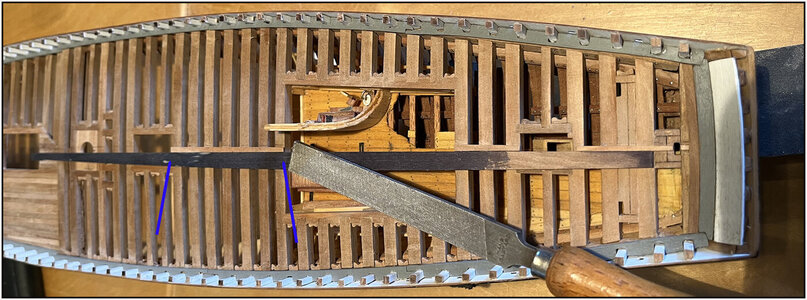
The piece to cut is under the cutting ruler by the 2 blue arrows. On the left a filler piece of 2.6 mm where the ruler connects and on the right the ruler on the 1.5 mm marking.

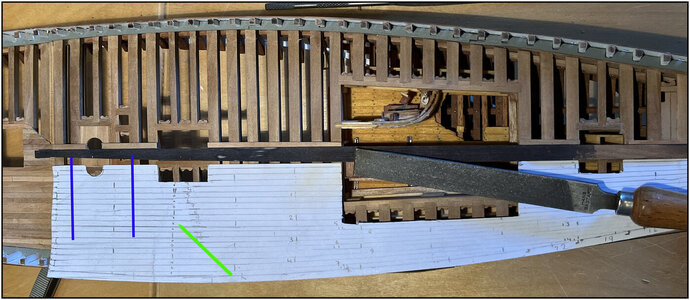
689 Tapper3.jpg
In yellow on the sheet the 2nd piece between the wheelhouse and the cabin.
The position marked on the batten.
The piece is under the cutting ruler by the 2 blue arrows.
The ruler on the left on the 2.6mm and right on the 1.5mm (the line with the big V).
The protruding piece is cut off.

690 Tapper4.jpg
The 2 pieces on the deck beams and aligned them during gluing to the left side, so that the later completely connects with the middle row of the low foredeck.
For the observant viewer: the back piece is still divided, because there will be another support.

691 Tapper5.jpg
The part in front of the cabin.

692 Tapper6.jpg
Under the cutting ruler

693 Tapper7.jpg
Glued and Aligned (with a curve of 2.6 - 1.5 = 1.1mm : 2 = 0.55mm ;) Yes “The Lunatic is in My Head”)

694 Tapper8.jpg
The last 2 pieces are in front of 'the curve' and are therefore just straight. The cutter curve ended bij the yellow arrow.
The hull then tapers back slightly to the foredeck. On the side of the waterway there will be an inset filling lath that is 2.6mm in the middle and has been 'nibbled' at both ends.

So, hopefully it is understandable now and for me, hopefully the next row will line up nice fully.
Regards, Peter
 
Last edited:
You're in luck, Heinrich. I was just doing the steps in the photo to clarify the theory. Here is the marriage :)
And for Stephan some more pictures and less text ;).
I also started here with the middle strip. And theoretically the chamfer should run on both sides, but.......
The back piece:
View attachment 300530
In yellow on the sheet the piece that comes on the back, behind the opening for the wheelhouse. It's 32mm long.
Markings for the length of the piece were made on a long batten (A).

View attachment 300523
The piece to cut is under the cutting ruler by the 2 blue arrows. On the left a filler piece of 2.6 mm where the ruler connects and on the right the ruler on the 1.5 mm marking.

View attachment 300524
In yellow on the sheet the 2nd piece between the wheelhouse and the cabin.
The piece is under the cutting ruler by the 2 blue arrows.
The ruler on the left on the 2.6mm and right on the 1.5mm (the line with the big V).
The protruding piece is cut off.

View attachment 300525
The 2 pieces on the deck beams and aligned them during gluing to the left side, so that the later completely connects with the middle row of the low foredeck.
For the observant viewer: the back piece is still divided, because there will be another support.

View attachment 300526
The part in front of the cabin.

View attachment 300527
Under the cutting ruler

View attachment 300528
Glued and Aligned

View attachment 300529
The last 2 pieces are in front of 'the curve' and are therefore just straight. The cutter curve ended bij the yellow arrow.
The hull then tapers back slightly to the foredeck. On the side of the waterway there will be an inset filling lath that is 2.6mm in the middle and has been 'nibbled' at both ends.

So, hopefully it is understandable now and for me, hopefully the next row will line up nice fully.
Regards, Peter
Very well thought out and executed. Thumbs-Up
Too bad the deck planks are a tad too wide. ROTF
(Just kidding...)
 
Too bad the deck planks are a tad too wide. ROTF (Just kidding...)
Haha, watched my confession in another build-log?
Another confession: I have to remember to 'flip' the piece of wood after cutting.
I just cut the curve at the top and that curve should point downwards, given the position of the model on the pictures.
 
Back
Top