YUANQING BLUENOSE - Peter Voogt [COMPLETED BUILD]

Started with planking the front deck.
There were 3 things I had to keep in mind:
- the openings in the deck beams for the mast and various uprights;
-not 3mm wide planks, but maybe 2mm;
-the supports of the winch are secured in a wider plank.
I came across that wider plank in another building and is also visible in various drawings in The Saga.
For the wider plank I assumed a double plank width. So after that wide plank, 2 planks with the normal width start. The beginning of those planks was also not allowed to coincide with a seam of adjacent planks.

While calculating and drawing I came to a plank pattern 1-3-2-4-1. And that the width of my extra made planks from the frame sheets of 2.6 mm turned out very well. I only had to saw the remaining hull planks to that size.
I had to start with a plank in the middle. This may be controversial, because you usually see a drawn center line, after which planking is started along that line.
But thanks to that middle row of planks I can now lay a mirrored plank pattern on either side. Also with a mirrored treenail pattern. (Yeah, it are the little things that matter! ;)) If I had started planking along the centerline, I would end up with a half plank width next to the wide windlass plank.
The sketch:
667 Plank.jpg
The shaded one with '1st' is therefore the middle strip with planks.
Next to it 3 rows (2nd, 3rd and 4th).
The 5th (and 6th) plank starts behind the wide plank 'WIND'. I took the seam of the 5th plank as a starting point to determine the seams of the other rows. With planks of max. 12 deck beams long. In terms of size and pattern, that came down to a seam every 3 cm / beams.

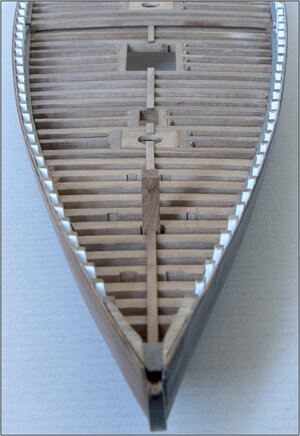
The 1st row of planks in the middle:
668 Plank.jpg
With all cutouts / shortcuts.

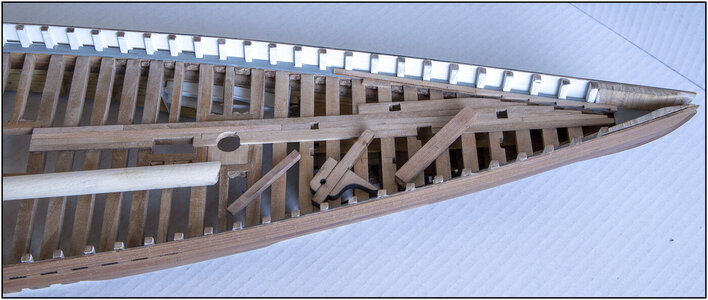
Then I could continue with the plank pattern:
669 Plank.jpg
The wide plank has a double nibble. Then the pattern continues smoothly.
The nibbler board is on the port side of the waterway. I can still take it out. Then it is easy to work with making a new recess for a recessed next plank. Also all parts that have to go into the respective holes.

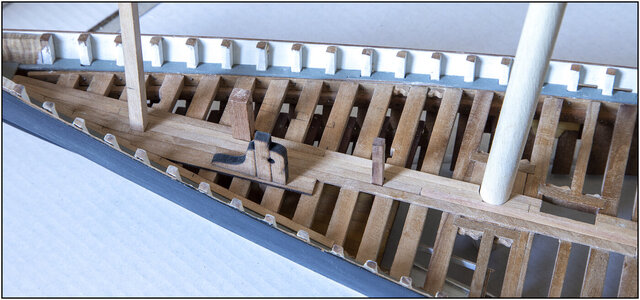
This is how it stands now:
670 Plank.jpg
With applied nibbler board and other parts. Around the mast still have to come the imitation wedges.
The hole for the support of the windlass took some time. The hole had to be in line with the recesses in the 2 decks in which the windlass upright will rest.
The front 'post' is still too high. I can only saw the beam to length when I start working with the bowsprit.
Regards, Peter
 
Last edited:
Started with planking the front deck.
There were 3 things I had to keep in mind:
- the openings in the deck beams for the mast and various uprights;
-not 3mm wide planks, but maybe 2mm;
-the supports of the winch are secured in a wider plank.
I came across that wider plank in another building and is also visible in various drawings in The Saga.
For the wider plank I assumed a double plank width. So after that wide plank, 2 planks with the normal width start. The beginning of those planks was also not allowed to coincide with a seam of adjacent planks.

While calculating and drawing I came to a plank pattern 1-3-2-4-1. And that the width of my extra made planks from the frame sheets of 2.6 mm turned out very well. I only had to saw the remaining hull planks to that size.
I had to start with a plank in the middle. This may be controversial, because you usually see a drawn center line, after which planking is started along that line.
But thanks to that middle row of planks I can now lay a mirrored plank pattern on either side. Also with a mirrored treenail pattern. (Yeah, it are the little things that matter! ;)) If I had started planking along the centerline, I would end up with a half plank width next to the wide windlass plank.
The sketch:
View attachment 295589
The shaded one with '1st' is therefore the middle strip with planks.
Next to it 3 rows (2nd, 3rd and 4th).
The 5th (and 6th) plank starts behind the wide plank 'WIND'. I took the seam of the 5th plank as a starting point to determine the seams of the other rows. With planks of max. 12 deck beams long. In terms of size and pattern, that came down to a seam every 3 cm / beams.

The 1st row of planks in the middle:
View attachment 295590
With all cutouts / shortcuts.

Then I could continue with the plank pattern:
View attachment 295591
The wide plank has a double nibble. Then the pattern continues smoothly.
The nibbler board is on the port side of the waterway. I can still take it out. It is so easy to work with making a new recess for a recessed next plank. Also all parts that have to go into the respective holes.

This is how it stands now:
View attachment 295592
With applied nibbler board and other parts. Around the mast still have to come the imitation wedges.
The hole for the support of the windlass took some time. The hole had to be in line with the recesses in the 2 decks in which the windlass upright will rest.
The front 'post' is still too high. I can only saw the beam to length when I start working with the bowsprit.
Regards, Peter
Meticulous work, Peter, as usual.
 
Started with planking the front deck.
There were 3 things I had to keep in mind:
- the openings in the deck beams for the mast and various uprights;
-not 3mm wide planks, but maybe 2mm;
-the supports of the winch are secured in a wider plank.
I came across that wider plank in another building and is also visible in various drawings in The Saga.
For the wider plank I assumed a double plank width. So after that wide plank, 2 planks with the normal width start. The beginning of those planks was also not allowed to coincide with a seam of adjacent planks.

While calculating and drawing I came to a plank pattern 1-3-2-4-1. And that the width of my extra made planks from the frame sheets of 2.6 mm turned out very well. I only had to saw the remaining hull planks to that size.
I had to start with a plank in the middle. This may be controversial, because you usually see a drawn center line, after which planking is started along that line.
But thanks to that middle row of planks I can now lay a mirrored plank pattern on either side. Also with a mirrored treenail pattern. (Yeah, it are the little things that matter! ;)) If I had started planking along the centerline, I would end up with a half plank width next to the wide windlass plank.
The sketch:
View attachment 295589
The shaded one with '1st' is therefore the middle strip with planks.
Next to it 3 rows (2nd, 3rd and 4th).
The 5th (and 6th) plank starts behind the wide plank 'WIND'. I took the seam of the 5th plank as a starting point to determine the seams of the other rows. With planks of max. 12 deck beams long. In terms of size and pattern, that came down to a seam every 3 cm / beams.

The 1st row of planks in the middle:
View attachment 295590
With all cutouts / shortcuts.

Then I could continue with the plank pattern:
View attachment 295591
The wide plank has a double nibble. Then the pattern continues smoothly.
The nibbler board is on the port side of the waterway. I can still take it out. Then it is easy to work with making a new recess for a recessed next plank. Also all parts that have to go into the respective holes.

This is how it stands now:
View attachment 295592
With applied nibbler board and other parts. Around the mast still have to come the imitation wedges.
The hole for the support of the windlass took some time. The hole had to be in line with the recesses in the 2 decks in which the windlass upright will rest.
The front 'post' is still too high. I can only saw the beam to length when I start working with the bowsprit.
Regards, Peter
Looking very good Peter! ;)
 
The 1st nibble strip with 11 rows of planks:
View attachment 295671
As if it's so planned.......the 2nd strip will start along with the 12th row. (Sometimes it's just coincidence, though.);)
But first I have to make a cluster of double knees before I can close it.
Regards, Peter
Hi Peter. Could you teach me a bit? Are you planking then nibbling the border - or nibbling the border and then adding planks? Or is everything loose and you are doing both things at the same time? Thanks.
 
Hi Peter. Could you teach me a bit? Are you planking then nibbling the border - or nibbling the border and then adding planks? Or is everything loose and you are doing both things at the same time? Thanks.
Hi Paul. I do both items loose and plank by plank.
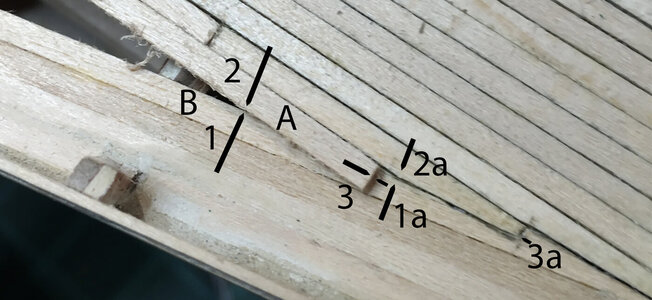
I came across the method via this photo on the construction report of the Suburban Ship Modeler (=source):
--> The Suburban Ship Modeler <--
A print screen from his report:
672 Nibbling.jpg
What I've done:
-lay plank A close to the last one, on the nibble plank B;
-on the picture, the plank must some further to 1a-2a;
-make markings 1 and 2 on the cutting-corner of both;
-make markings 3 on half the width of both;
Now I take out both:
-cut off from plank A the corner from 3 (long arrow) to point 2;
-on the nibbling strip: cut out the corner perpendicular to 3 and from 3 (short arrow) to point 1.
At the previously inserted plank you see the recessed point at 3a.
1a-2a, the cutting-corner of the previous plank.
1a-3a is the line of the cutting in the nibbler.
I then put the nibbler back, make the tip enclosing and glue the plank. Not the nibbler. Because cutting the angled corner in the nibbler is much easy on my working table then inside the ship, with the strip over de deck beams. But by every nibble, the strips becomes more fragile. Working on the edge. :)
Regards, Peter
 
Last edited:
The deck is going to be a very authentic-looking one. The "greyish" Pear and the planking pattern were both correctly chosen.
 
The deck is going to be a very authentic-looking one. The "greyish" Pear and the planking pattern were both correctly chosen.
Thanxs, Heinrich. However, the choice is limited. It's the rest of the planks for the hull and the planks that I saw out of the frame-sheets:
674 Rest.jpg
But all still from the YQ kit. And still a lot of spare sheet to make new ones, but with limited length
I have sorted them by shade transition a bit so I can control the gradient on the deck a bit. And some sanding to remove some saw deposits.

With the remaining hull planks, from which I can still get 17 12-beam/12-cm planks, I can probably just manage also the upper deck.
When possible, I use at the beginnen and ending of a row the 11-cm frame-sheet planks. Depending on the 1-3-2-4-1 pattern.
For the aft deck I still have to deal with cutting loss, because I will use L.B. Jenson's drawn pattern:
675 Dek.jpg
Fun to puzzle on that. And make a mold for rejuvenating the strips. And take the plank seams into account ........
Like a jig saw puzzle. It's already in de mind, now the transfer to the model .......
Regards, Peter
 
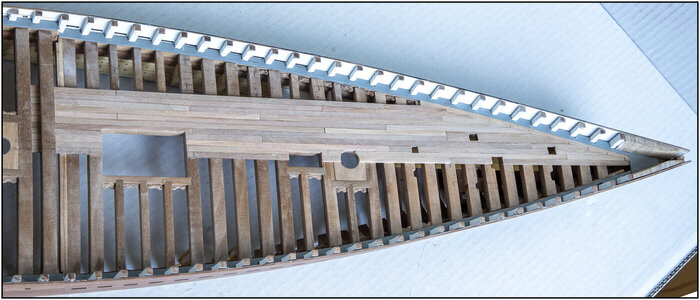
The port side of the foredeck is closed. I had made and glued the first part plank by plank, always removing the nibbling strip. But that was asking for trouble to keep that nibble strip intact.
This part in its entirety first built separately. Here are the parts ready to glue:
676 Dek.jpg
That meant that if I finished one row and had to cut the next into the nibble strip, I had to take everything out and then back again. But ...... enough time.:)
So 8x out and back in.

In the end this result:
677 Dek.jpg
I have placed the nibble strip in 2 enlarged inserts in the corners. I'm glad it worked though.
Not sanded yet, because there are still some planks on the starboard front. The windlass on that side must be supported, otherwise the support on that side will have a deck plank height difference.
Regards, Petere
 
The port side of the foredeck is closed. I had made and glued the first part plank by plank, always removing the nibbling strip. But that was asking for trouble to keep that nibble strip intact.
This part in its entirety first built separately. Here are the parts ready to glue:
View attachment 296269
That meant that if I finished one row and had to cut the next into the nibble strip, I had to take everything out and then back again. But ...... enough time.:)
So 8x out and back in.

In the end this result:
View attachment 296270
I have placed the nibble strip in 2 enlarged inserts in the corners. I'm glad it worked though.
Not sanded yet, because there are still some planks on the starboard front. The windlass on that side must be supported, otherwise the support on that side will have a deck plank height difference.
Regards, Petere
Very well done Peter! Precise work as always!
One observation... It looks like you ran your boards under the upper deck beam, this is extra length. What was the logic for that?
 
One observation... It looks like you ran your boards under the upper deck beam, this is extra length. What was the logic for that?
You have keen eyes, Dean :)
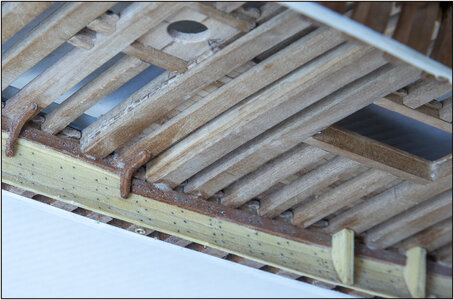
On pag. 49 I have explained that there where 2 double deck beams on the transition from the lower to the upper deck:
--> Double Deck Beams <--
Installed a long time ago and now put into use.
Here you can see them:
678 Double.jpg
Don't look at the dust, glue residue etc. A lot of sanding with de deck planking, a lot of cleaning when ready.
 
Last edited:
You have keen eyes, Dean :)
On pag. 49 I have explained that there 2 double deck beams the transition from the lower to the upper deck:
--> Double Deck Beams <--
Installed a long time ago and now put into use.
Here you can see them:
View attachment 296276
Don't look at the dust, glue residue etc. A lot of sanding with de deck planking, a lot of cleaning when ready.

Ok, this makes sense. I understand about the mess of construction. ;)
 
The port side of the foredeck is closed. I had made and glued the first part plank by plank, always removing the nibbling strip. But that was asking for trouble to keep that nibble strip intact.
This part in its entirety first built separately. Here are the parts ready to glue:
View attachment 296269
That meant that if I finished one row and had to cut the next into the nibble strip, I had to take everything out and then back again. But ...... enough time.:)
So 8x out and back in.

In the end this result:
View attachment 296270
I have placed the nibble strip in 2 enlarged inserts in the corners. I'm glad it worked though.
Not sanded yet, because there are still some planks on the starboard front. The windlass on that side must be supported, otherwise the support on that side will have a deck plank height difference.
Regards, Petere
Very nice Peter. Watching a master at work. I'm also impressed that you have already clocked 94 pages on your build log so far, surely that is some kind of record :)Thumbsup
 
Very nice Peter. Watching a master at work. I'm also impressed that you have already clocked 94 pages on your build log so far, surely that is some kind of record :)Thumbsup
Thanxs for the compliments, Mark.
Sometimes I am also surprised about the size of the log.
I see now that I started on pag. 87 with the experiments for my deck planking. Thanks to a lot of input, the foredeck is now in place. And we are 7 pages further.:rolleyes:
I like that it is not only the report of my build, but also an interaction with those who read it and react.:)

This was also a option:
"I started with the planking of the front deck.
This is the result:
-> insert picture <-
Next is the aft part of the deck."

Nha ...... no communication about 'all the struggle' about what kind of wood, the looks etc.
Regards, Peter
 
Last edited:
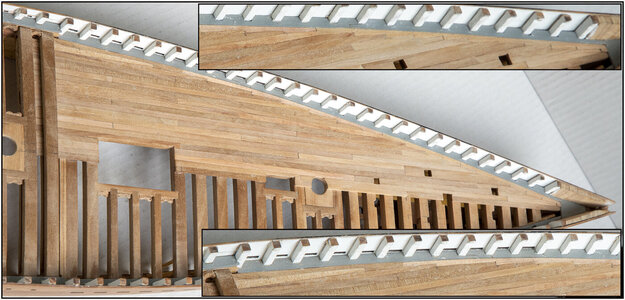
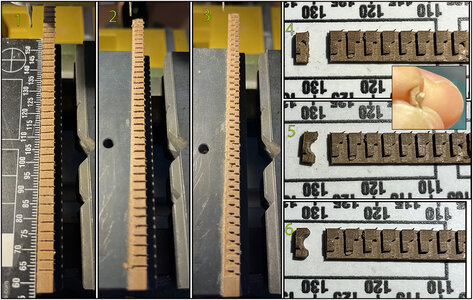
First made some double knees before I could continue with the planking.
This is also gradually moving towards production work:
679 Double.jpg
Glued a strip of 5x2 pear wood to the clamp of my cross plate with double sided tape.
With a 1 mm bit:
1: a horizontal partition for the upper knee every 3 mm at 1 mm depth;
2: a strip off to shorten the top toe;
3: shortening the toe to the shoulder of the upper knee;
4: cut loose;
5: filed the bridge;
6: files both shoulders round.

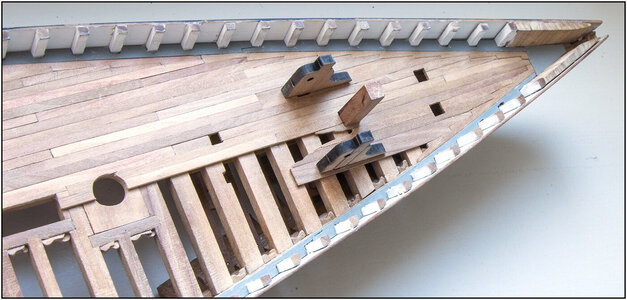
Made the wide plank under the right-hand upright of the windlass on the foredeck:
680 Front.jpg
Decided to close the point with planks. Shortened the nibbling strip on the side as well as the intermediate planks.
The double knees are so beautifully visible.
Next step are some pieces of plank around the mast and the recesses for the attributes on the deck.
Regards, Peter
 
Last edited:
Back
Top