YUANQING BLUENOSE - Peter Voogt [COMPLETED BUILD]

After a question from Stephan on the Dutch forum:
I opted for an interior door.
The Saga drawing was also the inspiration:
View attachment 277594
The blue arrows: horizontal at the door lockplate for a day and dead bolt, vertical at the door frame.
The cabin then does not get the cold / gust of wind / rain inside by opening the outside hatch.
Look at the top of the doorframe. The frame isn't parallel to the stairs, but goes at an angle to the wall.
 
In this picture it appears the cabin is extended beyond the upper walls towards the stern, with an extra bunk shown in that area. First you would have to crawl in there to get to it. Second, it seems the rudder shaft can be partially seen. Interesting.
It is indeed a interesting picture, Dean. I have measured the space in my BN, but for a extra bunk it was not realistic. Now there is under the stairs a hatch to come to that area as a storage.
Look at the top of the doorframe. The frame isn't parallel to the stairs, but goes at an angle to the wall.
That’s right, Stephan. Johan has also mentioned it. But it is a drawing of the Caroline Rose :).
It must have been placed in the corner there, because otherwise it would become a bit strange for me. You can also see the steering wheel through the opening. And that is in the middle with the BN.
So, build not like the drawing, but inspireert by the drawing.
Regards, Peter
 
Last edited:
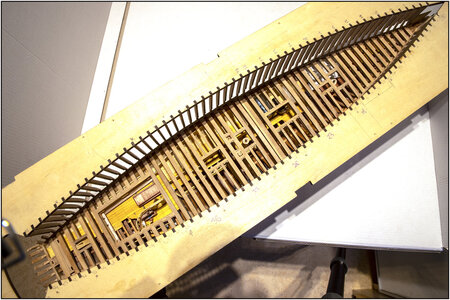
To be able to fill the deck with the remaining deck beams:
530 DeckBeams.jpg
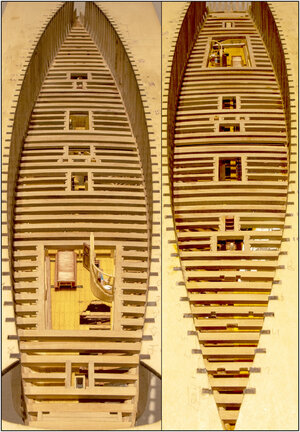
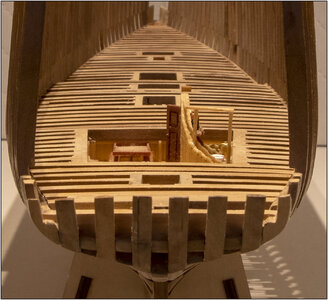
At the rudder passage I still have to make the double knees

From the back and the front:
531 DeckBeams.jpg

With the traditional view:
532 DeckBeams.jpg
With which the hull construction is ready. The deck beams must still be sanded flat on the top. Also in combination with the height of the Clamps that lock the beams.

Regards, Peter
 
That is a beautiful and artistically accurate rendering of the stove that appeared on the drawing in The Saga! Chapeau!First Place Metal
Thanxs Heinrich.
I hang the medal next to that of the Rotterdam Marathon. Why? I'll come back to that later, the day after tomorrow.
Regards, Peter
And that brings me back to the medals of a few posts ahead, in reference to Heinrich's post.

I started the build of my BN on December 25th last year. And so today the 24th, I complete the 1st year, at the same time as closing the hull with the necessary beams.
There were quite a few stages where it was just a matter of perseverance. Like preparing the 55 frames. I was able to nicely alternate the deck beams with the construction of the interior. Because preparing all those beams one after the other....... But also nailing, tree nailing etc etc.
And that perseverance brings me to Heinrich's medal and that I hang it next to that of the Rotterdam Marathon. Because running a marathon is also perseverance. Just bite your teeth and move on. The result: that finish.
The finish of the BN will take a while.
On to the 2nd year.

Regards, Peter
 
Last edited:
Merry Christmas, Mon Amie, to you and your loved ones!!! They say the best Christmas gifts come from the heart, but I say cash makes for a great gift too. :)


May Christmas end this year on a positive note and bring good tidings for 2022. Wishing you and your family a great festive season.
 
Merry Christmas, Mon Amie, to you and your loved ones!!! They say the best Christmas gifts come from the heart, but I say cash makes for a great gift too. :)


May Christmas end this year on a positive note and bring good tidings for 2022. Wishing you and your family a great festive season.
Thanxs Jim.
I was this year a little early:
-> Merry Christmas <-
But also for your and your beloved, all my best wishing for Chrismas and the new year.
And about the gifts: It's about the intention with which it is given. Here at the SoS, I don't doubt that for a moment.
Regards, Peter
 
And what a year the first year has been. For us, behind the scenes, not always easy, which makes everything so much more worthwhile. You have embarked on a very different path to the one most often traversed, a path that required great insight, omnipotent visualization and bravery beyond that of Mel Gibson in Braveheart. To say that you have pulled it all off would be an understatement, you have succeeded in the most graceful manner possible. With this build you have elevated what can be done with an ordinary POF build to levels that not even the manufacturer could ever have dreamt of. For that you deserve that medal through and through!
 
And what a year the first year has been. For us, behind the scenes, not always easy, which makes everything so much more worthwhile. You have embarked on a very different path to the one most often traversed, a path that required great insight, omnipotent visualization and bravery beyond that of Mel Gibson in Braveheart. To say that you have pulled it all off would be an understatement, you have succeeded in the most graceful manner possible. With this build you have elevated what can be done with an ordinary POF build to levels that not even the manufacturer could ever have dreamt of. For that you deserve that medal through and through!
Thank you for your very nice words, Heinrich. As users, we sometimes make it difficult for you as moderators. Sorry about that.
In terms of building I go a bit outside the book and sometimes push my limits. Or try to move them.
Hopefully it will encourage others to do (also) something other than 'prescribed'.
Regards, Peter
 
First I sanded the deck beams flat and finished with a polishing block with a fine grain.
533 DeckBeams.jpg

For the next steps I will deviate from the manual again. I'll try to explain why.
The manual contains the following steps:
534 DeckSheets.jpg
-place sheets and strips with deck planks.
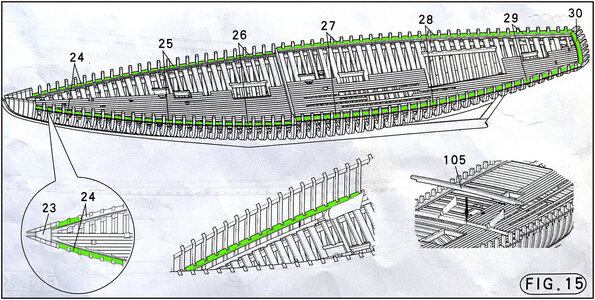
535 Waterways.jpg
- make the waterways on the deck planks.

After that, some small parts are placed and the hull is detached from the jig.
According to the plan, the hull planking is started from above, which becomes the bulwark.

The modified plan:
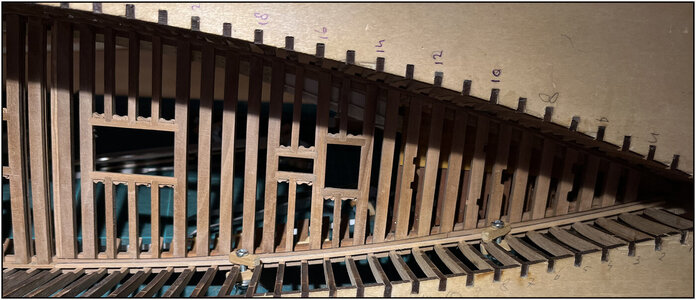
Since I cut the hull at the waterline, I want to have a little more rigidity in the part above the waterline. That's why I want to put the top planks on the hull first. To create the bulwarks.
Before I can install them, the waterways have to be made to measure. Both in terms of recesses around the frame heads and on the outside. There they must connect flush with the outside of the frames. So that the hull planks run smoothly again.

But ………. I find it strange that the waterways are fitted ON the deck planks. That doesn't seem logical to me. If water flies over the deck, a layer of water remains on the deck. Only when the water is sufficiently high, it runs over the edge of the imposed waterways.
I think the waterways and deck planks are on the same level.
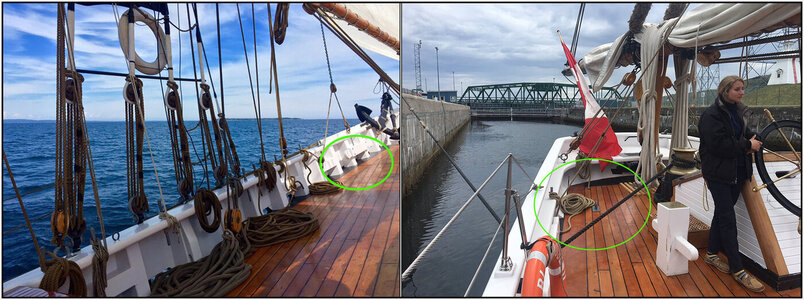
536 BN-II.jpg
This is clearly visible on these 2 photos of the BN-II. It can also be seen that the planks on the raised aft deck (right photo) also run backwards with the curve of the hull. So not straight like on the sheets of the kit.

These photos of the original BN also show that I also:
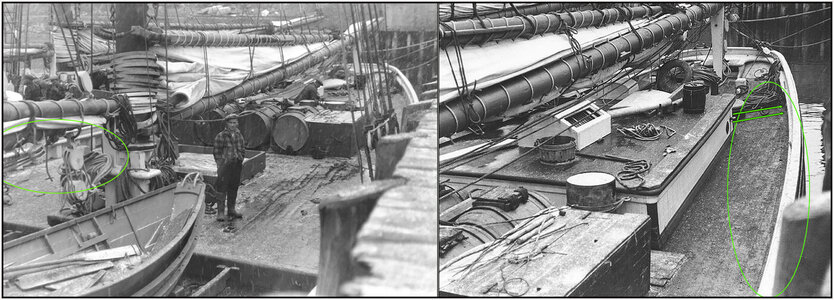
537 BN.jpg
In the photo on the right you can also see the frame heads at the 2 arrows. The deck planks are not completely parallel to the hull, but partly nibbled in.

538 BN.jpg
In this drawing from the Saga, which I showed earlier, L.B. Jenson didn't draw the planks on the aft deck quite parallel to the hull either, but also slightly nibbled into the molding along the waterway.

Put everything together and decided that these will be my next steps:
1: first make the waterways to size and apply primer and gray paint.
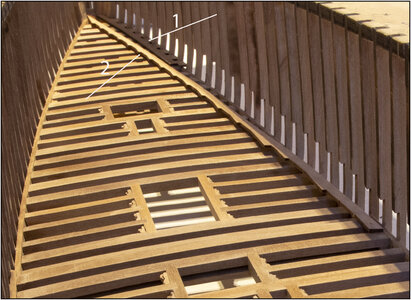
539 Waterway.jpg
Arrow 1 = waterway
Arrow 2 = 'nibble' strip for deck planks
But don't glue it yet because:
2: prime frame heads and sanding to paint white later.
3: prime, sand and apply the top hull planks on the inside. Where the scuppers are level with the waterways.
4: saw the top part loose from the jig and I can get to the deck more easily.
5: paint the inside of the bulwark and the frame heads white.
6: placing gray waterways.
7: make the strips where the deck planks will fall into nibbling. I will make my final plan for the deck planking.

I will probably use the strips and sheets from the kit, which were used for the deck planking. See the yellow accentuated parts in the 1st drawing of this post. But I will probably cut strips of 2mm wide for the deck planks. I 3mm is too wide. Then I should be able to get enough planks out of that. Otherwise I use wood from my own stock.

All in all, a lot of steps with a mutual connection that I have to take into account. For the time being, there is still time to rethink everything and adjust the plan if necessary. First make the 12 waterway strips to size.
Regards, Peter
 
Last edited:
In my previous post where I mentioned why I'm leveling the waterways with the deck planks, I may have 'stepped on the toes' of other builders of the YQ-BN. As if I'm saying that putting it on top of each other in that way is not good.
However, I want to make it very clear: If you (have) build the YQ-BN according to their manual, there is nothing wrong with that.
I'm just so crazy that I want to do something different again. Just like the sisters-keelson, the stringers, the clamps etc. etc. etc.
So if that's how it came across: my sincere apologies.Sick
Regards, Peter
 
Last edited:
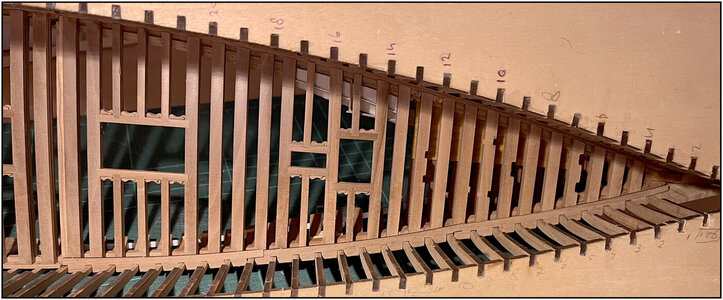
Started with the 1st row of waterways.
The 3 forward starboard strips fitted to the frame heads:
540 Waterway.jpg
In a few recesses, the openings are filled with fitting strips.

Then stretched a 1.5 mm lath on the waterways so that all 3 of them are fixed:
541 Waterway.jpg
And the waterways marked out. I will saw off the strips that protrude above the bar.
This must be 1 smooth line, because the cover strip into which the deck planks are nibbled, comes against this again.

The waterways on the outside are sanded flat with the outside of the frames:
542 Waterway.jpg
Here you can also see the stacking of the bearing beam, clamp and on top of that the waterway.

The 3 waterways are now sawed and grounded, along with the frame heads they come up against. Then I can see if everything I've planned works out.
Regards, Peter
 
Last edited:
In my previous post where I mentioned why I'm leveling the waterways with the deck planks, I may have 'stepped on the toes' of other builders of the YQ-BN. As if I'm saying that putting it on top of each other in that way is not good.
However, I want to make it very clear: If you (have) build the YQ-BN according to their manual, there is nothing wrong with that.
I'm just so crazy that I want to do something different again. Just like the sisters-keelson, the stringers, the clamps etc. etc. etc.
So if that's how it came across: my sincere apologies.Sick
Regards, Peter
Hello Peter,

As far as I'm concerned, no apologies required. Technically you're right; real life sees an urgent need to properly drain excess water overboard, as soon as possible. Obstructing these waterflows is considered bad practice.
Models and especially non-sailing ones don't have that pressing requirement, so it's easier (probably) for kit manufacturers to neglect these (to them) cumbersome and hard to implement requirements.
I'm still far removed from this step and I haven't come to a decision on this subject yet, but it's worthwhile to keep this in mind and add this to the list of "vergeet-me-nietjes" (don't forget about it).

Kind regards,

Johan
 
In my previous post where I mentioned why I'm leveling the waterways with the deck planks, I may have 'stepped on the toes' of other builders of the YQ-BN. As if I'm saying that putting it on top of each other in that way is not good.
However, I want to make it very clear: If you (have) build the YQ-BN according to their manual, there is nothing wrong with that.
I'm just so crazy that I want to do something different again. Just like the sisters-keelson, the stringers, the clamps etc. etc. etc.
So if that's how it came across: my sincere apologies.Sick
Regards, Peter
There is nothing wrong with either way. The difference in height is negligible IMO. But if you strive for accuracy, then you must do your homework and ignore the instructions! So do it your way, right or wrong, because it’s your ship and you’re the captain! ;)
 
Hello Peter,

As far as I'm concerned, no apologies required. Technically you're right; real life sees an urgent need to properly drain excess water overboard, as soon as possible. Obstructing these waterflows is considered bad practice.
Models and especially non-sailing ones don't have that pressing requirement, so it's easier (probably) for kit manufacturers to neglect these (to them) cumbersome and hard to implement requirements.
I'm still far removed from this step and I haven't come to a decision on this subject yet, but it's worthwhile to keep this in mind and add this to the list of "vergeet-me-nietjes" (don't forget about it).

Kind regards,

Johan
Thanxs for the understanding, Johan.
Regards, Peter
 
There is nothing wrong with either way. The difference in height is negligible IMO. But if you strive for accuracy, then you must do your homework and ignore the instructions! So do it your way, right or wrong, because it’s your ship and you’re the captain! ;)
Thanxs, Dean. Luckily there are no ISO-standards here. ROTF Just the 'own-standard'.:)
Regards, Peter
 
I should add that I agree with Johan, you don’t have to apologize for anything you change in the kit. Do keep in mind that the bulwarks (upper planking) are precut for you, including the scuppers, which saves a lot of work. The bulwarks are located by aligning the bottom of the scuppers with the top of the waterway boards. That in turn locates the cap railings and where you cut your frames. If you lower all of this by the thickness of the waterway board, I am not sure if it will be much of an issue, but it will lower your entire bulwarks by the thickness of the waterway board unless you compensate for it. You could cut the scuppers deeper by the thickness of the waterway board, or you could add height to the top of the bulwarks by the thickness of the waterway board. Or finally you could choose to let the bulwarks be shorter? But there is a ripple effect of lowering the waterway board. ;)

Ps - if it were me, I would just add a strip to the top of the bulwarks that is the thickness of the waterway board. It will be capped and painted black, so I think it will be fine. But…it’s your ship!
 
Last edited:
I should add that I agree with Johan, you don’t have to apologize for anything you change in the kit. Do keep in mind that the bulwarks (upper planking) are precut for you, including the scuppers, which saves a lot of work. The bulwarks are located by aligning the bottom of the scuppers with the top of the waterway boards. That in turn locates the cap railings and where you cut your frames. If you lower all of this by the thickness of the waterway board, I am not sure if it will be much of an issue, but it will lower your entire bulwarks by the thickness of the waterway board unless you compensate for it. You could cut the scuppers deeper by the thickness of the waterway board, or you could add height to the top of the bulwarks by the thickness of the waterway board. Or finally you could choose to let the bulwarks be shorter? But there is a ripple effect of lowering the waterway board. ;)

Ps - if it were me, I would just add a strip to the top of the bulwarks that is the thickness of the waterway board. It will be capped and painted black, so I think it will be fine. But…it’s your ship!
Thanxs for your point of view. I always appreciate that. :)
With the scuppers ‘at the level of the waterways’, the height of the bulwark in relation to the waterways remains the same. It is only +/- 1mm lower compared to the decking.
When I have the top planks on, I saw off the frames well above them. Then I will look at what is visually necessary.
But that 1mm compared to the deck: with a quote from you: "The difference in height is negligible IMO.";)
Regards, Peter
Correct! Which is why I said one option is to do nothing and leave it shorter. ;)
 
Thanxs Heinrich.
As we say in Dutch: "There are many ways to go to Rome". Also for fitting these parts together :).
Regards, Peter

Peter,
As we say in Roman (as I am), there are a couple of ways to go to Rome: by car from Amsterdam strait to Rome driving on highways; by fly, from Schiphol Airport strait to Fiumicino Airport; by train, but sincerely I don't know how many train changes you should make ...

P.S.: I'm looking at your log just to get an idea where to start. Honestly, it's difficult for me to understand Chinese (or Mandarin) language. I was thinking of going to my friend who owns a Chinese restorant and ask him to translate the manuals ... paying of course
 
Back
Top