YUANQING BLUENOSE - Peter Voogt [COMPLETED BUILD]

Peter, for this reason I decided to do both sides with the planks up to the waterline ... no more! Maybe one or two more strips but not complete, like you did
I agree with you on that, a very good reason to stop there. :)
But ........ I also want to make 1 side black and red, while the planks and treenails remain visible. :cool:
I got that in my head and I can't get it out. sh......
Then I have to plank below the waterline. I can't leave out the last part .......... then on. Sick
 
Peter, for this reason I decided to do both sides with the planks up to the waterline ... no more! Maybe one or two more strips but not complete, like you did
So you're looking at 2500 trennels for the hull planks alone...
I think it's a very intriguing approach though.
 
I agree with you on that, a very good reason to stop there. :)
But ........ I also want to make 1 side black and red, while the planks and treenails remain visible. :cool:
I got that in my head and I can't get it out. sh......
Then I have to plank below the waterline. I can't leave out the last part .......... then on. Sick
I've my mind set on one side completely planked. Not sure about the trennels, but definitely sure about no cutting of the hull on the waterline... :eek:
 
…. not on the waterline ….. Aha ……
Then Lengthwise, like the model from Nova Scotia. Great!
ROTF
Oh no Mr Voogt, no section cut on the waterline, nor on the centerline, nor on any possible or impossible plane; I will be more than lucky if my model comes out looking any good.

I will not allow a saw anywhere near my model if I can help it (and don't give the Admiral any ideas either, as she's already smitten with your Bluenose). ;)
 
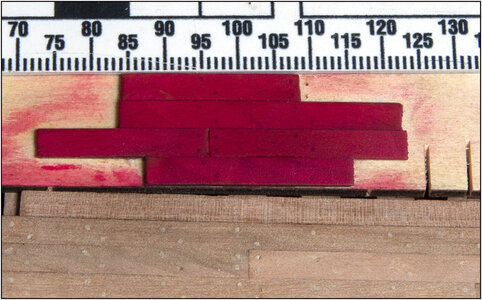
A nice coincidence: Uwe shows a moment ago his Granado Section with red parts. I was this afternoon experimenting with Ecoline Carmine Red for the hull below the waterline:
610 CarmineTreenails.jpg
First popped the planks with my 3 polishing blocks, then applied the Ecoline with a cloth. After drying a light after polishing.
In any case, the treenails remain visible.
Regards, Peter
 
A nice coincidence: Uwe shows a moment ago his Granado Section with red parts. I was this afternoon experimenting with Ecoline Carmine Red for the hull below the waterline:
View attachment 290002
First popped the planks with my 3 polishing blocks, then applied the Ecoline with a cloth. After drying a light after polishing.
In any case, the treenails remain visible.
Regards, Peter

Peter, it seems a little too red to me (Carmine Red ...). It seems to me that the BN red is a bit more bordeau than bright red. Unless the pic and the light doesn't make it too .... flamboyant.
 
Peter, it seems a little too red to me (Carmine Red ...). It seems to me that the BN red is a bit more bordeau than bright red. Unless the pic and the light doesn't make it too .... flamboyant.
Thanxs Piero.
I was considered to show it along with some reference photos of the BN-II. Because how the color shows to someone else depends on the embedded color profile and how the viewer's screen is set up. Think sea-blue and sea-green.
I'll post it with reference soon. Then the color of both can shift, but the comparison remains possible.
Regards, Peter
 
A nice coincidence: Uwe shows a moment ago his Granado Section with red parts. I was this afternoon experimenting with Ecoline Carmine Red for the hull below the waterline:
View attachment 290002
First popped the planks with my 3 polishing blocks, then applied the Ecoline with a cloth. After drying a light after polishing.
In any case, the treenails remain visible.
Regards, Peter
Looking good, Peter. Will you apply a final topcoat to protect the Ecoline?
 
Looking good, Peter. Will you apply a final topcoat to protect the Ecoline?
Thanxs Johan. My intention is to do only the Ecoline. Without a coat over the Ecoline, I think it’s will be more dark and less transparant.
But perhaps a layer of linseed over it. To get the polished look from the other side. I’ll test it on the test sheet.
 
Last edited:
Picked up the thread again. Not too much text, I think the images speak for themselves.

Drilling:
View attachment 288284

Treenailing:
View attachment 288285

Raw Sanding:
View attachment 288286

Start the 1st sawcut to determine the direction:
View attachment 288287
One extra plank installed in the front. Because the saw cut was very tight along an open side.

In the vice, perpendicular to the waterline:
View attachment 288288

Through:
View attachment 288289

Relief:
View attachment 288290
View attachment 288291
By also applying glue to the sides of the planks, all points remain nicely in place.

As hoped, even the treenails are in half and staying in place, thanxs to the glue:
View attachment 288292
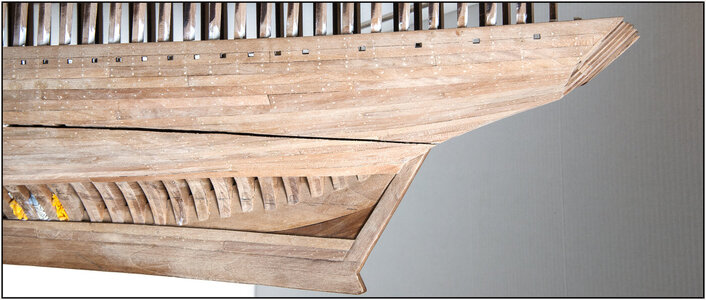
With the macro lens, so everything can be seen. The finishing will come when part 2 has also been sawn and the rest of the planking has been applied.

Then someone will think, why not first planked, then sawn all at ones and installed the interior?
If I had known everything in advance how I was going to carry out the inside and outside, I could indeed have done it better in that order. But there are still plenty of follow-up items that I don't know exactly or have worked out yet. I've only just now decided how I'm going to make the planked hull black and red.
So let's just say it's mostly challenging right now.
Regards, Peter
The images certainly do speak for themselves Peter, really nice work!
- Mark
 
The advantage of skating at these Olympics is that they started with the 3000 for the women and the 5000 for the men. That takes a long time. I sat down in front of the TV with my stash of re-pointed toothpicks. And with the DrawPlate the treenail dots rotate. :) And now we have 1 Gold and 1Silver.First Place MetalFirst Place Metal
With the new stock of a few hundred, I was able to provide all the planks installed so far with the 'trennels':
View attachment 288919
Between the 2 blue arrows the next 12-frame plank that has to be sawn in half. With the intended saw seam.

But wouldn't I start sawing a half hull? Still, I wanted to try whether my first option of sawing per plank was also possible. Then you have a better view and direction of the already existing saw cut. Because in the first part I had lightly tapped a few frames with the saw. I do get that flat and neat again, but what doesn't need to be updated is always included.
Sawn the plank from 2 sides:
View attachment 288920
With the 'loose tip' feared by Johan @RDN1954. ;) But it was not loose and that stayed on the frame.
This has been 'roughly' sanded, so the treenails are not yet neatly flattened. That comes when the whole hull is closed.

Using the strip that I later apply to fill the saw seam and then equal the waterline-line, applied the following plank:
View attachment 288921
The tip, with glue on the sides, held in place.
So it can also be done this way.
Now just drill, place trennels, sand and on to the next cut.

The lines on the sides of the frames are from always calculating in between to see if I can manage with the rows of full planks.
Regards, Peter
"And now we have 1 Gold and 1 Silver"

There's a need for speed amongst your countryfolk Peter, speed-skating specialists! ThumbsupRedface
 
Thanxs Piero.
I was considered to show it along with some reference photos of the BN-II. Because how the color shows to someone else depends on the embedded color profile and how the viewer's screen is set up. Think sea-blue and sea-green.
I'll post it with reference soon. Then the color of both can shift, but the comparison remains possible.
Regards, Peter
I am looking forward to see the paint compared
BTW: I am using usually the brushpens from Ecoline - much easier to handle especially on smaller areas - f.e. I am using the black one also for immitating the caulking...
If it is allowed I would give here the link to the post in my building log of the HMS Granado you mentioned - here I compared three red tones from Ecoline
Thanks Uwe. Of course it is allowed to post the link. For both of us it is a Red-Test.

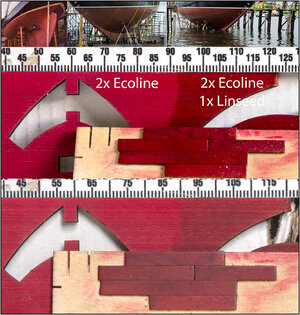
I had previously used my test slats for the linseed oil test. Then sanded and the Ecolione on it. That can therefore be somewhat distorted compared to 'clean' wood. That's why I grabbed a rest sheet.
Both left and right 2 layers of Ecoline with a cloth, applied rubbing:
611 CarmineTreenails.jpg
The right side polished with my finest block and provided with a layer of linseed oil. Also applied with a cloth. This gives a very nice deep color. And not much difference from my 1st test.
The top one with obliquely incident light. The bottom one with almost straight light so that it just won't reflect.
At the top 3 photos of the BN-II. Here, too, the incidence of light influences the shade you see.
I think it will be the same with other reds. The angle of the light makes a great difference.
It will therefore most likely be 2x Ecoline with 1x linseed oil.
On to the black/blue tests.
Regards, Peter
 
Last edited:
Back
Top