HMS Vanguard 1787 1:72 scale by ADoyon - First Build

My compliments, Andre great job.
I am finishing the first planking of my Vanguard and I am using aliphatic glue.
What kind of glue are you using for the second planking?
Antonio
Hi Antonio and thank you for your comment. The glues I’m using are Weld Bond for the frame and for the first layer planking, and ZAP-A-GAP Medium CA+ and Z-ENDS for the second layer planking. The Weld Bond was recommended by Bob Hunt for its superior strength and because it can be de-bonded. I did notice that when cutting through a Weld Bond joint the glue remains slightly flexible. ZAP-A-GAP works great for the second layer planking. It bonds within 10 seconds, so you don’t need to use clamps or pins to hold the planks. I pre-fit the planks before applying glue and draw a pencil line under the edge of the plank to know where to apply glue. I apply glue to about ¼ the length of the hull at a time when installing a full-length plank. Start at one end applying a little pressure working along the plank, then continue adding a little more glue and moving on. I do need to pre-bend the planks at the bow and stern since the ZAP-A-GAP bonds quickly and I don’t have a lot of time to get a good fit. Bending and installing the 1 mm x 5 mm walnut planks turned out to be easier than I anticipated. They are quite flexible and easier to install than the first layer planking especially when using CA glue.

IMG_1241.jpg

IMG_1237.jpg

IMG_1238.jpg
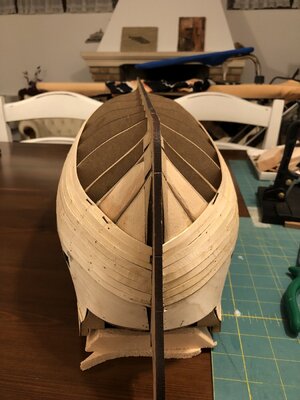
A little more progress on the second layer planking. Not moving too quickly on the second layer planking. Although I’m retired, there are many things keeping me occupied, mainly our landscaping at this time of year and there is family and grandchildren. Not complaining, just commenting if anyone is wondering why this guy is so slow.
 
thanks Andre for your help. I am also posting my progress with Vanguard. I'd love to have your comment.
Antonio
 
My compliments, Andre great job.
I am finishing the first planking of my Vanguard and I am using aliphatic glue.
What kind of glue are you using for the second planking?
Antonio
with my many years of experience, I would use Contact glue. Only be careful with your hands and other parts, where there can be glue on both side
were a mask, open windows or much better outside. or something as it is a chemical product- solvents- we have had one of our colleague having problems with cyancrolic glue.
 
I arrived here with the first planking
Hi Antonio,
Your first layer planking is looking very good at this stage of planking. I assume you are building the same ship, the Amati HMS Vanguard 1787. I noticed a few minor differences in our approach…I may have tapered my planks a little more at the bow, but this doesn’t matter since you will be covering the hull with wood filler and sanding to achieve a smooth hull for second layer planking. I also cut a rabbet in the MDF false keel along the walnut stem, keel, and stern post. It’s basically a recess or groove where the planks are inserted in these members. I’m not sure if it’s required on a ship model but it was recommended in Bob Hunt’s practicum. There is a wonderful explanation by El Capi for the rabbet in post #67 in my log and a link to cutting the rabbet on a real ship in post #68. I am mentioning this because you could probably do this for the second layer planking. It does help when gluing the second layer. By inserting the plank in the groove at the bow it holds that end of the plank in place while bending and gluing. It may also help to provide a smoother line where the hull meets at the stem and keel pieces. I did need to clean up the rabbet for second layer planking by trimming away part of the lime wood planks and not cutting the walnut stem or keel pieces. Whether or not you decide to cut a rabbet, the false MDF keel needs to be tapered to the stern post so that the second layer planks are flush with the stern post. I cannot tell from your photos if you have done this. See my post #66 for what this should look like.

IMG_1242.jpg

IMG_1243.jpg
Drawing lines on the hull to aid in determining how much taper to apply to second layer planking and where to use drop planks and stealers. I glued five scrap planks together to divide the hull in planking bands. Using a full-length plank holding it horizontal amidship and bending around the curve of the hull while drawing a line along the plank. I can see that the lower section at the stern will require stealers where the last line rides up.

IMG_1244.jpg
Used Elmer’s Carpenter’s wood filler on the first layer planking and will use Elmer’s Walnut wood filler on second layer planking.
 
Hi Andre. Yes, we are building the same model. You are ahead of me so your experience is very useful to me. I am also posting my progress in my Work Diary. I have seen the explanations of El Capi and I find them very interesting and useful for those who make modeling. I am finishing the first planking and I am near the end of the false keel so the drawings of El Capi are very useful to me. Thanks for your suggestions.
I see you prefer to put the frames in the windows of the guns after finishing the second planking although the instructions say to do this before.
I hope our two models look as good as the real Vanguard was.
Regards
Antonio
 
Hi Andre. You are doing a great job. I really like how you work because you take care of the details as I like it.
With my model I reached the end of the first planking. Tomorrow I will post the photos.

Now I'm building the grates and ladders. In the drawings reference is made to the number 464 but I cannot find it in the pieces.
I imagine that there are only the shoulders and that the steps are made from the strips. Did you do that?

It is a real shame to hide the stove and not show it. I had thought of leaving a grating broken down to show what is underneath.
What do you say?
 
Hi. Antonio
You will find 464 is the ladder assembly

You will find the number in your parts list .the packet will be in one of your boxes .
Cheers snowy
 
Hi Andre. Yes, we are building the same model. You are ahead of me so your experience is very useful to me. I am also posting my progress in my Work Diary. I have seen the explanations of El Capi and I find them very interesting and useful for those who make modeling. I am finishing the first planking and I am near the end of the false keel so the drawings of El Capi are very useful to me. Thanks for your suggestions.
I see you prefer to put the frames in the windows of the guns after finishing the second planking although the instructions say to do this before.
I hope our two models look as good as the real Vanguard was.
Regards
Antonio
Hi Antonio,
I’m glad to hear we are building the same model and that we may be able offer each other support and advice.
I have not yet framed out the gunports. When laying down the second layer of planking I overlapped the side edges of the gunports a bit so that I could trim off and file the planks flush with the opening. There are a few lower gunports that still need to be trimmed along the lower edge.
I’ll try and stay ahead of you if you decide to follow.

Andre
Hi Andre. You are doing a great job. I really like how you work because you take care of the details as I like it.
With my model I reached the end of the first planking. Tomorrow I will post the photos.

Now I'm building the grates and ladders. In the drawings reference is made to the number 464 but I cannot find it in the pieces.
I imagine that there are only the shoulders and that the steps are made from the strips. Did you do that?

It is a real shame to hide the stove and not show it. I had thought of leaving a grating broken down to show what is underneath.
What do you say?
Hi Antonio,

I found the ladder parts in one of the boxes of small parts where the anchor is located. I have not started with any of the deck fittings yet. A lot of what I do is guided by Bob Hunt’s practicum and he is a little bit out of sequence with the kit’s build instructions. I am working on the second layer planking. Once that is complete, I will be constructing the galleries, then painting the hull before working on any deck fittings. As for not showing the stove, I agree with you that it’s a shame. However, you will have photos of the stove to show before it’s covered. I do plan on leaving a grating hatch partially uncovered as shown in one of the photos on the cover of the box. Looking forward to seeing your first layer planking completed.

Andre
 
Lovely job on your planking Andre. You are entering a challenging time at the bow as the curve wants to force the planks to run vertically (at least that happened to me).
 
Hi Andre.
Very nice work and thanks for your help.
Are you using cyanoacrylate glue for the second planking ?.
 
Lovely job on your planking Andre. You are entering a challenging time at the bow as the curve wants to force the planks to run vertically (at least that happened to me).
Thanks Paul. I am trying to follow the band lines I drew, but I am still finding it to be a bit difficult. At each of those lines, the planks will lay flat naturally without any lateral bending. By dividing the hull into planking sections it helps me to see where I need to use drop planks, and where I will need to use stealers at the stern. And by the way, whenever I look at the posts on your build of the Vasa I am amazed at the stunning quality of your workmanship. You have a lot of innovative ideas which give me some inspiration for my build.
 
Hi Andre.
Very nice work and thanks for your help.
Are you using cyanoacrylate glue for the second planking ?.
Hi Antonio,
Yes, I'm using cyanoacrylate ZAP-A-GAP Medium CA+ glue for the second layer. It works great since you don't need to use nails or pins to hold the planks down. Something I discovered, is that cyanoacrylate glue bonds better in the presence of moisture. If you soak the planks in water and there is a little moisture left on the plank it's better for the bond. If you were able to bend the lime wood planks without applying heat, you should be able to do the same with the walnut planks. They are thinner and more flexible.
Something else I did on second layer planking that's not mentioned in any instructions...after installing the lower counter fascia part (the part that was difficult to bend) I trimmed the plywood gunport patterns flush with fascia surface. It made it easier to install the horizontal walnut planks on the counter rather than try to fit between the plywood sections and provides for a nice fit between the hull planks and the counter planks.
 
Hi Andre.
I'm interested in your opinion about the hull coloring.
I am very fascinated by the model you see in this photo. The black and ocher yellow are seen very well together with the beauty of the walnut wood.
I would also like to try to make softer and less vivid colors on Vanguard.
What do you think?
antonio

IMG_7620.JPG
 
Last edited by a moderator:
Hi Antonio,
This is a beautiful model. I love the colors which are so pleasing to the eye. I did have a lot of hesitancy about which paints to use. Initially I wanted to use the Humbrol Paints recommended in the Kit’s instructions because that’s what I thought was intended by the person who designed this kit. I did like the yellow paint as shown on the cover of the box because of the pale-yellow color. Two problems with the Humbrol Paints; they are oil based which make them more difficult to cleanup, especially since I will be using an airbrush and the fact that I would have to mix paints to achieve the Red Ochre color. After doing a little research on which type of paints most modelers prefer, it seems like acrylics are the way to go. I found that Caldercraft makes a set of Admiralty Paints for the Vanguard. These paints have been color matched to the Admiralty colors, as still used on the HMS Victory in Portsmouth, England. So, I would like to be historically accurate and decided to use these paints (two sets so not to run out). Also, they are acrylics. I purchased the paints from Cornwall Model Boats in the UK, https://www.cornwallmodelboats.co.u...=HMS-Vanguard-Paint-Set-APS9102W.html#SID=339.

Below are samples of some of the Admiralty Paint colors, from left to right, Dull Black, Yellow Ochre, Red Ochre, French Blue and Ironwork Black. Dull Black would be for the ships hull and other wooden parts painted black. Dull Black and French Blue have a slight satin finish. The two samples to the right are the Humbrol Paints. Looking at the Humbrol yellow, I think it’s too yellow. Also, just want to mention that the colors in the photo appear darker than they are, probably because of the lighting.
Andre

IMG_1283.jpg
 
Back
Top