-

Win a Free Custom Engraved Brass Coin!!!
As a way to introduce our brass coins to the community, we will raffle off a free coin during the month of August. Follow link ABOVE for instructions for entering.
You are using an out of date browser. It may not display this or other websites correctly.
You should upgrade or use an alternative browser.
You should upgrade or use an alternative browser.
Jim, according to google search;
The phrase "down the hatch" originates from nautical origins, referring to cargo being lowered into a ship's hatch, and evolved into a toast or encouragement to drink.
The phrase "down the hatch" originates from nautical origins, referring to cargo being lowered into a ship's hatch, and evolved into a toast or encouragement to drink.
There are other phrases also in common use like "loose cannon". When a cannon came loose in a rolling ship it could do terrible damage.Jim, according to google search;
The phrase "down the hatch" originates from nautical origins, referring to cargo being lowered into a ship's hatch, and evolved into a toast or encouragement to drink.
Thank you all for the likes and compliments - greatly appreciated.
Starting the Deck Planking. Several pieces I already messed up and started over. The main point is deck COLOR. This is the combo I used and I am not saying this is the best. I am just saying that after different types of experiments, this is what I chose. Since I have a tendency to have little patience in this area, I opted for this combo. The pieces are being dry fitted - no glue up yet.
Taking a long raw strip of deck planking
1. Painting with stain (Dark Oak)
2. Painted with Weathered Gray Stain
3. Painted with another coat of Weathered Gray Stain.
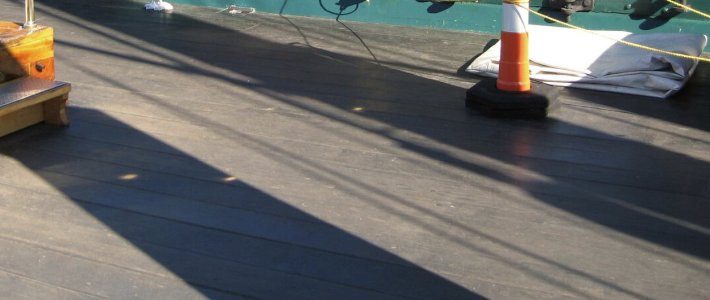
lighted sanded a few strokes of 1000 grit. In some areas of the real ship, it does appear to have some very dark red streak in the planks, maybe its the lighting on the real ship. In some photos it looks like just plain gray painted over raw wood. At any rate, I am probably going to stick with this. The light sanding gives a little worn affect, but not much. I might go back and add a little more gray stain if need be.
As they say - - I think it is close enough for Government work !!!
It gives nice contrasts in the woodwork, Donnie.Thank you all for the likes and compliments - greatly appreciated.
Starting the Deck Planking. Several pieces I already messed up and started over. The main point is deck COLOR. This is the combo I used and I am not saying this is the best. I am just saying that after different types of experiments, this is what I chose. Since I have a tendency to have little patience in this area, I opted for this combo. The pieces are being dry fitted - no glue up yet.
Taking a long raw strip of deck planking
1. Painting with stain (Dark Oak)
2. Painted with Weathered Gray Stain
3. Painted with another coat of Weathered Gray Stain.
lighted sanded a few strokes of 1000 grit. In some areas of the real ship, it does appear to have some very dark red streak in the planks, maybe its the lighting on the real ship. In some photos it looks like just plain gray painted over raw wood. At any rate, I am probably going to stick with this. The light sanding gives a little worn affect, but not much. I might go back and add a little more gray stain if need be.
As they say - - I think it is close enough for Government work !!!
Gr. Peter
I think Model Expo needs to reevaluate its parts list and quantities. I have run out of Deck Planking strips and am only halfway done ! This kit was ordered about a year and a half ago. So, I had to put in a parts request for 15 more, and even with that, I think I might run short again. What you see is all that I have.
Instead of this kit turning into the most difficult "kit" - it is turning into the worst challenging (??) (that I have built so far). And I thought the Mantua San Felipe was not good.
Furthermore, with a PoB kit, Model Shipways should have utilized a FALSE deck platform (which is usually made out of 1/32 or thinner ply) to cover the entire deck surface. This way you can cut all your planks to 3 -7/8" to scale and lay them down like that instead of using an exacto knife to "simulate" the joints. Come on ME, lets make some changes here.

Last edited:
- Joined
- Feb 23, 2024
- Messages
- 20
- Points
- 58

I think one of the most surprising things to me getting into this hobby was how long these manufacturers sell the same kits for without ever updating design errors or instructions. Constitution is probably at the top of my list to build, but after seeing seeing modern kit designs like we see coming out of China and companies like Vanguard models, it's hard to go back to Model Expo kits using designs that are nearly unchanged for 30 plus years.Come on ME, lets make some changes here.
The box also has hull planking which is 1/16 x 1/8. I ran a few of these strips through my Micro Mark Table saw and trimmed off 1/32 off of one side which gave me a strip of 1/16 x 3/32 (which is same as deck strips). Given the 15 extra that I ordered (free) from ME (Model Expo)- I think I can make the deck work out ok.
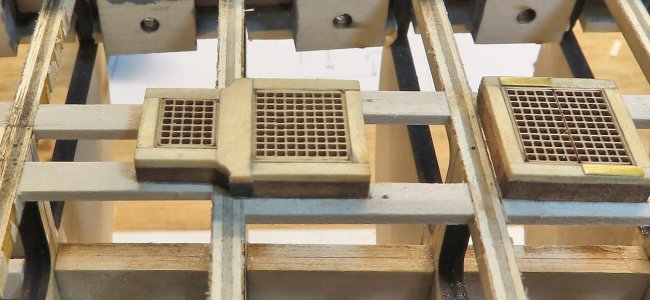
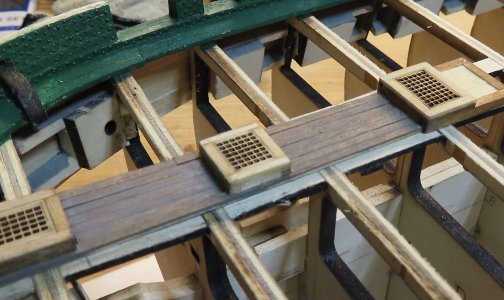
In ME's defense, I will say that the PLANS are good. However, you are also given a box of wood and strips that a person MUST go through and study. The parts list DO tell you for instance (40 strips for decking, 50 strips for hull), ---- but ---- the rest of the wood in the box is a mystery as to HOW it is supposed to be used. If the parts list says (again as example) you have 5 pieces of 1/4 x 1/8 then the parts list should say these strips are for the HATCH FRAMES. This is not easily figured out --- however, I guess it is possible that I DID NOT study the entire set of plans enough to determine what strips or stock of wood should be used. Then also is another mystery: there is also ONE piece of like 3" x 3/32 solid plank of which I have no idea of what it is used for.
I really think that ME should at least hire someone with great experience to re evaluate the kit with its parts list being more specific, and also including the correct number of pieces to complete the project. The manual is severely out dated and I can understand that probably the manual was written WAY before computer graphics or CADD - ok, so, I get that 100%. But we live in a different world now that can show better graphics. The images in the manual are all HAND drawn of what I can tell. Please understand that I do not mean to be critical or harsh. Most of it remains that I admit that I am not a naval architect and this kit in the hands of someone that has done A LOT of scratch building "might" get it. As Bob Hunt said in his practicum a few times, even he was mystified on some of the things about the kit did not quite make any sense.
All I am saying is that for this kit to be really successful for those that are intermediate kit builders wanting to try something more difficult, the kit needs some serious overhaul. Otherwise, I would not nor could not recommend this kit to someone that had a clear understanding of how to be flexible and to modify on their own to make the kit a good project. I have already made a few trips to my local Hobby Lobby to get some basswood to make parts that the wood is not mentioned.
So in conclusion, in order to make this kit stand out, a lot of effort should be taken into consideration. One of the things I should have done is to make a paper template of the deck parameter and then DRAW out how all the deck planks were going to be arranged - as the deck planks will be tapered going aft to the stern. Yes, you can calculate what the width of each strip would be in order to squeeze the exact amount - but it is more difficult to that as we know that there will be tolerances to deal with. If a person had the time and being so careful, they can take a plastic ships type curve to lay out all the planking on the paper template, but that would take several days to accomplish - and I admit that I just did not want to invest that much time - instead I just chose the "seat of my pants"approach. I really do not want this project to turn into a multi year project as I have other things I want to get involved with.
- Joined
- Apr 11, 2025
- Messages
- 1
- Points
- 0
Hi Donnie,The box also has hull planking which is 1/16 x 1/8. I ran a few of these strips through my Micro Mark Table saw and trimmed off 1/32 off of one side which gave me a strip of 1/16 x 3/32 (which is same as deck strips). Given the 15 extra that I ordered (free) from ME (Model Expo)- I think I can make the deck work out ok.
In ME's defense, I will say that the PLANS are good. However, you are also given a box of wood and strips that a person MUST go through and study. The parts list DO tell you for instance (40 strips for decking, 50 strips for hull), ---- but ---- the rest of the wood in the box is a mystery as to HOW it is supposed to be used. If the parts list says (again as example) you have 5 pieces of 1/4 x 1/8 then the parts list should say these strips are for the HATCH FRAMES. This is not easily figured out --- however, I guess it is possible that I DID NOT study the entire set of plans enough to determine what strips or stock of wood should be used. Then also is another mystery: there is also ONE piece of like 3" x 3/32 solid plank of which I have no idea of what it is used for.
I really think that ME should at least hire someone with great experience to re evaluate the kit with its parts list being more specific, and also including the correct number of pieces to complete the project. The manual is severely out dated and I can understand that probably the manual was written WAY before computer graphics or CADD - ok, so, I get that 100%. But we live in a different world now that can show better graphics. The images in the manual are all HAND drawn of what I can tell. Please understand that I do not mean to be critical or harsh. Most of it remains that I admit that I am not a naval architect and this kit in the hands of someone that has done A LOT of scratch building "might" get it. As Bob Hunt said in his practicum a few times, even he was mystified on some of the things about the kit did not quite make any sense.
All I am saying is that for this kit to be really successful for those that are intermediate kit builders wanting to try something more difficult, the kit needs some serious overhaul. Otherwise, I would not nor could not recommend this kit to someone that had a clear understanding of how to be flexible and to modify on their own to make the kit a good project. I have already made a few trips to my local Hobby Lobby to get some basswood to make parts that the wood is not mentioned.
So in conclusion, in order to make this kit stand out, a lot of effort should be taken into consideration. One of the things I should have done is to make a paper template of the deck parameter and then DRAW out how all the deck planks were going to be arranged - as the deck planks will be tapered going aft to the stern. Yes, you can calculate what the width of each strip would be in order to squeeze the exact amount - but it is more difficult to that as we know that there will be tolerances to deal with. If a person had the time and being so careful, they can take a plastic ships type curve to lay out all the planking on the paper template, but that would take several days to accomplish - and I admit that I just did not want to invest that much time - instead I just chose the "seat of my pants"approach. I really do not want this project to turn into a multi year project as I have other things I want to get involved with.
I'm new to the site, but am also building the Model Shipways Constitution. While the plans themselves aren't bad, the instructions are pitiful. This is my first attempt at building a model ship, so I definitely needed help figuring out how to go about it. There is a resource that a number of my fellow builders at ModelShipWorld.com have used - the Bob Hunt practicum. It's far from perfect, but without it, I'd have been lost. Better still for reference, tips and techniques, are the build logs at that site. There have been some masterpieces. Right now, there are about a half dozen of us working away at Conny in various stages, but we consult one another for ideas and advice. I know one of these fellows, Jon, has contributed on your build log here. If you've never been there, check out the site. I think you'll find it helpful as you progress on your own build.
Best
Peter (aka Der Alte Rentner - at both sites)
I agree with you this kit can be very frustrating. Nearly every part has to be carefully planned with little or no instruction. I kinda wish I had the practicum but I find my best source for help is all the other build logs.The box also has hull planking which is 1/16 x 1/8. I ran a few of these strips through my Micro Mark Table saw and trimmed off 1/32 off of one side which gave me a strip of 1/16 x 3/32 (which is same as deck strips). Given the 15 extra that I ordered (free) from ME (Model Expo)- I think I can make the deck work out ok.
In ME's defense, I will say that the PLANS are good. However, you are also given a box of wood and strips that a person MUST go through and study. The parts list DO tell you for instance (40 strips for decking, 50 strips for hull), ---- but ---- the rest of the wood in the box is a mystery as to HOW it is supposed to be used. If the parts list says (again as example) you have 5 pieces of 1/4 x 1/8 then the parts list should say these strips are for the HATCH FRAMES. This is not easily figured out --- however, I guess it is possible that I DID NOT study the entire set of plans enough to determine what strips or stock of wood should be used. Then also is another mystery: there is also ONE piece of like 3" x 3/32 solid plank of which I have no idea of what it is used for.
I really think that ME should at least hire someone with great experience to re evaluate the kit with its parts list being more specific, and also including the correct number of pieces to complete the project. The manual is severely out dated and I can understand that probably the manual was written WAY before computer graphics or CADD - ok, so, I get that 100%. But we live in a different world now that can show better graphics. The images in the manual are all HAND drawn of what I can tell. Please understand that I do not mean to be critical or harsh. Most of it remains that I admit that I am not a naval architect and this kit in the hands of someone that has done A LOT of scratch building "might" get it. As Bob Hunt said in his practicum a few times, even he was mystified on some of the things about the kit did not quite make any sense.
All I am saying is that for this kit to be really successful for those that are intermediate kit builders wanting to try something more difficult, the kit needs some serious overhaul. Otherwise, I would not nor could not recommend this kit to someone that had a clear understanding of how to be flexible and to modify on their own to make the kit a good project. I have already made a few trips to my local Hobby Lobby to get some basswood to make parts that the wood is not mentioned.
So in conclusion, in order to make this kit stand out, a lot of effort should be taken into consideration. One of the things I should have done is to make a paper template of the deck parameter and then DRAW out how all the deck planks were going to be arranged - as the deck planks will be tapered going aft to the stern. Yes, you can calculate what the width of each strip would be in order to squeeze the exact amount - but it is more difficult to that as we know that there will be tolerances to deal with. If a person had the time and being so careful, they can take a plastic ships type curve to lay out all the planking on the paper template, but that would take several days to accomplish - and I admit that I just did not want to invest that much time - instead I just chose the "seat of my pants"approach. I really do not want this project to turn into a multi year project as I have other things I want to get involved with.
The drawings are excellent but it's difficult to build all of the details into the model.
My hull is nearly finished and I have a lot of timber left over I hope I haven't missed anything. It seems to me M.E. have allowed for a good margin for error.
Although it's taking a lot longer than I expected I'm happy with how the model is progressing. This kit is an ideal introduction to scratch building.
Tony
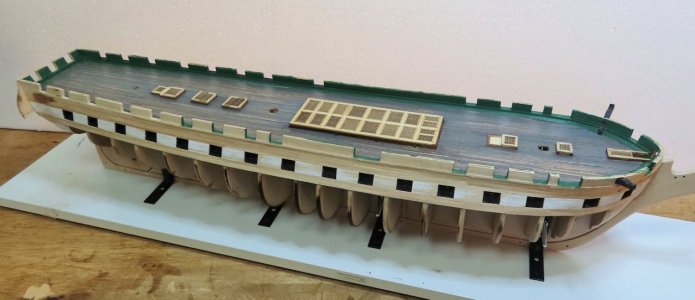
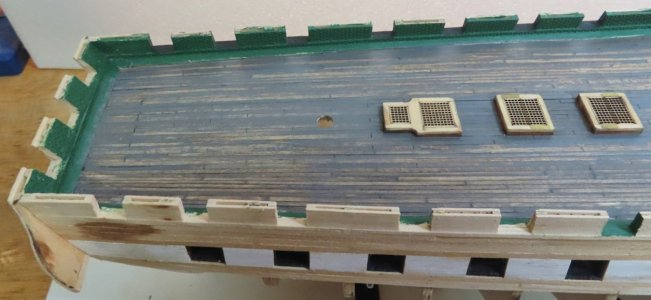
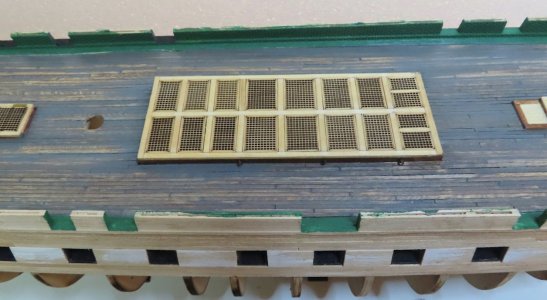
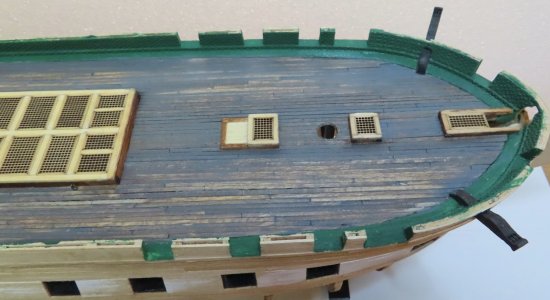
So, this falls into the dilemma of being happy with it and not happy with it. The deck looks better in real life than the pics do. Yes, I know that there are areas that look worn - but I might add some more gray later on.
However, when the deck furnishings get added along with the Cannons, Bitts, and rails, and what not , alot of this will not even be noticed or even seen. Lets just say that it is a well worn ship ! HA.
The Deck would have turned out A LOT better if this kit had a "False Ply Deck" to mount your deck strips to - like what OcCre does. This should be the first thing Model Shipways should do to this kit.
After working on this, I am tempted to say to myself, no more ship models.
So here is the "Ugly Deck".
- Joined
- Aug 6, 2024
- Messages
- 43
- Points
- 48

What? are you going to take up knitting?no more ship models.
If you are not happy with the deck, you could try buffing it with some 0000 steel wool. It would take come of the color off and make the deck more worn, if that is the look you are after.  There is always quilting.....
  Of course, that can get expensive too. My wife was looking at a sewing machine that was about $8K USD ! LOL
 Of course, that can get expensive too. My wife was looking at a sewing machine that was about $8K USD ! LOL
Yea , very funny Folks !
Seems like arthritis is setting up pretty bad in my first finger knuckle. Very sharp pain suddenly brings things to a stop at times. Its too early in the game to be dealing with this since rigging even uses more finger / hand manipulation.
I really wanted this Coney to be the best, but I am afraid that is not going to happen. I shall just do the best I can with it.
anyway - enough whining - next will be the upper railings.
Hi Donnie,So, this falls into the dilemma of being happy with it and not happy with it. The deck looks better in real life than the pics do. Yes, I know that there are areas that look worn - but I might add some more gray later on.
However, when the deck furnishings get added along with the Cannons, Bitts, and rails, and what not , alot of this will not even be noticed or even seen. Lets just say that it is a well worn ship ! HA.
The Deck would have turned out A LOT better if this kit had a "False Ply Deck" to mount your deck strips to - like what OcCre does. This should be the first thing Model Shipways should do to this kit.
After working on this, I am tempted to say to myself, no more ship models.
So here is the "Ugly Deck".
You would look terrible behind a sewing machine...
I think I see your deck differently than you do. You mentioned adding more grey. If it were me (and its not) I would take away some of the gray. Of course you are the captain and likely have a vision of what you are after. To me this doesn't look like wood greyed out by the sun and scrubbing - it looks like a painted grey deck with the paint worn through by weather and use. If that was your goal you are spot on - but if you intended to represent a wood deck greyed out by sun and time then it is the opaque places that need lightening.
Hope you don't mind I weighed in - I usually just sit quietly but wanted to risk a suggestion.
I hope you don’t mind me sharing a few thoughts about the deck. One of the key parts of building a model is deciding early on how you want to present it. That initial planning shapes everything, especially when it comes to how the hull and deck will work together visually.So, this falls into the dilemma of being happy with it and not happy with it. The deck looks better in real life than the pics do. Yes, I know that there are areas that look worn - but I might add some more gray later on.
However, when the deck furnishings get added along with the Cannons, Bitts, and rails, and what not , alot of this will not even be noticed or even seen. Lets just say that it is a well worn ship ! HA.
The Deck would have turned out A LOT better if this kit had a "False Ply Deck" to mount your deck strips to - like what OcCre does. This should be the first thing Model Shipways should do to this kit.
After working on this, I am tempted to say to myself, no more ship models.
So here is the "Ugly Deck".
What I’m trying to say (and please forgive any language quirks—English isn’t my first language) is this: if you’re presenting a defined age on the coppered hull, it makes sense to carry that same level of definition through to the deck, and even to the sails, in my humble opinion.
I agree with Jeff that steel wool should do the trick, and as Doc @dockattner mentioned, brightening the deck can help a lot. But in the end, as they both wisely pointed out, you’re the Captain of your build, and the final course is yours to chart!


