• SUBSCRIBE TO SHIPS IN SCALE TODAY!

    The beloved Ships in Scale Magazine is back and charting a new course for 2026!
    Discover new skills, new techniques, and new inspirations in every issue.

    NOTE THAT OUR NEXT ISSUE WILL BE July/August 2026
  • Win a Free Custom Engraved Brass Coin!!!
    As a way to introduce our brass coins to the community, we will raffle off a free coin during the month of August. Follow link ABOVE for instructions for entering.

HMS Alert [1777] 1:48 POF by serikoff. (Two hulls: skeleton and fully rigged)

Metalworking. Galvanizing.

Rudder Hinges.
Alert 2304.jpg


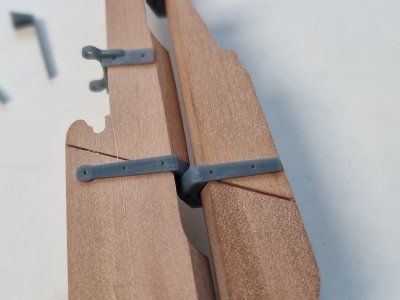
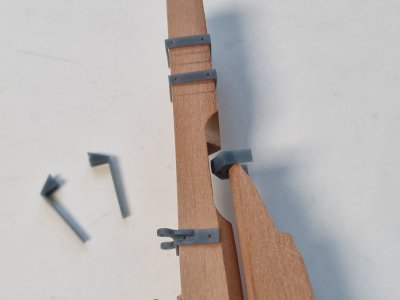
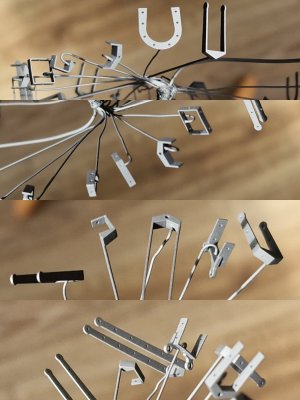
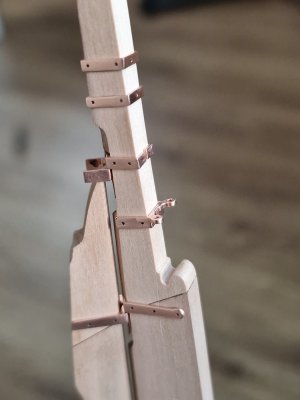
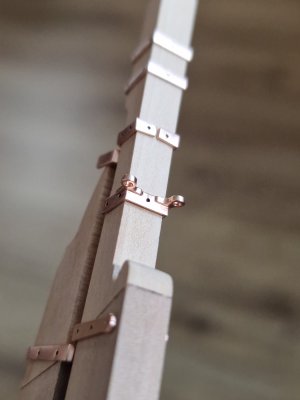
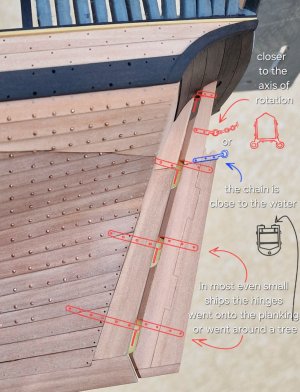
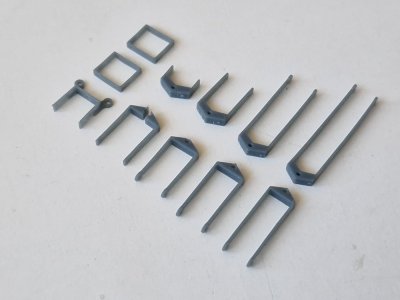
As I mentioned earlier, I'll be making extended loops that extend onto the boards to strengthen the connection. The top loop will also wrap around the handlebars, and there will be another piece to hold the chain in place for an emergency turn if the main steering mechanism is damaged (the red version, not the blue one).
3D 01.jpg

3D 02.jpg

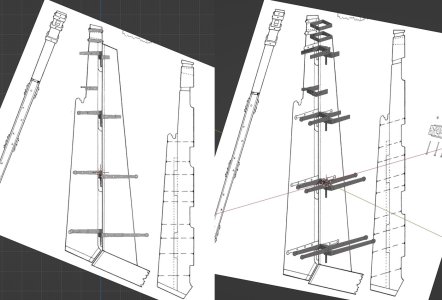
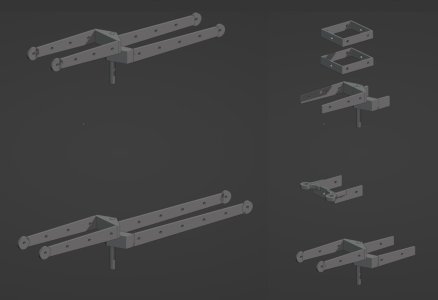
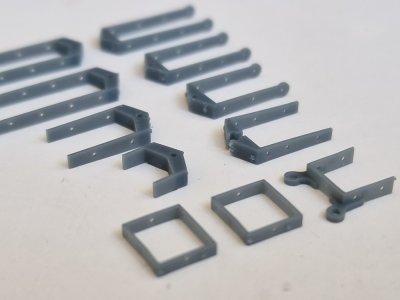
I've previously shown that I modeled these hinges in Blender 3D and 3D printed them. This is in the relevant section.

After printing, I lightly sanded them with 400-grit sandpaper and matched them to the wood. The final fit will be after copper plating.
Alert 2555.jpg

Alert 2556.jpg

Alert 2557.jpg

Alert 2558.jpg

Alert 2559.jpg

Alert 2560.jpg

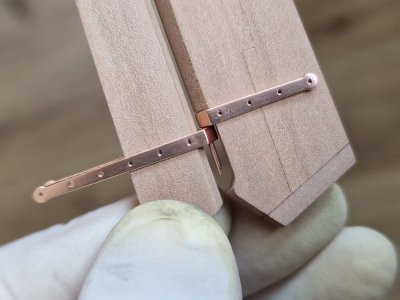
The holes are more like marker holes, as after copper plating, they'll need to be drilled to the correct size for the bolts.

The top hinge will be disassembled, as it's curved and impossible to install without separating. However, the seam will be inside, deep and invisible.

Alert 2561.jpg

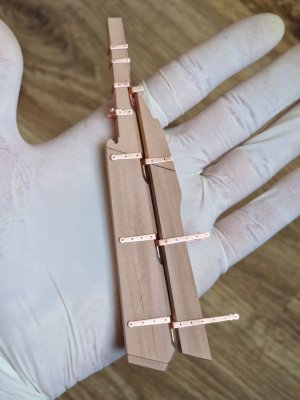
When everything was ready, I glued the leg holders to the parts. (I mostly use 0.5 mm brass wire, since I have a lot of it. But in the places where the axis will be on the hinge, I use 0.6 mm copper!!! And this holder will serve as the axis. In the rest of the places, I glued the holders inside the surfaces.)

Alert 2562.jpg

Then I connected all the holders into the wood and covered it all with Graphite Varnish.

Alert 2562а.jpg

Alert 2562б.jpg

The next day I put the first batch into a special copper plating machine for galvanization (I talk about this in detail here).

Alert 2562в.jpg

Looking ahead, I want to clarify that I conducted a lot of testing and experimentation to achieve the best result. This batch was quite good, but there were a couple of defects, and I fixed them when I made the second batch with two more sets of hinges. So, in fact, I now have three sets for my two hulls and one custom-made for a friend. I compared my hinges with the ones in the kit and realized that the latter wouldn't fit on the model and would have to remake the rudder and sternpost for the first hull (although I thought I'd use them like the hinges from the kit, but changed my mind).

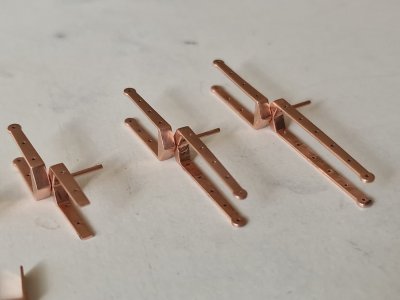
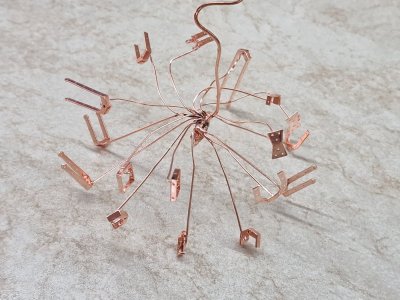
I'll describe all the details of the galvanic process and all the parameters in the dedicated thread, but here I'll show the results of the first batch.

Alert 2563.jpg

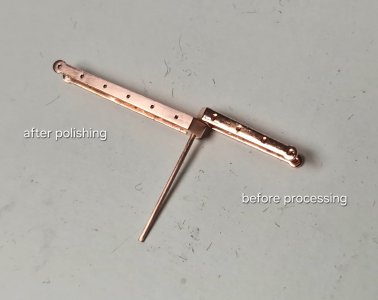
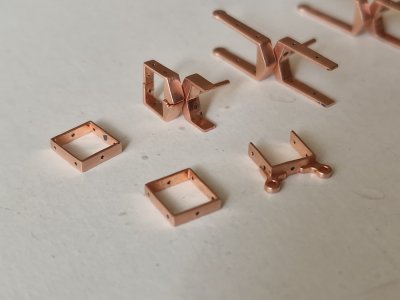
The copper layer on the plastic is over 60 microns thick, up to 100, so it's more than enough to sand and polish the copper (I'll detail the failures in the Galvanic section). Two parts were damaged, but I've already repaired them (more on that later).

Alert 2564.jpg

Alert 2565.jpg

Alert 2566.jpg

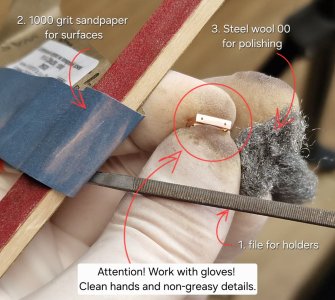
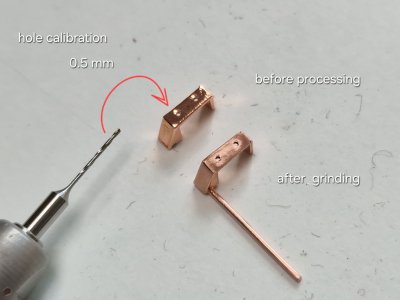
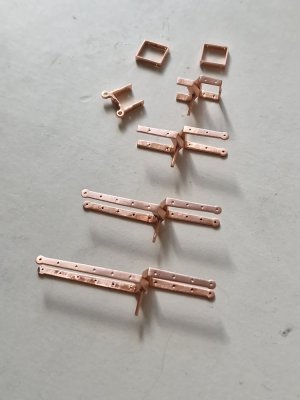
First, I cut the holder with wire cutters, then sanded it with a file, then went over the surface with 600-1000-grit sandpaper to smooth it out. Then I drilled the holes for the bolts and finally polished it (not too hard, just superficially) with 00 or 000-grit steel wool. Just to remove the sandpaper scratches. Don't polish too much (especially with 0000+ steel wool), as the blackening will adhere less well. I was quite happy with the result, but I felt I could do better and made two more sets. More on that later. For now, here's the result of my first attempt:

Alert 2567.jpg

Alert 2568.jpg

Alert 2569.jpg

Alert 2570.jpg

Alert 2571.jpg


Alert 2573.jpg

Alert 2574.jpg

Tomorrow I'll try to post something on the Electroplating Tests thread, detailing what I did the first time and the second time... and it looks like I'm finally close to the ideal electroplating method... but I'm not sure... I'm still in the process.
 
Last edited:
Metalworking. Galvanizing.

Rudder Hinges.

View attachment 613564


As I mentioned earlier, I'll be making extended loops that extend onto the boards to strengthen the connection. The top loop will also wrap around the handlebars, and there will be another piece to hold the chain in place for an emergency turn if the main steering mechanism is damaged (the red version, not the blue one).

View attachment 613566

View attachment 613567

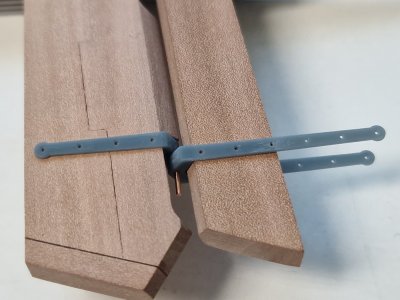
I've previously shown that I modeled these hinges in Blender 3D and 3D printed them. This is in the relevant section.

After printing, I lightly sanded them with 400-grit sandpaper and matched them to the wood. The final fit will be after copper plating.
View attachment 613568

View attachment 613569

View attachment 613570

View attachment 613571

View attachment 613572

View attachment 613573

The holes are more like marker holes, as after copper plating, they'll need to be drilled to the correct size for the bolts.

The top hinge will be disassembled, as it's curved and impossible to install without separating. However, the seam will be inside, deep and invisible.

View attachment 613574

When everything was ready, I glued the leg holders to the parts. (I mostly use 0.5 mm brass wire, since I have a lot of it. But in the places where the axis will be on the hinge, I use 0.6 mm copper!!! And this holder will serve as the axis. In the rest of the places, I glued the holders inside the surfaces.)

View attachment 613575

Then I connected all the holders into the wood and covered it all with Graphite Varnish.

View attachment 613576

View attachment 613577

The next day I put the first batch into a special copper plating machine for galvanization (I talk about this in detail here).

View attachment 613578

Looking ahead, I want to clarify that I conducted a lot of testing and experimentation to achieve the best result. This batch was quite good, but there were a couple of defects, and I fixed them when I made the second batch with two more sets of hinges. So, in fact, I now have three sets for my two hulls and one custom-made for a friend. I compared my hinges with the ones in the kit and realized that the latter wouldn't fit on the model and would have to remake the rudder and sternpost for the first hull (although I thought I'd use them like the hinges from the kit, but changed my mind).

I'll describe all the details of the galvanic process and all the parameters in the dedicated thread, but here I'll show the results of the first batch.

View attachment 613579

The copper layer on the plastic is over 60 microns thick, up to 100, so it's more than enough to sand and polish the copper (I'll detail the failures in the Galvanic section). Two parts were damaged, but I've already repaired them (more on that later).

View attachment 613580

View attachment 613581

View attachment 613582

Zuerst habe ich die Halterung mit einem Seitenschneider durchtrennt, dann mit einer Feile geschliffen und anschließend mit 1000er-Schleifpapier geglättet. Danach habe ich die Löcher für die Schrauben gebohrt und die Halterung schließlich (nicht zu stark, nur oberflächlich) mit Stahlwolle der Körnung 00 oder 000 poliert, um die Schleifspuren zu entfernen. Man sollte nicht zu stark polieren (vor allem nicht mit Stahlwolle der Körnung 0000 oder höher), da die Schwärzung sonst nicht so gut haftet. Ich war mit dem Ergebnis recht zufrieden, wollte es aber noch besser machen und habe zwei weitere Sets angefertigt. Mehr dazu später. Hier ist nun das Ergebnis meines ersten Versuchs:

View attachment 613583

View attachment 613584

View attachment 613585

View attachment 613586

View attachment 613587


View attachment 613589

View attachment 613590

Morgen werde ich versuchen, etwas im Thread „Galvanisierungstests“ zu posten und detailliert zu beschreiben, was ich beim ersten und zweiten Mal gemacht habe… und es sieht so aus, als ob ich der idealen Galvanisierungsmethode endlich nahe gekommen bin… aber ich bin mir nicht sicher… ich bin noch mittendrin.
Die Ruderscharniere sehen super realistisch aus. Kein Vergleich mit den dem Bausatz beigelegten Scharniere. Der Prozess des Beschichtens ist genial und absolut präzise erklärt. Sergey es ist schade, daß Du kein Bausatzhersteller bist. Dein Baubericht ist die Bibel des Modellbaus auf höchstem Niveau. Danke daß Du uns an jedem Schritt teilnehmen läßt und alles so tief erklärst.
 
Metalworking. Galvanizing.

Rudder Hinges.

View attachment 613564


As I mentioned earlier, I'll be making extended loops that extend onto the boards to strengthen the connection. The top loop will also wrap around the handlebars, and there will be another piece to hold the chain in place for an emergency turn if the main steering mechanism is damaged (the red version, not the blue one).

View attachment 613566

View attachment 613567

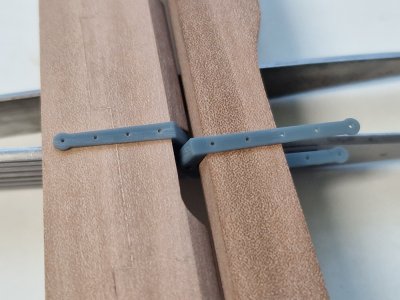
I've previously shown that I modeled these hinges in Blender 3D and 3D printed them. This is in the relevant section.

After printing, I lightly sanded them with 400-grit sandpaper and matched them to the wood. The final fit will be after copper plating.
View attachment 613568

View attachment 613569

View attachment 613570

View attachment 613571

View attachment 613572

View attachment 613573

The holes are more like marker holes, as after copper plating, they'll need to be drilled to the correct size for the bolts.

The top hinge will be disassembled, as it's curved and impossible to install without separating. However, the seam will be inside, deep and invisible.
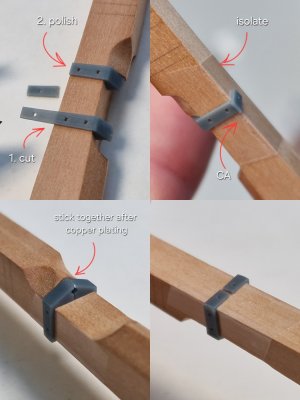
View attachment 613574

When everything was ready, I glued the leg holders to the parts. (I mostly use 0.5 mm brass wire, since I have a lot of it. But in the places where the axis will be on the hinge, I use 0.6 mm copper!!! And this holder will serve as the axis. In the rest of the places, I glued the holders inside the surfaces.)
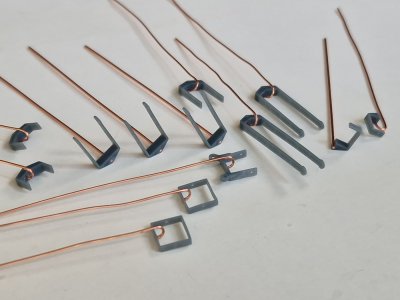
View attachment 613575

Then I connected all the holders into the wood and covered it all with Graphite Varnish.
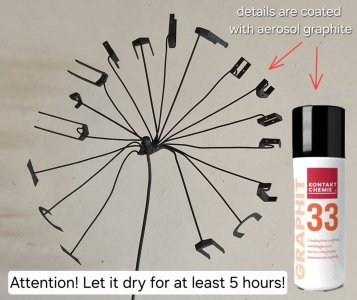
View attachment 613576

View attachment 613577

The next day I put the first batch into a special copper plating machine for galvanization (I talk about this in detail here).
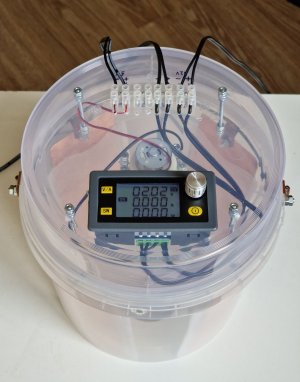
View attachment 613578

Looking ahead, I want to clarify that I conducted a lot of testing and experimentation to achieve the best result. This batch was quite good, but there were a couple of defects, and I fixed them when I made the second batch with two more sets of hinges. So, in fact, I now have three sets for my two hulls and one custom-made for a friend. I compared my hinges with the ones in the kit and realized that the latter wouldn't fit on the model and would have to remake the rudder and sternpost for the first hull (although I thought I'd use them like the hinges from the kit, but changed my mind).

I'll describe all the details of the galvanic process and all the parameters in the dedicated thread, but here I'll show the results of the first batch.
View attachment 613579

The copper layer on the plastic is over 60 microns thick, up to 100, so it's more than enough to sand and polish the copper (I'll detail the failures in the Galvanic section). Two parts were damaged, but I've already repaired them (more on that later).
View attachment 613580

View attachment 613581

View attachment 613582

First, I cut the holder with wire cutters, then sanded it with a file, then went over the surface with 600-1000-grit sandpaper to smooth it out. Then I drilled the holes for the bolts and finally polished it (not too hard, just superficially) with 00 or 000-grit steel wool. Just to remove the sandpaper scratches. Don't polish too much (especially with 0000+ steel wool), as the blackening will adhere less well. I was quite happy with the result, but I felt I could do better and made two more sets. More on that later. For now, here's the result of my first attempt:
View attachment 613583

View attachment 613584

View attachment 613585

View attachment 613586

View attachment 613587


View attachment 613589

View attachment 613590

Tomorrow I'll try to post something on the Electroplating Tests thread, detailing what I did the first time and the second time... and it looks like I'm finally close to the ideal electroplating method... but I'm not sure... I'm still in the process.
Wow!
 
Die Ruderscharniere sehen super realistisch aus. Kein Vergleich mit den dem Bausatz beigelegten Scharniere. Der Prozess des Beschichtens ist genial und absolut präzise erklärt. Sergey es ist schade, daß Du kein Bausatzhersteller bist. Dein Baubericht ist die Bibel des Modellbaus auf höchstem Niveau. Danke daß Du uns an jedem Schritt teilnehmen läßt und alles so tief erklärst.
Friends, thank you for your comments.


I've shown the results of my previous galvanic work, but for those interested in the technical details, here you go:

 
Beim ersten Lesen deines Berichtes ist man einfach nur sprachlos. Die Fülle an Hinweisen, Tipps und genialer Lösungen sind überwältigend. Beim zweiten Lesen erkennt man deine präzise Vorgehensweise. Beim dritten Lesen wird die Motivation geweckt,es Dir gleich zu tun. Deine Arbeit motiviert und zeigt einen ganz anderen Weg zu einem wunderschönen Modell. Du zeigst Wege, die einem normalen verschloßen sind. Nachvollziehbar, sehr gut Schritt für Schritt erklärt. Sehr lehrreich dein Bericht und die Einzelergebnisse sprechen für sich. Danke fürs Zeigen.
 
Beim ersten Lesen deines Berichtes ist man einfach nur sprachlos. Die Fülle an Hinweisen, Tipps und genialer Lösungen sind überwältigend. Beim zweiten Lesen erkennt man deine präzise Vorgehensweise. Beim dritten Lesen wird die Motivation geweckt,es Dir gleich zu tun. Deine Arbeit motiviert und zeigt einen ganz anderen Weg zu einem wunderschönen Modell. Du zeigst Wege, die einem normalen verschloßen sind. Nachvollziehbar, sehr gut Schritt für Schritt erklärt. Sehr lehrreich dein Bericht und die Einzelergebnisse sprechen für sich. Danke fürs Zeigen.
Wow, just wow! Inspirational!
Amazing work ! Just beautiful !
Thank you friends for your feedback! Thumbsup


Hej, are you fine?
Hi. I'm alive. We've had a real blast this week. Those bastards in my neighborhood destroyed several houses with ballistic missiles just a few kilometers from my house.
 
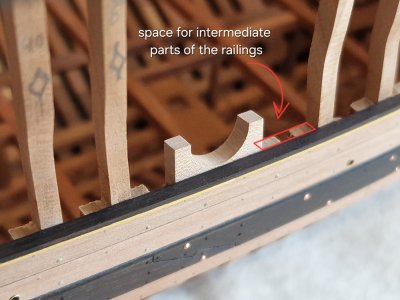
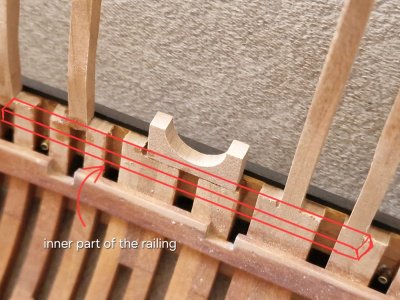
I made what I'm about to show you a long time ago. I didn't post it in the hopes that I'd finish it soon, but I got carried away with electroplating and 3D printing, and I'm stuck there for now. So, I'm on a bit of a hiatus with the bodywork. I've made the outer part of the lower railings. And then I still need to make the intermediate and inner parts.

Alert 2588.jpg

Alert 2589.jpg

Alert 2590.jpg

Alert 2591.jpg

Alert 2592.jpg

For those wondering where I've been (thanks to everyone who's been writing me private messages, worried about the situation in the country). Things have been really tough lately. That damned country that invaded Ukraine destroyed several high-rise residential buildings in my area with ballistic missiles. So, I have to live with this reality.

Work on the hulls has been on hold for a bit, as I'm currently working on electroplating. I got a new 3D printer, which was supposed to be much better than the old one, but so far, my experiments suggest otherwise. I'm not giving up just yet. Next up are more experiments with copper coating plastic. I'm trying to find the most repeatable, predictable, and quick results. All this will appear in the electroplating thread. But with what I have so far, I'm quite happy with the result, and so I've decided to redesign the rudder and sternpost on the first hull and install new hinges for them. I really hope the final tests will yield the desired results, and I'll be able to complete most of the metal deck parts and continue working on the deck rigging on both ships. Thank you for your attention.
 
Das, was ich euch gleich zeigen werde, habe ich schon vor langer Zeit gebaut. Ich habe es nicht veröffentlicht, weil ich gehofft hatte, es bald fertigzustellen, aber ich habe mich in Galvanisierung und 3D-Druck vertieft und komme da momentan nicht weiter. Deshalb liege ich mit der Karosseriearbeit erstmal etwas auf Eis. Die äußeren Teile des unteren Geländers sind fertig. Die Zwischen- und Innenteile fehlen mir noch.

View attachment 617508

View attachment 617509

View attachment 617510

View attachment 617511

View attachment 617512

Für alle, die sich gefragt haben, wo ich war (vielen Dank an alle, die mir private Nachrichten geschrieben und sich Sorgen um die Lage im Land gemacht haben): Es war in letzter Zeit wirklich hart. Dieses verdammte Land, das in die Ukraine einmarschiert ist, hat in meiner Gegend mehrere Hochhäuser mit ballistischen Raketen zerstört. Damit muss ich nun leben.

Die Arbeiten an den Rümpfen ruhen momentan, da ich mich mit der Galvanisierung beschäftige. Ich habe einen 3D-Drucker, der deutlich besser sein sollte als der alte, aber meine bisherigen Versuche lassen etwas anderes vermuten. Ich gebe aber noch nicht auf. Als nächstes stehen weitere Experimente mit Kupferbeschichtungen auf Kunststoff an. Ich versuche, die reproduzierbarsten, vorhersagbarsten und schnellsten Ergebnisse zu erzielen. All das werde ich im Thread zur Galvanisierung dokumentieren. Mit dem bisherigen Ergebnis bin ich aber recht zufrieden und habe mich daher entschieden, Ruder und Heckpfosten des ersten Rumpfes neu zu konstruieren und neue Scharniere einzubauen. Ich hoffe sehr, dass die abschließenden Tests die gewünschten Ergebnisse liefern und ich die meisten Metalldeckteile fertigstellen und mit der Decksausrüstung beider Schiffe weiterarbeiten kann. Vielen Dank für Ihre Aufmerksamkeit.
Hallo Serikoff, wie gewohnt eine absolut saubere und schlüssige Arbeit. Tolles Ergebnis. Das ist einer der spannendsten Bauberichte, den ich je gelesen habe. Ich bin auch auf den Bericht zum Galvanisieren gespannt. Bis dahin und paßen Sie auf sich auf.
 
Last edited:
Hallo Serikoff, wie gewohnt eine absolut saubere und schlüssige Arbeit. Tolles Ergebnis. Das ist einer der spannendsten Bauberichte, den ich je gelesen habe. Ich bin auch auf den Bericht zum Galvanisieren gespannt. Bis dahin und paßen Sie auf sich auf.
Vielen Dank. Ich habe bereits eine neue Charge Teile mit dem 3D-Drucker gedruckt und werde demnächst neue Galvanisierungsversuche starten. Es gab einige Erfolge und Misserfolge, daher wird es spannend.

Thank you very much. I've already printed a new batch of parts on a 3D printer and will soon begin new electroplating tests. There have been some successes and failures, so it will be interesting.

Good morning Sergey. I'm glad to hear you are OK. Terrible times. Fabulous modelling....as always. Cheers Grant
Thank you for your support. Yes, something is happening right now that you wouldn't wish on anyone, even just once in their life, and here I have to live with it constantly. But my hobby gives me strength and distracts me from what's happening.

I'm happy you are well, Sergey. Terrible times.
Thank you very much. Yeah, I never would have thought that this could ever happen... in our time.
 
For those interested in copper plating plastic parts and what can be achieved this way, please read this:


The topic is complex, but interesting, and I am trying to find zen in it.

Alert 2612.jpg

Alert 2613.jpg
 
Back
Top