HM Cutter Lady Nelson 1803 - Scale 1:64, Victory Models by Glbarlow [COMPLETED BUILD]

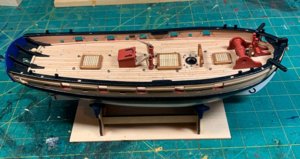
I replaced the last of the kit walnut by building the bits from cherry, the kit provided piece is laying on the hatch for comparison

Nelson-1945.jpg

The tape over the mast hole was belatedly added after I dropped one of the pieces into the hull. Fortunately with a few lucky upside down shakes and tweezers I was able to retrieve it.

Nelson-1952.jpg

The kit design and parts has a significant flaw that I recognized and had been struggling to find a solution. The bowsprit bit is either out of scale or just too high. I built the bowsprit, and found two problems. Once braced on the bit It sits to high above the rail, almost 5mm. There is also not way in the plans on how to secure it. I contacted Chris Watten, who designed it over 18 years ago he says and he agreed but didn’t have a suggestion. I’m not sure how the box photo is holding the bowsprit either. He told me on his new Vanguard Alert model, a similar cutter, the stem is much higher and he provides a photo etched brass ring to secure it on the stem at the rail. I tried fabricating one from wire, but that pushes the bowsprit off center and with the short stem it simply wasn’t a solution. So where to go. I could just glue it to the side of the stem but it looked bad sitting so much above the notch in the rail and that’s no way to build a model.

Nelson-1950.jpg

So I ripped the kit provide bit off the deck, got out my trusty tools along with some cherry and boxwood and scratch built new bits.

Nelson-1951.jpg

I was tempted to leave them natural, but it has the reverse affect of highlighting the somewhat oversized wench - I thought about rebuilding that but decided enough is enough, I have Speedy and Cheerful waiting for me.

Nelson-1954.jpg

Seeing the two sitting side by side it doesn’t seem I made much difference, but its far more to scale and the with the difference in height of the bar allows the bowsprit to lay right in the groove with enough clearance on the stem for the later rigging. (the drill is just holding it in place during this dry fit, the blue tape on the connecting dowel is so I don’t loose it on my work desk)

Nelson-1953.jpg

I’ve now completed all the deck furniture, next of is the rail stanchions and gun mounts, plus two cannon left to paint. Off I go.
 
Hello, Glenn,

I think you are correct that the windlass is a bit oversized and inaccurately represented. If you rebuilt bowsprit bits, you may consider building windlass from scratch... Oh...I hear you, two more models waiting for you...but you most likely will have challenges there. Challenges - is what make our hobby interesting!

In any way, the model looks great!
 
Here is the finished hull. The swivel guns are made but won’t be put on until the end. I’ve also completed the cannons and will install those after adding the channels and deadeyes. The rudder and tiller I'll also install later when I won't be banging it around as much.

Nelson Build-1955.jpg

Nelson Build-1956.jpg

The deadeye and strops that came with this kit make no sense. If anyone else has built this model I’d appreciate a clue - I may have to order some.

I'll mount the boat on its final stand before stepping mast and beginning rigging - it's home is already and waiting.
 

Attachments

  • Nelson Build-1955.jpg
    Nelson Build-1955.jpg
    142.2 KB · Views: 10
consider building windlass from scratch..
I've scratch built (or replaced in the case of the pumps) everything on the deck except the windless, While I'm sure I could build it too and briefly considered using the one in the Speedy kit and asking Chris for a replacement, I'm calling it a win and moving on.
 
Just recording progress at this point, if anyone has any questions please feel free to reply.

IMG_1997.jpg

Since the last update I’ve added the channels and deadeyes and made the transition to the cutter’s final home. A step I always take prior to beginning rigging as I need the ship steady and looking like it will look on my shelf. I prepare for this step at the very beginning as is noted in my earliest posts by drilling the 2mm hole in the keel and matching it up to brass wire and pedestals on a 12 inch walnut display board. This always pays off in making the mounting so much easier. I’ll confess the 3mm keel had me a little concerned, I always used threaded bars for the extra grip. I see no need for the elaborate nuts and bolts built into the keel I see some modelers use, I haven’t had one come off the base yet. However this time I couldn’t find something threaded so small so I had to use smooth brass. I need'nt have been concerned, the JB Weld Clear epoxy mix I used, properly applied and allowed to cure has melded the boat, wire, pedestals and board into a single entity. The big challenge is to make sure the boat is level on the stand before it sets. I have a number of line and small levels to match the boat, board, and surface its sitting on are all equally level. I should have taken a photo, but I’m sure its clear.

IMG_1998.jpg

Weird angle in this photo. The cannons are now mounted and the rigging has begun. I’m only adding breech ropes for this model, the small 4 pounders are just too little for me to rig and have any semblance of scale. I learned the trick of using an awl to split the rope and create a loop with white glue from my Cheerful instructions, it works great at simulating the seizing. I know the breeching lines are going to be shorter than they should, I also didn't add the necessary eye bolt to the carriage though in retrospect I maybe wish I had, oh well. NOTE: Only the forward three on the starboard side are done, the others are temporarily pulled tight to be out of the way and to allow the seizing to dry on the cannon until I get to them.

IMG_1996.jpg

So my work area converts to my rigging box. I’m using Warner blocks and Syren Ship Company rope. Probably the last time for the Warner blocks, though far superior to the junk blocks in kits the Syren product is another level better. The only problem is I work in millimeters and all the Syren Stuff is Imperial. Why the US hasn’t converted is beyond me, 3mm makes so much more since than 3/32.

After rigging the cannon its time to make the main mast, yards and boom. The bow sprit is already done and rigged but will be the near last thing I install - cutters have long bowsprits and not a lot of rigging to hold them.
 
Last edited:
Here are some photos of the completed hull (including dry-fitted swivel guns). It's rigging time... I normally do a better job of the photography this is a bit of a rush and my computer is not happy at the moment. So clearly the colors are off but you get the idea.

This kit has some scale issues, the swivel guns seem to be larger than the cannon .... :-/

IMG_2004.jpgIMG_2006.jpgIMG_2007.jpgIMG_2008.jpgIMG_2009.jpgIMG_2010.jpg
 
All the yards, booms, and masts are made. My process is to cut the appropriate dowel 3 inches too long, stick it in my DeWalt drill and spin them into shape with sand paper, files, and my digital caliper. Once I have the shape and size, I just cut off the extra length. I leave my workshop and sit out on the porch, wear a mask, and let the sawdust fly. I was happy with how they all turned out not having done this for a long while, especially the extra baskets on the mast.

Nelson Build-2045.jpg

The kit rigging is a bit sparse for me so I added a few lines and blocks, it's reasonably accurate but I’m sure not fully so. My goal is shelf appearance, I’m not sailing it anywhere.

I replaced all the rope with Dark Brown and Light Brown rope along with most of the blocks from http://syrenshipmodelcompany.com

Nelson Build-2046.jpg

Then I set about rigging them, with the objective to complete every standing and running line I can before anything is installed on the ship. I found these color coded tabs when I was looking for something to store my Syren rope, they came with a little inexpensive winding tool that works just great for moving the rope from their loose coil to these tabs, the rope is then easy to work with and free of tangles. They also work great along with low adhesion tape to keep the installed lines out of the way until I’m ready to deploy them. The last thing yet to do on the mast is adding the shrouds.

Nelson Build-2044.jpg

So here it sits with the mast dry-fitted while I check and install lines and I get ready to move to the final stage of building. If you look close forward of the bits I added something just yesterday. I've appropriated some of my wife's sewing material for seizing lines and found the handy rigging box on line at Amazon (where else can we shop these days).

It occurred to me the crew had no means for a hot meal, so I built a stove, installed it below decks and then built and added the stove chimney to the deck. Ok, I did one of those things.

As a photographer I've been slumming, just using my iPhone for these photos. Once I'm done I'll get out my good stuff and get photos worthy of the effort.
 
Last edited:
The mast is rigged with every rope both standing and running rope in advance including the loosely fitted shrouds. It looks like a mess now but doing this makes installing the rigging so much easier by doing all the seizing and blocks off the ship.

Nelson Build Rig-2061.jpg

The next step is critical, stepping the mast permanently in place. Do this wrong and I’ll just toss the whole thing away - a crooked or twisted mast does not a ship make. The small ship with a tall mast makes it a little bit more of a choir finding and keeping level. I started by inserting a cut off straight pin in the bottom of the mast leaving only about 5mm protruding. This does a nice job of grabbing purchase in the mast seat below the deck to prevent it slipping around.

Next is leveling the boat which I confirm by the line level on the deck, I did this before I epoxied it into the stand, I was happy to see it still level on the stand (which I also confirm with another line level on the table to check they match up.

Nelson Build Rig-2050.jpg

Then I followed the authentic method used by 18th century shipbuilders when stepping the mast, the use of a laser level :-D. This is the perfect tool for the job.

Nelson Build Rig-2052.jpg

The red laser up the mast confirms its level on dry fit, so I take the mast out, dump in the PVA and insert the mast. The pin catches the seat, a little maneuvering to make sure its straight and facing the right direction (wouldn’t that be fun to find later I had it facing backwards).

Nelson Build Rig-2054.jpg

I doubly confirm its all lined up, if you look close you can see the laser hits the stem, the forward bit and the mast, then travels straight up the mast. I carefully backed out of the room and left it to dry and cure overnight.

I think I’m going to leave off the swivel guns, they are so comically out of scale they make the whole ship look silly. I’ll have to make new posts to fill the slots on the cap rail.

Now the final attachment of the rigging begins and the ship is almost done. My log to myself will then be complete.
 
That is a pity. As I don't use VPN, I cannot access that site (and truth be told; neither do I want to). :D
 
Thanks for the reply and comment. You’ll need to journey over to Model Ship World, I‘ve committed to doing the Speedy and Cheerful logs there.
Greetings Glen! Hope you and your family safe those difficult times. Do you plan to open Speedy and Cheerful logs on SOS forum? Most of our members are banned from MSW, unfortunately we will not have a chance to see the build logs there...
 
Greetings Glen! Hope you and your family safe those difficult times. Do you plan to open Speedy and Cheerful logs on SOS forum? Most of our members are banned from MSW, unfortunately we will not have a chance to see the build logs there...
Banned!?! Why would they ban any of nice folks from SOS?
 
I don’t know or want to know the problem. I am and hope to continue to be a member in good standing on both sites. Chris Watton is a contributor on MSW, I committed to put my Speedy build log there to help support his new Vanguard Models business. The Cheerful build log will be there in order to get Chuck‘s help and advice, which I will need for this scratch build, it’s a year away anyway.

No disrespect to anyone here, but I’ve have virtually no interaction or feedback on this build log. It’s hard to be motivated to start another here. It’s been enough just to complete this one as I have always hated to see unfinished logs.

I hope to continue being a contributor to other logs and forums here and respect everyone’s personal choices (though I don’t know what a VPN has to do with MSW). I hope you understand mine.
 
Last edited:
Back
Top