-

Win a Free Custom Engraved Brass Coin!!!
As a way to introduce our brass coins to the community, we will raffle off a free coin during the month of August. Follow link ABOVE for instructions for entering.
- Home
- Forums
- Ships of Scale Build Logs
- Super Detailing Static Models / Other Genres
- Historical Trailways, Guns, Aircraft, and Cars
You are using an out of date browser. It may not display this or other websites correctly.
You should upgrade or use an alternative browser.
You should upgrade or use an alternative browser.
Avro Anson Mk.1 - Plastic by Airfix in 1/48 Scale - Build by Smithy
- Joined
- Sep 10, 2024
- Messages
- 913
- Points
- 353

I can tell that you identified the new Airfix kit which makes either variant so you win the prize.
Ooh, goodie! What is it? What is it? I'm quivering in anticipation!

- Joined
- Dec 3, 2022
- Messages
- 1,547
- Points
- 488

Ooh, goodie! What is it? What is it? I'm quivering in anticipation!
My undying respect.
- Joined
- Sep 8, 2024
- Messages
- 176
- Points
- 78

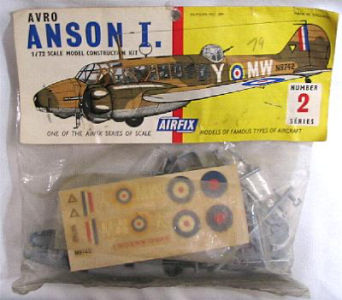
I’ve just come across thread, and I was transported to the basement floor of Woolworths where they had an entire counter full of Airfix kits. I think they started at 1/6d. (One shilling and sixpence) for a polythene bag of bits, with the folded instructions stapled at the top. A sheet of transfers (decals) was in the bag. I made dozens. After a few, I started to paint them, so they looked better. Then I had to put string across my bedroom from one picture rail to another, and hang them from there. But I also had to make them with undercarriage down so I could stand them on the chest of drawers.
I was always sorry my planes were in flight with their wheels down.
Eventually of course, they all went. But amazingly, about a couple of years ago, I found I had kept all of those instructions sheets, well, lots of them, and they went off via the Bay to new homes. Surprising how much interest 50 year old exploded diagrams still have for some of us.
Thanks for dragging out some old memories.
J
- Joined
- Sep 8, 2024
- Messages
- 176
- Points
- 78

Yes, I remember it,
But I’ll see your Anson, and raise you a Rotodyne,


But then, as this is a ship forum, maybe HMS Victorious, or HMS Daring for style, or HMS Campbeltown for a touch of class.
Hard to believe those old Woolies shops, M and S too, with the walk round island counters and an actual assistant in the centre of each.
Simple times for a simpler world
J

But I’ll see your Anson, and raise you a Rotodyne,


But then, as this is a ship forum, maybe HMS Victorious, or HMS Daring for style, or HMS Campbeltown for a touch of class.
Hard to believe those old Woolies shops, M and S too, with the walk round island counters and an actual assistant in the centre of each.
Simple times for a simpler world
J

- Joined
- Dec 3, 2022
- Messages
- 1,547
- Points
- 488

your Anson
I confess that’s not mine, just an internet photo. My life has been far too nomadic to have kept anything from way back. Airfix models led me into the RAF.
A Javelin! I remember that one.
One thing that was really good about old Airfix instructions was the way they used the correct terms for things. I learned a lot that way, although I never learned how to pronounce ‘pitot’ before Air Force training, much to my embarrassment.

Last edited:
- Joined
- Sep 8, 2024
- Messages
- 176
- Points
- 78

Ah, my uncle, after whom I was named, was training in the Royal Flying Corps when war, WWI that is, ended. I have the control knob of an RE2 engraved with the date he crashed it.One thing that was really good about old Airfix instructions was the way they used the correct terms for things. I learned a lot that way, although I never learned how to pronounce ‘pitot’ before Air Force training, much to my embarrassment.
Walking away from a string bag crash seems to have been a thing. Biggles did it all the time. Talking of Biggles, I have some of my Uncle’s books from WWI era which are in a similar vein. Maybe they were training manuals?
J
- Joined
- Dec 3, 2022
- Messages
- 1,547
- Points
- 488

Ew, it was the tiresome business of sanding down seams. There was the hidden reason that I've been absent on parade! First thing was to sort out my abrasives. I cut my sheets of wet and dry paper into convenient sized strips and they were in need of replenishment from the file of full sized papers. They were low stock too, but enough is on hand for the Anson.

2500 grit 'sandpaper'. Now that's something you don't often need on a wooden boat project.
Still wanting to put the seam sanding off a little longer, I turned to the niff-naff and trivia of the build.

I cleared away any spare parts. The kit contains parts for a pre-war example of the Anson and Airfix don't provide a list of redundant parts, which is a bind. I like to get them out of the way as early as possible so that I can see clearly what remains to be dealt with. If I don't have a list, I do this by eye towards the end of the construction phase. I decant the components into plastic trays because I learned long ago that tiny pieces can escape from cardboard kit boxes. That yellow tray contains all that's left to go onto the Annie, with the exception of the clear parts which I didn't photograph.
Some of the pieces will be attached before the main exterior painting, some afterwards but all need to be cleaned up and if possible, improved. Already I'm moving away from the simple 'out of the box' building style towards my old superdetailing habits.

This is the venturi that's mounted above the port engine fairing. The prop wash on start-up and the airflow in flight conditions rush through this double trumpet and the constriction in the middle causes a pressure drop relative to atmospheric pressure. A pipe leads the suction to the pilot's instrument panel and to the back of the turn and slip indicator. Back in 1935 the gyroscope in the T&S was driven round by ambient air flowing into a hole in the instrument casing, impinging on the brass gyro which had 'buckets' cut into the circumference like a mill wheel, before being sucked out by the venturi. The plastic moulding as delivered doesn't look much like a venturi.

That's a little closer. Allowing for the limitations of polystyrene, that's as good as I can make it anyway.
Checking through the yellow tray I was happy with the components and sub-assemblies, everything seemed ready for paint or for attachment to the model. Everything? There was one thing that I was very keen not to forget - the pilot's control wheel MUST be fitted before the cockpit roof/windscreen. Er. Wait a minute. Where is it? There should actually be two of them as a spare is provided. Not there.
I remember worrying that I'd lose those tiny and delicate pieces. I'm almost certain that I "put them somewhere safe". A week ago, or perhaps more.
I dare say that they are still safe. I just don't know where the somewhere is.
I didn't sand any seams today because I spent the remaining time searching my tiny and obsessively neat working area for the control wheels. And then searching the rest of the flat, the car, the dog's bed, the garden, the park, Staffordshire, England, Europe, Earth, The Solar System, the Milky Way, the Universe. Nothing found.
There's only one way to locate one of those missing parts. I must spend days scratchbuilding a replacement, glue it in place and then seal the fuselage permanently. After that it will only be a matter of moments before my eye falls on the fugitives and I smilingly say "Ah, there you are." (or words to that effect. )
)

2500 grit 'sandpaper'. Now that's something you don't often need on a wooden boat project.
Still wanting to put the seam sanding off a little longer, I turned to the niff-naff and trivia of the build.

I cleared away any spare parts. The kit contains parts for a pre-war example of the Anson and Airfix don't provide a list of redundant parts, which is a bind. I like to get them out of the way as early as possible so that I can see clearly what remains to be dealt with. If I don't have a list, I do this by eye towards the end of the construction phase. I decant the components into plastic trays because I learned long ago that tiny pieces can escape from cardboard kit boxes. That yellow tray contains all that's left to go onto the Annie, with the exception of the clear parts which I didn't photograph.
Some of the pieces will be attached before the main exterior painting, some afterwards but all need to be cleaned up and if possible, improved. Already I'm moving away from the simple 'out of the box' building style towards my old superdetailing habits.

This is the venturi that's mounted above the port engine fairing. The prop wash on start-up and the airflow in flight conditions rush through this double trumpet and the constriction in the middle causes a pressure drop relative to atmospheric pressure. A pipe leads the suction to the pilot's instrument panel and to the back of the turn and slip indicator. Back in 1935 the gyroscope in the T&S was driven round by ambient air flowing into a hole in the instrument casing, impinging on the brass gyro which had 'buckets' cut into the circumference like a mill wheel, before being sucked out by the venturi. The plastic moulding as delivered doesn't look much like a venturi.

That's a little closer. Allowing for the limitations of polystyrene, that's as good as I can make it anyway.
Checking through the yellow tray I was happy with the components and sub-assemblies, everything seemed ready for paint or for attachment to the model. Everything? There was one thing that I was very keen not to forget - the pilot's control wheel MUST be fitted before the cockpit roof/windscreen. Er. Wait a minute. Where is it? There should actually be two of them as a spare is provided. Not there.
I remember worrying that I'd lose those tiny and delicate pieces. I'm almost certain that I "put them somewhere safe". A week ago, or perhaps more.
I dare say that they are still safe. I just don't know where the somewhere is.
I didn't sand any seams today because I spent the remaining time searching my tiny and obsessively neat working area for the control wheels. And then searching the rest of the flat, the car, the dog's bed, the garden, the park, Staffordshire, England, Europe, Earth, The Solar System, the Milky Way, the Universe. Nothing found.
There's only one way to locate one of those missing parts. I must spend days scratchbuilding a replacement, glue it in place and then seal the fuselage permanently. After that it will only be a matter of moments before my eye falls on the fugitives and I smilingly say "Ah, there you are." (or words to that effect.
Last edited:
Too right!There's only one way to locate one of those missing parts. I must spend days scratchbuilding a replacement, glue it in place and then seal the fuselage permanently. After that it will only be a matter of moments before my eye falls on the fugitives and I smilingly say "Ah, there you are." (or words to that effect.)
- Joined
- Dec 3, 2022
- Messages
- 1,547
- Points
- 488

I’d use my time machine to go get them but I lost the keys to it.
- Joined
- Sep 10, 2024
- Messages
- 913
- Points
- 353

I’d use my time machine to go get them but I lost the keys to it.
They're in the violet tray also.
- Joined
- Dec 3, 2022
- Messages
- 1,547
- Points
- 488

They're in the violet tray also.
I bet that's where my marbles are. I lost them a long time ago.
- Joined
- Dec 3, 2022
- Messages
- 1,547
- Points
- 488

For a number of reasons I haven't been able to do much creative modelling lately. I'm hoping things will soon pick up because there are some exciting projects in the pipeline and I'm still very keen to make a good job of this one. Funnily enough, every book that I pick up seems to mention the Anson at one point or another. Perhaps that's not surprising given that half my reading materials right now are related to aviation in WWII.

I had a go at scratching a control wheel, first from copper wire and solder and then from plastic card. Neither are brilliant but the plastic one is obviously the most suitable. It will look better painted and it's very small so I think I'll get away with it. I'm not up to painting it today so I've put it somewhere safe .

I had a go at scratching a control wheel, first from copper wire and solder and then from plastic card. Neither are brilliant but the plastic one is obviously the most suitable. It will look better painted and it's very small so I think I'll get away with it. I'm not up to painting it today so I've put it somewhere safe .
- Joined
- Sep 10, 2024
- Messages
- 913
- Points
- 353

...so I've put it somewhere safe .
Your control wheels are quite good smithy!
- Joined
- Dec 3, 2022
- Messages
- 1,547
- Points
- 488

Here we go again.
Your control wheels are quite good smithy!
You are very kind Russ. However, they are both quite unacceptable. I can do better than that.
This would be a good candidate for a resin printer.For a number of reasons I haven't been able to do much creative modelling lately. I'm hoping things will soon pick up because there are some exciting projects in the pipeline and I'm still very keen to make a good job of this one. Funnily enough, every book that I pick up seems to mention the Anson at one point or another. Perhaps that's not surprising given that half my reading materials right now are related to aviation in WWII.
View attachment 513758
I had a go at scratching a control wheel, first from copper wire and solder and then from plastic card. Neither are brilliant but the plastic one is obviously the most suitable. It will look better painted and it's very small so I think I'll get away with it. I'm not up to painting it today so I've put it somewhere safe .
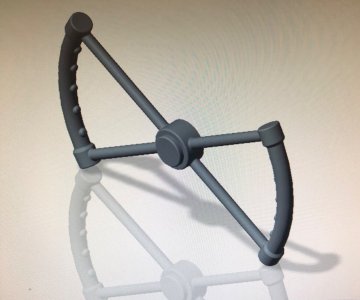
Of course it has to be modeled and the STL file exported to set up in slicer software to create a print file.
I can model it and export a STL file if you have access to a printer.
- Joined
- Dec 3, 2022
- Messages
- 1,547
- Points
- 488

This would be a good candidate for a resin printer.
Of course it has to be modeled and the STL file exported to set up in slicer software to create a print file.
I can model it and export a STL file if you have access to a printer.
It’s very kind of you to offer Dean. I won’t take you up on it though as I prefer hand skills to computer. I’m not out of ideas just yet.


