-

Win a Free Custom Engraved Brass Coin!!!
As a way to introduce our brass coins to the community, we will raffle off a free coin during the month of August. Follow link ABOVE for instructions for entering.
-

PRE-ORDER SHIPS IN SCALE TODAY!
The beloved Ships in Scale Magazine is back and charting a new course for 2026!
Discover new skills, new techniques, and new inspirations in every issue.
NOTE THAT OUR FIRST ISSUE WILL BE JAN/FEB 2026
You are using an out of date browser. It may not display this or other websites correctly.
You should upgrade or use an alternative browser.
You should upgrade or use an alternative browser.
Bluenose II Build (Artesania Latina) 1:75 by Nomad [Completed Build]
Thanks Rich, I knew I could rely on you for a detailed explanationYes. the bottom rod just gives a more structural and secure method of securing the bits to or through the deck of the model. In realty they probably passed through to the under structure as there is a great deal of tension placed on these when a broad reach is being sailed; less when running before the wind as the speed is slower. In either case the longer boom tackle is needed. Takes me back to my days of racing where we were continually seeking best sail shape and position for greatest speed. Rich (PT-2)

Thank youLooking great!

Yes, and it seems you have to take a deep breath now and again, such as when you drop a miniscule piece on the floor - for the seventh time - and spend the next fifteen minutes trying to find it. Got to love it.Very nice! We always say ship building is tedious work. Some refer to it as being fiddly…lol.

I agree, it does bring it to life. The same way that masts seem to suddenly transform a boat into a ship. I find myself plugging the masts in every now and again just to remind myself where my build is headed, hopefullySince my last visit I saw a lot of posts pass by. Making the attributes for the deck construction goes well. Especially the small details, such as the brass, make it come to life.
And ..... I also admit that using tweezers and (magnifying) glasses makes life more enjoyable.
Regards, Peter
- Mark
If I had a plug nickle for every small part that I lost on the floor and had to remake, before doing that again, I could retire the way that I dreamed of.Yes, and it seems you have to take a deep breath now and again, such as when you drop a miniscule piece on the floor - for the seventh time - and spend the next fifteen minutes trying to find it. Got to love it.
The Artesania Latina kit provides a jig to construct the two small dory boats that accompany the Bluenose II. The process shares similarities with the fairing and planking process of the Bluenose itself, just on a much smaller and far more finicky scale. The jig allows you to assemble the dory in upside-down fashion on a series of tempoarary bulkheads that are provided to hold the dory in place but do not actually form part of the boat.
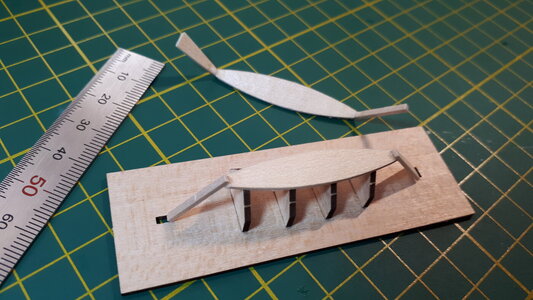
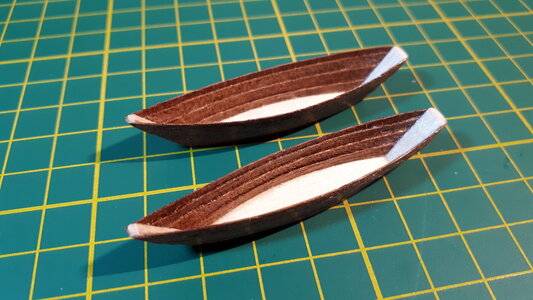
The planks are made up of the same sapele wood that formed the second planking layer of the ship, and overlay each other in a stepping manner to complete the hull. Fairing the stem- and sternpost went a long way to ensuring that the planks lay flush and comfortable at each point of contact.
A series of stanchions gave the dory a certain sense of shape and form.
And the sprint to the end included the laying of walnut seats, a single bulkhead positioned near the stern, gunwale covers along the sides, and the most challenging of all, the installation of twenty-four 2mm brass-wire cuttings to make up the oarlocks.
The dory boats will rest on a set of cradles when they are eventually hoisted and attached to the ship.

The planks are made up of the same sapele wood that formed the second planking layer of the ship, and overlay each other in a stepping manner to complete the hull. Fairing the stem- and sternpost went a long way to ensuring that the planks lay flush and comfortable at each point of contact.

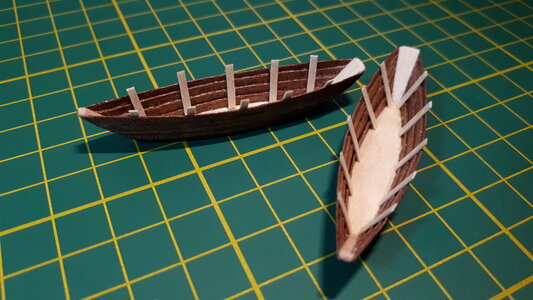
A series of stanchions gave the dory a certain sense of shape and form.

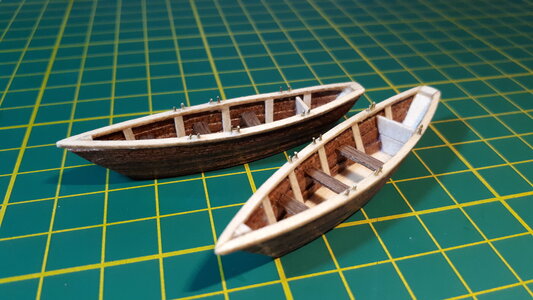
And the sprint to the end included the laying of walnut seats, a single bulkhead positioned near the stern, gunwale covers along the sides, and the most challenging of all, the installation of twenty-four 2mm brass-wire cuttings to make up the oarlocks.

The dory boats will rest on a set of cradles when they are eventually hoisted and attached to the ship.
The Artesania Latina kit provides a jig to construct the two small dory boats that accompany the Bluenose II. The process shares similarities with the fairing and planking process of the Bluenose itself, just on a much smaller and far more finicky scale. The jig allows you to assemble the dory in upside-down fashion on a series of tempoarary bulkheads that are provided to hold the dory in place but do not actually form part of the boat.
View attachment 261873
The planks are made up of the same sapele wood that formed the second planking layer of the ship, and overlay each other in a stepping manner to complete the hull. Fairing the stem- and sternpost went a long way to ensuring that the planks lay flush and comfortable at each point of contact.
View attachment 261874
A series of stanchions gave the dory a certain sense of shape and form.
View attachment 261875
And the sprint to the end included the laying of walnut seats, a single bulkhead positioned near the stern, gunwale covers along the sides, and the most challenging of all, the installation of twenty-four 2mm brass-wire cuttings to make up the oarlocks.
View attachment 261876
dddddddddddddddddddddddddddddddddddddddddddddddddddddddddddddddddddddddddddddddddddddddddddddddddddddddddddddddddddddddddddddddddddddddddddddddddddddddddddddddddddddddddddddddddddddd
Nicely done. They should nest very tightly. RIch
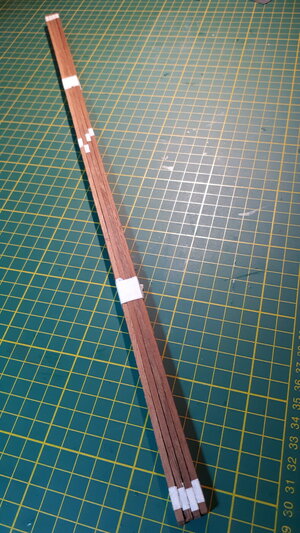
The pack of sapele planks I ordered for the ship stanchions finally arrived, much to my delight. The two strips supplied by AL were insufficient for the number of stanchions required and I consider myself fortunate to have measured them all before attaching them to the deck. Particularly as the new strips are slightly thicker than the ones supplied by AL.
Installing the stanchions on the deck was a breeze after all the tricky joinery of the deck furniture. The bow deck stanchions rose to the full height of the bulwarks, whereas those on the stern deck were cut to a shorter, predetermined length.
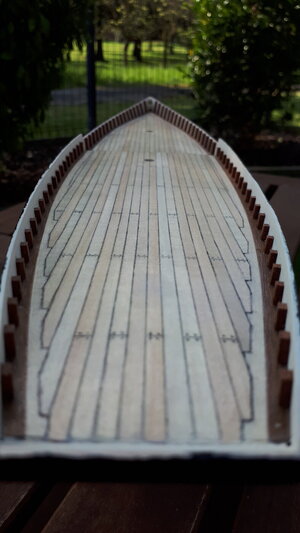
Time will tell whether I got the stern deck stanchion lengths correct, as there appear to be a lot of things that will be placed on top of them. But at least now I can crack on with the scuppers
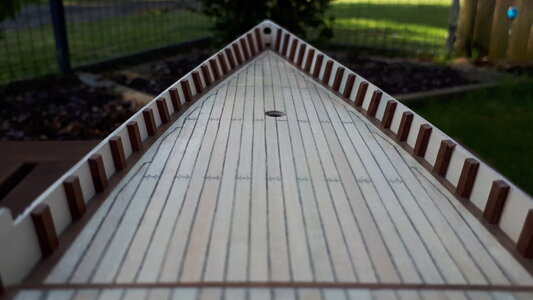

Installing the stanchions on the deck was a breeze after all the tricky joinery of the deck furniture. The bow deck stanchions rose to the full height of the bulwarks, whereas those on the stern deck were cut to a shorter, predetermined length.

Time will tell whether I got the stern deck stanchion lengths correct, as there appear to be a lot of things that will be placed on top of them. But at least now I can crack on with the scuppers

Last edited:
Looking very good!The pack of sapele planks I ordered for the ship stanchions finally arrived, much to my delight. The two strips supplied by AL were insufficient for the number of stanchions required and I consider myself fortunate to have measured them all before attaching them to the deck. Particularly as the new strips are slightly thicker than the ones supplied by AL.
View attachment 262366
Installing the stanchions on the deck was a breeze after all the tricky joinery of the deck furniture. The bow deck stanchions rose to the full height of the bulwarks, whereas those on the stern deck were cut to a shorter, predetermined length.
View attachment 262367
Time will tell whether I got the stern deck stanchion lengths correct, as there appear to be a lot of things that will be placed on top of them. But at least now I can crack on with the scuppers
View attachment 262368
Installing the scuppers was another nerve-racking experience that called for precision and patience, creating thirty-eight new holes in the hull that I had been so careful to protect from a mere scratch. I started by applying masking tape to the affected areas and carefully marked the depth of each scupper from the top edge of the bulwarks.
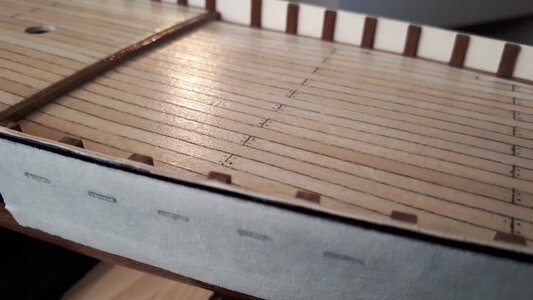
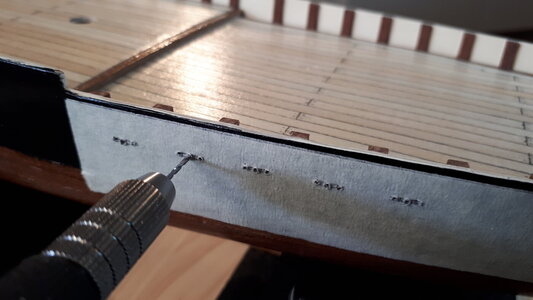
Using a pin vise, I drilled three small holes with a .5mm bit at the centre and ends of each scupper outline, and enlarged them again with a bigger, 1mm drill bit.
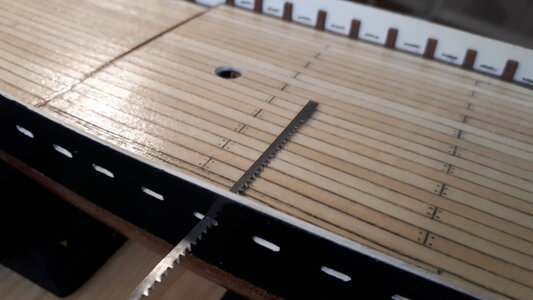
I removed the tape at this point and used a hobby knife to clean out the wood between the drilled holes. When the slot was wide enough, I used a fine coping-saw blade to give the scupper a consistent length and width.
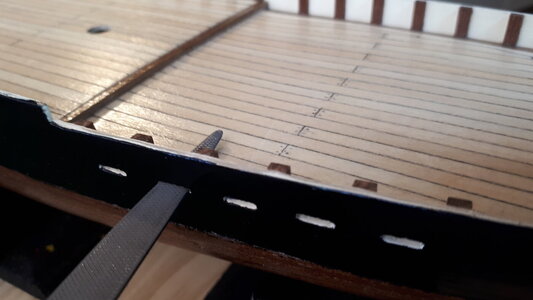
A pointed flat file took care of the inside edges and gave the scupper its final shape and form.
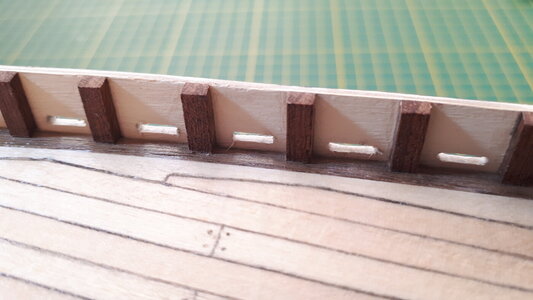
Always making sure that the corresponding slots on the inside of the bulwarks were clean and above deck level.
It was a case of mark, drill, saw, file, rinse and repeat thirty four times until all the scupper holes were installed. Two further circular holes on either side aft completed the process.
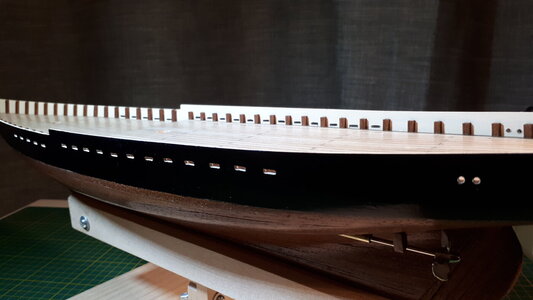
I'm sure there is an easier way to do this, and on closer inspection I think I may have done a better job, but for now I'm quite happy with the result and relieved that I didn't wreck my hull in the process

Using a pin vise, I drilled three small holes with a .5mm bit at the centre and ends of each scupper outline, and enlarged them again with a bigger, 1mm drill bit.

I removed the tape at this point and used a hobby knife to clean out the wood between the drilled holes. When the slot was wide enough, I used a fine coping-saw blade to give the scupper a consistent length and width.

A pointed flat file took care of the inside edges and gave the scupper its final shape and form.

Always making sure that the corresponding slots on the inside of the bulwarks were clean and above deck level.

It was a case of mark, drill, saw, file, rinse and repeat thirty four times until all the scupper holes were installed. Two further circular holes on either side aft completed the process.

I'm sure there is an easier way to do this, and on closer inspection I think I may have done a better job, but for now I'm quite happy with the result and relieved that I didn't wreck my hull in the process
Last edited:
Very well laid out and executed. You are a brave man working from the outside. I did it from the inside for the initial holes to get them flush to the waterway/deck initially and then followed your tack refining them from the outside. Your BN is looking very good. RIch (PT-2)Installing the scuppers was another nerve-racking experience that called for precision and patience, creating thirty-eight new holes in the hull that I had been so careful to protect from a mere scratch. I started by applying masking tape to the affected areas and carefully marked the depth of each scupper from the top edge of the bulwarks.
View attachment 263307
Using a pin vise, I drilled three small holes with a .5mm bit at the centre and ends of each scupper outline, and enlarged them again with a bigger, 1mm drill bit.
View attachment 263309
I removed the tape at this point and used a hobby knife to clean out the wood between the drilled holes. When the slot was wide enough, I used a fine coping-saw blade to give the scupper a consistent length and width.
View attachment 263310
A pointed flat file took care of the inside edges and gave the scupper its final shape and form.
View attachment 263311
Always making sure that the corresponding slots on the inside of the bulwarks were clean and above deck level.
View attachment 263312
It was a case of mark, drill, saw, file, rinse and repeat thirty four times until all the scupper holes were installed. Two further circular holes on either side aft completed the process.
View attachment 263316
I'm sure there is an easier way to do this, and on closer inspection I think I may have done a better job, but for now I'm quite happy with the result and relieved that I didn't wreck my hull in the process
Looks great! Nice job!Installing the scuppers was another nerve-racking experience that called for precision and patience, creating thirty-eight new holes in the hull that I had been so careful to protect from a mere scratch. I started by applying masking tape to the affected areas and carefully marked the depth of each scupper from the top edge of the bulwarks.
View attachment 263307
Using a pin vise, I drilled three small holes with a .5mm bit at the centre and ends of each scupper outline, and enlarged them again with a bigger, 1mm drill bit.
View attachment 263309
I removed the tape at this point and used a hobby knife to clean out the wood between the drilled holes. When the slot was wide enough, I used a fine coping-saw blade to give the scupper a consistent length and width.
View attachment 263310
A pointed flat file took care of the inside edges and gave the scupper its final shape and form.
View attachment 263311
Always making sure that the corresponding slots on the inside of the bulwarks were clean and above deck level.
View attachment 263312
It was a case of mark, drill, saw, file, rinse and repeat thirty four times until all the scupper holes were installed. Two further circular holes on either side aft completed the process.
View attachment 263316
I'm sure there is an easier way to do this, and on closer inspection I think I may have done a better job, but for now I'm quite happy with the result and relieved that I didn't wreck my hull in the process
Thanks Rich. Yes, I think starting from the inside would have made more sense, and I wonder now whether I should have done what I intended several weeks ago and cut the scuppers before installing the bulwarks. Didn't have the confidence. Still it is done at least and I feel I have made reasonably good progress, but when I look at your and Dean's models I can't help but feel that I still have a very long way to go yet. Have you a next model lined up yet? Cheers, Mark.Very well laid out and executed. You are a brave man working from the outside. I did it from the inside for the initial holes to get them flush to the waterway/deck initially and then followed your tack refining them from the outside. Your BN is looking very good. RIch (PT-2)
Thanks DeanLooks great! Nice job!

In your reference to the BN of Dean and me, they are very different in all aspects: Dean has a clean precisely detailed model while my own is a ratty and worn looking presentation. Both may offer some aspects for your own BN but in addition those elements that are of your mind and eye only. Keep up the good work. It shows. Rich (PT-2)Thanks Rich. Yes, I think starting from the inside would have made more sense, and I wonder now whether I should have done what I intended several weeks ago and cut the scuppers before installing the bulwarks. Didn't have the confidence. Still it is done at least and I feel I have made reasonably good progress, but when I look at your and Dean's models I can't help but feel that I still have a very long way to go yet. Have you a next model lined up yet? Cheers, Mark.
I can imagine that it created ‘some’ tension when making the scuppers. Drilling into the tight hull of so many openings. They completely determine the view. But they all fit nicely and in line. Bravo Mark!
Regards, Peter
Regards, Peter
- Joined
- Sep 3, 2021
- Messages
- 5,190
- Points
- 738

Can't say I ever tried to make scuppers, but all of the available methods are, IMHO, full of risk;Thanks Rich. Yes, I think starting from the inside would have made more sense, and I wonder now whether I should have done what I intended several weeks ago and cut the scuppers before installing the bulwarks. Didn't have the confidence. Still it is done at least and I feel I have made reasonably good progress, but when I look at your and Dean's models I can't help but feel that I still have a very long way to go yet. Have you a next model lined up yet? Cheers, Mark.
- Inside-out: risk of damaging one's decks, drill angle not parallel to deck or normal to planks.
- Outside-in: risk of damaging one's decks, scuppers to high or to low.
- Off ship: risk of misaligned scuppers, both horizontally (stansions) and vertically (decks).
Once came across a solution where the scuppers were printed (white) on (black) paper and glued to the ship's hull. From a normal viewpoint rather convincing, only a close inspection would reveal the truth.
For those who succeeded with their selected/preferred method: chapeau! That includes you, Mark; consistent in dimensions and positions, at least as far as I can see; very nicely done.
That is one nice thing about the YQ kit, the scuppers are precut on the upper bulwarks used to plank with. Saves a lot of time and headache!Can't say I ever tried to make scuppers, but all of the available methods are, IMHO, full of risk;
- Inside-out: risk of damaging one's decks, drill angle not parallel to deck or normal to planks.
- Outside-in: risk of damaging one's decks, scuppers to high or to low.
- Off ship: risk of misaligned scuppers, both horizontally (stansions) and vertically (decks).
Once came across a solution where the scuppers were printed (white) on (black) paper and glued to the ship's hull. From a normal viewpoint rather convincing, only a close inspection would reveal the truth.
For those who succeeded with their selected/preferred method: chapeau! That includes you, Mark; consistent in dimensions and positions, at least as far as I can see; very nicely done.


