Bluenose II Build (Artesania Latina) 1:75 by Nomad [Completed Build]

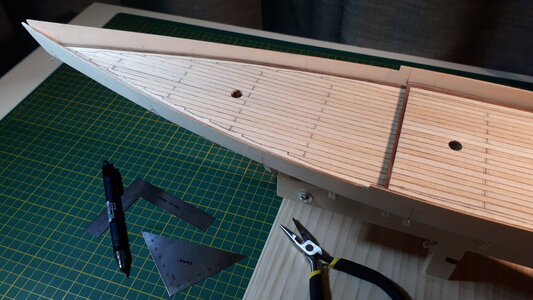
A small bit of progress. I completed the joggling of the planks on both the fore and quarter decks, and then used a small awl to scrape narrow grooves between the planks. Similarly, I used the awl to demarcate the plank butts and punctured small holes to emulate treenails. Then using a 2B pencil I scribed all the holes and furrows created by the awl.
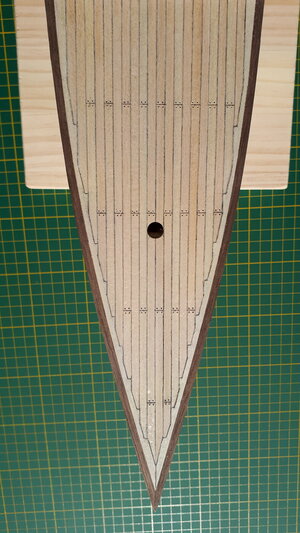
0085_20210822_bluenose_II_build.jpg

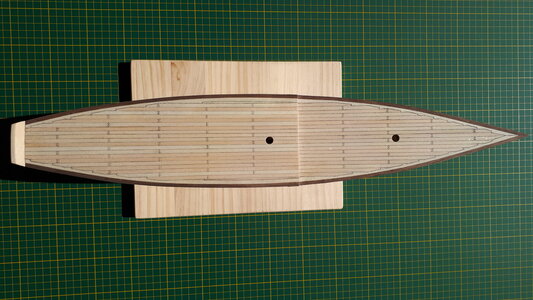
I was obliged to insert two very slim planks on the outer edges of the quarter deck near the waist. I'm not sure if this was the result of a miscalculation somewhere, as I had laid the planks from the centre line outwards, but I seemed to have little choice by the time I reached the margin planks. Oh well :rolleyes:
0090_20210822_bluenose_II_build.jpg
 
Last edited:
A small bit of progress. I completed the joggling of the planks on both the fore and aft decks, and then used a small awl to scrape narrow grooves between the planks. Similarly, I used the awl to demarcate the plank butts and punctured small holes to emulate treenails. Then using a 2B pencil (thanks Rich) I scribed all the holes and furrows created by the awl.

View attachment 252116

I was obliged to insert two very slim planks on the outer edges of the deck near the waist. I'm not sure if this was the result of a miscalculation somewhere, as I had laid the planks from the centre line outwards, but I seemed to have little choice by the time I reached the margin planks. Oh well :rolleyes:

View attachment 252117
This looks great! You did a very good job! Stain will accent those grooves and holes. ;)
 
After much deliberation I've decided not to stain the deck or waterways. I haven't quite plucked up the courage to use dyes on such a large area for one, but I also quite like the natural wood colour of the walnut waterways and basswood deck planks and will simply apply several coats of clear satin varnish instead. I pinned the bulwarks to the structure temporarily to make sure I had the recommended measurements correct and to verify a smooth and continuous curve from bow to stern.

0095_20210826_bluenose_II_build.jpg

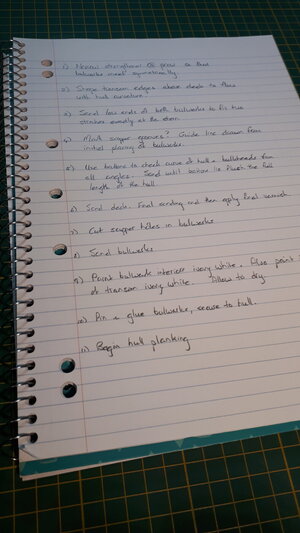
It occurred to me that I could mark out and possibly cut the scupper holes at this point, rather than after the bulwarks are painted, pinned and glued as suggested in the AL instructions, assuming of course that all the other measurements are spot on. Just trying to think ahead, which seems requisite for this hobby, and I've even gone as far as mapping my disorganised thoughts into some sort of logical sequence on paper :p

0100_20210826_bluenose_II_build.jpg
 
Last edited:
After much um'ing and ah'ing I've decided not to stain the deck or waterways. I don't trust myself with dyes for one, but I kinda liked the natural wood colours - walnut waterways and the various shades of basswood decking - and will apply several coats of clear satin varnish instead.

I pinned the bulwarks to the structure temporarily to make sure I had the recommended measurements correct and to verify a smooth curve of the deck bow to stern.

View attachment 252571

Once I was happy with that it occurred to me that I could mark out and possibly cut the scupper holes at this point, rather than after the bulwarks are painted, pinned and glued as suggested by AL. Seems it would be easier before fitting the bulwarks, as long as the measurements are spot on.

Maybe I'm just starting to learn what seasoned modellers have always known, to think ahead. If nothing else it has at least forced me into a habit of putting it down on paper, to create some sort of sequence for the disorganised chaos in my head ROTF

View attachment 252576
Yes, always think ahead! And look ahead in the instructions! I try to read the entire instructions up front, and see if the order makes logical sense. Most often, you find that certain steps are best done sooner or later in the build. I always say the instructions are a guide, but not an absolute! ;)
 
Yes, always think ahead! And look ahead in the instructions! I try to read the entire instructions up front, and see if the order makes logical sense. Most often, you find that certain steps are best done sooner or later in the build. I always say the instructions are a guide, but not an absolute! ;)
Your kit is different in some ways than my MS2130 and may simplify things for you without having planked bulwarks along the deck edges. Dean is right in having a good grasp of the instructions and the sequences that will work best for you. You are doing well. Rich (PT-2)
 
Yes, always think ahead! And look ahead in the instructions! I try to read the entire instructions up front, and see if the order makes logical sense. Most often, you find that certain steps are best done sooner or later in the build. I always say the instructions are a guide, but not an absolute! ;)
Yes, spot on Dean. I must admit that the instructions that came with my AL kit aren't half bad. Very colourful and relatively clear, except for the occasional mistake, like calling the false keel a mast ROTF

AL do not supply a plan of the ship however, which I think would have been an interesting addition. Still, I enjoy the fact that building these ships isn't that straightforward and requires plenty of patience and forethought. Thanks for keeping up with my slow progress :cool:

Cheers, Mark
 
Your kit is different in some ways than my MS2130 and may simplify things for you without having planked bulwarks along the deck edges. Dean is right in having a good grasp of the instructions and the sequences that will work best for you. You are doing well. Rich (PT-2)
Thanks Rich. I had another look at your build log and you're right, the deck and bulwarks of your model is certainly a more complex ball game. I love your attention to detail, and find lots to look at in the pictures that you and Dean post. So far I've bookmarked about fifteen different builds of the Bluenose II, although several seem to stop posting around the hull planking stage, which doesn't give my confidence the world of good. Thanks again for your encouragement Thumbsup
Cheers, Mark
 
Last edited:
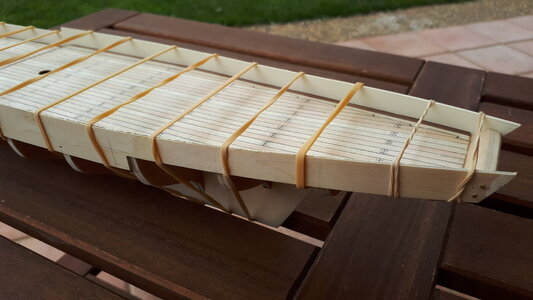
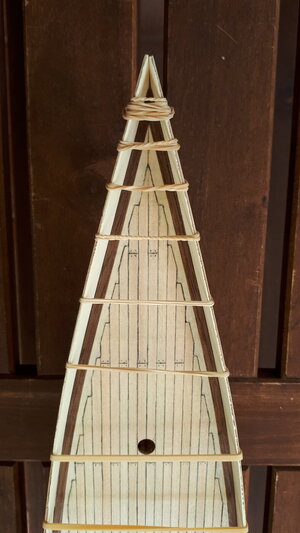
Painted the inside of the bulwarks ivory white and nailed and glued them to the hull, using my trusty Gorilla wood glue and the 10mm brass pins supplied by AL. The nailing was another new experience, and I quickly learnt that if you apply undue pressure on an obstinate nail, and slip, the results could be disasterous. I eventually settled on a long-nose pliers to push the pins in halfway, and then a small ball-peen hammer to drive them home completely. I thought the hammer had been a waste of money when I bought it at the start of this project - how you could deliver blows to such a delicate structure? - but was mildly surprised that with gentle tapping the nails were driven flush into the edges of the bulkheads. I then wrapped it all up in elastic bands and let the glue set.

0105_20210828_bluenose_II_build.jpg

I didn't cut the scupper holes as I thought I might do before installing the bulwarks. After studying the instructions it occurred to me that the spacing of both the scuppers and stanchions had to be spot on to look respectable, and any errors in cutting the scupper holes at this stage may introduce many unwanted complications later on. So yes, I chickened out. Maybe in a future build, with more confidence :)

0110_20210828_bluenose_II_build.jpg
 
Last edited:
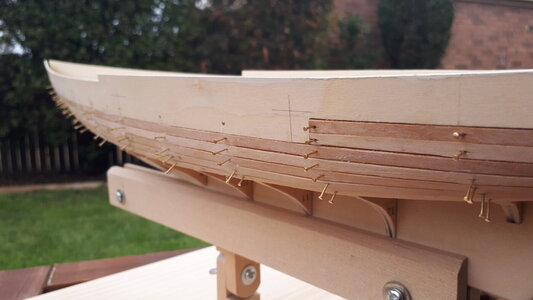
And so on to the hull planking. In most of my research on this topic planks are bent and tapered according to various calculations before being fitted to the hull, but this AL kit does not appear to call for any form of tapering at all, and several other Bluenose II builds with the same 1:75 AL kit seem to confirm this. Well, that's what I'm going with anyway. The instructions call for two planks to be laid initially to complete the Bulwark trimming, and then a further five planks, deck to keel, which gather together to surround the transom completely. I started on the port side after soaking the required planks in warm water for two to three hours.

0115_20210830_bluenose_II_build.jpg

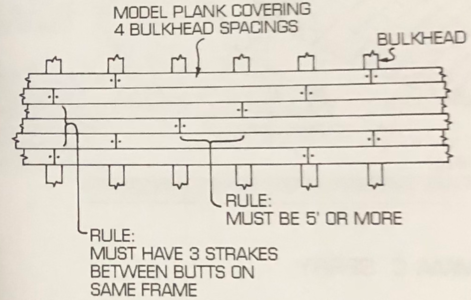
The supplied basswood planks are not long enough to extend the full length of the hull, and I used the references that Dean kindly sent me earlier to space the butts appropriately.

1630283390008.png

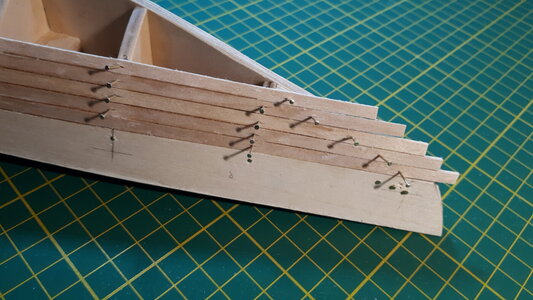
I used Gorilla wood glue to bind the planks to each other on their lateral ends, and CA glue (also Gorilla) wherever the planks met the hull structure. That is, at the edges of the bulkheads, the transom and the bow strengthener. I used pins to hold it all together while the glue sets, although I am hoping to remove them, or at least as many as I can without it all falling apart, before starting the second layer of planking.

0120_20210830_bluenose_II_build.jpg
 
And so on to the hull planking. In most of my research on this topic planks are bent and tapered according to various calculations before being fitted to the hull, but this AL kit does not appear to call for any form of tapering at all, and several other Bluenose II builds with the same 1:75 AL kit seem to confirm this. Well, that's what I'm going with anyway. The instructions call for two planks to be laid initially to complete the Bulwark trimming, and then a further five planks, deck to keel, which gather together to surround the transom completely. I started on the port side after soaking the required planks in warm water for two to three hours.

View attachment 253198

The supplied basswood planks are not long enough to extend the full length of the hull, and I used the references that Dean kindly sent me earlier to space the butts appropriately.

View attachment 253199

I used Gorilla wood glue to bind the planks to each other on their lateral ends, and CA glue (also Gorilla) wherever the planks met the hull structure. That is, at the edges of the bulkheads, the transom and the bow strengthener. I used pins to hold it all together while the glue sets, although I am hoping to remove them, or at least as many as I can without it all falling apart, before starting the second layer of planking.

View attachment 253200
NIce to see that you followed the planning/spacing detail. On my MS2130 the bulkheads were more than the five feet so I went to a closest matching butt layout. With your substrate sheet you will be able to place the butt ends correctly. You deck look very precise with the nibbing. One thing that you may consider when going around convex or concave hull curves is to lightly taper the plank edge in the correct angle so that you have contacting edges and not right angled faces leaving gaps in convex or in concave gaps that may show up when you do your finishing fairing with files and sandpaper. There are easy ways to fill narrow cracks with a mixture of your sanding dust rubbed into a light line of a slow setting glue in an orbital manner and then with fine sandpaper to create more sawdust and smooth out the fill line. Just a suggestion. You are doing well. Rich (PT-2)
 
And so on to the hull planking. In most of my research on this topic planks are bent and tapered according to various calculations before being fitted to the hull, but this AL kit does not appear to call for any form of tapering at all, and several other Bluenose II builds with the same 1:75 AL kit seem to confirm this. Well, that's what I'm going with anyway. The instructions call for two planks to be laid initially to complete the Bulwark trimming, and then a further five planks, deck to keel, which gather together to surround the transom completely. I started on the port side after soaking the required planks in warm water for two to three hours.

View attachment 253198

The supplied basswood planks are not long enough to extend the full length of the hull, and I used the references that Dean kindly sent me earlier to space the butts appropriately.

View attachment 253199

I used Gorilla wood glue to bind the planks to each other on their lateral ends, and CA glue (also Gorilla) wherever the planks met the hull structure. That is, at the edges of the bulkheads, the transom and the bow strengthener. I used pins to hold it all together while the glue sets, although I am hoping to remove them, or at least as many as I can without it all falling apart, before starting the second layer of planking.

View attachment 253200
Looking good so far. I would recommend a much smaller nail for the boards, as you can see it is splitting them. ;)
 
NIce to see that you followed the planning/spacing detail. On my MS2130 the bulkheads were more than the five feet so I went to a closest matching butt layout. With your substrate sheet you will be able to place the butt ends correctly. You deck look very precise with the nibbing. One thing that you may consider when going around convex or concave hull curves is to lightly taper the plank edge in the correct angle so that you have contacting edges and not right angled faces leaving gaps in convex or in concave gaps that may show up when you do your finishing fairing with files and sandpaper. There are easy ways to fill narrow cracks with a mixture of your sanding dust rubbed into a light line of a slow setting glue in an orbital manner and then with fine sandpaper to create more sawdust and smooth out the fill line. Just a suggestion. You are doing well. Rich (PT-2)
Thanks for the tips Rich, I will certainly bear them in mind as I move along. I was hoping to get things spot on and not rely on fillers of any sort, but that was a bit of a pipe dream I guess :rolleyes:

A bit like a new car I suppose; the sooner you get a dent or scratch the better. It lowers your expectations and you can carry on without all the stress of perfection :cool:

- Mark
 
Looking good so far. I would recommend a much smaller nail for the boards, as you can see it is splitting them. ;)
Yes thanks for noticing that Dean :p

I did notice the splits at the time it must be said, which is another reason why I held back driving the nails in all the way. I'm limited to AL's supplied pins at the moment but will look out for skinnier ones, good idea. The wood was mildly damp at the time and I wonder if that had anything to do with it. In other build logs of this kit I've noticed most modellers leave the pins in and sand them flush before applying the second layer of planking. I'm hoping to avoid that as the prospect of sanding brass pin heads down doesn't sound too appealing. Thanks for the tips Thumbsup

- Mark
You don’t have to sand them down. I used a small punch to sink the head below the board! ;)
 
I switched to slightly smaller nails (7mm x .69mm) midway through the initial planking as the AL pins (10mm) looked like they might split some of the battons. I developed a better sense of the process with each new plank, and by the time I ran up the starboard side I could better understand how to lay the planks flush along their lateral edges :)

0125_20210901_bluenose_II_build.jpg

It was a bit of a nerve-racking moment removing the nails from the hull, fearing the worst, but the planks held their shape quite nicely and now I have a lot of nails I can re-use ;). I used a small chiselling tool and sandpaper (120 grit) to remove the excess wood and shape the prow and transom. I imagine I'll need to do a thorough sanding once the hull is complete and before applying the second layer of planks.

0130_20210901_bluenose_II_build.jpg

The AL instructions become a bit vague at this point, with no real direction on how to complete the remainder of the planking towards the keel. The colourful photos give you some idea, and lots of research on other bluenose builds will hopefully do the rest. The garboard strake (love these names) looks an interesting prospect, but I suspect if I get that right the rest will flow from there.

0135_20210901_bluenose_II_build.jpg
 
Last edited:
I switched to slightly smaller nails (7mm x .69mm) midway through the initial planking as the AL pins (10mm) looked like they might split some of the battons. I developed a better sense of the process with each new plank, and by the time I ran up the starboard side I could better understand how to lay the planks flush along their lateral edges :)

View attachment 253579

It was a bit of a nerve-racking moment removing the nails from the hull, fearing the worst, but the planks held their shape quite nicely and now I have a lot of nails I can re-use ;). I used a small chiselling tool and sandpaper (120 grit) to remove the excess wood and shape the prow and transom. I imagine I'll need to do a thorough sanding once the hull is complete and before applying the second layer of planks.

View attachment 253580

The AL instructions become a bit vague at this point, with no real direction on how to complete the remainder of the planking towards the keel. The colourful photos give you some idea, and lots of research on other bluenose builds will hopefully do the rest. The garboard strake (where do they get these names from?) looks an interesting prospect, but I suspect if I get that right the rest will flow from there.

View attachment 253581
One alternative to files and sandpaper is using a razor blade to scrape in only one direction, with the grain, which provides a very good surface. Dean put me onto this method which I used on both my deck and hull planks as the surface could work with the straight edge. For concave surfaces I have some curve scraper and wrapped sandpaper around various diameters of PVC tubing. Fingers work well in those as well as you get a feedback as you work. As several of us have recommended just work slowly and enjoy the moment as there will be frustrations along the way to set aside and move onwards. Nice progress as you learn as you go what works best for the scale of the model and your preferences. Rich (PT-2)
 
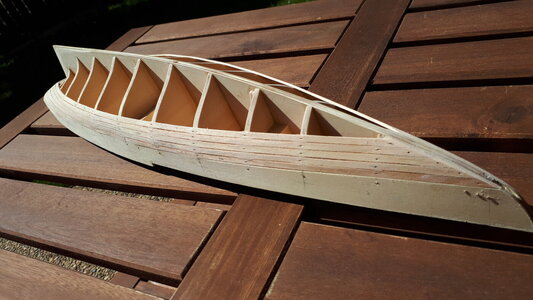
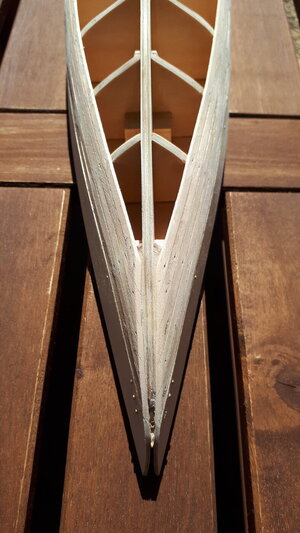
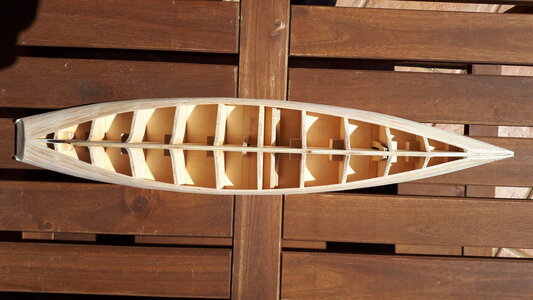
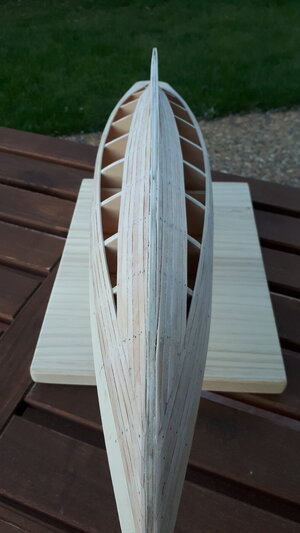
Planking the hull has been interesting, challenging and a rewarding experience in equal measure. And I'm not done yet. After the AL instructions dried up I used a combination of books, colourful pictures, other build logs and maybe a little bit of common sense to get going. It looked like it would take six planks to cover the mostly vertical area of the hull from sternpost to bow, so my starting point was to divide the sternpost accordingly into eleven segments - six for the planks and five intermediate wedges for stealers - and plank my way upwards towards the deck.

0140_20210907_bluenose_II_build.jpg

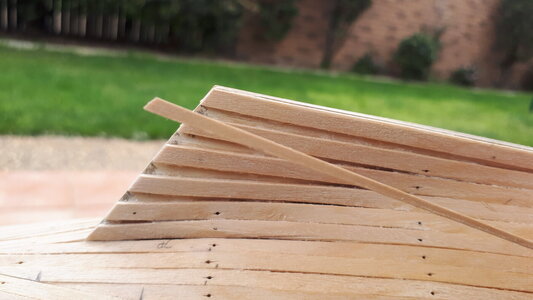
The planking process itself was quite a learning curve, filled with trial and error. I learnt how to bend planks with heat, invaluable for the plank-ends at the sternpost which required a near cork-screw shape to sit flush against the false keel. I also discovered why my first few planks showed noticable gaps between them: Inserting nails into the damp (and therefore malleable) wood had the effect of expanding the plank width at that point. Then as it dried, the expanded areas (at the nail heads) maintained their shape while the lengths of plank between the nails shrunk slightly, creating thin gaps along the lateral edges. So as I worked my way from keel to deck I became less reliant on nails and put more stock in my newly-acquired wood bending and glueing skills. A dab of AC to secure the plank to each bulkhead and again at the midpoint between bulkheads to secure the plank to the previous one, with carpenter's glue along all the plank edges inbetween. I still applied nails to hold the plank in place, but removed them again within a couple of minutes before the wood dried. Still not the quality I see in other build logs, but a marked improvement from my first attempt :)

0145_20210907_bluenose_II_build.jpg

Because of the initial gaps I will probably be obliged to apply putty and sand before applying the second layer. In the meantime though, I still need to carve out and insert these pesky little stealers ...
 
Planking the hull has been interesting, challenging and a rewarding experience in equal measure. And I'm not done yet. After the AL instructions dried up I used a combination of books, colourful pictures, other build logs and maybe a little bit of common sense to get going. It looked like it would take six planks to cover the mostly vertical area of the hull from sternpost to bow, so my starting point was to divide the sternpost accordingly into eleven segments - six for the planks and five intermediate wedges for stealers - and plank my way upwards towards the deck.

View attachment 254983

The planking process itself was quite a learning curve, filled with trial and error. I learnt how to bend planks with heat, invaluable for the plank-ends at the sternpost which required a near cork-screw shape to sit flush against the false keel. I also discovered why my first few planks showed noticable gaps between them: Inserting nails into the damp (and therefore malleable) wood had the effect of expanding the plank width at that point. Then as it dried, the expanded areas (at the nail heads) maintained their shape while the lengths of plank between the nails shrunk slightly, creating thin gaps along the lateral edges. So as I worked my way from keel to deck I became less reliant on nails and put more stock in my newly-acquired wood bending and glueing skills. A dab of AC to secure the plank to each bulkhead and again at the midpoint between bulkheads to secure the plank to the previous one, with carpenter's glue along all the plank edges inbetween. I still applied nails to hold the plank in place, but removed them again within a couple of minutes before the wood dried. Still not the quality I see in other build logs, but a marked improvement from my first attempt :)

View attachment 254984

Because of the initial gaps I will probably be obliged to apply putty and sand before applying the second layer. In the meantime though, I still need to carve out and insert these pesky little stealers ...
I am glad that you saw an improvement from prior planking. It is a learning experience for all of us as we have gone and will continue to gain more experience and skills. The planking of your kit is definitely different than in the MS2130. Don't worry about how it is as you have your own ideas how you will proceed. The main mission is to enjoy this hobby as you work in it. Keep your patience and thinking ahead at all times so that when the schooner is completed you can truly say that it is what it is and I did the best that I could with it at the time. There will be other models in the future where lessons and skills gained now will come forth. Rich (PT-2)
 
I am glad that you saw an improvement from prior planking. It is a learning experience for all of us as we have gone and will continue to gain more experience and skills. The planking of your kit is definitely different than in the MS2130. Don't worry about how it is as you have your own ideas how you will proceed. The main mission is to enjoy this hobby as you work in it. Keep your patience and thinking ahead at all times so that when the schooner is completed you can truly say that it is what it is and I did the best that I could with it at the time. There will be other models in the future where lessons and skills gained now will come forth. Rich (PT-2)
I'm learning a lot about working with small bits of wood at any rate. There were certainly a few minor panic moments in laying the planks, a process which seems to call for a lot of precision and timing, and always being aware not to apply too much pressure and break something. Not to mention the 'you haven't got very far' from the other members of my household who can't marry up the time spent on the ship to the output I produce ROTF
 
Back
Top