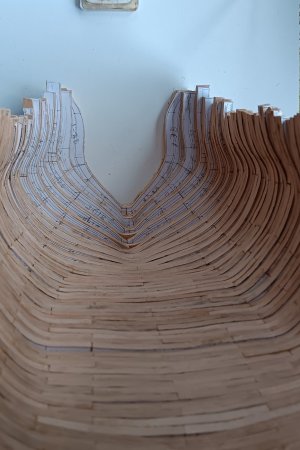
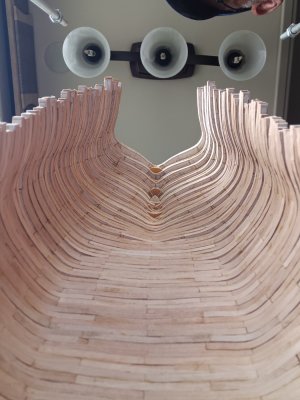
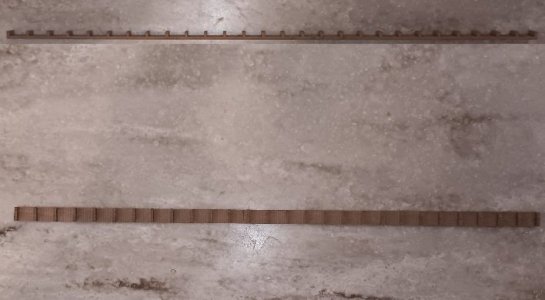
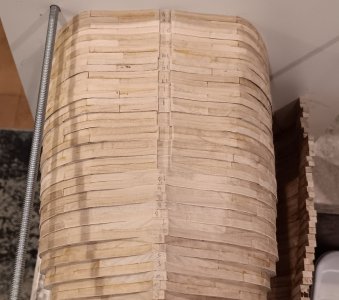
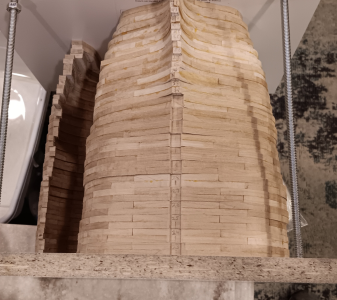
Note to self: don't get Brad mad at me from 100 yards...Glue thickness added 0.37" to the "length along the keel", compared to the "length along the top of the rail".
This is almost the thickness of a single frame (0.386"!!)
Below photos show this phenomenon (Shipyard Superintendent will discuss why he thinks this occurred below):
View attachment 527220View attachment 527221
The surface area of the frame cross section is very large around the keel area (red square), when compared to the much narrower area at the top of the rails (green square).
View attachment 527223
While pressing the halves together, the excess glue is almost completely squeezed out of the narrower top, while more glue remains in the wider area near the keel.
Dividing 0.37 by 42 frames equates to an average of 0.0088inches thicker in the keel area of each frame (about the thickness of two pages of copy paper).
SHIPYARD SOLUTION: Shipyard Superintendent will direct workers to sand each frame around the keel area more. The Superintendent will personally measure the thickness of EACH frame until BOTH the TOP and BOTTOM measure equally at 0.386".
Workers are glueing the final frame today (photos of the frame stack to follow)!!!
We are camped at "Range Time" on the DelMaVa Peninsula, so shooters put some lead downrange!! (photo 1). Yesterday we visited Assateague Island and rode bikes with the wild horses on the island (photo 2). Tonight, seafood in Ocean City MD!!
View attachment 527248View attachment 527224
-

Win a Free Custom Engraved Brass Coin!!!
As a way to introduce our brass coins to the community, we will raffle off a free coin during the month of August. Follow link ABOVE for instructions for entering.
-

PRE-ORDER SHIPS IN SCALE TODAY!
The beloved Ships in Scale Magazine is back and charting a new course for 2026!
Discover new skills, new techniques, and new inspirations in every issue.
NOTE THAT OUR FIRST ISSUE WILL BE JAN/FEB 2026
You are using an out of date browser. It may not display this or other websites correctly.
You should upgrade or use an alternative browser.
You should upgrade or use an alternative browser.
Bomb Ketch Salamandre 1:48
Shipyard is making sawdust in an actual New London, CT SHIPYARD!!!
The "land-yacht" is parked amongst some true yachts for the next few days.

Today workers were able to mill a pear beam to the correct thickness and rough out multiple pieces for the keel/bow/stern/rudder structures.
Workers also braved the 100-degree heat and humidity (YUCK!!), riding three miles to the US Coast Guard Academy. It is a beautiful campus/base, on the banks of the Thames River. We have now visited each of the academies and toured each chapel (photo below). They all are beautiful in their own unique way and provide peaceful places for the young officers to develop and integrate the spiritual side of leadership.

The "land-yacht" is parked amongst some true yachts for the next few days.

Today workers were able to mill a pear beam to the correct thickness and rough out multiple pieces for the keel/bow/stern/rudder structures.

Workers also braved the 100-degree heat and humidity (YUCK!!), riding three miles to the US Coast Guard Academy. It is a beautiful campus/base, on the banks of the Thames River. We have now visited each of the academies and toured each chapel (photo below). They all are beautiful in their own unique way and provide peaceful places for the young officers to develop and integrate the spiritual side of leadership.

- Joined
- Apr 12, 2025
- Messages
- 290
- Points
- 158

... or just stretch the keel by .386". Nobody will ever know, and I promise not to tell!SHIPYARD SOLUTION: Shipyard Superintendent will direct workers to sand each frame around the keel area more. The Superintendent will personally measure the thickness of EACH frame until BOTH the TOP and BOTTOM measure equally at 0.386".
I could also just cut the (room) mortise for the "thicker" frame bases a bit wider. This would reduce the "space" and keep the length of the keel the same. That way, no keel parts would need to be lengthened.... or just stretch the keel by .386". Nobody will ever know, and I promise not to tell!
I have the frames stacked in a press and it's easy to see which bases are too wide, because I can slide paper between the tops of certain frames.
I've marked those offending frames and will sand their bases down. Then I'll just evenly space the mortise for each frame...some may have to be enlarged slightly so all frames fit tight. Shouldn't be too hard and like you say, no one will ever know how the workers got it all to fit "perfectly"!!
- Joined
- Apr 12, 2025
- Messages
- 290
- Points
- 158

"Press them a little harder!" LOLI have the frames stacked in a press
All kidding aside, your work is coming along nicely. I've no doubts that this will become an extremely fine model once all is said and done! I truly enjoy seeing builds such as this as they progressively take form!
Lots of firsts today in the mobile shipyard parked in an actual New London, CT shipyard!
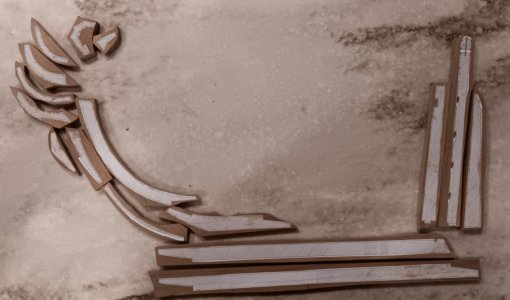
1. First Scarf joint completed on the keel.
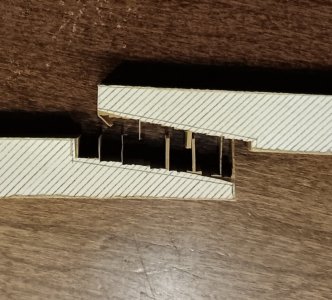
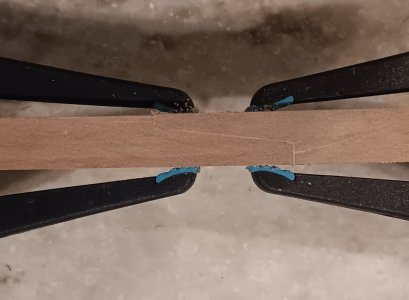
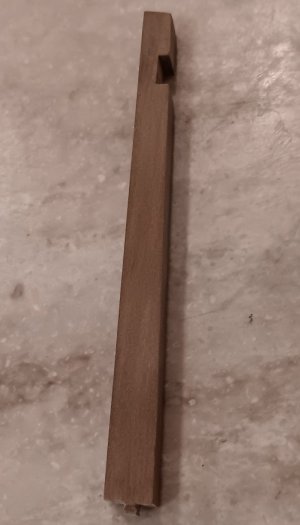
2. First Tenon produced on the Sternpost. I'll have to figure out how to do a mortise joint on the keel, to insert the tenon.
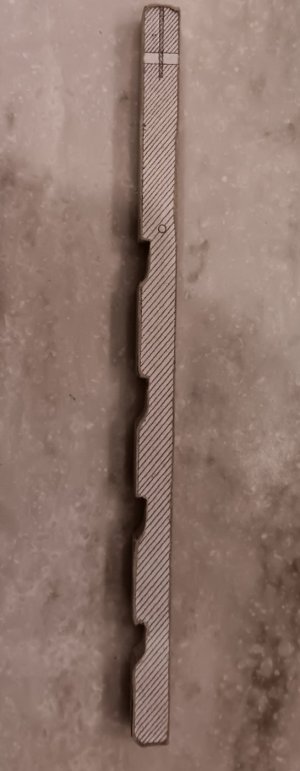
First time cutting out notches for the rudder pins.
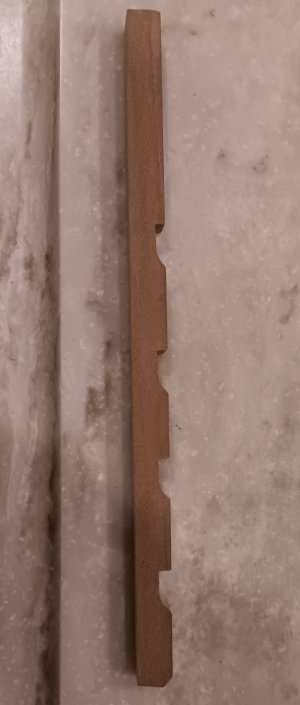
First time cutting decorative ogees on the rudder.

Over the next few days, workers will begin experimenting with the complex curved joints that make up the bow structure. It looks both complex and challenging!!
1. First Scarf joint completed on the keel.


2. First Tenon produced on the Sternpost. I'll have to figure out how to do a mortise joint on the keel, to insert the tenon.

First time cutting out notches for the rudder pins.


First time cutting decorative ogees on the rudder.

Over the next few days, workers will begin experimenting with the complex curved joints that make up the bow structure. It looks both complex and challenging!!
Very clean work, Brad. Looking forward to more!Lots of firsts today in the mobile shipyard parked in an actual New London, CT shipyard!
1. First Scarf joint completed on the keel.
View attachment 528214View attachment 528215
2. First Tenon produced on the Sternpost. I'll have to figure out how to do a mortise joint on the keel, to insert the tenon.
View attachment 528216
First time cutting out notches for the rudder pins.
View attachment 528217View attachment 528218
First time cutting decorative ogees on the rudder.
View attachment 528219
Over the next few days, workers will begin experimenting with the complex curved joints that make up the bow structure. It looks both complex and challenging!!
That looks great !
Very clean work, Brad. Looking forward to more!
Thanks for the likes and kind word. Shipyard moves N to Maine tomorrow. 1st stop Kennebunkport.That looks great !
Today we spent the afternoon at Mystic Seaport (model ship gallery was closed
A few pics to share.
1st, a large tun barrel. I thought the BHR kit barrels were too big....evidently not!!

They were prepping for a wooden boat show, so a few shots of some beautiful boats:
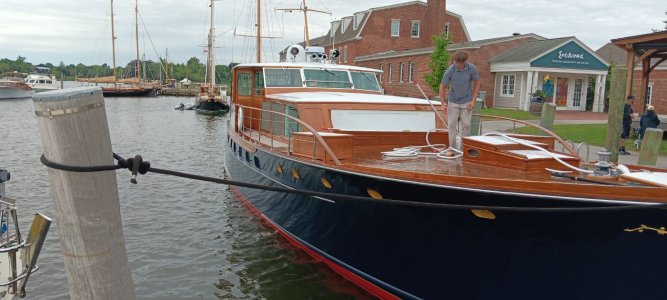
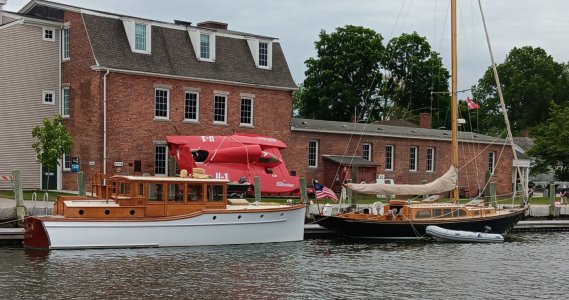
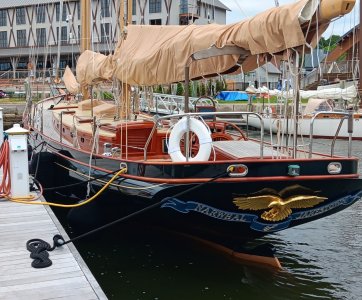
Mystic is a lovely town…except when you’re trying to get home to Newport when the drawbridge goes up…
Shipyard spent several days in beautiful Kennebunkport, Maine.
Workers made some progress in between bike rides, beer tasting, seafood lunches, bocce ball, and sightseeing.
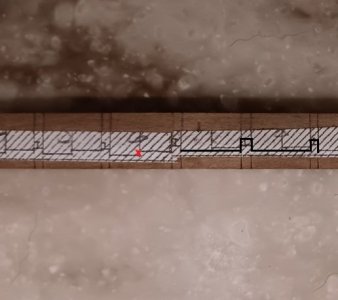
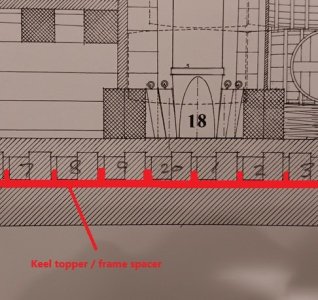
Keel slots were cut 24 frames that lay flat on the keel (i.e.: between the fore/aft rising wood).
Workers DID NOT cut a double step notch (see red X) in each frame. Instead, the spacer above the keel will be cut with a single flat notch for each frame, as shown in black in photo 1 and red in photo 2 below.
Shipyard workers did two awesome bike rides which included:
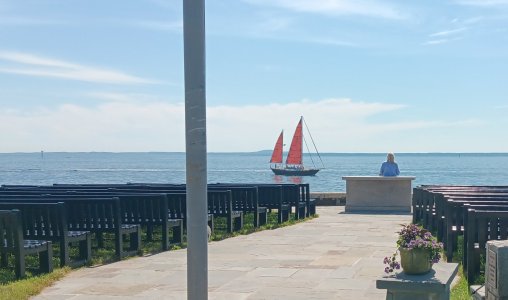
1) The beautiful St Ann's Episcopal Church (photo 1) with an "outdoor chapel by-the-sea" (photo 2). We waited till a majestic sailboat cruised by for a nice photo-op:

2) A stop at the seaside "Bush Compound" where the 41st president (George H.W. Bush) spent every summer of his life, including his time as president. The Texas flag was flying (meaning Bush 43 was in residence) and the secret service was out in force.

3) Miles of spectacular seaside mansions, each unique and incredible in their own way.


Shipyard relocated to a remote and scenic peninsula, on the central Maine coast, for the next week. More hiking, Biking, Lobster, and some sawdust in the future!
Workers made some progress in between bike rides, beer tasting, seafood lunches, bocce ball, and sightseeing.
Keel slots were cut 24 frames that lay flat on the keel (i.e.: between the fore/aft rising wood).


Workers DID NOT cut a double step notch (see red X) in each frame. Instead, the spacer above the keel will be cut with a single flat notch for each frame, as shown in black in photo 1 and red in photo 2 below.


Shipyard workers did two awesome bike rides which included:
1) The beautiful St Ann's Episcopal Church (photo 1) with an "outdoor chapel by-the-sea" (photo 2). We waited till a majestic sailboat cruised by for a nice photo-op:


2) A stop at the seaside "Bush Compound" where the 41st president (George H.W. Bush) spent every summer of his life, including his time as president. The Texas flag was flying (meaning Bush 43 was in residence) and the secret service was out in force.

3) Miles of spectacular seaside mansions, each unique and incredible in their own way.


Shipyard relocated to a remote and scenic peninsula, on the central Maine coast, for the next week. More hiking, Biking, Lobster, and some sawdust in the future!
$3 sliding cross-cut table for Proxxon table saw.
I have no milling machine to cut frame slots in the keel.
Shipyard workers quickly realized the Proxxon table saw needs a sliding cross-cut table!!
The provided attachments are not capable of cutting these slots to the required accuracy. This is the "foundation" of the entire model, so accuracy is crucial!!
SO...off to the ACE hardware store in tiny Belfast, Maine, to build one for under $3!
Below are the parts purchased (Less than $3 for the screws):
2ft of scrap hardwood (1.5" x 0.25"). (Free from shipyard scrap pile)
8 x M3 countersink machine screws (Length 12mm / thread diameter 3mm)
6 x M3 countersink machine screws (Length 6mm / thread diameter 3mm)
0.1 inch thick plexiglass 5" x 10" (ACE gave me a 12" x 5" piece from a broken slab for free)
Steps with photos:
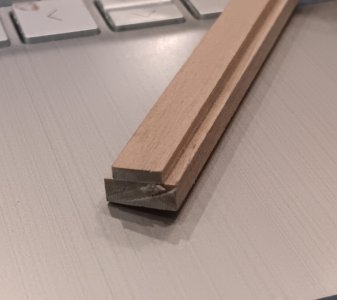
1. Cut two strips 0.464" wide x 0.172" thick x 10" long)
2. Cut two strips (0.300" wide x 0.15" thick x 10" long)
3. Slide the wider strip into the travel groove
4. Using instant glue, set the narrower strip on top, apply pressure.
NOTE: continue to move the two pieces back and forth in the groove for two minutes while applying pressure. This will ensure none of the instant glue bonds to the metal of the table saw guides.
5. Pull them from the slots and use a file to remove and glue that may have leaked from the joint.
6. Ensure they slide freely, without binding. If they bind, find the "high" spots and file or sand till they slide smoothly.
Result:
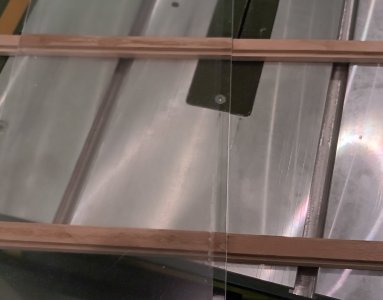
1. Cut the 0.1" plexiglass to 5" x 10". If you have enough cut to 10" x 10" (I didn't).
2. Place the wood runners in the slots. Place 3 strips of paper under the runners, so they stand "slightly proud" of the table.
3. Run instant glue along the top of the runner and press on the plexiglass squarely for two minutes.
SAME NOTE: continue to slide the cross-cut table so no glue can bind to the metal
4. Slide back and forth until it slides freely (file or sand if necessary...mine slid freely at this point).
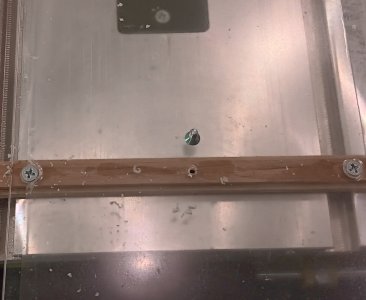
1. Pre-drill three holes on each guide, using a 3/32 drill bit for the machine screws. I went all the way through (then sanded the bottom).
2. Use a 15/64" drill bit to make the countersink hole for the screw heads.
3. Insert the 3 screws (use 5 if your plexiglass is 10" x 10").
4. Result should look like this
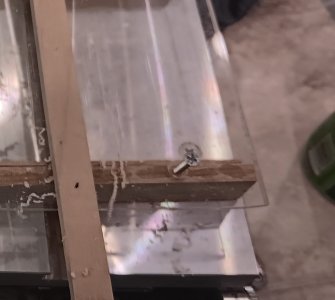
1. Cut two pieces (0.25" x 0.65" x 10") for the bottom "wood rest" and "top brace"
2. Using jigs/stops/clamps/etc, PRACTICE setting the bottom "wood rest" EXACTLY PERPENDICULAR (you only get one chance).
3. Use instant glue to set the bottom "wood rest"
4. Use instant glue to set the "top brace". This is not critical to make exactly perpendicular.
5. Use the eight 12mm M3 screws to reinforce these glued joints. Ensure these are countersunk, so they do not drag/scrape your table.
See below:
1. Run the sliding cross-cut table through a blade raised 0.50" (I felt this was adequate for 1/4" ship modeling). This will give you 0.40", available for cross-cuts.
2. Do a test and experiment with blade height adjustments/lock stops/etc
3. You are now ready to begin cutting accurate and repeatable frame slots in your keel.
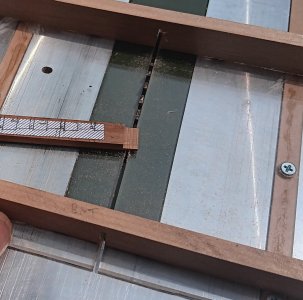
Shipyard will start milling the frame slots in the keel soon!
I have no milling machine to cut frame slots in the keel.
Shipyard workers quickly realized the Proxxon table saw needs a sliding cross-cut table!!
The provided attachments are not capable of cutting these slots to the required accuracy. This is the "foundation" of the entire model, so accuracy is crucial!!
SO...off to the ACE hardware store in tiny Belfast, Maine, to build one for under $3!
Below are the parts purchased (Less than $3 for the screws):
2ft of scrap hardwood (1.5" x 0.25"). (Free from shipyard scrap pile)
8 x M3 countersink machine screws (Length 12mm / thread diameter 3mm)
6 x M3 countersink machine screws (Length 6mm / thread diameter 3mm)
0.1 inch thick plexiglass 5" x 10" (ACE gave me a 12" x 5" piece from a broken slab for free)
Steps with photos:
1. Cut two strips 0.464" wide x 0.172" thick x 10" long)
2. Cut two strips (0.300" wide x 0.15" thick x 10" long)
3. Slide the wider strip into the travel groove
4. Using instant glue, set the narrower strip on top, apply pressure.
NOTE: continue to move the two pieces back and forth in the groove for two minutes while applying pressure. This will ensure none of the instant glue bonds to the metal of the table saw guides.
5. Pull them from the slots and use a file to remove and glue that may have leaked from the joint.
6. Ensure they slide freely, without binding. If they bind, find the "high" spots and file or sand till they slide smoothly.
Result:

1. Cut the 0.1" plexiglass to 5" x 10". If you have enough cut to 10" x 10" (I didn't).
2. Place the wood runners in the slots. Place 3 strips of paper under the runners, so they stand "slightly proud" of the table.
3. Run instant glue along the top of the runner and press on the plexiglass squarely for two minutes.
SAME NOTE: continue to slide the cross-cut table so no glue can bind to the metal
4. Slide back and forth until it slides freely (file or sand if necessary...mine slid freely at this point).

1. Pre-drill three holes on each guide, using a 3/32 drill bit for the machine screws. I went all the way through (then sanded the bottom).
2. Use a 15/64" drill bit to make the countersink hole for the screw heads.
3. Insert the 3 screws (use 5 if your plexiglass is 10" x 10").
4. Result should look like this

1. Cut two pieces (0.25" x 0.65" x 10") for the bottom "wood rest" and "top brace"
2. Using jigs/stops/clamps/etc, PRACTICE setting the bottom "wood rest" EXACTLY PERPENDICULAR (you only get one chance).
3. Use instant glue to set the bottom "wood rest"
4. Use instant glue to set the "top brace". This is not critical to make exactly perpendicular.
5. Use the eight 12mm M3 screws to reinforce these glued joints. Ensure these are countersunk, so they do not drag/scrape your table.
See below:

1. Run the sliding cross-cut table through a blade raised 0.50" (I felt this was adequate for 1/4" ship modeling). This will give you 0.40", available for cross-cuts.
2. Do a test and experiment with blade height adjustments/lock stops/etc
3. You are now ready to begin cutting accurate and repeatable frame slots in your keel.

Shipyard will start milling the frame slots in the keel soon!
- Joined
- Dec 7, 2022
- Messages
- 131
- Points
- 78

Nice job - but if you had a Byrnes saw you could have bought this as an accessory for $135.$3 sliding cross-cut table for Proxxon table saw.
I have no milling machine to cut frame slots in the keel.
Shipyard workers quickly realized the Proxxon table saw needs a sliding cross-cut table!!
The provided attachments are not capable of cutting these slots to the required accuracy. This is the "foundation" of the entire model, so accuracy is crucial!!
SO...off to the ACE hardware store in tiny Belfast, Maine, to build one for under $3!
Below are the parts purchased (Less than $3 for the screws):
2ft of scrap hardwood (1.5" x 0.25"). (Free from shipyard scrap pile)
8 x M3 countersink machine screws (Length 12mm / thread diameter 3mm)
6 x M3 countersink machine screws (Length 6mm / thread diameter 3mm)
0.1 inch thick plexiglass 5" x 10" (ACE gave me a 12" x 5" piece from a broken slab for free)
Steps with photos:
1. Cut two strips 0.464" wide x 0.172" thick x 10" long)
2. Cut two strips (0.300" wide x 0.15" thick x 10" long)
3. Slide the wider strip into the travel groove
4. Using instant glue, set the narrower strip on top, apply pressure.
NOTE: continue to move the two pieces back and forth in the groove for two minutes while applying pressure. This will ensure none of the instant glue bonds to the metal of the table saw guides.
5. Pull them from the slots and use a file to remove and glue that may have leaked from the joint.
6. Ensure they slide freely, without binding. If they bind, find the "high" spots and file or sand till they slide smoothly.
Result:
View attachment 529848
1. Cut the 0.1" plexiglass to 5" x 10". If you have enough cut to 10" x 10" (I didn't).
2. Place the wood runners in the slots. Place 3 strips of paper under the runners, so they stand "slightly proud" of the table.
3. Run instant glue along the top of the runner and press on the plexiglass squarely for two minutes.
SAME NOTE: continue to slide the cross-cut table so no glue can bind to the metal
4. Slide back and forth until it slides freely (file or sand if necessary...mine slid freely at this point).
View attachment 529825
1. Pre-drill three holes on each guide, using a 3/32 drill bit for the machine screws. I went all the way through (then sanded the bottom).
2. Use a 15/64" drill bit to make the countersink hole for the screw heads.
3. Insert the 3 screws (use 5 if your plexiglass is 10" x 10").
4. Result should look like this
View attachment 529826
1. Cut two pieces (0.25" x 0.65" x 10") for the bottom "wood rest" and "top brace"
2. Using jigs/stops/clamps/etc, PRACTICE setting the bottom "wood rest" EXACTLY PERPENDICULAR (you only get one chance).
3. Use instant glue to set the bottom "wood rest"
4. Use instant glue to set the "top brace". This is not critical to make exactly perpendicular.
5. Use the eight 12mm M3 screws to reinforce these glued joints. Ensure these are countersunk, so they do not drag/scrape your table.
See below:
View attachment 529827
1. Run the sliding cross-cut table through a blade raised 0.50" (I felt this was adequate for 1/4" ship modeling). This will give you 0.40", available for cross-cuts.
2. Do a test and experiment with blade height adjustments/lock stops/etc
3. You are now ready to begin cutting accurate and repeatable frame slots in your keel.
View attachment 529828
Shipyard will start milling the frame slots in the keel soon!
I WANTED a Byrnes after my PREAC died!!!Nice job - but if you had a Byrnes saw you could have bought this as an accessory for $135.
Spent 2-weeks trying to chase down rumors that they were back in production. Called and e-mailed several times, to no avail. Broke down and ordered the Proxxon.
With this sliding table I'm finally happy and saved $132 for
 !
!Great job on cutting the slots (and making the sled).!"Sliding Sled Saw Slays Slots"!
Used the DIY sled saw to cut notches on the keel for frames. It transformed the Proxxon saw!!
View attachment 530020
Workers went to a local beach concert in the small town of Belfast, ME. Beautiful venue, cold beer, great music and lots of local "characters"!
View attachment 530022View attachment 530023
Nicely done Brad on your "new" Proxxon saw! Enjoy your Independence Day in Maine! Magic Mike
Hope the skeeters in Belfast aren’t as bad as they are in Bethel!
Did you use a standard Proxxon blade for those notches?
Did you use a standard Proxxon blade for those notches?
Lobster dinner for the 4th and then moisquites drove us "indoors".Hope the skeeters in Belfast aren’t as bad as they are in Bethel!
Did you use a standard Proxxon blade for those notches?
Yep, the blade that came with it. I have an upgraded blade I'll replace it with, when it stops making crisp cuts.


