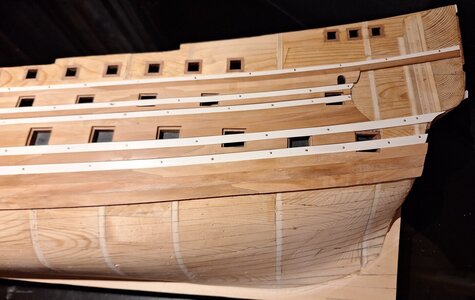
DE 7 PROVINCIËN (1665) 1:50

Sorry Herman, I sent the only information I have.

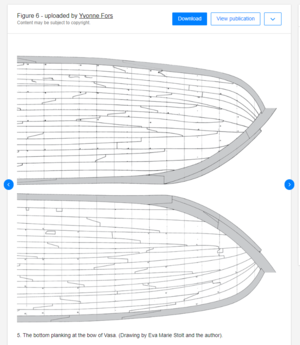
I see that Stephan found something, but I have never seen that before. Eva Marie Stolt created one of the first belay maps as well as the ship plans (once offered by the museum) so she knows what she is talking about... To my knowledge the museum only produced the full planking expansion for one side of the ship (based on an exchange with Dr. Hocker). I have his personal email so I'll ask him to be sure...

Of course, you are not building the Vasa so the combination of what I sent and what Stephan sent should at least introduce you to the style.

I don't think anyone who has an interest in these Dutch built ships will be surprised to learn that the Vasa is wonderfully asymmetric. I think about 10 inches different in height port to starboard along with other anomalies!
I agree with Paul, you can't copy, because the shape of the hull is not the same. Set out the second method you mentioned out on the hull. Only without stealers. Like the planking on the Prins Willem of me. Then past the planking patern of the Vasa in that patern created on the ship. You will come a whole way when you do so. Just take different wide planks and fit them in keeping method 2 in your mind for the direction.
This will be fun doing.

Paul, thank you for inquiring with Fred Hocker if the expansion for the other side is also available. It will be interesting to see the differences and get a better feel for this free style planking method.

I won't be copying it 1:1 to the 7P but will use it as a guideline. I think I will not erase the lines on the model but indeed use them for directional purposes.
 
Dear Herman. Without any doubt, the "Shipyard" Method - not based on aesthetics but on how we perceive it to have been. The VASA method was on the VASA - not on the 7P. I will refrain from commenting on the so-called "Dutch" method. I believe @Maarten and @Ptèr Peter are both correct in their rationale.
 
Hi gents,

I don t think there is a Vasa methode. The methode is just to use as much of the available wood as possible. In the Vasa that gave this outcome. PS and SB side of Vasa most probably are different. The shape of the bow is determining the way of the planking in combination with the available materials. This means actually you can t do it wrong whatever you decide. For sure planks were of different widths, shapes and lenghts. In Vasa you are not only seeing this in the hull but also in the decks.
 
And there go our beautiful and careful designed planking plans, down the drain...
The good news, we may now use what comes with the kit, or what we still have floating about: we use what we have. ;)
And also the deck planking - they did not follow any shift pattern for the butt joints and also had different widths of planking width -> we modelers are much to much perfectionists
Screenshot 2023-10-16 133206.png
 
Indeed, the planking of Vasa is not perfectly symmetrical, although there is a general symmetry (same number of strakes on each side amidships). The details vary. I can post the planking expansions of both sides if there is still interest.

Fred
 
Indeed, the planking of Vasa is not perfectly symmetrical, although there is a general symmetry (same number of strakes on each side amidships). The details vary. I can post the planking expansions of both sides if there is still interest.

Fred
Many thanks for replying to my request, that was so nicely passed on to you by Paul @dockattner.

I have been playing with the idea to follow such a method of planking for my model of De 7 Provinciën. The last days I have made some designs but am not convinced by either of them. As this is my first model I also might be reaching too high to get a good result.
I have therefore abandoned that idea and have chosen to follow more or less the planking method as shown on the shipyard model in Batavia Stad.

That said, there certainly is still interest for the planking expansions of the Vasa. If not for me, building my model of De 7 Provinciën, then certainly in general to learn more of the contemporary ship building and maybe for others building the Vasa who can make an attempt to copy the original planking expansion, quite a challenge.

Thanks again for your offer and visiting my build log.
BTW Stockholm is still on our bucket list and I will certainly visit the Vasa Museum, I hope next year.
 
Very interesting conversation, I personally would like version 2 very much, although the other two versions also have something to them. I am sure you will choose the one that is most beautiful for you and it will certainly be a fantastic piece of work.
 
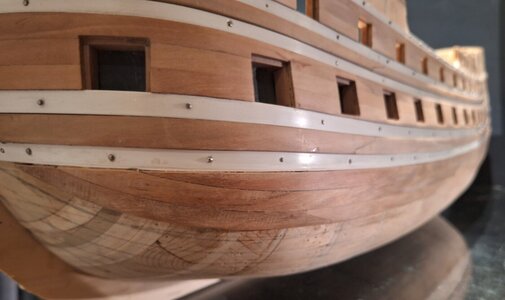
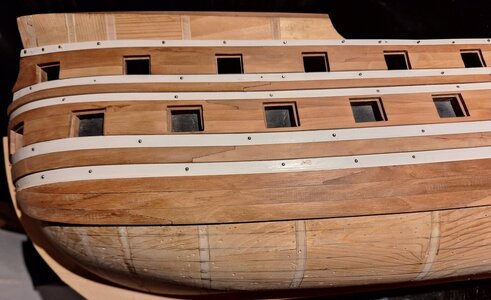
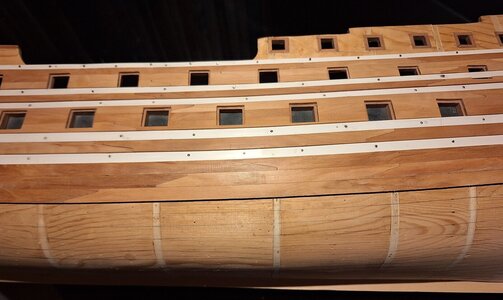
I thank you all for your involvement in the discussion regarding the planking system. As stated earlier I opted for the "shipyard method" and have started planking. The first three rows of planks (portside only) are fitted to the model. The planks are oversized, now about 3,5 mm thick. I have made them somewhat oversized as there are some imperfections in the shape of the hull. As soon as the planking is almost finished (before fitting the keel/stem-and sternbeam) I will sand them down until the correct shape of the hull is achieved. So all the scratches from sawing and filing will later disappear. I am not working as clean as I see others do, but after sanding is completed I hope to achieve a similar result.

20231021_192528_resized.jpg

20231021_192808_resized.jpg

20231021_192813_resized.jpg

20231021_192817_resized.jpg

Planking the hull will take me a long time. I will therefore post regular updates.
Thank you for your interest and likes, a source of extra motivation and an extra push to reach for the highest possible result, highly appreciated.
 
I thank you all for your involvement in the discussion regarding the planking system. As stated earlier I opted for the "shipyard method" and have started planking. The first three rows of planks (portside only) are fitted to the model. The planks are oversized, now about 3,5 mm thick. I have made them somewhat oversized as there are some imperfections in the shape of the hull. As soon as the planking is almost finished (before fitting the keel/stem-and sternbeam) I will sand them down until the correct shape of the hull is achieved. So all the scratches from sawing and filing will later disappear. I am not working as clean as I see others do, but after sanding is completed I hope to achieve a similar result.

View attachment 401605

View attachment 401606

View attachment 401607

View attachment 401608

Planking the hull will take me a long time. I will therefore post regular updates.
Thank you for your interest and likes, a source of extra motivation and an extra push to reach for the highest possible result, highly appreciated.
A nice start if the hull planking, Herman.
Regards, Peter
 
Just to make sure; you didn't make a typo with that statement "about 3,5mm thick"?
No typo, about 3,5 mm.
I have made the planks using my bandsaw and did not even bother to use the thicknesser to get planks of exactly the right thickness as they will later get a thorough sanding job.
Downside for thicker planks is the fact it is more work to get a good fit between individual planks but on the other hand edge-bending thicker wood is easier then thinner strips. Just a bit longer in the steampipe.
 
I thank you all for your involvement in the discussion regarding the planking system. As stated earlier I opted for the "shipyard method" and have started planking. The first three rows of planks (portside only) are fitted to the model. The planks are oversized, now about 3,5 mm thick. I have made them somewhat oversized as there are some imperfections in the shape of the hull. As soon as the planking is almost finished (before fitting the keel/stem-and sternbeam) I will sand them down until the correct shape of the hull is achieved. So all the scratches from sawing and filing will later disappear. I am not working as clean as I see others do, but after sanding is completed I hope to achieve a similar result.

View attachment 401605

View attachment 401606

View attachment 401607

View attachment 401608

Planking the hull will take me a long time. I will therefore post regular updates.
Thank you for your interest and likes, a source of extra motivation and an extra push to reach for the highest possible result, highly appreciated.
You have certainly mastered getting planks to fit well next to each other! Love your work my friend!
 
Back
Top