Endurance (1912) - Occre, Scale 1:70 - My First Shipbuilding Adventure

The hardest area I found was the stern, I never really took much notice but it's a bit of an odd shape, sort of flat at 45 deg. side on, then concave, then morphing into convex it blends onto the hull.

Turns out that ‘shipshape’ is constantly changing angles in every possible direction! I find it very confusing at times when I’m trying to shape a plank. “So I bend this bit down and twist it clockwise, with a curve inwards and up at the other end?” Then I turn round to my ‘ironing board’ and do everything the opposite way! Sometimes a plank for the port side fits better on the stbd.

Just a few planks around the wire exit on the starboard side, then rough sand to match, and finally fine sand both sides and go from there.

View attachment 482334

It’s very neat. You’ve done incredibly well for your first time planking. Perhaps it’s the artists eye, seeing clearly.

There’s a couple of long gaps which you could possibly fill with wood instead of filler. I’ve sometimes glued a plank in on its edge in places like that. I’d always rather sand wood than filler because sanding things with two different hardnesses makes it difficult for me to avoid making waves.

When you do a single planked POB or a POF you can’t get away with anything except perfect but seeing what you’re doing already, I think you’ll cope. :D
 
Watched the National Geographic doco last night. 5 stars, brilliant.
Well, I think I've saved my dear Endurance, but only just.
Finished 1 side of her hull, rough sanded into shape and hardly any filler, I was anticipating cupfuls of the stuff.
The hardest area I found was the stern, I never really took much notice but it's a bit of an odd shape, sort of flat at 45 deg. side on, then concave, then morphing into convex it blends onto the hull.
I was watching the doco last night and studied every shot of the real Endurance trying to find a good angle to gain references :p ROTF
Just a few planks around the wire exit on the starboard side, then rough sand to match, and finally fine sand both sides and go from there.

View attachment 482334
Good evening. Way to go. Looking good. BTW that picture of Clint you posted on Smithy’s log is incredible. You are very talented. Cheers Grant
 
Good evening. Way to go. Looking good. BTW that picture of Clint you posted on Smithy’s log is incredible. You are very talented. Cheers Grant
Thankyou Grant that's very kind Thumbsup
Many years at art school and learning tricks of correction is the key, as I'm finding with my new passion for modelling.
the tips and tricks in here are amazing, there is a plethora of talent in SOS ;)Gold Star
 
Not much gone on of late, only able to tinker here and there, but where I have, I've had a lot of fun doing fiddley stuff until such time I can get to spend more time with my dearest Endurance. ;)

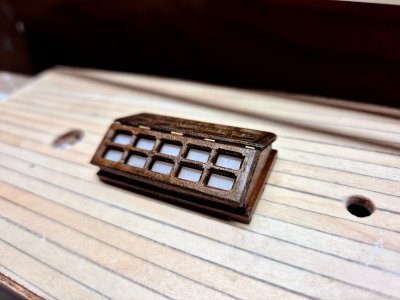
I think its called the service hatch (??)
The instructions call for a single length of 2mm dia brass as a hinge but it looked a bit out of scale, so I reached for those pesky little nails again and created some far smaller "hinges"
I also put a chamfer around the windows and skirting too hoping to catch a little realism as best as she would allow :p

12th Nov (2).jpg

It's not attached yet, I cut away most of the underneath as I wanted the LED's inside the hull to glow under the frosted glass and I'll need to cut a section in the deck for this to happen. Thumbsup:)
 
Not much gone on of late, only able to tinker here and there, but where I have, I've had a lot of fun doing fiddley stuff until such time I can get to spend more time with my dearest Endurance. ;)

I think its called the service hatch (??)
The instructions call for a single length of 2mm dia brass as a hinge but it looked a bit out of scale, so I reached for those pesky little nails again and created some far smaller "hinges"
I also put a chamfer around the windows and skirting too hoping to catch a little realism as best as she would allow :p

View attachment 483891

It's not attached yet, I cut away most of the underneath as I wanted the LED's inside the hull to glow under the frosted glass and I'll need to cut a section in the deck for this to happen. Thumbsup:)

Smart work. I like the way the frame chamfers stop short of the corners leaving that square bit.

The hinges are good too: OcCre hardware is often a bit clunky and benefits from replacement with something a bit more delicate.

Service hatch? Skylight?

Nice to see you back on the job.
 
Ever sanded the hull to achieve the desired shape so far that you end up with a wafer-thin patch?
I have.
Walk away Cat............slowly.........walk.........away...........
Nah, it's OK, I just need to be extra careful, plus it's the side that faces the wall ROTF
Got me thinking though.
IF you should sand an area so much that it actually punctures, are there any tips to repair ?
Just a thought.
Tried my hand at a few lengths of the secondary planking last night, ----- woah.
To all the experienced builders out there you'd get a good guffaw out of this, to all the green-as-grass newbies like me, word of advice.
Never, EVER cover your bench with paper to protect against the contact adhesive.
What a nightmare, awful mess.
I'll try my hand at a bit more tonight, might even take a few pics of my efforts, and the bit that still has the print of yesterday's news on it. :p
 
IF you should sand an area so much that it actually punctures, are there any tips to repair ?
Just a thought.

I think we all do that at some time. I seem to remember laying the second planks over the top of the hole and being careful not to touch that bit ever again.

Tried my hand at a few lengths of the secondary planking last night, ----- woah.
To all the experienced builders out there you'd get a good guffaw out of this, to all the green-as-grass newbies like me, word of advice.
Never, EVER cover your bench with paper to protect against the contact adhesive.

Contact adhesive? That gives you no chance to adjust the fit of OcCre's lace-like and delicate Tanganyika (?) veneer. I suggest Titebond or equivalent. Put it on the hull and the plank and blast it with a hairdryer for a few seconds until it's almost dry then put it in place. With that thin stuff you probably won't even need to heat set it with the soldering iron.
 
I suggest Titebond or equivalent.
Soooo glad I'm back on here after this last week (all is well mate ;))
I did order and have that Titebond, I was even looking at it last night and thought "do I ? - should I ?"
Most definitly will tonight mate, thankyou so much again Smithy ThumbsupThumbsup:p
With that thin stuff you probably won't even need to heat set it with the soldering iron.
ROTF

My travel iron still hasn't arrived after ordering it 6 weeks back :confused:
 
Hurrah, pip-pip and loud, laborious hussars for Titebond !! :p Thumbsup
Only managed a few lengths the other night with my soup of contact adhesive and paper, evidence of that disaster is clear near the bow, between 1st
and 2nd planks, but last night I had my first introduction to Titebond, and boy what a difference!
I found no need to introduce any means of speeding things up a little with the curing prior to fixing as it's almost Summer here, and although Victoria isn't famous for its heat it's certainly warming up a tad, 32c today.
I managed about 7 lengths last night, still very nervous but slowly, oh so very slowly gaining confidence.
I often say your only good at what you do if you know how to fix it. Well, if something went awry, I wouldn't have a clue how to fix it.............yet.........

15th Nov (2).jpg 15th Nov (1).jpg

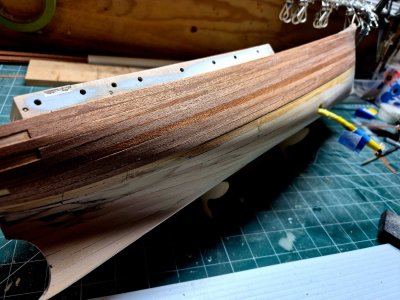
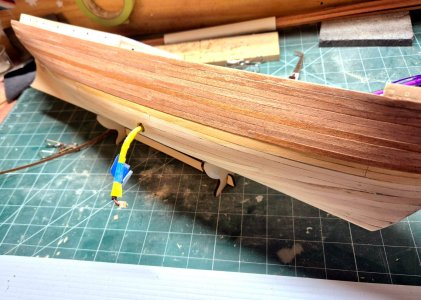
This is the side that's facing the wall following the love of my life's great advice of "practice on that side first" - the yellow bit hanging out is the protection I wrapped around those delicate LED wires as I realised if I lose / damage those I'm toast.
 
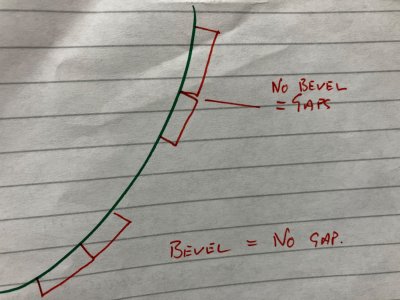
That’s looking good. Are you beveling the edges of the planks?
Thanks Smithy :) To be honest mate the planks are 0.5mm thick and act like paper.
Although that is one tip I will take when it comes to PoF one day - Yes, I have goals ;)Thumbsup
The Occre instruction videos show I need to press the edges down with a file handle or similar which is what I'm doing at the mo.
 
use the leftover wood for shimming and gap filling.
You Sir are a bloody genius.
There are a few pesky "gaps" at the stern where I've over sanded it in a bid to create a continuing contour, and your right of course, the glue does soak through leaving the veneer as hard as a stick of Blackpool rock, even that soft area has disappeared.
It's a few weeks until Summer here, and it's starting to warm up a tad, 32c today and very humid, I found the glue was literally dry on the hull by the time I finished adding the glue to the planks.
I thought I might get away with preparing 3 or 4 but even ended up struggling to keep up with just the one, and actually got a better
result doing a single row in 2 sections. (I was wondering at the time how many my mate Smithy could manage at once)
I had to give your heat trick a try too mate, worked very well on some awkward ends, but I only have that soldering iron, so I tried to be as careful as possible.
Got a few more to go on the Starboard side before I do the fillers, but I'll get the Port side to the same level before I try those.

16th Nov (1).jpg
 
32c today and very humid, I found the glue was literally dry on the hull by the time I finished adding the glue to the planks.

It doesn’t seem to make much difference as long as there’s a layer of glue on the hull.

I thought I might get away with preparing 3 or 4 but even ended up struggling to keep up with just the one, and actually got a better
result doing a single row in 2 sections. (I was wondering at the time how many my mate Smithy could manage at once)

I do my second planking in short sections. At first it was for the sake of authenticity, but then I discovered how much easier it was. I like the patchwork effect of mixing up several shades of plank along a strake. (A strake is a line of planks or whatever that goes from one end to the other)

I don’t know how many I do at a time. I concentrate on the one under my fingers and stop when I’ve had enough.

I had to give your heat trick a try too mate, worked very well on some awkward ends, but I only have that soldering iron, so I tried to be as careful as possible.

Yeah. Don’t burn the topcoat!

Got a few more to go on the Starboard side before I do the fillers, but I'll get the Port side to the same level before I try those.

View attachment 484417

You’ll have learned a lot about the shape of a hull, I guess. How in some places you might need to add wood but in others you need to taper the ends.
 
Back
Top