I'm very glad to hear it, thank you. I thought the first pancakes are always lumpy))) I always want it to be absolutely perfect, but it takes a lot of time and you understand that the result that is - is enough))Wonderful joints. I like the result
-

Win a Free Custom Engraved Brass Coin!!!
As a way to introduce our brass coins to the community, we will raffle off a free coin during the month of August. Follow link ABOVE for instructions for entering.
-

PRE-ORDER SHIPS IN SCALE TODAY!
The beloved Ships in Scale Magazine is back and charting a new course for 2026!
Discover new skills, new techniques, and new inspirations in every issue.
NOTE THAT OUR FIRST ISSUE WILL BE JAN/FEB 2026
- Home
- Forums
- Ships of Scale Group Builds and Projects
- HMS Alert 1777 1:48 PoF Group Build
- HMS Alert 1777 1:48 Group Build Logs
You are using an out of date browser. It may not display this or other websites correctly.
You should upgrade or use an alternative browser.
You should upgrade or use an alternative browser.
HMS Alert [1777] 1:48 POF by serikoff. (Two hulls: skeleton and fully rigged)
So, in the last post I showed how I made the frames of the front part of the hull. Today I will show how I assembled the frames of the rear part.
In general, everything is very similar, but I did some things a little differently, so I will show you in detail again.
Spoiler: some of the rear frames had to be redone, because (if you remember, I showed this) there were defective parts and they had to be redone, but I will tell you about this in the next post, but for now...
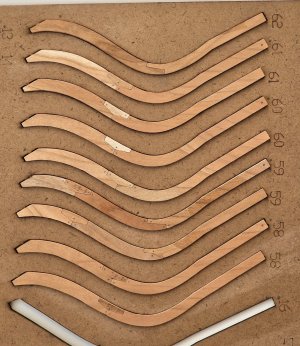
Assembly and adjustment, as with the front frames, was carried out in special templates, which is very convenient. With experience, all manipulations become faster and more accurate.
Then, all the parts are taken out, a film is laid and they are assembled back, but with glue!

To prevent the glue from opening the glue seam when drying, I apply a strip of glue over the seam. Then, after drying, I take out the glued frames again and remove the film, check the joints and the accuracy of the glued parts. (In the next post, I will tell you how to fix it if the parts are glued incorrectly, with an offset).
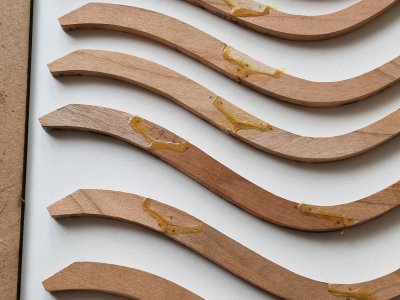
Then I cut off the excess glue with a sharp knife to make it easier to polish, because this glue is very strong and sandpaper cannot cope with it, but we get stuck in it.
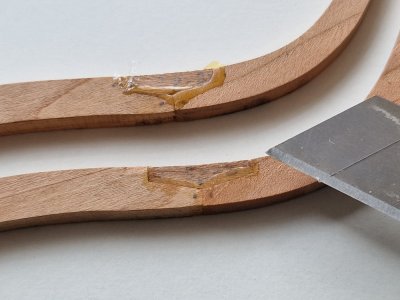
It takes a couple of minutes, but then it saves a lot of time and simplifies the polishing process.
I polish with 240 grit sandpaper.
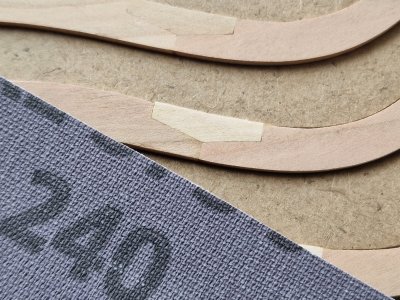
I like it when the joints are so thin and the glue seam looks like a cut =))
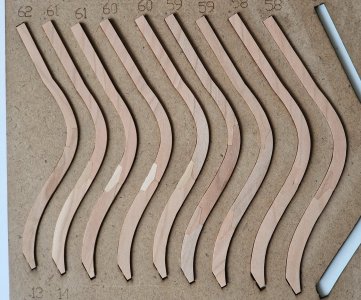
Then, to polish the back side, I turn the template over...
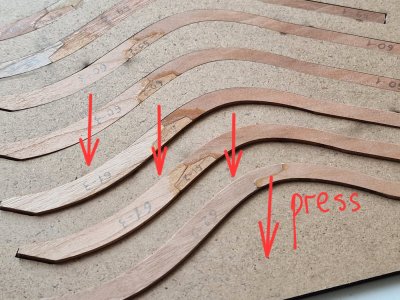
... and I push it so that the frames stick out. This method (compared to how I did it at the beginning) saves a lot of time, since you don't need to take out the frames and you don't need to insert them from the back side, where they usually get jammed and don't want to stick in, since the laser cut on the back side is slightly smaller by microns than on the front.
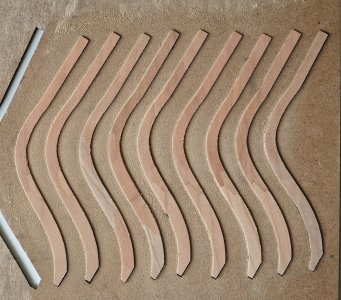
Well, after that, all that remains is to polish the back side and go lightly along the ends, removing excess glue, and the micro-steps and frames are ready for contouring!
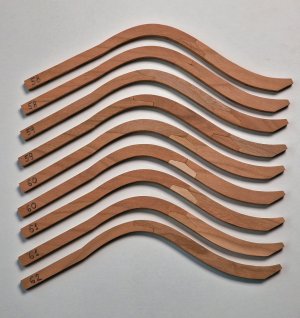
So far I really like the pace... let's move on!


In general, everything is very similar, but I did some things a little differently, so I will show you in detail again.
Spoiler: some of the rear frames had to be redone, because (if you remember, I showed this) there were defective parts and they had to be redone, but I will tell you about this in the next post, but for now...

Assembly and adjustment, as with the front frames, was carried out in special templates, which is very convenient. With experience, all manipulations become faster and more accurate.
Then, all the parts are taken out, a film is laid and they are assembled back, but with glue!

To prevent the glue from opening the glue seam when drying, I apply a strip of glue over the seam. Then, after drying, I take out the glued frames again and remove the film, check the joints and the accuracy of the glued parts. (In the next post, I will tell you how to fix it if the parts are glued incorrectly, with an offset).

Then I cut off the excess glue with a sharp knife to make it easier to polish, because this glue is very strong and sandpaper cannot cope with it, but we get stuck in it.

It takes a couple of minutes, but then it saves a lot of time and simplifies the polishing process.
I polish with 240 grit sandpaper.

I like it when the joints are so thin and the glue seam looks like a cut =))

Then, to polish the back side, I turn the template over...

... and I push it so that the frames stick out. This method (compared to how I did it at the beginning) saves a lot of time, since you don't need to take out the frames and you don't need to insert them from the back side, where they usually get jammed and don't want to stick in, since the laser cut on the back side is slightly smaller by microns than on the front.

Well, after that, all that remains is to polish the back side and go lightly along the ends, removing excess glue, and the micro-steps and frames are ready for contouring!

So far I really like the pace... let's move on!


- Joined
- Oct 23, 2018
- Messages
- 886
- Points
- 403

Really precise job.

Thank you)) I hope I motivate you to start your own Alert ? )))Really precise job.
- Joined
- Oct 23, 2018
- Messages
- 886
- Points
- 403

I'am working on my Fly-project. There is so many work, that I do not find time to build on my Alert.Thank you)) I hope I motivate you to start your own Alert ? )))
- Joined
- Oct 17, 2020
- Messages
- 1,691
- Points
- 488

Hi, nice work, congratulations, I ask: did you do the nailing of the patches? Thanks. FrankSo, in the last post I showed how I made the frames of the front part of the hull. Today I will show how I assembled the frames of the rear part.
In general, everything is very similar, but I did some things a little differently, so I will show you in detail again.
Spoiler: some of the rear frames had to be redone, because (if you remember, I showed this) there were defective parts and they had to be redone, but I will tell you about this in the next post, but for now...
View attachment 509554
Assembly and adjustment, as with the front frames, was carried out in special templates, which is very convenient. With experience, all manipulations become faster and more accurate.
Then, all the parts are taken out, a film is laid and they are assembled back, but with glue!
View attachment 509555
To prevent the glue from opening the glue seam when drying, I apply a strip of glue over the seam. Then, after drying, I take out the glued frames again and remove the film, check the joints and the accuracy of the glued parts. (In the next post, I will tell you how to fix it if the parts are glued incorrectly, with an offset).
View attachment 509559
Then I cut off the excess glue with a sharp knife to make it easier to polish, because this glue is very strong and sandpaper cannot cope with it, but we get stuck in it.
View attachment 509561
It takes a couple of minutes, but then it saves a lot of time and simplifies the polishing process.
I polish with 240 grit sandpaper.
View attachment 509562
I like it when the joints are so thin and the glue seam looks like a cut =))
View attachment 509564
Then, to polish the back side, I turn the template over...
View attachment 509565
... and I push it so that the frames stick out. This method (compared to how I did it at the beginning) saves a lot of time, since you don't need to take out the frames and you don't need to insert them from the back side, where they usually get jammed and don't want to stick in, since the laser cut on the back side is slightly smaller by microns than on the front.
View attachment 509566
Well, after that, all that remains is to polish the back side and go lightly along the ends, removing excess glue, and the micro-steps and frames are ready for contouring!
View attachment 509567
So far I really like the pace... let's move on!
View attachment 509568

Hi. Thank you. I haven't done the bolt imitation yet, I will do it after the contouring. I will only do the imitation, I understand that there simply won't be enough time for brass or wooden fonts. I will talk about this later.Hi, nice work, congratulations, I ask: did you do the nailing of the patches? Thanks. Frank
- Joined
- Jul 27, 2021
- Messages
- 444
- Points
- 323

It's good to see how much effort you make to clean and polish the wood. Something I often miss a lot. I always find it a shame when you see the fibres, no surface treatment, no oil and I have to ask myself why you have to work so hastily.
Dirk
Dirk
Thank you for your words. I am also often lazy and do not always do as I would like, but this is all my laziness))) But in this project I want to make at least a decent result. Now I am making the middle frames, of which there are 41 pieces and they are of two shapes. That is, 20 + 21 identical frames with 7 parts in each... and what is most important, today I managed to make only 8 halves)))) I feel this will last a long time))It's good to see how much effort you make to clean and polish the wood. Something I often miss a lot. I always find it a shame when you see the fibres, no surface treatment, no oil and I have to ask myself why you have to work so hastily.
Dirk
Thank you. Yes, it is not a fast process, but I am gradually moving forward. The dimensions are approximately 5 mm.You continue to create beautifully made joints.I realize you will have a lot of fairing to do later, but wondered what is the approximate moulded dimension at the top of the top timbers as they are in your photo.
Thanks
Allan
View attachment 509696
Remaking defective (and white) parts.
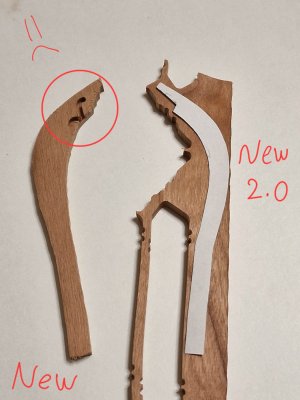
If you remember when I cut off the holders on the milled rams I noticed some parts with milled defects.
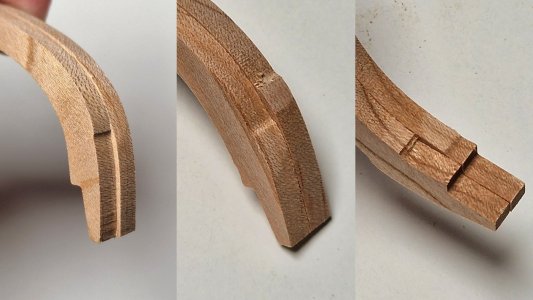
Some differed from each other (although they are duplicates), and some were even irregularly shaped in pairs. Which led to voids in the template.
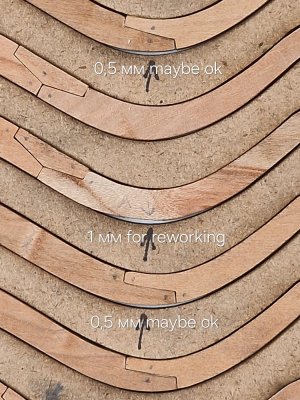
Half a millimeter may still be permissible (during the final polishing this place is likely to align), but here a millimeter is definitely too much and there will be a depression. Therefore, I decided to redo these details, as well as those that did not completely coincide with the template.
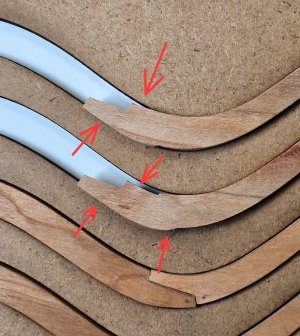
I put a sheet of paper under the template and outlined the profile of the part. Then he cut this pattern and found on it a place on the dies where it was possible to place such a size and geometry of the part.

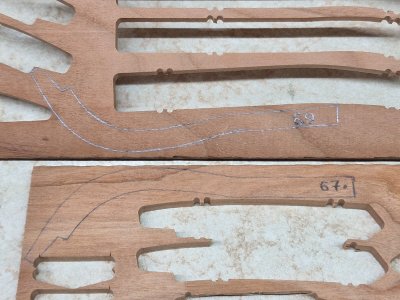
And then a very interesting idea came to me... If I have already decided to redo something, so why not redo all the white details?! Light brown will do well with other shades of brown, but the snow-white details are knocked out from the general background. And since there were only 5 of them, plus 4 in defects, there was not much work.
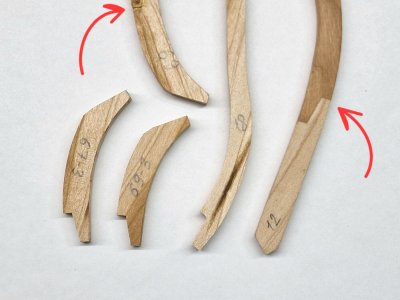
One point was that I had already managed to glue some parts (12th and 69th, pictured above).
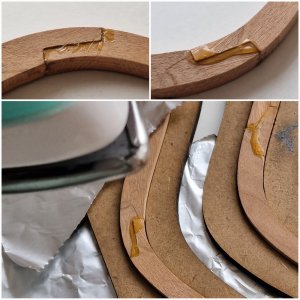
But we all know that PVA glue is a reversible glue, and if you heat it with an iron, it sticks out.

By the way, as promised, I tell you: that if you overlooked and the details stuck together crookedly, then this place can also be heated with an iron through the foil and then you can re-glue it correctly. (The photo below shows that a large step has formed in the glue seam and after warming up, I re-glued it all correctly. The only thing I noticed was such a moment. When heating the clerical (white) PVA, it was easily divided. But Titebond II had to be pulled, it was a lip, stretched like gum and with difficulty, but came off. This is the word about the strength of different PVA. (Plus, in order to simplify grinding at the glue sites, it is advisable to scrape off the glue as soon as it hardens. If you do this in a day, the glue will become very hard and this will complicate its processing. I will talk about this later).
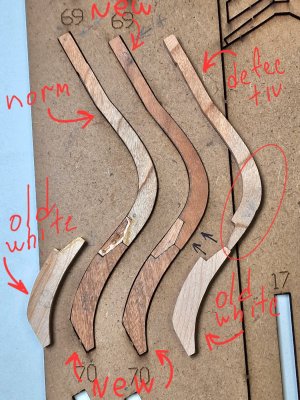
So, I decided to redo 9 parts: 4 (marked in red) those that are defective and 5 (marked in blue) those that were made of white wood. They were placed on a suitable size fragment of the die and circled their profile, since I already had them done.

It took a very long time to saw all this with a hand jigsaw and I just separated them into separate fragments...
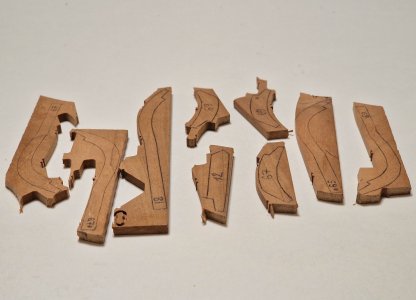
... and then the angle grinder gave them the desired shape. This is faster and simply tens of times more predictable.
It was ridiculous when I almost made one part and then turned it over and found that it had traces of a milling cutter right on the work surface... had to be redone again =)))
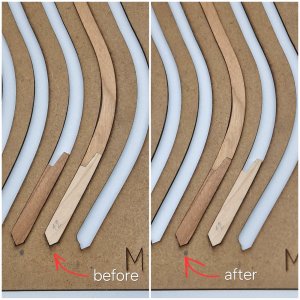
As a result, here is the result of one detail (out of 5) replacing white with a darker one.
And here is the replacement of white parts and defective on two pairs of frames.
At the end of all the preparatory work and alterations, I glued all the details together...
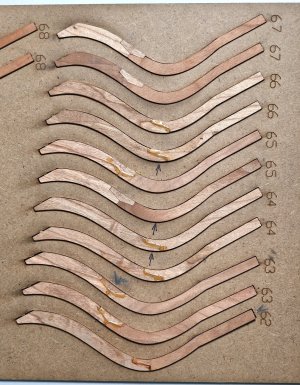
... and now almost the second half of the rear frames is ready for the next stage.

I really like that now there are no (at least in the frames) white details and everything looks harmonious, and most importantly without defective details.
The next in line are the one-piece frames of the central part of the hull...
Today I have already started to do them and it is much more difficult and longer than what I have already done. There are more connections, more frames, as many as 41 pieces and I understand that this is for a long time))).

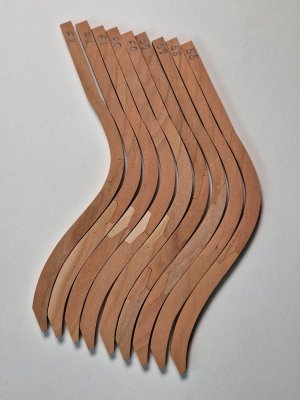
If you remember when I cut off the holders on the milled rams I noticed some parts with milled defects.

Some differed from each other (although they are duplicates), and some were even irregularly shaped in pairs. Which led to voids in the template.

Half a millimeter may still be permissible (during the final polishing this place is likely to align), but here a millimeter is definitely too much and there will be a depression. Therefore, I decided to redo these details, as well as those that did not completely coincide with the template.

I put a sheet of paper under the template and outlined the profile of the part. Then he cut this pattern and found on it a place on the dies where it was possible to place such a size and geometry of the part.


And then a very interesting idea came to me... If I have already decided to redo something, so why not redo all the white details?! Light brown will do well with other shades of brown, but the snow-white details are knocked out from the general background. And since there were only 5 of them, plus 4 in defects, there was not much work.

One point was that I had already managed to glue some parts (12th and 69th, pictured above).
But we all know that PVA glue is a reversible glue, and if you heat it with an iron, it sticks out.

By the way, as promised, I tell you: that if you overlooked and the details stuck together crookedly, then this place can also be heated with an iron through the foil and then you can re-glue it correctly. (The photo below shows that a large step has formed in the glue seam and after warming up, I re-glued it all correctly. The only thing I noticed was such a moment. When heating the clerical (white) PVA, it was easily divided. But Titebond II had to be pulled, it was a lip, stretched like gum and with difficulty, but came off. This is the word about the strength of different PVA. (Plus, in order to simplify grinding at the glue sites, it is advisable to scrape off the glue as soon as it hardens. If you do this in a day, the glue will become very hard and this will complicate its processing. I will talk about this later).

So, I decided to redo 9 parts: 4 (marked in red) those that are defective and 5 (marked in blue) those that were made of white wood. They were placed on a suitable size fragment of the die and circled their profile, since I already had them done.

It took a very long time to saw all this with a hand jigsaw and I just separated them into separate fragments...

... and then the angle grinder gave them the desired shape. This is faster and simply tens of times more predictable.
It was ridiculous when I almost made one part and then turned it over and found that it had traces of a milling cutter right on the work surface... had to be redone again =)))

As a result, here is the result of one detail (out of 5) replacing white with a darker one.

And here is the replacement of white parts and defective on two pairs of frames.

At the end of all the preparatory work and alterations, I glued all the details together...

... and now almost the second half of the rear frames is ready for the next stage.

I really like that now there are no (at least in the frames) white details and everything looks harmonious, and most importantly without defective details.
The next in line are the one-piece frames of the central part of the hull...
Today I have already started to do them and it is much more difficult and longer than what I have already done. There are more connections, more frames, as many as 41 pieces and I understand that this is for a long time))).

- Joined
- Jul 27, 2021
- Messages
- 444
- Points
- 323

Much better without the white wood!
Dirk
Dirk
Wow, that is a lot of wood to remove if you are going to fair it to the thickness on the actual vessel.The dimensions are approximately 5 mm.
Allan
Definitely, I think so too.Much better without the white wood!
Dirk
Since this is a kit, the sides are a little thicker here and definitely not 2.5 mm. In theory it should be 4.5 or 4,2, but I plan to make it a little thinner, maybe 3,7-3.5 mm, since anything less will be very fragile.Wow, that is a lot of sanding you will need to get to the approximate 2.5mm it would be at your scale of 1:48. (dimension from Steel and The Builder's Repository 1788) Having it heavier though makes it stronger and less prone to breakage while doing the assembly but then the fairing to take away half the wood is going to be long and arduous. At least we get to pick our poison in these situations.
Allan
For now I'm moving forward with the build plan the kit, because changes now can greatly affect the build in the future.
The problem with leaving the top timbers too thick is that when you add the planking inboard and outboard, the top rail will have to be much too broad. I agree these can be fragile, but I found that I can add a temporary batten to the outside of the framed model, then sand the inboard side so all is in alignment. After that, add the spirketing inboard then remove the temporary batten on the outside and finish fairing the outside to the thickness required. In this case it would be about 4 inches to 5 inches (about 2.5mm) If you are not comfortable with getting it to the scaled thickness and leave it heavy I totally understand.In theory it should be 4.5 or 4,2, but I plan to make it a little thinner, maybe 3,7-3.5 mm
Alaln
I will try to stick to the anatomy of this ship during the construction process. I printed it out in full size and will take measurements while working with the finished hull. But while the assembly is in progress on the slipway, I will stick to the instructions from the kit, otherwise I may not assemble it correctly. I will definitely make the top timbers and railings thinner, since they are very wide in the kit, but this will happen later.The problem with leaving the top timbers too thick is that when you add the planking inboard and outboard, the top rail will have to be much too broad. I agree these can be fragile, but I found that I can add a temporary batten to the outside of the framed model, then sand the inboard side so all is in alignment. After that, add the spirketing inboard then remove the temporary batten on the outside and finish fairing the outside to the thickness required. In this case it would be about 4 inches to 5 inches (about 2.5mm) If you are not comfortable with getting it to the scaled thickness and leave it heavy I totally understand.
Alaln
Solid frames.
So, before that there were paired frames, i.e. which consisted of a left and a right half. I have already made 10 front ones (which needed to be glued) and 14 rear ones, now let's move on to the 41st solid frame of the middle part of the ship.
Of the 41 frames: 20 of one type and 21 of another, and each of these frames consists of 7 parts. And accordingly, there will be many times more work on them...
But first, I needed to make one tool that would speed up the processing of one important unit.

This is a homemade engraving machine attachment. Where the disk should be fixed (it did not suit me), I made my disk out of wood and sandpaper.
First he gave the disc a perfect round shape...
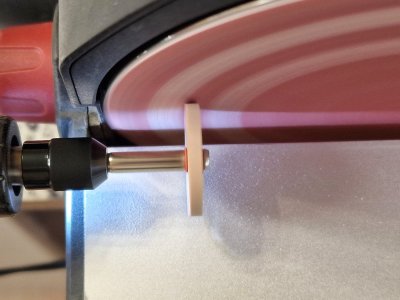
Then he glued sandpaper on both sides so that he could be processed on both sides at once without changing the position of the engraver.
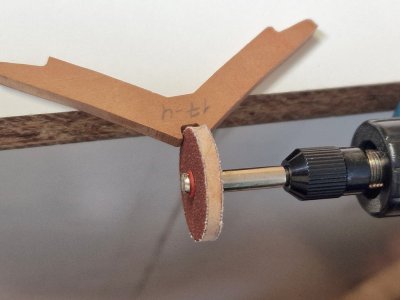

And as it became clear, all this is for one single part, which came from the set with a 4 mm slot.
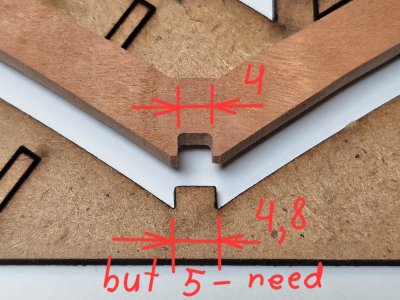
But in the template, the simulation of the keel frame is 4.8 mm, although the 5.2 frame itself will be somewhere up to 5 mm after polishing. That is, accordingly, you need to make a 1 mm wider groove in the part. This is most likely done specifically so that when milling from a milling cutter, the acute angle of the workpiece is not damaged.

So I milled 90% of the wood and finished the corner with a file.

Then the part took its place in the template.
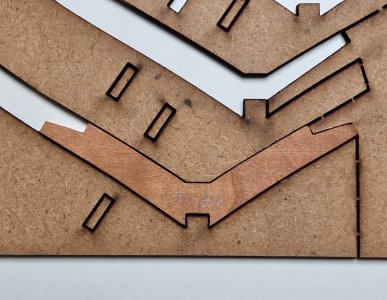
Well, then, everything is as before - fitting and replacing white parts. Now, there are only a few of these white connecting parts left, and they will practically not be visible, but I decided to remake them into darker ones.
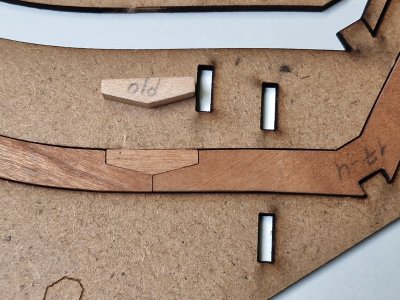
And one more of these white parts, of which there are several (which is good that there were spare parts in the set, maybe in such a case, although I think they just made a mistake with the number))
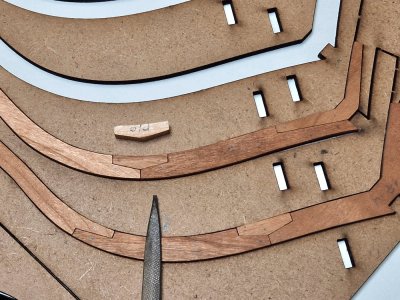
After fitting one side, you had to glue it together... By the way, I would like to remind you once again that it is better to remove the glue as soon as it hardens, scraping it off, otherwise, in a day it will be very hard and it will be more difficult to remove it. This is me about Titebond II.

So, solid frames are assembled first in halves...
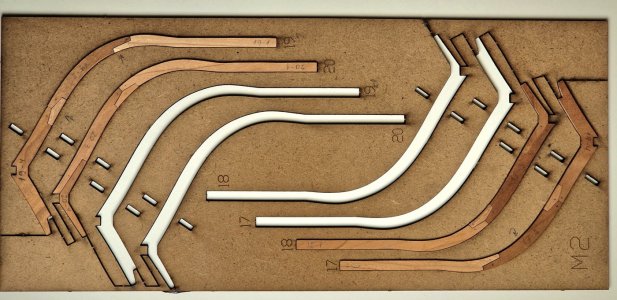
... after glue hardening, retaining fragment is separated from template, halves of frames are turned over and fitting continues from middle to other side.
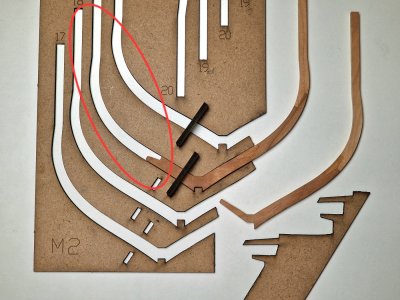
The downside is that the fitting and gluing of the first halves can be done at the same time, but the second halves can only be glued one by one, since the other frame, which is standing next to it, is crossed with the others.

That is, the first stage can be done at least with all frames at the same time, but the second stage - with only one at a time (on one side). But if you start working on several templates at once, then with quick-drying glue, the work progresses without pauses and expectations.
By the way, the templates are connected with special clips that prevent them from changing the original geometry.
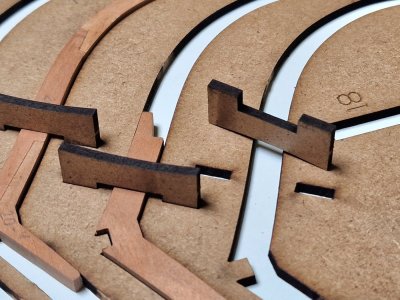
In total, in 2 days I made 4 full frames...

... and 8 halves of frames...
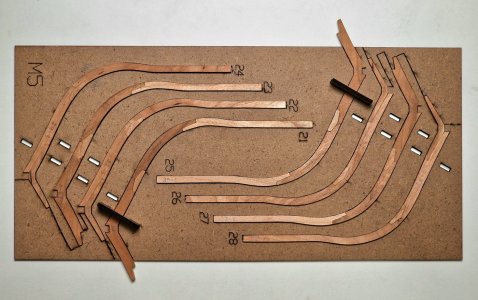
... that in fact is 8 out of 41 frames and this is 20% of the total. So another 8 days of monotonous repetitive work awaits me... eh... let's go!

So, before that there were paired frames, i.e. which consisted of a left and a right half. I have already made 10 front ones (which needed to be glued) and 14 rear ones, now let's move on to the 41st solid frame of the middle part of the ship.
Of the 41 frames: 20 of one type and 21 of another, and each of these frames consists of 7 parts. And accordingly, there will be many times more work on them...
But first, I needed to make one tool that would speed up the processing of one important unit.

This is a homemade engraving machine attachment. Where the disk should be fixed (it did not suit me), I made my disk out of wood and sandpaper.
First he gave the disc a perfect round shape...

Then he glued sandpaper on both sides so that he could be processed on both sides at once without changing the position of the engraver.


And as it became clear, all this is for one single part, which came from the set with a 4 mm slot.

But in the template, the simulation of the keel frame is 4.8 mm, although the 5.2 frame itself will be somewhere up to 5 mm after polishing. That is, accordingly, you need to make a 1 mm wider groove in the part. This is most likely done specifically so that when milling from a milling cutter, the acute angle of the workpiece is not damaged.

So I milled 90% of the wood and finished the corner with a file.

Then the part took its place in the template.

Well, then, everything is as before - fitting and replacing white parts. Now, there are only a few of these white connecting parts left, and they will practically not be visible, but I decided to remake them into darker ones.

And one more of these white parts, of which there are several (which is good that there were spare parts in the set, maybe in such a case, although I think they just made a mistake with the number))

After fitting one side, you had to glue it together... By the way, I would like to remind you once again that it is better to remove the glue as soon as it hardens, scraping it off, otherwise, in a day it will be very hard and it will be more difficult to remove it. This is me about Titebond II.

So, solid frames are assembled first in halves...

... after glue hardening, retaining fragment is separated from template, halves of frames are turned over and fitting continues from middle to other side.

The downside is that the fitting and gluing of the first halves can be done at the same time, but the second halves can only be glued one by one, since the other frame, which is standing next to it, is crossed with the others.

That is, the first stage can be done at least with all frames at the same time, but the second stage - with only one at a time (on one side). But if you start working on several templates at once, then with quick-drying glue, the work progresses without pauses and expectations.
By the way, the templates are connected with special clips that prevent them from changing the original geometry.

In total, in 2 days I made 4 full frames...

... and 8 halves of frames...

... that in fact is 8 out of 41 frames and this is 20% of the total. So another 8 days of monotonous repetitive work awaits me... eh... let's go!

But they look so good, you should be happy.. So another 8 days of monotonous repetitive work awaits me... eh... let's go
Allan
Thank you for your words, I am very pleased to read this. I, in turn, spent a lot of time on forums studying different methods and techniques of production and for this reason I created the site to concentrate in one place all the most interesting things without unnecessary information. And I am always grateful to those who describe the whole process in detail. And I learned a lot from this, so I try to do everything the same way myself. and I am very glad that this will be useful to someone.But they look so good, you should be happy.I would bet seeing this great array of photos and how well these frames are "shaping up" is giving a lot of members a goal to shoot for.
Allan


