Yes, you are right, but if you calculate everything correctly, then the anatomical version is not so difficult. I will try and will definitely show the result.That joinery, as shown in the anatomy, it's pretty insane. I like your fake joint. Smart solution! Cheers!
-

Win a Free Custom Engraved Brass Coin!!!
As a way to introduce our brass coins to the community, we will raffle off a free coin during the month of August. Follow link ABOVE for instructions for entering.
-

PRE-ORDER SHIPS IN SCALE TODAY!
The beloved Ships in Scale Magazine is back and charting a new course for 2026!
Discover new skills, new techniques, and new inspirations in every issue.
NOTE THAT OUR FIRST ISSUE WILL BE JAN/FEB 2026
- Home
- Forums
- Ships of Scale Group Builds and Projects
- HMS Alert 1777 1:48 PoF Group Build
- HMS Alert 1777 1:48 Group Build Logs
You are using an out of date browser. It may not display this or other websites correctly.
You should upgrade or use an alternative browser.
You should upgrade or use an alternative browser.
HMS Alert [1777] 1:48 POF by serikoff. (Two hulls: skeleton and fully rigged)
Keel for the second hull, version No. 2.
All mistakes were taken into account and their own advice was applied... and here is the result, or rather the build process of the second version.
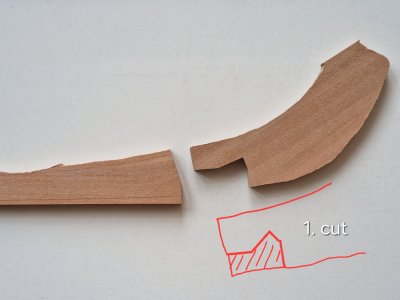
At first, everything is practically as in the first versions, but we cut it off only from a small part.
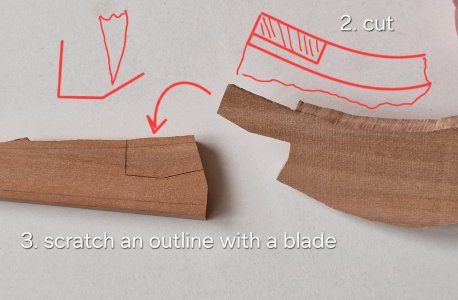
Then, in the same detail, I cut off the excess and scribbled a contour on the second detail with a finished profile...
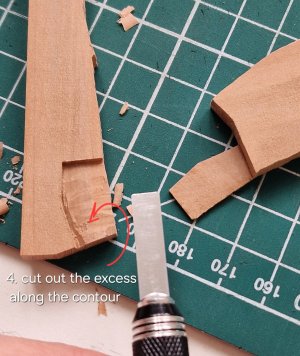
Well, then cut out everything superfluous from this detail. Here the principle is simple, we prepare one part, we make a second one according to it, and the only visual connection will be the contour that we scribbled, so I made sampling (4) in excess, without bothering, because all the voids will be occupied by glue.
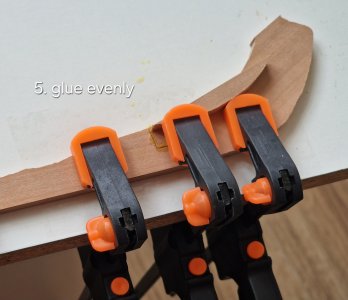
The main thing is to set everything straight. And do not cut everything along the contour until all the details are adjusted.
And here is the result after drilling holes from both sides! To perfectly achieve the correct arrangement of holes on both sides (if there is no vertical drilling device). That is, I drilled holes in a pattern on each side and inserted wire there on each side and glued CA gel over it. (shown above). And after grinding, I really liked the result.
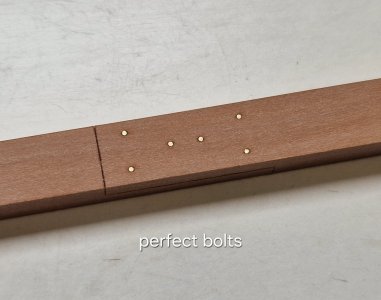
I also liked the right lock. And as I expected, it was not difficult to manufacture.
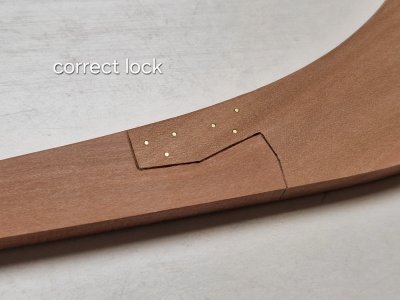
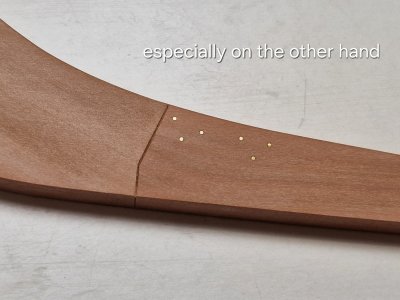
I get straight high from this lock.
Well, this is a sample of the top of the keel (stem). I wanted to design it in the color scheme of the entire case. And I also really liked the result and I will do the same to the original.
(the sample was hastily made and covered with tung oil to see mostly the color and arrangement of the lines.)
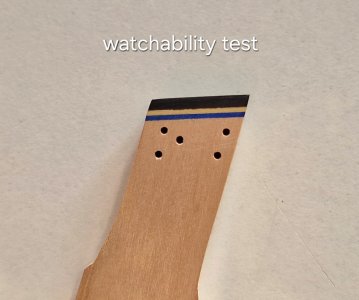
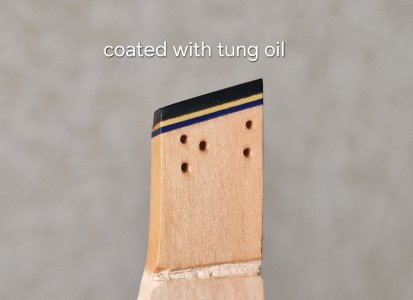
I think one more day and I will finish the final version of the keel (second), which looks much better than the first (and the option from the set too!).
P.S. I really like the color scheme (yellow, blue)... just like the colors of my country's flag.
All mistakes were taken into account and their own advice was applied... and here is the result, or rather the build process of the second version.

At first, everything is practically as in the first versions, but we cut it off only from a small part.

Then, in the same detail, I cut off the excess and scribbled a contour on the second detail with a finished profile...

Well, then cut out everything superfluous from this detail. Here the principle is simple, we prepare one part, we make a second one according to it, and the only visual connection will be the contour that we scribbled, so I made sampling (4) in excess, without bothering, because all the voids will be occupied by glue.

The main thing is to set everything straight. And do not cut everything along the contour until all the details are adjusted.
And here is the result after drilling holes from both sides! To perfectly achieve the correct arrangement of holes on both sides (if there is no vertical drilling device). That is, I drilled holes in a pattern on each side and inserted wire there on each side and glued CA gel over it. (shown above). And after grinding, I really liked the result.

I also liked the right lock. And as I expected, it was not difficult to manufacture.


I get straight high from this lock.
Well, this is a sample of the top of the keel (stem). I wanted to design it in the color scheme of the entire case. And I also really liked the result and I will do the same to the original.
(the sample was hastily made and covered with tung oil to see mostly the color and arrangement of the lines.)


I think one more day and I will finish the final version of the keel (second), which looks much better than the first (and the option from the set too!).
P.S. I really like the color scheme (yellow, blue)... just like the colors of my country's flag.
- Joined
- Jul 27, 2021
- Messages
- 437
- Points
- 323

Slava Ukraini
Thank you, Günther, very nice. By the way, if you accidentally missed it, then I share photos from the museum in Greenwich at this link to GoogleDrive, There are 470 photos of models, which I liked the most. And also, in these branches I posted photos from the championships, which were held in Kyiv.Hey Sergey,
As always, incredibly impressive. I'm always impressed by your work. Many thanks for showing the beautiful model ships. Really great.
Best regards
Günther
IV Open Cup of Kyiv 2013
This was a long time ago... Even before the war. When the strongest gathered in Kyiv and competed shoulder to shoulder... But such photos should not just be stored on my disk and on my website. So, I decided to share them with the SoS community. I took all the photos myself. There are 13...
shipsofscale.com
V Open Cup of Kyiv 2014
This championship was more modest than in 2013, but there were reasons for that. However, this does not diminish the beauty of the models that were presented there; there were simply significantly fewer of them. 1/9 I'll start with the legend, Evgeny Epur. He was both a participant and a judge...
shipsofscale.com
Have fun.
Hello Sergey,
I just had the pleasure of revisiting your posts of the IV & V Open Cups again. It is always a great treat to see such great master builders work.
Thanks again.
Bill
I just had the pleasure of revisiting your posts of the IV & V Open Cups again. It is always a great treat to see such great master builders work.
Thanks again.
Bill
I continue with the keel...
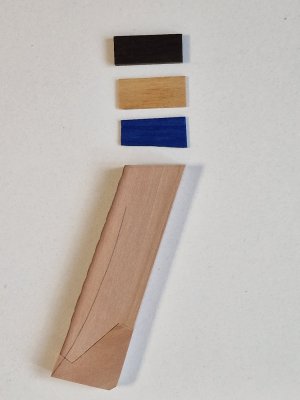
By colors: black hornbeam - boxwood - blue hornbeam - light pear.
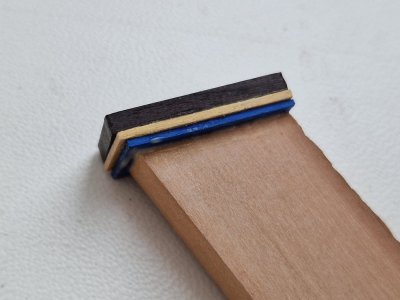
In order not to make a complex connection, I made one part and then scribbled a seam between them through a template.
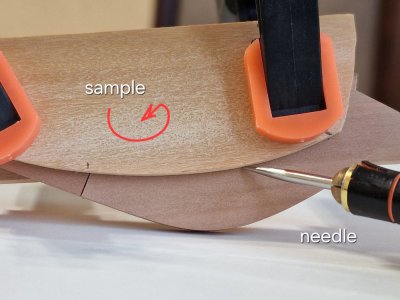
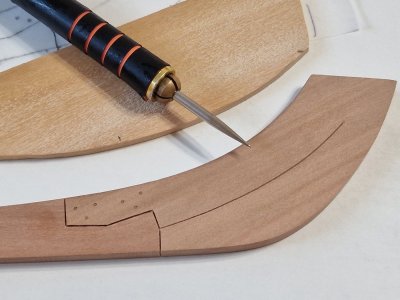
And here's the result:
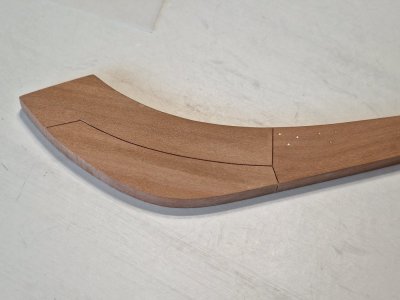
Since there will be a fragile connection along the waterline, I decided to strengthen it with metal nails and glued it to the CA gel.
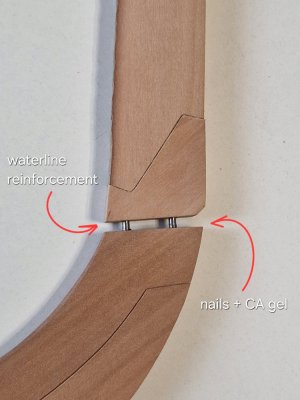
I remind you that the skin will be made of dark and light pear along the waterline, like the keel.
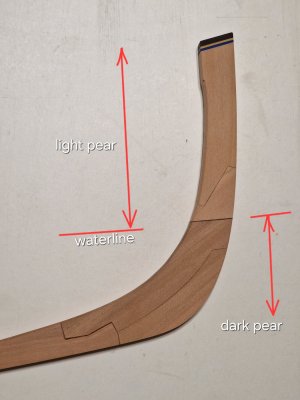
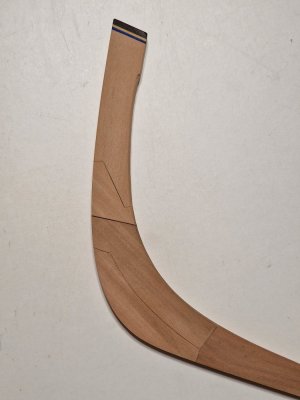
And a couple of close-ups...
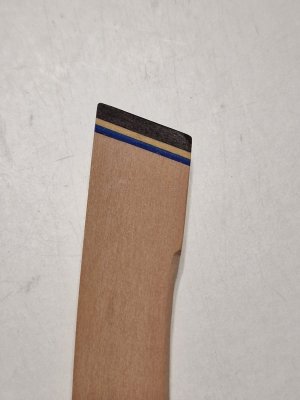
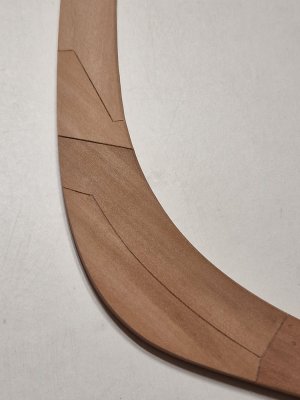
It remains to make bolts at the end and holes for rigging and you can glue the keel to the body... finally.

By colors: black hornbeam - boxwood - blue hornbeam - light pear.

In order not to make a complex connection, I made one part and then scribbled a seam between them through a template.


And here's the result:

Since there will be a fragile connection along the waterline, I decided to strengthen it with metal nails and glued it to the CA gel.

I remind you that the skin will be made of dark and light pear along the waterline, like the keel.


And a couple of close-ups...


It remains to make bolts at the end and holes for rigging and you can glue the keel to the body... finally.
Today is a small anniversary... exactly 100 days of work on this project. Let me remind you, I started it in January of this year.
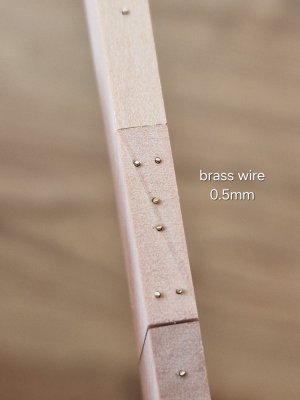
And today I finished the keel for the second hull. And in order: drilled 0.55 mm holes...
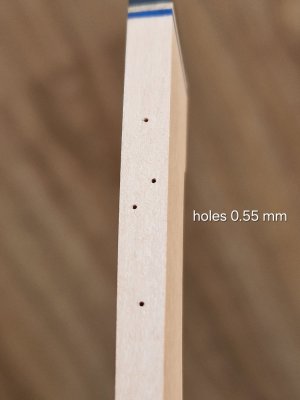
... inserted 0.5 mm brass wire from them...
... sealed CA with gel...
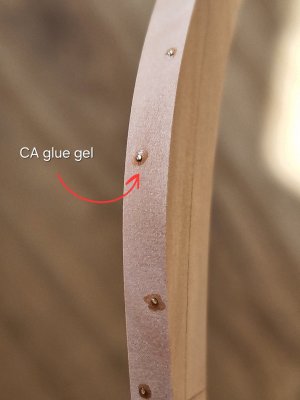
... and ground on an angle grinder.
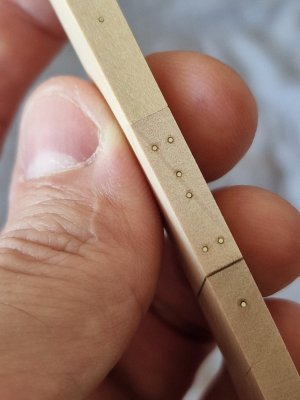
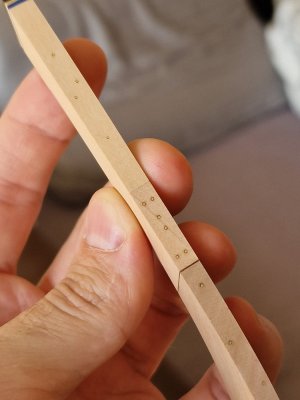
Then he made Latin numbers. I have already described this process earlier with the first keel on the first case. First marked, drew and cut with a scalpel, but straight, as if pressing and not scratching.
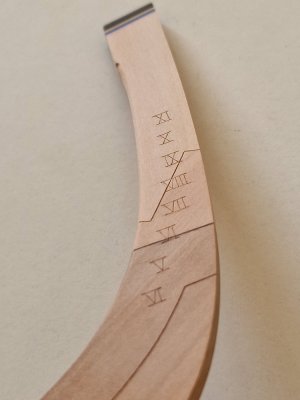
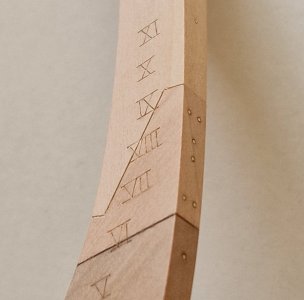
Cut the keel along the length...
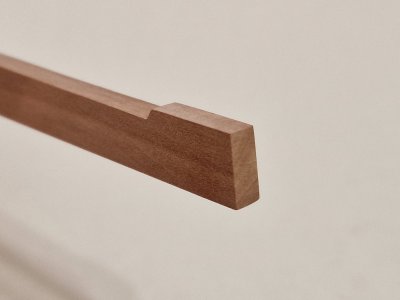
... and drilled holes for rigging with a diameter of 1 mm.
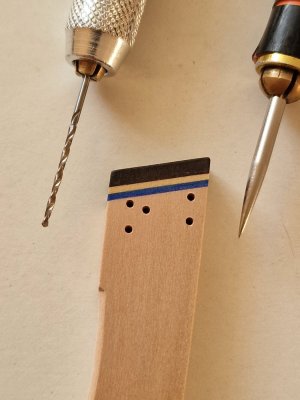
Now the keel is ready and tomorrow according to the plan to glue it to the second hull... well, can I start sheathing the hull with boards... I can't wait and imagine how difficult it will be, given that the skin is two-tone and not yet butt and overlapping...

And today I finished the keel for the second hull. And in order: drilled 0.55 mm holes...

... inserted 0.5 mm brass wire from them...

... sealed CA with gel...

... and ground on an angle grinder.


Then he made Latin numbers. I have already described this process earlier with the first keel on the first case. First marked, drew and cut with a scalpel, but straight, as if pressing and not scratching.


Cut the keel along the length...

... and drilled holes for rigging with a diameter of 1 mm.

Now the keel is ready and tomorrow according to the plan to glue it to the second hull... well, can I start sheathing the hull with boards... I can't wait and imagine how difficult it will be, given that the skin is two-tone and not yet butt and overlapping...

Hello Sergey. Very nice small detail.
Bill
Bill
I have videos of these competitions, but unfortunately the quality is very poor, the photos are much better. If I filmed them now, I would see - it would be a masterpiece, but 10 years ago there was no normal technology or stabilization.Hello Sergey,
I just had the pleasure of revisiting your posts of the IV & V Open Cups again. It is always a great treat to see such great master builders work.
Thanks again.
Bill
Thank youHello Sergey. Very nice small detail.
Bill
With the experience of the 1st this must have been a bit easier, Sergey. Again a nice fit and details. Hope to see soon a comparison.Today is a small anniversary... exactly 100 days of work on this project. Let me remind you, I started it in January of this year.
And today I finished the keel for the second hull. And in order: drilled 0.55 mm holes...
View attachment 535373
... inserted 0.5 mm brass wire from them...
View attachment 535374
... sealed CA with gel...
View attachment 535375
... and ground on an angle grinder.
View attachment 535376
View attachment 535377
Then he made Latin numbers. I have already described this process earlier with the first keel on the first case. First marked, drew and cut with a scalpel, but straight, as if pressing and not scratching.
View attachment 535378
View attachment 535379
Cut the keel along the length...
View attachment 535381
... and drilled holes for rigging with a diameter of 1 mm.
View attachment 535382
Now the keel is ready and tomorrow according to the plan to glue it to the second hull... well, can I start sheathing the hull with boards... I can't wait and imagine how difficult it will be, given that the skin is two-tone and not yet butt and overlapping...

Regards, Peter
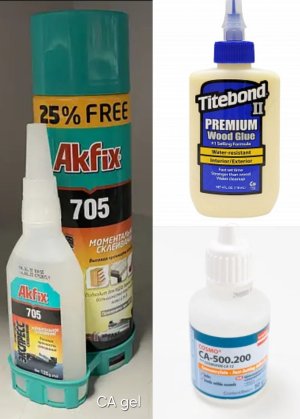
I often receive questions in private messages and would like to answer a frequently asked question. By the way, you can safely ask questions in my threads and I will try to answer them.
I use these 3 glues 90% of the time. For regular gluing, I use PVA Titebond II for wood. It glues in 5 minutes with good compression. But you need to know how to use it, since its speed is also its occasional inconvenience, but mostly it is a huge plus. The main thing is to remove the excess, otherwise it will affect the oil coating and appearance. But if you need to peel something off using the heating method, it is better to use regular office PVA.
If you need to glue something using the reinforcement principle, I use Akfix gel 705 with an activator.
For capillary gluing and rigging, I use Cosmo CA 500.200 while it is very liquid and this is important for capillarity and rigging, so that there is no shine on the threads. If it starts to thicken (becomes viscous and not flowable at all), I take a new one and use this one for other needs.

I can say this is the third attempt and I liked it the most. Thank you, I really want to see the keel in its rightful place.With the experience of the 1st this must have been a bit easier, Sergey. Again a nice fit and details. Hope to see soon a comparison.
Regards, Peter
Last edited:
Hello,
This question has also been on my mind
The excess glue is removed with water or do you need a special cleaner?
1. Tidebond ?
2.Akfix
3.Ca500?
Greetings
This question has also been on my mind
The excess glue is removed with water or do you need a special cleaner?
1. Tidebond ?
2.Akfix
3.Ca500?
Greetings
Last edited:
Cleaning the glue is a very important point and a very good question for you!Hello,
This question has also been on my mind
The excess glue is removed with water or do you need a special cleaner?
1. Tidebond ?
2.Akfix
3.Ca500?
Greetings
I don't use water, it raises the pile.
1a. Any regular PVA is better to remove immediately with a metal spatula (looks like a flat screwdriver) the width of the planes is ±5 mm.
1b. It is better not to smear or wipe off Titebond immediately, but wait a little, but not for long. It will harden a little to a rubbery state and then it will be easy to remove in one piece. BUT it is important not to forget, otherwise it will be impossible to remove it later. If you rub it on wood, it covers it with a thin layer and this will be noticeable visually and this worsens the penetration of oil. But if the surface is sanded, then everything is ok.
2. Akfix, if activated with a spray, is almost impossible to remove. Maybe with some means for this. Although it does not glue as strongly if you apply it pointwise. I use it if you need to grab something and then tear it off when the part is no longer needed. As a temporary solution. But the fixation should be point-like, even if it is a large drop.
3. Cosmo is very fluid and if it glues a tightly joined surface, it is impossible to unstick them. The capillary connection is strong...
The best way to remove excess CA (liquid and gel) is to scrape it off with a straight scalper (looks like a spatula). This removes the stain perfectly, but it is important to do it carefully.
... but PVA is still the best for wood because of its reversibility. That is, if you glued something and then realized that you need to remove it - you just need to heat it up and the glue will stop holding. Then you can even slightly correct the gluing place and heat it up again (iron) and after cooling, the glue will glue this place.
I hope the Translator translated everything correctly)))
Some really good information about your experience with the various glues, thanks.
Hurray, finally the work on the keel is over and I fixed it to the hull. You can say laid the keel (although this is not quite how it was done in life))
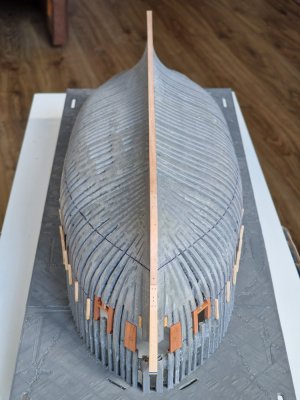
The keel was glued to the CA gel. I grabbed it at the back and front for a couple of dots. Then he set the parallelism and correctness of the fit 100500 times and then grabbed it at several more points. After solidification, I smeared glue all over the surface on both sides where there was a recess under the board. In appearance - tightly glued. Plus, the reinforcement will be for the light of sticking boards.
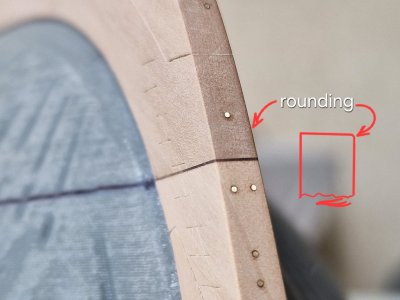
After fixation, he made a small round, maintaining the quadratic shape. Well, I remind you that I made a keel with expansion to the top from 5mm to 6mm.
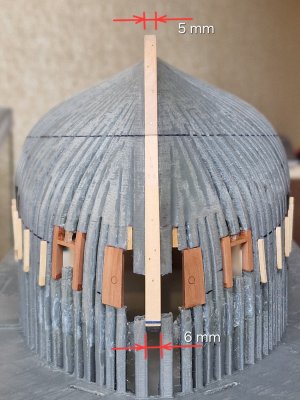
The positioners are almost all in place and now, after fixing the keel, you can sheathe the body with boards.
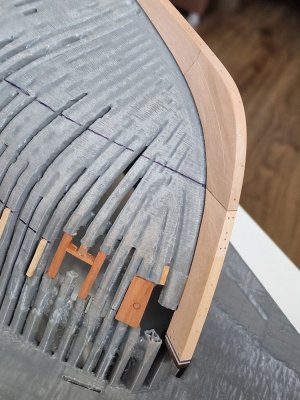
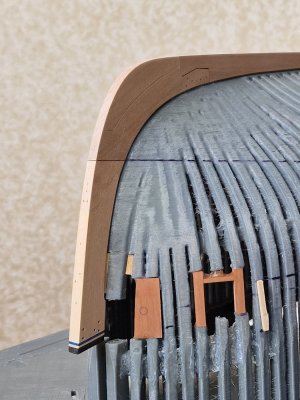
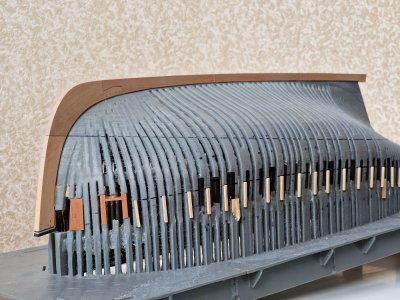
Already in anticipation of the side plating... I can imagine how it will not be easy to put it mildly.
By the way, there are 90 parts on board and soon there should be more of them...

The keel was glued to the CA gel. I grabbed it at the back and front for a couple of dots. Then he set the parallelism and correctness of the fit 100500 times and then grabbed it at several more points. After solidification, I smeared glue all over the surface on both sides where there was a recess under the board. In appearance - tightly glued. Plus, the reinforcement will be for the light of sticking boards.

After fixation, he made a small round, maintaining the quadratic shape. Well, I remind you that I made a keel with expansion to the top from 5mm to 6mm.

The positioners are almost all in place and now, after fixing the keel, you can sheathe the body with boards.


Already in anticipation of the side plating... I can imagine how it will not be easy to put it mildly.
By the way, there are 90 parts on board and soon there should be more of them...
Hello,Cleaning the glue is a very important point and a very good question for you!
I don't use water, it raises the pile.
1a. Any regular PVA is better to remove immediately with a metal spatula (looks like a flat screwdriver) the width of the planes is ±5 mm.
1b. It is better not to smear or wipe off Titebond immediately, but wait a little, but not for long. It will harden a little to a rubbery state and then it will be easy to remove in one piece. BUT it is important not to forget, otherwise it will be impossible to remove it later. If you rub it on wood, it covers it with a thin layer and this will be noticeable visually and this worsens the penetration of oil. But if the surface is sanded, then everything is ok.
2. Akfix, if activated with a spray, is almost impossible to remove. Maybe with some means for this. Although it does not glue as strongly if you apply it pointwise. I use it if you need to grab something and then tear it off when the part is no longer needed. As a temporary solution. But the fixation should be point-like, even if it is a large drop.
3. Cosmo is very fluid and if it glues a tightly joined surface, it is impossible to unstick them. The capillary connection is strong...
The best way to remove excess CA (liquid and gel) is to scrape it off with a straight scalper (looks like a spatula). This removes the stain perfectly, but it is important to do it carefully.
... but PVA is still the best for wood because of its reversibility. That is, if you glued something and then realized that you need to remove it - you just need to heat it up and the glue will stop holding. Then you can even slightly correct the gluing place and heat it up again (iron) and after cooling, the glue will glue this place.
I hope the Translator translated everything correctly)))
Thank you very much for the detailed information. Perfect. That helps me a lot, thank you
Very interesting thought!!!
Recently I was reminded of the photos from the 13th and 14th ship modeling championships... This is just the last years before my big pause in modeling. For almost 10 years I have not been engaged in ships and have not attended such events. And now the war has closed my borders and I cannot leave my hometown, so all the time that I would travel in peacetime, I now spend behind my hobby. And to be honest, I didn't think about it, I was sure that such competitions were not held in wartime. But it turns out they were in all the years of the war... and there were this year, in February and April... And unfortunately, I didn't hit any of them.
And I had a very interesting thought... but what if next year (and this is already six months later) take part in one or even two such championships...
I have 3 models... at different stages of construction. And there is another six months in stock to still work on them. And since you can participate in the championships with a model that has not yet been completed, then at least I will get acquainted with all this "kitchen" from the inside, and upon completion, maybe in a couple of years I can really perform... Maybe something will even be won, some kind of prize... who knows.

Друзі, хто був в цьому чи в минулі роки на подібних змаганнях - поділіться фото!
Напишіть мені в особисті, дякую!
А тим, хто брав участь в подібних змаганнях - категорично прошу написати мені

Recently I was reminded of the photos from the 13th and 14th ship modeling championships... This is just the last years before my big pause in modeling. For almost 10 years I have not been engaged in ships and have not attended such events. And now the war has closed my borders and I cannot leave my hometown, so all the time that I would travel in peacetime, I now spend behind my hobby. And to be honest, I didn't think about it, I was sure that such competitions were not held in wartime. But it turns out they were in all the years of the war... and there were this year, in February and April... And unfortunately, I didn't hit any of them.
And I had a very interesting thought... but what if next year (and this is already six months later) take part in one or even two such championships...
I have 3 models... at different stages of construction. And there is another six months in stock to still work on them. And since you can participate in the championships with a model that has not yet been completed, then at least I will get acquainted with all this "kitchen" from the inside, and upon completion, maybe in a couple of years I can really perform... Maybe something will even be won, some kind of prize... who knows.

Друзі, хто був в цьому чи в минулі роки на подібних змаганнях - поділіться фото!
Напишіть мені в особисті, дякую!
А тим, хто брав участь в подібних змаганнях - категорично прошу написати мені
Last edited:
Очень интересная мысль!!!
Недавно мне вспомнились фотографии с 13-го и 14-го чемпионатов по судомоделизму... Это как раз последние годы перед моим большим перерывом в моделизме. Почти 10 лет я не занимался кораблями и не посещал подобные мероприятия. А теперь война закрыла мои границы, и я не могу покинуть родной город, поэтому всё время, которое я путешествовал в мирное время, теперь провожу за своим хобби. И, честно говоря, я об этом не задумывался, был уверен, что в военное время таких соревнований не бывает. Но оказывается, они были во все годы войны... и в этом году, в феврале и апреле... И, к сожалению, ни на одно из них я не попал.
И у меня возникла очень интересная мысль... а что если в следующем году (а это уже полгода спустя) принять участие в одном или даже двух таких чемпионатах...
У меня есть три модели... на разных стадиях сборки. И ещё полгода в запасе, чтобы над ними поработать. А раз уж на чемпионатах можно участвовать и с ещё не доделанной моделью, то хотя бы познакомлюсь со всей этой «кухней» изнутри, а по завершении, может быть, через пару лет, смогу и выступить по-настоящему... Может, даже что-нибудь выиграю, приз какой-нибудь... кто знает.
View attachment 535818
Друзья, кто был в этом чи в нескольких минутах ходьбы на прекрасных змаганнях - подилить фото!
Напишите мне в особистую, дякую!
А тим, кто отважно участвует в прекрасных событиях - категорически прошу написать мне :прохладный:
Log into Facebook
Log into Facebook to start sharing and connecting with your friends, family, and people you know.
 www.facebook.com


