Just catching up Ken, she looks great! And you’re moving fast! 
-

Win a Free Custom Engraved Brass Coin!!!
As a way to introduce our brass coins to the community, we will raffle off a free coin during the month of August. Follow link ABOVE for instructions for entering.
-

PRE-ORDER SHIPS IN SCALE TODAY!
The beloved Ships in Scale Magazine is back and charting a new course for 2026!
Discover new skills, new techniques, and new inspirations in every issue.
NOTE THAT OUR FIRST ISSUE WILL BE JAN/FEB 2026
You are using an out of date browser. It may not display this or other websites correctly.
You should upgrade or use an alternative browser.
You should upgrade or use an alternative browser.
HMS Blandford 1:48 POF Modelship Dockyard [COMPLETED BUILD]
……luckily I have a big houseHi Maarten, Thanks for following my build and for your many recent likes, I hope that I can keep you entertained. It’s surprising how many places you can find in a house to display models, but I think an understanding wife is more beneficial than a big house.

Good morning Ken and Paul.
 - seriously though I share your view that with guys like Paul it keeps us striving to do that much better. Cheers Grant
Ken our problem is that Paul keeps raising the bar….…Ha! No bars have been set.
 - seriously though I share your view that with guys like Paul it keeps us striving to do that much better. Cheers Grant
- Joined
- Dec 16, 2016
- Messages
- 1,192
- Points
- 493

Hi Keith, Thanks for your thoughtful comments, I agree with everything you said, it's good to know the thoughts of others and not just their approval. You're right when you say it's coming along quickly, I'm enjoying the build and I'm treating it almost like a job, get up, do household chores, then if the weather's not too good do a full day on the build and sometimes evening overtime.Hi Ken. Your Blandford is coming along beautifully and at a very fast pace. Already l can see an improvement with the placement of the carlings. The slight misalignment of a few lower deck timbers will not notice, although, like me you obviously want to do the best job possible and we are our own worst critics but like everybody else on here is telling you it looks amazing. l personally don't like using cyno for this sort of work, but if you find it works for you then good luck with it.
- Joined
- Dec 16, 2016
- Messages
- 1,192
- Points
- 493

Hello Modellers and again welcome. I've now completed all of the upper deck beams, they just need a good sanding before I stain and varnish them according to my plan. Like others I'm usually very critical of my work but I'm rather pleased with how this has turned out, not perfect but much better than my first effort, I don't think that I could have done it any better.
You may notice that I thought it a good idea to add some bracing to the transom frames, I'm now rather careful here but this precaution I think is wise.

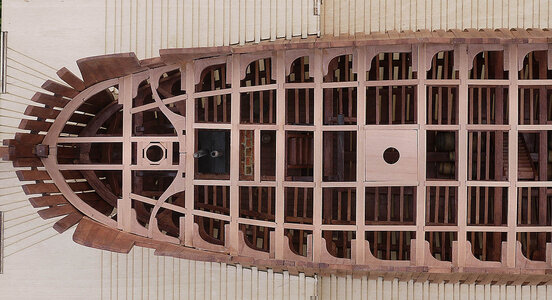
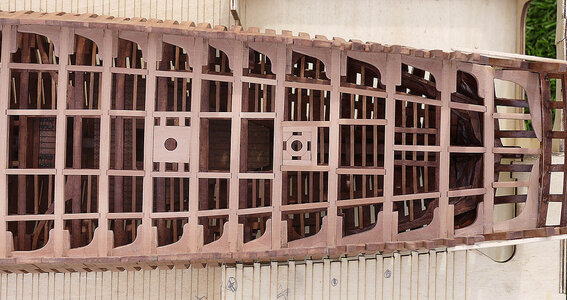

You may notice that I thought it a good idea to add some bracing to the transom frames, I'm now rather careful here but this precaution I think is wise.


- Joined
- Dec 16, 2016
- Messages
- 1,192
- Points
- 493

Hi Frank, Thanks for those nice comments. I have to admit that I sometimes get sidetracked and realise that instead of working on it I’m just sitting by my bench looking at it, it’s all part of the little pleasures that I get from modellingWow... that alone would look beautiful sitting in a display case.
- Joined
- Dec 16, 2016
- Messages
- 1,192
- Points
- 493

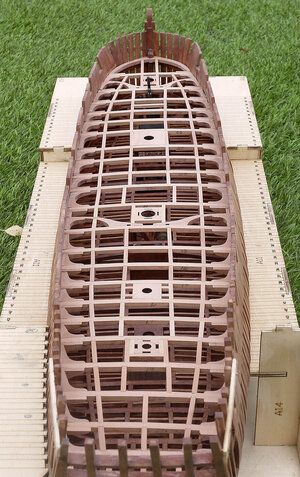
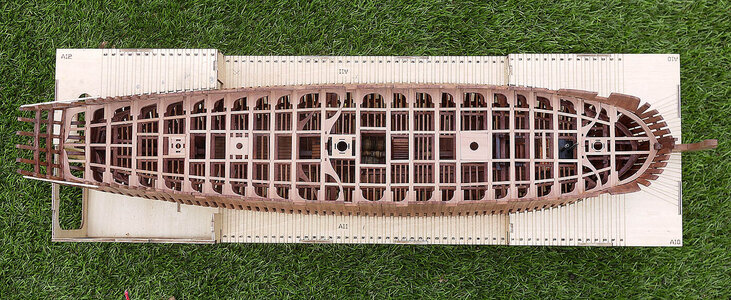
Hello and once again thanks for following and for the many likes that I’m getting, they are encouraging and welcome. No building to show today just the finished beams. I stained, sealed and using a satin poly varnished them, the surface turned out blemish free but a little darker than I’d anticipated and perhaps a bit too much shine but still looks good. I’m now ready to add the batons which I have also pre varnished.

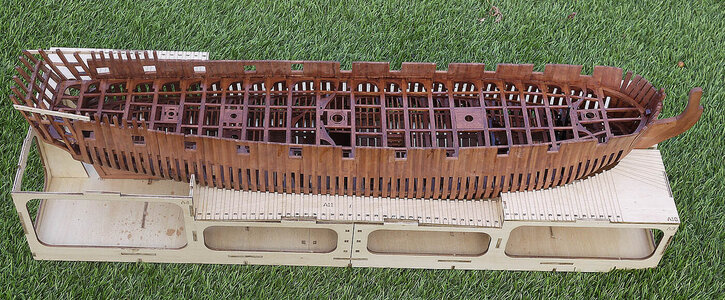
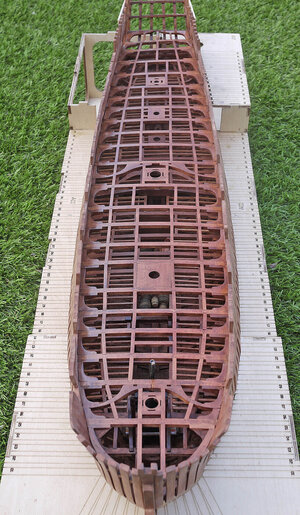


The grass is still green in the UK
Defintely you know how to handle gardening, but also shipmodel building
Looking very good - > Bravo
Defintely you know how to handle gardening, but also shipmodel building
Looking very good - > Bravo
Good morning Ken. Wow, very impressive. Cheers GrantHello and once again thanks for following and for the many likes that I’m getting, they are encouraging and welcome. No building to show today just the finished beams. I stained, sealed and using a satin poly varnished them, the surface turned out blemish free but a little darker than I’d anticipated and perhaps a bit too much shine but still looks good. I’m now ready to add the batons which I have also pre varnished.
View attachment 409659
View attachment 409660
View attachment 409661
- Joined
- Dec 16, 2016
- Messages
- 1,192
- Points
- 493

Hello and again welcome, I think that it goes without saying that I’m most happy to have you following along.
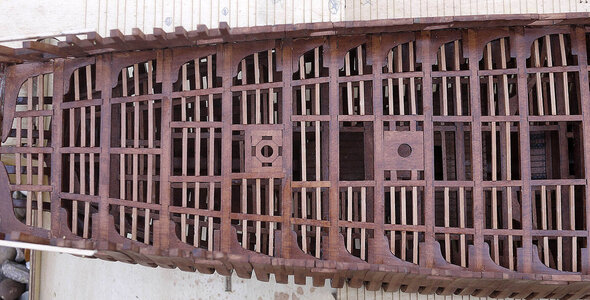
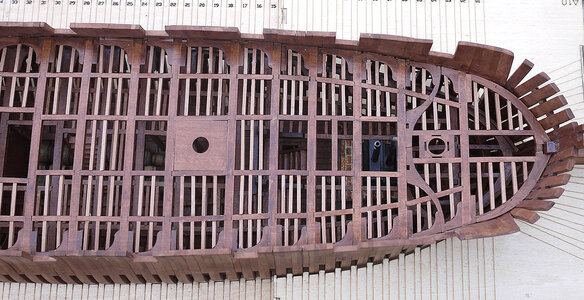
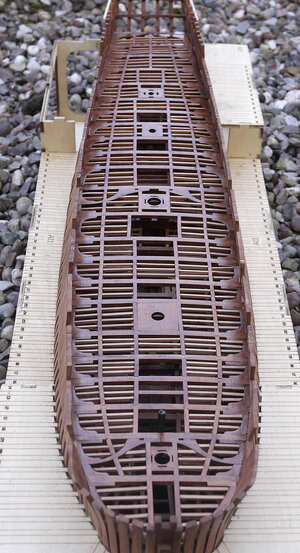
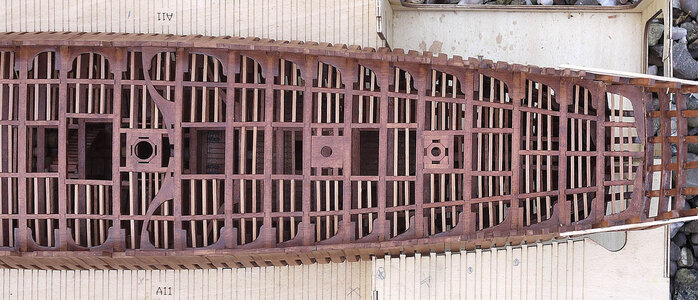
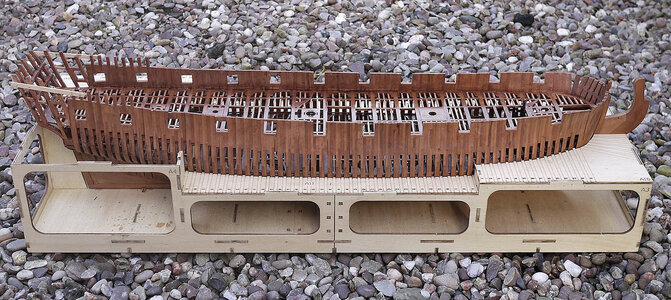
Yippee! The batons are now all done. The use of cyno worked perfect for me, a bit of a tedious job but one that I’m rather pleased with. Next will probably be the capstan so for now some pictures.
Some of you have noticed that I am also doing another build log, Wappen Von Hamburg, thanks to those that have responded to that, but I’m finding it a bit much doing two logs at the same time, with the appropriate replies. That log should only take a couple of weeks to finish, so until then I’ll continue to build Blandford but shan’t do updates until the other log is complete. You would be most welcome to join me on that for the few weeks that it will take.


Last edited:
This color tone would definitely fit my taste. You are making a very 'tasty' progress, Ken! Despite the tedious job, you made it!! 


This is looking fantastic Ken! Congratulations!
Kurt Konrath
Kurt Konrath
I love the color contrast between the ship and building jig, makes the outstanding workmanship just stand out so much more.
- Joined
- Jan 10, 2022
- Messages
- 862
- Points
- 403

Beautiful build that Ken. It looks great. I'm totally amazed at the speed you work. IHello and again welcome, I think that it goes without saying that I’m most happy to have you following along.
Yippee! The batons are now all done. The use of cyno worked perfect for me, a bit of a tedious job but one that I’m rather pleased with. Next will probably be the capstan so for now some pictures.
Some of you have noticed that I am also doing another build log, Wappen Von Hamburg, thanks to those that have responded to that, but I’m finding it a bit much doing two logs at the same time, with the appropriate replies. That log should only take a couple of weeks to finish, so until then I’ll continue to build Blandford but shan’t do updates until the other log is complete. You would be most welcome to join me on that for the few weeks that it will take.
View attachment 410474
View attachment 410475
View attachment 410476
View attachment 410477
View attachment 410478
View attachment 410479
View attachment 410480
View attachment 410481
Hello and again welcome, I think that it goes without saying that I’m most happy to have you following along.
Yippee! The batons are now all done. The use of cyno worked perfect for me, a bit of a tedious job but one that I’m rather pleased with. Next will probably be the capstan so for now some pictures.
Some of you have noticed that I am also doing another build log, Wappen Von Hamburg, thanks to those that have responded to that, but I’m finding it a bit much doing two logs at the same time, with the appropriate replies. That log should only take a couple of weeks to finish, so until then I’ll continue to build Blandford but shan’t do updates until the other log is complete. You would be most welcome to join me on that for the few weeks that it will take.
View attachment 410474
View attachment 410475
View attachment 410476
View attachment 410477
View attachment 410478
View attachment 410479
View attachment 410480
View attachment 410481
- Joined
- Dec 16, 2016
- Messages
- 1,192
- Points
- 493

Hi Keith, Thanks, it was your log that gave me the confidence to give it a go in the first place, as they say, the rest is historyBeautiful build that Ken. It looks great. I'm totally amazed at the speed you work. I
- Joined
- Sep 23, 2021
- Messages
- 266
- Points
- 168

Hi Ken,
Just catching up with your build. It looks amazing, that's a lot of pieces to place so neatly! What type of wood is used for the framing? It looks really nice the way you have finished it, what type of stain/varnish did you use? Usually I avoid the CA glue because I find that stain doesn't take if it gets onto places where it shouldn't be (I can be a messy worker at times!) but then again, it is so much faster to use.
We will try to drop by sometime and say hello but the weather we have been having has been so rubbish we haven't ventured out to the Red rocks on our bikes for a while. Hopefully, the weather will improve.
Dom
- Joined
- Oct 2, 2023
- Messages
- 26
- Points
- 58

I ordered this kit a month ago and it was shipped 3.5 weeks ago but still not arrived; how long did you wait to get your one from China to the UK Ken?
- Joined
- Jun 23, 2023
- Messages
- 37
- Points
- 58

Hello Ken,Hello fellow modellers, this is going to be my build log of HMS Blandford a 1:48 scale POF model from Modelship Dockyard
View attachment 394751.
Many of you will know me from some of my other logs but for those that don’t I will introduce myself. I am a 76 year old retired Police Detective and I live in the north west of England with my wife. I started building model ships about twenty years ago when I retired, they have been quite an assortment but all from kits and all plank on bulkhead, this is going to be my first attempt at a POF build, I am both nervous and excited at the same time as this type of model is probably going to stretch my abilities to the limit.
This has come about because I have been seduced by reading the increasing amount of build logs on these types of kits and I am in awe of every one that I’ve seen, without exception. I note that they are being built by the more accomplished modellers on this forum, even so many are encountering some difficulties, it does cause me some concern but this will be my humble attempt.
My actual build log will start in my next post when I have studied the kit more thoroughly and am ready to proceed, initially though the kit does look to be very good quality.
Here is my workbench, it is in the corner of our home study, no dedicated workshop I’m afraid so I’m not allowed to make much dust, I believe that this may be an issue with this type of build but I’ll address that when it arises. Except for the Proxxon sander and drills I have no power tools, I do all my work by hand.
I am showing you some pictures of the models that I have built and are displayed around the house. You can probably imagine the conversation with my wife, “What do you need another kit for, haven’t you got enough! Where on earth are you going to put it?” I didn’t like to say, “There’s always the kitchen dear”
View attachment 394743
View attachment 394744
View attachment 394745
View attachment 394746
View attachment 394747
View attachment 394748
View attachment 394749
View attachment 394750
Re: The dust problem perhaps a cheap-ish fix could be a dust vacuum although they range in price from under £100 to a thousand +. See link below for a dental/nail type as an example. I am planing to build my own consisting of a desk/workbench box with a perforated SS lid and the box connected to a VAX type wet & dry vacuum. Good luck with your new project. Brgds.

Portable 60W Dust Collector Extractor Dental Vacuum Cleaner Dust Suction Machine | eBay UK
Power : 60W. ◆ If the suction is weakened,clean or replace the new filter plate. ◆ The filter is replaceable and the maintenance is very convenience. ◆ If there is too much dust in the filter board,the reverse flow will occur when the filter is used.
www.ebay.co.uk
Last edited:
- Joined
- Sep 23, 2021
- Messages
- 266
- Points
- 168

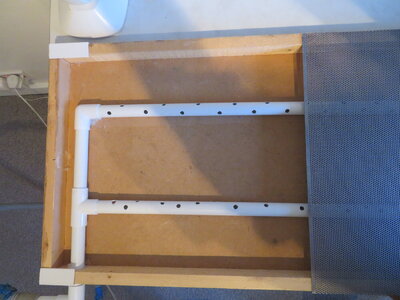
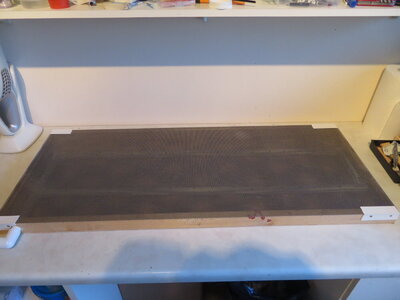
Here's my solution to the evil dust problem. I made a table top dust extractor from an off-cut of perforated steel, scrap wood for the frame and a piece of hard board for the base. I drilled holes in some 20mm overflow plumbing pipe which is very cheap, attached it to an old vacuum and the dust problem got sucked away. I have since upgraded the vacuum to a quieter one but my hobby room remains very clean now even when I have a lot of sanding to do. It's not very tall or heavy so when it's not needed it can be stored away very easily. The total cost was £25 and the only thing I regretted was not building one sooner. 