Wonderful Mark. You have clearly done the research. Now it's just a matter of doing it yourself to figure out what methods and strategies work in your hands. It all looks very promising to me!
-

Win a Free Custom Engraved Brass Coin!!!
As a way to introduce our brass coins to the community, we will raffle off a free coin during the month of August. Follow link ABOVE for instructions for entering.
-

PRE-ORDER SHIPS IN SCALE TODAY!
The beloved Ships in Scale Magazine is back and charting a new course for 2026!
Discover new skills, new techniques, and new inspirations in every issue.
NOTE THAT OUR FIRST ISSUE WILL BE JAN/FEB 2026
You are using an out of date browser. It may not display this or other websites correctly.
You should upgrade or use an alternative browser.
You should upgrade or use an alternative browser.
Hi Mark , you might be interested in this site Vanguard Models based in the UK , Chris Watton is the owner designer who also designed HMS Fly , and does a lot of work for Amati and the quality shows
Hi Grant, thanks for the vote of confidence. I have read so many versions of how to go about planking a hull but could not find any definitive and sure-fire method to get me through from A to Z. Maybe there isn't one, or maybe the ship modelling gods are just having a bit of a laughHello Mark. Looking all good. You are correct, on these British ships, the bow needs to be tapered fairly high up otherwise it just doesn't keep to your lining of the hull and some dropper planks are needed. I cheated a little as I did the same and some of my planks where tapered less than half on the lower part of my bow. I also had to including some droppers. If you have double planking you can save this. The stern you will add some stealers as well but these look cool. Really good planking so far Mark! Cheers Grant

Thanks Paul. I believe you hit the nail on the head. And if I don't get the planking altogether right with this build, there's always the next build ... and the next ... or perhaps the one after that ...Wonderful Mark. You have clearly done the research. Now it's just a matter of doing it yourself to figure out what methods and strategies work in your hands. It all looks very promising to me!

Bookmarked it! Thanks for the info RobertHi Mark , you might be interested in this site Vanguard Models based in the UK , Chris Watton is the owner designer who also designed HMS Fly , and does a lot of work for Amati and the quality shows

The first layer of planking is progressing slowly but surely. With the ship upside down I worked my way upwards from the bulwarks to the end of my first planking band, about halfway up the hull. I then installed the garboard strakes and have started to work my way down from the keel, trying to keep the unfinished gap between the two sets of planks equidistant.
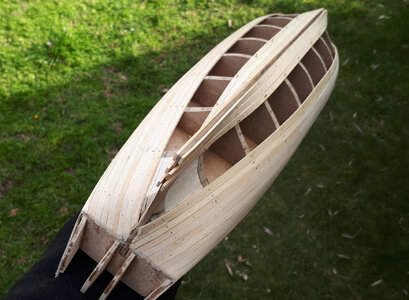
Yet despite what appears to be relatively good progress so far, I remain skeptical about how the closing of the gap is going to play out and suspect that my overenthusiastic tapering at the bow may come back to haunt me. Thanks Sasha for your tip on pre-drilling holes in the planks to avoid the nails splitting the wood. That worked a treat
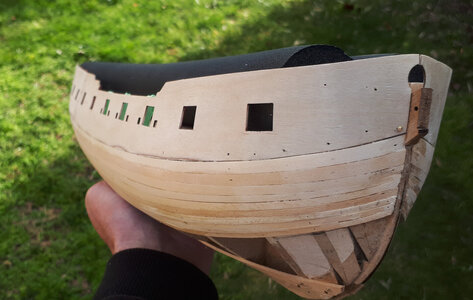

Yet despite what appears to be relatively good progress so far, I remain skeptical about how the closing of the gap is going to play out and suspect that my overenthusiastic tapering at the bow may come back to haunt me. Thanks Sasha for your tip on pre-drilling holes in the planks to avoid the nails splitting the wood. That worked a treat


Good morning Mark. Looking good. I think this will come together nicely. I can see a dropper being added funnily enough. Have you seen the planking colour pdf by my namesake? It helped me when I was planking. Cheers GrantThe first layer of planking is progressing slowly but surely. With the ship upside down I worked my way upwards from the bulwarks to the end of my first planking band, about halfway up the hull. I then installed the garboard strakes and have started to work my way down from the keel, trying to keep the unfinished gap between the two sets of planks equidistant.
View attachment 320131
Yet despite what appears to be relatively good progress so far, I remain skeptical about how the closing of the gap is going to play out and suspect that my overenthusiastic tapering at the bow may come back to haunt me. Thanks Sasha for your tip on pre-drilling holes in the planks to avoid the nails splitting the wood. That worked a treat
View attachment 320132
Attachments
..the method of lining the hull etc, is the second method he shows towards the end of the document. This is the layout you are using.Good morning Mark. Looking good. I think this will come together nicely. I can see a dropper being added funnily enough. Have you seen the planking colour pdf by my namesake? It helped me when I was planking. Cheers Grant
Grant, thanks for that, much appreciated. And in colour too, magic. I think I'll have a good look at this guide before I carry on, thanks againGood morning Mark. Looking good. I think this will come together nicely. I can see a dropper being added funnily enough. Have you seen the planking colour pdf by my namesake? It helped me when I was planking. Cheers Grant

- Joined
- Jan 9, 2020
- Messages
- 10,566
- Points
- 938

Mark your planking looks very good to me. A few points I would like to make.The first layer of planking is progressing slowly but surely. With the ship upside down I worked my way upwards from the bulwarks to the end of my first planking band, about halfway up the hull. I then installed the garboard strakes and have started to work my way down from the keel, trying to keep the unfinished gap between the two sets of planks equidistant.
View attachment 320131
Yet despite what appears to be relatively good progress so far, I remain skeptical about how the closing of the gap is going to play out and suspect that my overenthusiastic tapering at the bow may come back to haunt me. Thanks Sasha for your tip on pre-drilling holes in the planks to avoid the nails splitting the wood. That worked a treat
View attachment 320132
1. Your point of keeping an equal distance between the top and bottom halves is exactly how it should be done - Good!
2. Your tapering at the bow does not look excessive to me. As you have probably heard by now, there is an old wives' tale of never tapering to less than the plank's original width. Whilst I don't subscribe to this nonsense (I taper to a point that is required), it does serve as an indication whether you are tapering lightly, moderately, or aggressively. If the plkanking does turn out to be problematic at the bow later on, we simply throw in a lost strake or two. What I would do now if that was my planking, would be to pull the line from the top half straighter, by also tapering at the stern
Thanks for the vote of confidence Heinrich, and the additional tips! I'm taking it all on board, pun intended, and appreciate the guidanceMark your planking looks very good to me. A few points I would like to make.
1. Your point of keeping an equal distance between the top and bottom halves is exactly how it should be done - Good!
2. Your tapering at the bow does not look excessive to me. As you have probably heard by now, there is an old wives' tale of never tapering to less than the plank's original width. Whilst I don't subscribe to this nonsense (I taper to a point that is required), it does serve as an indication whether you are tapering lightly, moderately, or aggressively. If the plkanking does turn out to be problematic at the bow later on, we simply throw in a lost strake or two. What I would do now if that was my planking, would be to pull the line from the top half straighter, by also tapering at the stern
Hi Mark.The first layer of planking is progressing slowly but surely. With the ship upside down I worked my way upwards from the bulwarks to the end of my first planking band, about halfway up the hull. I then installed the garboard strakes and have started to work my way down from the keel, trying to keep the unfinished gap between the two sets of planks equidistant.
View attachment 320131
Yet despite what appears to be relatively good progress so far, I remain skeptical about how the closing of the gap is going to play out and suspect that my overenthusiastic tapering at the bow may come back to haunt me. Thanks Sasha for your tip on pre-drilling holes in the planks to avoid the nails splitting the wood. That worked a treat
View attachment 320132
Most importantly, it helped. It's nice when advice is used and useful.
This stage in the planking proces is always exciting, Mark. What is done is looking good.The first layer of planking is progressing slowly but surely. With the ship upside down I worked my way upwards from the bulwarks to the end of my first planking band, about halfway up the hull. I then installed the garboard strakes and have started to work my way down from the keel, trying to keep the unfinished gap between the two sets of planks equidistant.
View attachment 320131
Yet despite what appears to be relatively good progress so far, I remain skeptical about how the closing of the gap is going to play out and suspect that my overenthusiastic tapering at the bow may come back to haunt me. Thanks Sasha for your tip on pre-drilling holes in the planks to avoid the nails splitting the wood. That worked a treat
View attachment 320132
More and more measuring, calculating, fitting etc. Grant's document is very clear. Looking forward to see ‘the stealers’.
Regards, Peter
Thanks Peter, much appreciatedThis stage in the planking proces is always exciting, Mark. What is done is looking good.
More and more measuring, calculating, fitting etc. Grant's document is very clear. Looking forward to see ‘the stealers’.
Regards, Peter

Well, I muddled my way through it but I finally reached the end of the first layer of planking. It was not the convincing effort I had been hoping for and I can see that I still have a lot to learn about this intricate process of tapering, bending and installing planks. That said, I am reasonably happy with the result. I managed to get everything down without any drop planks or forcing strakes into unnatural positions. And without breaking anything 
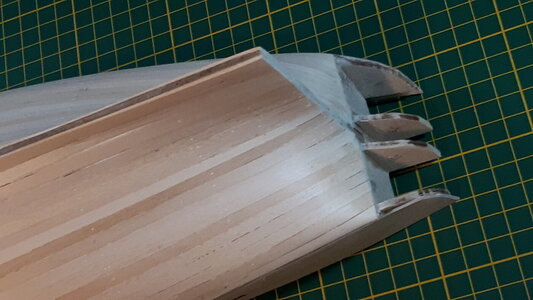
I was also hoping not to have to apply any wood filler to the hull, but a light sanding revealed a few minor gaps that would probably benefit from a dab or two. It took eighteen planks on either side to line the hull from the keel to the lower edge of the gunport patterns, and about four or five stealers on either side at the stern. All the planks were bent with a heating iron and any twists required were steamed into place. And although I reduced the stern area of the false keel to within an inch of its life to accommodate the rudder post, the thickness of the planks took it back to to its original width and will require further reduction to accommodate both the rudder post and second layer of planking.
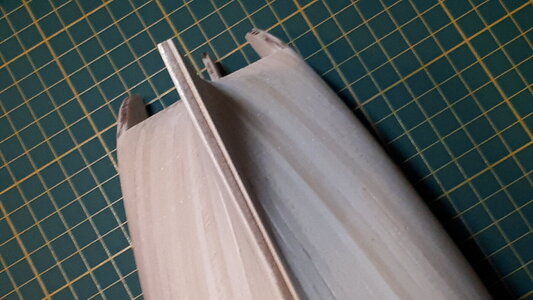
So, onwards and upwards. The wales and second layer of planking now beckon, although I may turn my attention back to completing the gun deck and inner bulwark planking just for a change of scene. Not to mention a bit of a reprieve while I consider how to improve my planking technique before tackling the second layer
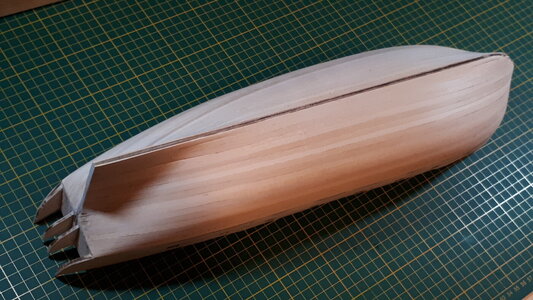

I was also hoping not to have to apply any wood filler to the hull, but a light sanding revealed a few minor gaps that would probably benefit from a dab or two. It took eighteen planks on either side to line the hull from the keel to the lower edge of the gunport patterns, and about four or five stealers on either side at the stern. All the planks were bent with a heating iron and any twists required were steamed into place. And although I reduced the stern area of the false keel to within an inch of its life to accommodate the rudder post, the thickness of the planks took it back to to its original width and will require further reduction to accommodate both the rudder post and second layer of planking.

So, onwards and upwards. The wales and second layer of planking now beckon, although I may turn my attention back to completing the gun deck and inner bulwark planking just for a change of scene. Not to mention a bit of a reprieve while I consider how to improve my planking technique before tackling the second layer

Last edited:
Looking very good Mark
- Joined
- Jan 9, 2020
- Messages
- 10,566
- Points
- 938

Congratulations, Mark! I think that hull looks beautiful!  You have a very smooth and solid base for your second planking and that is what counts. You will find that with a solid base on which to apply the second planking, it will become easier!
 You have a very smooth and solid base for your second planking and that is what counts. You will find that with a solid base on which to apply the second planking, it will become easier!
Ahem...excuse me Mark if I might make a small correction to your post...
YOUR PLANKING JOB IS OUTSTANDING!
YOUR PLANKING JOB IS OUTSTANDING!
Good morning Mark. First class. For your first layer it is stunning, and will make that second way simpler to apply. Well done. Cheers GrantWell, I muddled my way through it but I finally reached the end of the first layer of planking. It was not the convincing effort I had been hoping for and I can see that I still have a lot to learn about this intricate process of tapering, bending and installing planks. That said, I am reasonably happy with the result. I managed to get everything down without any drop planks or forcing strakes into unnatural positions. And without breaking anything
View attachment 321342
I was also hoping not to have to apply any wood filler to the hull, but a light sanding revealed a few minor gaps that would probably benefit from a dab or two. It took eighteen planks on either side to line the hull from the keel to the lower edge of the gunport patterns, and about four or five stealers on either side at the stern. All the planks were bent with a heating iron and any twists required were steamed into place. And although I reduced the stern area of the false keel to within an inch of its life to accommodate the rudder post, the thickness of the planks took it back to to its original width and will require further reduction to accommodate both the rudder post and second layer of planking.
View attachment 321343
So, onwards and upwards. The wales and second layer of planking now beckon, although I may turn my attention back to completing the gun deck and inner bulwark planking just for a change of scene. Not to mention a bit of a reprieve while I consider how to improve my planking technique before tackling the second layer
View attachment 321344
- Joined
- Sep 3, 2021
- Messages
- 5,197
- Points
- 738

Hey Mark,
Again, for reasons unknown, I'm not always receiving update notifications and your build falls victim to that.
What beautiful progress you made in the meantime. Personally I think you are suffering from false modesty, your planking job looks great!
Johan
Again, for reasons unknown, I'm not always receiving update notifications and your build falls victim to that.
What beautiful progress you made in the meantime. Personally I think you are suffering from false modesty, your planking job looks great!
Johan


