HMS Fly Build (Amati) 1:64 by Nomad

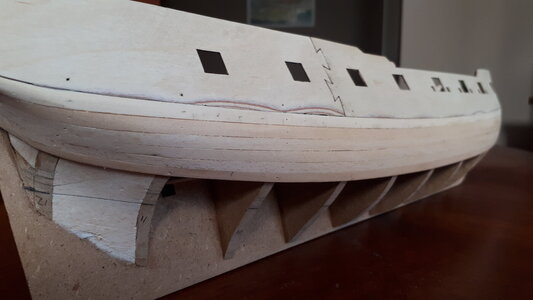
I gave the gun port patterns a day or so to dry completely and was relieved to see them maintain their shape after removing them from the hull. However, a small kink at the foremost bulkhead had me soaking them a second time to correct the error. This seemed to do the trick, and happily the second dunking did not incur any noticable damage to the wood :)

View attachment 316640

The gunport patterns were then glued to the hull in much the same way as they were first fitted for shape, using clamps and pins to hold everything in place. The temporary bowsprit worked well as a termination point for the ends of the bulwark strips.

View attachment 316641

I remembered just in time to wrap the temporary bulkhead extensions with tape before glueing down the gun port patterns. These extensions will be removed later on and it wouldn't help much if they were stuck fast to the inner side of the bulwarks.

View attachment 316642

Symmetry was everything for this exercise. The litmus test was to ensure, for both port and starboard sides, that the top edges of the bulwarks lined up with the tops of the bulkhead frames, the gun port openings were equidistant from the surface of the gun deck, and the forward ends of the bulwarks met at the prow with some degree of uniformity.

View attachment 316643

The zig-zag join of the gun port pattern drew a fair bit of my attention. It is situated just aft of the ninth bulkhead frame for no apparent reason with nothing but open air for support. At first I reinforced the entire join on the inside with a strip of ply but soon realised that this would likely interfere with the inner bulwark planking later on. Removing it did not seem to make any real difference to the strength of the connection, but I did leave the part of the strip below the deck in place as some measure of reinforcement, and to facilitate the slight lateral bend of the lower bulwark at that point.

View attachment 316644

And that's the gun port patterns fitted. I don't think I got it entirely right, but I don't think I got it entirely wrong either. The top edges of the patterns are not all exactly flush with the bulkhead frames, and I am yet to learn whether the wavy lateral nature of the bulwarks will sit well with the first layer of planking. Those are challenges for another day though :)

View attachment 316645
Hi Mark. I was watching your build ‘in the background’. But what I see what you did with this big peaces of plywood: Well done!
Stretching it over the whole length of the model with curves in 2 direction: hat off!
Regards, Peter
 
Hi Mark. I was watching your build ‘in the background’. But what I see what you did with this big peaces of plywood: Well done!
Stretching it over the whole length of the model with curves in 2 direction: hat off!
Regards, Peter
Thanks Peter, much appreciated. If there's one thing I want to take away from this build it is an improved ability to bend and taper wood. So far so good, but it's early days yet :p
 
Thanks for that advice DomCee, much appreciated. I'm a rank amateur with all things related to bending wood, and even now approach my first-layer planking with no small amount of trepidation. Good to know you don't really need to soak laminated wood. I am following a YouTube video series of a  Fly build, and the author bends his planks into shape within seconds by holding them over the spout of a boiling kettle and twisting them where necessary. I used a heating iron on the Bluenose but wasn't altogether comfortable with the process, so I may try the kettle trick this time around. And I'll have a look into the Ant-Xin D1 tool that you mentioned, it sounds like a very useful tool indeed :)
Hi,

the kettle steaming works fine for solid wood strips. When I bend against the grain I use a steam iron and bend the wood against some wooden pegs or pins. With the thin plys (1.5-2mm) I found the dry heat from the hair dryer was better and you only need to run the dryer over the section you need to bend for a few seconds with a little bending pressure. I found that the steam is very fierce for thin plys and can swell the surface layer if you leave it in too long and it will start to warp/wrinkle. All good stuff!
Interesting. I've been experimenting with this and that and after reading your post I added a hair dryer to the trials, and sure enough it does work well. I quite like the steam method for putting a twist in the wood, as you can simply hold two ends of the wood, twist it to shape and hold it over the steam for a few seconds. With the iron and dryer it always seems as though you need a third hand. But I take your point about other issues that may arise, like wood swelling. Ah, the trials go on...
 
Interesting. I've been experimenting with this and that and after reading your post I added a hair dryer to the trials, and sure enough it does work well. I quite like the steam method for putting a twist in the wood, as you can simply hold two ends of the wood, twist it to shape and hold it over the steam for a few seconds. With the iron and dryer it always seems as though you need a third hand. But I take your point about other issues that may arise, like wood swelling. Ah, the trials go on...
Good morning Mark- I appreciate your trials and the advice. Will save me the time on my next build. Keep those trials coming ;). Seriously you are taking all advice and opinions into your build and this is going to stand you in good stead for a stunning HMS Fly. Cheers Grant
 
Hey Mark- you on holiday? All good? Cheers Grant
Howzit Grant! I wish, a holiday would be brilliant round about now. Thanks for checking up on me, I've been a bit snowed under with work and the Fly has taken a bit of a backseat for now, not to mention all the build logs I need to catch up with. I hope to be back in the modeling room again very soon, there's a ship that requires a first coat of planking in there somewhere ROTF
 
Good morning Mark- I appreciate your trials and the advice. Will save me the time on my next build. Keep those trials coming ;). Seriously you are taking all advice and opinions into your build and this is going to stand you in good stead for a stunning HMS Fly. Cheers Grant
Thanks Grant. I think this planking phase gives me the jitters more than anything else as the ramifications of not getting it right can be far reaching. We are indeed fortunate that many have gone before us and we can pick up so many hints and tips in their wake. Hopefully when I come out the other side of this planking lark I'll be able to leave a tip or two of my own, even if it is how not to do it ROTF
 
Thanks Grant. I think this planking phase gives me the jitters more than anything else as the ramifications of not getting it right can be far reaching. We are indeed fortunate that many have gone before us and we can pick up so many hints and tips in their wake. Hopefully when I come out the other side of this planking lark I'll be able to leave a tip or two of my own, even if it is how not to do it ROTF
I'll do your planking - you do my rigging! ROTF
 
Howzit Grant! I wish, a holiday would be brilliant round about now. Thanks for checking up on me, I've been a bit snowed under with work and the Fly has taken a bit of a backseat for now, not to mention all the build logs I need to catch up with. I hope to be back in the modeling room again very soon, there's a ship that requires a first coat of planking in there somewhere ROTF
Good morning Mark. I happy to see you alive and kicking- sometimes we have to work and make some money. The only good thing about planking it is always relatively easy to remove those horrid planks and redo....until we run out of wood ROTF . Looking forward to see your Fly with some beautifully laid planks on- no pressure ;). Cheers Grant
 
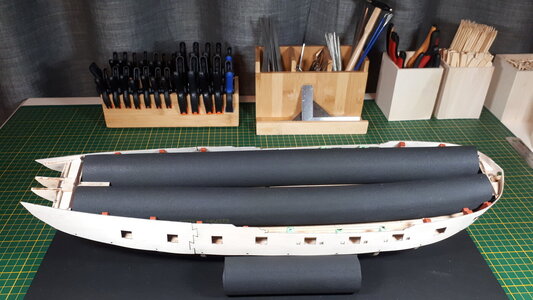
After reading numerous articles and innumerable build logs to better understand the planking process, I took a deep breath, unwrapped the pack of 5mm x 1.5mm plank strips, and settled down to the task. Given the forces and pressures on the hull during the planking phase, I had refrained from adding any features to the deck just yet and also reinforced the structure with lengths of foam tubing on the inside.

0380_20220715_hms_fly.jpg

This allows me to easily turn the hull upside down without any fear of damage to the deck or deck items, or the bulwarks and gunport patterns which are essentially suspended above the ground by the foam tubing underneath.

0385_20220715_hms_fly.jpg

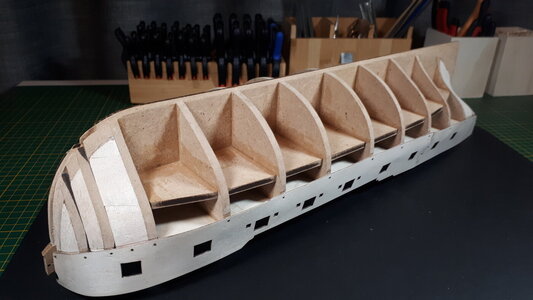
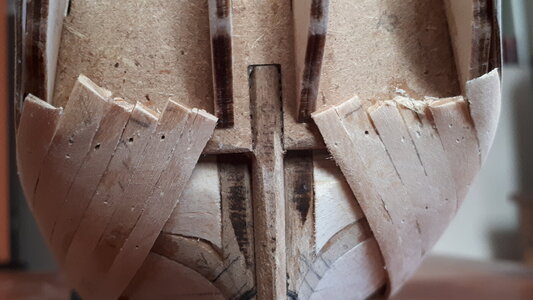
A recurring theme in the planking tutorials was to divide the planking area into manageable band widths, and another was to allow the planks to flow naturally against the hull. I took this on board, but only after installing a couple of untapered planks on either side below the bulwarks as per instructions. A plank is then positioned in the centre and allowed to flow as naturally as possible towards the fore and aft ends, effectively dividing the remaining planking area into two bands. In this instance each band will accommodate a total of eight planks, which added to the two planks already installed yields a total of eighteen planks on either side of the hull.

0390_20220715_hms_fly.jpg

Tapering the planks was an entirely new experience for me. According to the rules of tapering a plank should not be reduced by more than half its width, 2.5mm in this case. However, the uppermost band left very little room for eight planks to merge at the bow and I was obliged to taper to a width a bit less than 2.5mm. In hindsight, it may have paid to taper the initial two planks as well. I found the starting point of the taper by holding each plank firmly in place at the centre of the hull - against bulkheads six, seven and eight - and then, allowing it to flow naturally towards its fore and aft end, marked the point at which it started to intersect with the plank above. Or, as the hull was upside down, the plank below.

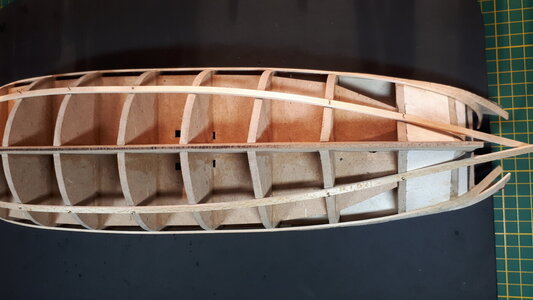
As for bending and twisting the planks I trialled several planks with varying degrees of success. And failure, as it turned out after breaking several of the precious things. Ultimately, however, I settled on a rather basic procedure of using steam to form a twist in the plank and a planking iron to create the bends. I didn't soak the planks in water at all. And rather than applying glue to all the contact points and attaching the entire plank in a single, panicked rush, I only applied glue and fixed the plank to one or two bulkheads at a time. I used a combination of white and CA glue to begin with, but eventually just used white glue when it became apparent that the CA glue did not add any real value.

0395_20220715_hms_fly.jpg

I also created a mild bevel at the top of each plank (or bottom, when upside down) to better fit the plank above it. This did make a difference despite a few gaps between the planks which I hope time and experience will eventually heal. I used small 7mm pins to hold the planks in place and removed them again within a day. Care had to be taken with pinning the ends of the planks, especially the narrow ends at the bow as they had a tendency to split.

0400_20220715_hms_fly.jpg

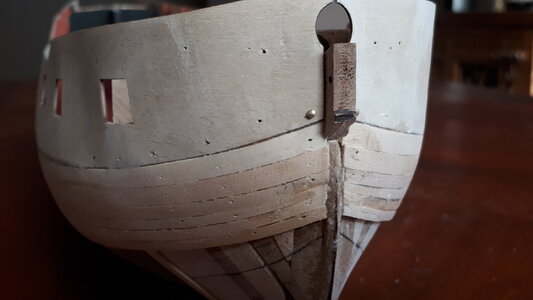
The planks sweep up quite violently at the stern and it pays to have the plank bent to the correct shape at that point rather than rely on pins and glue to maintain the form.

0405_20220715_hms_fly.jpg

At this point only six planks have been laid on either side and I have no real idea how the full set of thirty-six planks will play out. But I have enjoyed the learning curve and there is a certain satisfaction of seeing your carefully crafted plank fitting correctly into position, at the bow, the stern, and against the adjacent planks. It is worth mentioning that filler blocks are every penny their worth. They are relatively easy to install and worth their weight in gold as a guide and support for planks at the curvy ends of the bow and stern.
 
Last edited:
Very good going Mark - the planks have a good flow to them. In my opinion, you are making life unnecessarily difficult for yourself by not soaking the planks and bending them. I can tell you that on the WB, I have applied all planks still wet on the hull - not even just damp. It has absolutely no adverse effect on adhesion - in fact, if anything the water acts as an accelerator with the PVA glue. Also, I use push pins and drawing pins to secure my planks. You insert that into the bulkhead just below or above the plank so that the head secures the plank. That way you eliminate all risks of splitting the planks. Also see my latest post on my build log as to why I do not as a rule like to bevel planks.

Much success!
Ahhh no Heinrich, now you go and add more options into the mix! Seriously though, thanks for the tips. I may well try the soaking with the next few planks and see how that goes. I also like the push-pin technique, holding the planks in place without puncturing them. I like that a lot. The jury is out on the bevelling though, but I do see your point as well. I really do enjoy this planking stage, working the wood, and I know I will enjoy it even more once I become comfortable with the process. I'm not there yet but all these tips and tricks will hopefully take me in the right direction :)
 
Mark, hi. Then one more piece of advice. To prevent boards from spikes from nails, there are at least 2 ways: drill a hole with a drill in the board, under the diameter of the nail and make the nail nose "blunt". Bite off the sharp part with pliers. Then the nail will not cut the fibers, but will crush them and the board will not crack.
 
Ahhh no Heinrich, now you go and add more options into the mix! Seriously though, thanks for the tips. I may well try the soaking with the next few planks and see how that goes. I also like the push-pin technique, holding the planks in place without puncturing them. I like that a lot. The jury is out on the bevelling though, but I do see your point as well. I really do enjoy this planking stage, working the wood, and I know I will enjoy it even more once I become comfortable with the process. I'm not there yet but all these tips and tricks will hopefully take me in the right direction :)
Planking is a wonderful part of the build - as you go along, you will start developing your own tricks and trades which work for you and your style of work.
 
Mark, hi. Then one more piece of advice. To prevent boards from spikes from nails, there are at least 2 ways: drill a hole with a drill in the board, under the diameter of the nail and make the nail nose "blunt". Bite off the sharp part with pliers. Then the nail will not cut the fibers, but will crush them and the board will not crack.
Thanks Sasha, that makes all kinds of sense. Between push-pins, pre-drilled holes and blunt nails I'm sure I'll be able to get these planks flush with the hull without any splinters Thumbsup
 
After reading numerous articles and innumerable build logs to better understand the planking process, I took a deep breath, unwrapped the pack of 5mm x 1.5mm plank strips, and settled down to the task. Given the forces and pressures on the hull during the planking phase, I had refrained from adding any features to the deck just yet and also reinforced the structure with lengths of foam tubing on the inside.

View attachment 318636

This allows me to easily turn the hull upside down without any fear of damage to the deck or deck items, or the bulwarks and gunport patterns which are essentially suspended above the ground by the foam tubing underneath.

View attachment 318637

A recurring theme in the planking tutorials was to divide the planking area into manageable band widths, and another was to allow the planks to flow naturally against the hull. I took this on board, but only after installing a couple of untapered planks on either side below the bulwarks as per instructions. A plank is then positioned in the centre and allowed to flow as naturally as possible towards the fore and aft ends, effectively dividing the remaining planking area into two bands. In this instance each band will accommodate a total of eight planks, which added to the two planks already installed yields a total of eighteen planks on either side of the hull.

View attachment 318638

Tapering the planks was an entirely new experience for me. According to the rules of tapering a plank should not be reduced by more than half its width, 2.5mm in this case. However, the uppermost band left very little room for eight planks to merge at the bow and I was obliged to taper to a width a bit less than 2.5mm. In hindsight, it may have paid to taper the initial two planks as well. I found the starting point of the taper by holding each plank firmly in place at the centre of the hull - against bulkheads six, seven and eight - and then, allowing it to flow naturally towards its fore and aft end, marked the point at which it started to intersect with the plank above. Or, as the hull was upside down, the plank below.

As for bending and twisting the planks I trialled several planks with varying degrees of success. And failure, as it turned out after breaking several of the precious things. Ultimately, however, I settled on a rather basic procedure of using steam to form a twist in the plank and a planking iron to create the bends. I didn't soak the planks in water at all. And rather than applying glue to all the contact points and attaching the entire plank in a single, panicked rush, I only applied glue and fixed the plank to one or two bulkheads at a time. I used a combination of white and CA glue to begin with, but eventually just used white glue when it became apparent that the CA glue did not add any real value.

View attachment 318639

I also created a mild bevel at the top of each plank (or bottom, when upside down) to better fit the plank above it. This did make a difference despite a few gaps between the planks which I hope time and experience will eventually heal. I used small 7mm pins to hold the planks in place and removed them again within a day. Care had to be taken with pinning the ends of the planks, especially the narrow ends at the bow as they had a tendency to split.

View attachment 318640

The planks sweep up quite violently at the stern and it pays to have the plank bent to the correct shape at that point rather than rely on pins and glue to maintain the form.

View attachment 318641

At this point only six planks have been laid on either side and I have no real idea how the full set of thirty-six planks will play out. But I have enjoyed the learning curve and there is a certain satisfaction of seeing your carefully crafted plank fitting correctly into position, at the bow, the stern, and against the adjacent planks. It is worth mentioning that filler blocks are every penny their worth. They are relatively easy to install and worth their weight in gold as a guide and support for planks at the curvy ends of the bow and stern.
Hello Mark. Looking all good. You are correct, on these British ships, the bow needs to be tapered fairly high up otherwise it just doesn't keep to your lining of the hull and some dropper planks are needed. I cheated a little as I did the same and some of my planks where tapered less than half on the lower part of my bow. I also had to including some droppers. If you have double planking you can save this. The stern you will add some stealers as well but these look cool. Really good planking so far Mark! Cheers Grant
 
Back
Top