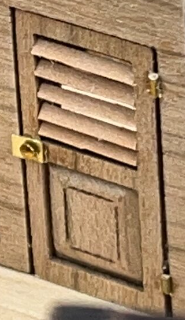
Excellent… you have already ensured a better view!Yes - you are right with this model of the 70-gunner
The modeler made the cut at the upper height of the wales, and with this the complete deck structure with beams and carlings is installed on top of the lower half and is hindering the view inside the hull
"Our" cut is at the lower end of the wales, means that the beams and carlings are installed at the upper half and left the lower half open to see directly the walls and interior
View attachment 365789
View attachment 365790
and also
View attachment 365791
View attachment 365792
-

Win a Free Custom Engraved Brass Coin!!!
As a way to introduce our brass coins to the community, we will raffle off a free coin during the month of August. Follow link ABOVE for instructions for entering.
-

PRE-ORDER SHIPS IN SCALE TODAY!
The beloved Ships in Scale Magazine is back and charting a new course for 2026!
Discover new skills, new techniques, and new inspirations in every issue.
NOTE THAT OUR FIRST ISSUE WILL BE JAN/FEB 2026
You are using an out of date browser. It may not display this or other websites correctly.
You should upgrade or use an alternative browser.
You should upgrade or use an alternative browser.
HMS GRANADO - full hull - POF kit by CAF in 1:48 - by Uwe
VERY impressive work Uwe. I do some crazy things when bashing kits but doubt I would have the nerve to dissect one horizontally, much kudos
Kind Regards
Nigel
Kind Regards
Nigel
- Joined
- Sep 3, 2021
- Messages
- 5,199
- Points
- 738

Beware, splitting hulls is a virus and it's spreading...VERY impressive work Uwe. I do some crazy things when bashing kits but doubt I would have the nerve to dissect one horizontally, much kudos
Kind Regards
Nigel
Many Thanks to all for the kind replys and comments and also the likes received
Having finished the planking (outer and inner) of the upper part, I made a fast calculation of the nails and bolts installed until now
- only to get an impression
- all number are approximate
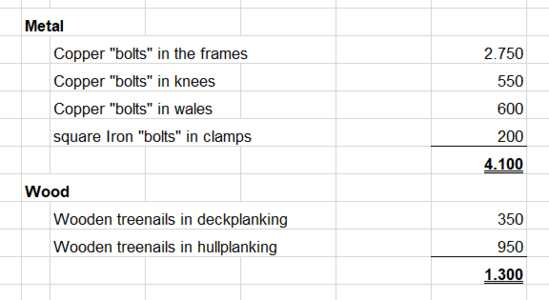
so until now more than 5.000 holes
and I killed until now only a handfull drills -> I am getting better
Having finished the planking (outer and inner) of the upper part, I made a fast calculation of the nails and bolts installed until now
- only to get an impression
- all number are approximate

so until now more than 5.000 holes
and I killed until now only a handfull drills -> I am getting better
That's an impressive total Uwe! And I think you drill only with your fingers? Or have you switched over to a motorized drill?
In the meantime I "learnt" to use (when are where possible) the Proxxon .......That's an impressive total Uwe! And I think you drill only with your fingers? Or have you switched over to a motorized drill?
Absolutely magnificent! I have a question about the build. I am just starting on the Granado and ran into a few problems. First was the install of 5K and 5L pieces at the stern. A lot of problems that will take some work to get them right. While starting on the frames I decided to build frame 25 since it is midships. I found the frame to be 13mm wide which matches the plans but the notch in the keel is 12.5mm. I will be widening the notch but my question is did you also deal with problems installing the ribs. I also have a problem getting the rib into the assembly jig. It will take some force to install it via the instructions.
Any thoughts, suggestions would be appreciated.
Thanks in advance,
Iran Ausley
Any thoughts, suggestions would be appreciated.
Thanks in advance,
Iran Ausley
Hallo Iran,Absolutely magnificent! I have a question about the build. I am just starting on the Granado and ran into a few problems. First was the install of 5K and 5L pieces at the stern. A lot of problems that will take some work to get them right. While starting on the frames I decided to build frame 25 since it is midships. I found the frame to be 13mm wide which matches the plans but the notch in the keel is 12.5mm. I will be widening the notch but my question is did you also deal with problems installing the ribs. I also have a problem getting the rib into the assembly jig. It will take some force to install it via the instructions.
Any thoughts, suggestions would be appreciated.
Thanks in advance,
Iran Ausley
first of all many thanks for the interest in my log and your kind words
Second I am very happy to read, that you also build the Granado - so hope to see once also your project in a building log. It would be helpful also fro you, because there would be the possibility for me and others to comment directly on your work and give maybe hints and tipps during your progress -> think about it.
and sorry for not replying earlier....
Related to frame 25:
on two or three frames I had also the small "problem", that the notch on top of the keel was slighlty too small, which I adjusted on the keel - the problem sometimes is, that the cnc burr is not able to cut a rectangle edge - it is cut slightly round edges - so definitely you have to adjust a little bit every single notch on top of the keel
see the red arrows
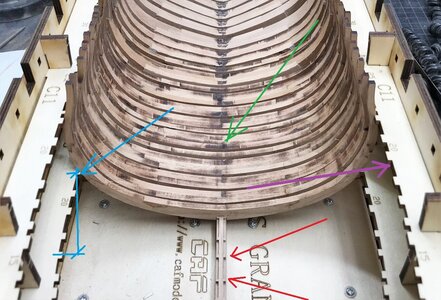
In addition frame 25 is a triple frame (green arrow), so with a little bit more glue between the three timbers, it can be slightly thicker - but no problem, if you adjust slightly the notches - nobody will recognize, if on both sides the gap / space between frames 24 to 25 and to 26 is 0,25mm smaller
we are working with wood, and also the old shipwrights made not everything so absolute correct - to be honest - I like to life with such small imperfections - it is part of our hobby
Related to parts 5k and 5L:
I am not sure, which parts you mean - maybe you can show us a photo, so I understand better and can try to give an advise.
In principle the stern structure is usually (in POF kits and also scratch builds one of the most complicated areas - so I had also to think twice or three times how to install the elements
Problem with getting the rib into the assemly jig:
Here you have really to check all elements - Is the frame correctly glued and maybe not too wide? Please check with the frame drawing of the kit
Is the jig correctly installed? and is the height correct? (blue arrow)
Is the keel correctly fixed inside the small notches of the base? and is the keel in the correct height?
Small adjustments are maybe necessary - f.e. the small notches of the jig where every individual frame is fixed have still some char and have to be also slightly widened (purple arrow)
Thank you Uwe, lessons learned. Build the frame over the plan, fit it to the keel, and adjust the slots in the jig to fit. My frame 25 was too wide. After adjusting it to the plan size, fit is good.
Iran
Iran
Good to hear, that you solved this small "problem" - better now than later - it is important for all later works - f.e. the main strong riders inside have also to fit against the inner planking laying and installed of the inner side of the framesThank you Uwe, lessons learned. Build the frame over the plan, fit it to the keel, and adjust the slots in the jig to fit. My frame 25 was too wide. After adjusting it to the plan size, fit is good.
Iran
Good that you solved this
After counting the number of nails and drilled holes, let us come back to the real work on the model
The doors included in the kit have this window cross
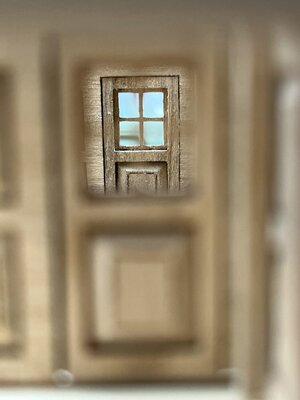
but I guess the sleeping room of the captain and also the entrance door to the main cabinet was different - I think such a louvre or blinds were installed here
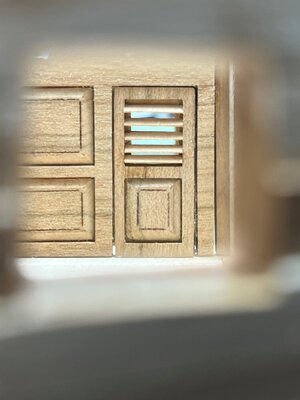
I made it also to have a little bit more details to see inside the model
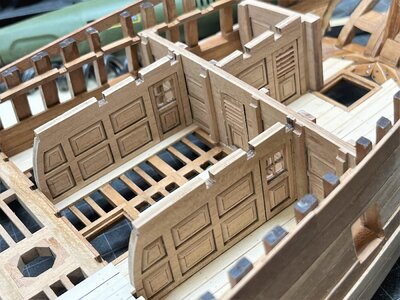
The doors got some hinches and also doorknobs - I did not blacken them - I can imagine, that they used inside some polished brass
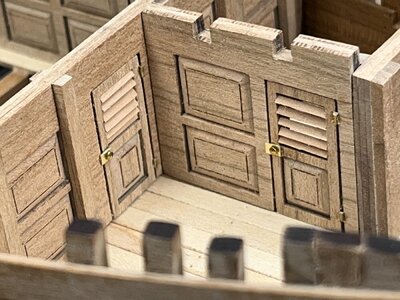
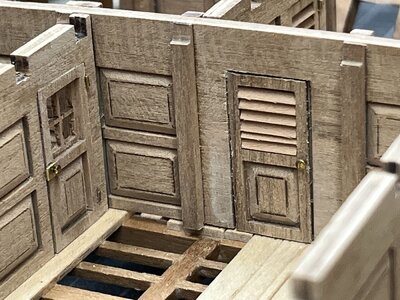
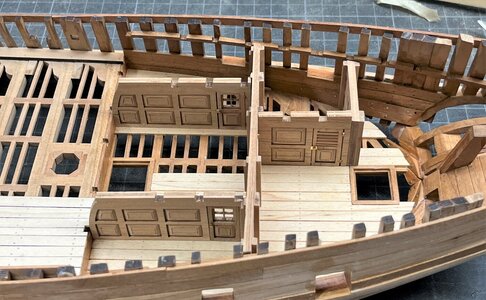
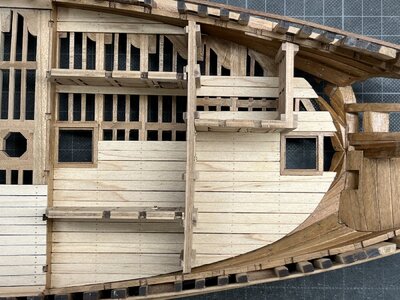
and the beams are fitting well into the notches in the interior walls
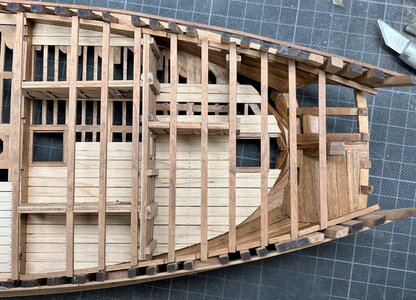
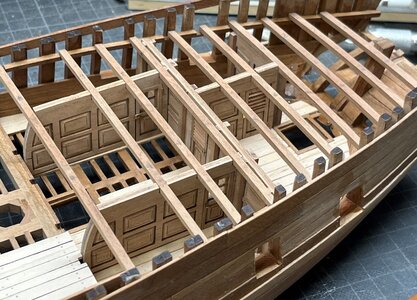
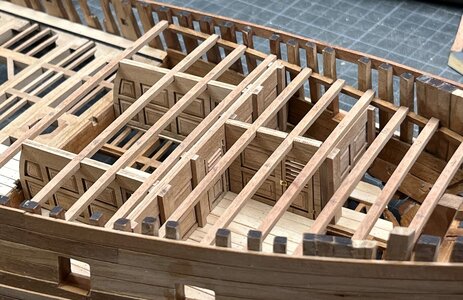
all is still dry fitted - now ready for the "CLOU"- treatment and the final installation
Many Thanks for your interest ..... to be continued
The doors included in the kit have this window cross

but I guess the sleeping room of the captain and also the entrance door to the main cabinet was different - I think such a louvre or blinds were installed here

I made it also to have a little bit more details to see inside the model

The doors got some hinches and also doorknobs - I did not blacken them - I can imagine, that they used inside some polished brass


and the beams are fitting well into the notches in the interior walls


all is still dry fitted - now ready for the "CLOU"- treatment and the final installation
Many Thanks for your interest ..... to be continued
Hi Uwe, wonderful work and the idea with the slats is great.
BeautifulHallo friends......
how to start the building log ?
1) starting with the section model which I finalized short time ago?
View attachment 297646
HMS GRANADO (1742) - midship section - POF by CAF in 1:48 - by Uwe
Some days ago I started working on a new project - HMS GRANADO - bomb vessel midship section - POF by @CAFmodel in 1:48 I made already a detailed kit review, where you can find more detailed Information abou the content and also the specialities of this kit, like the correct framing, the...shipsofscale.com
This I will show also later on when I compare the framing etc. of the section with the full hull model - also the wood material, the jig etc.......
And you can not really compare the two kits, which have so much differences
or .....
2) to start with the expected result?
I hope once the model will have the quality like the model built in 1971 by Lightley, Robert A. and owned now by the NMM
View attachment 297647
OK - I will not be able to reach this quality, but I try everything to get close from a certain distance
or
3) I start with the Kit Review(s), which I made before, showing the content of the kit(s) very much in detail
Kit Review - HMS GRANADO (1742) - POF in scale 1:48 by CAF model
Kit Review: PART 1 HMS GRANADO (1742) complete full hull model Plank On Frame in scale 1:48 by CAF model Beginning with this year we were already able to see the highly interesting kit of the Granado section model...shipsofscale.com
Kit Review - HMS GRANADO (1742) - section - kit No.2 - POF in scale 1:48 by CAF model
Kit Review: PART 1 HMS GRANADO (1742) section - kit No.2 Plank On Frame in scale 1:48 by CAF model since several months we were able to follow the development of this amazing kit in one of our topics https://shipsofscale.com/sosforums/threads/caf-granado-1-48.5628/ -> so we all want now to see...shipsofscale.com
or
4) The Granado History with all contemporary drawings and models known
HMS GRANADO - bomb vessel - 1742
Based on the big interest, which was produced by the new model kits devloped by CAF I decided to make a new topic, showing the basic data and contemporary and new sources existing HMS GRANADO (1742) - bomb vessel - interesting is maybe also the fact, that the Constructor John Barnard...shipsofscale.com
or
5) the available and intesively used Anatomy of Ships book about the bomb vessel HMS Granado (1742) by Peter Goodwin
Book review - Book Review: "The Bomb Vessel GRANADO (Anatomy of the Ship)" by Peter Goodwin
Book Review: The Bomb Vessel GRANADO (Anatomy of the Ship) by Peter Goodwin Hardcover: 128 pages Publisher: Conway Maritime Press; New edition edition (21 April 2005) Language: English Product Dimensions: 26 x 1.9 x 24.1 cm Synopsis: Built as a floating siege engine able to...shipsofscale.com
or
6) in medias res - making a first frame ...... Let us make some saw dust
you see, that we have already so much information here in our forum about the ship, the kit and the results of some research, which should be not repeated
I will choose possibility 6 !!!
Awesome!
- Joined
- Dec 9, 2019
- Messages
- 971
- Points
- 403

Witaj
Pięknie wygląda wnętrze, bardzo podoba mi się twoje dbanie o szczegóły zawiasy żaluzje . Pozdrawiam Mirek
Hello
The interior looks beautiful, I really like your attention to detail, hinges and blinds. Regards, Mirek
Pięknie wygląda wnętrze, bardzo podoba mi się twoje dbanie o szczegóły zawiasy żaluzje . Pozdrawiam Mirek
Hello
The interior looks beautiful, I really like your attention to detail, hinges and blinds. Regards, Mirek
Last edited by a moderator:
The doors look very nice. The overall imression is also extraordinary.
Many Thanks to @Steef66 , @Tobias , @Tommy S , @rlwhitt , @Nomad , @Mirek and @pianoforte for the kind words
.... and all the postive feedbacks via the likes received
Based on some requests or questions received to the CLUE treatment of the wood surface I mentioned earlier
This is the stuff used instead of any oil

Here you can see the wall elements - one is treated with Clou -
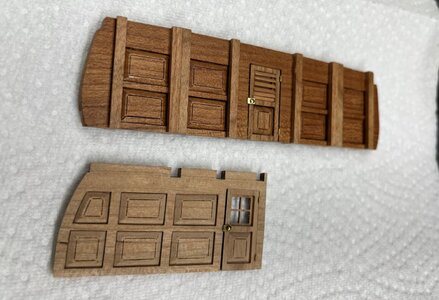
all wall elements are prepared for the final installation
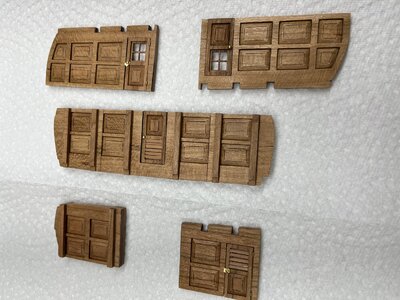
Many Thanks for your interest in my log
.... and all the postive feedbacks via the likes received
Based on some requests or questions received to the CLUE treatment of the wood surface I mentioned earlier
This is the stuff used instead of any oil

Here you can see the wall elements - one is treated with Clou -

all wall elements are prepared for the final installation

Many Thanks for your interest in my log


