yep sure is but a lot of fun.
-

Win a Free Custom Engraved Brass Coin!!!
As a way to introduce our brass coins to the community, we will raffle off a free coin during the month of August. Follow link ABOVE for instructions for entering.
-

PRE-ORDER SHIPS IN SCALE TODAY!
The beloved Ships in Scale Magazine is back and charting a new course for 2026!
Discover new skills, new techniques, and new inspirations in every issue.
NOTE THAT OUR FIRST ISSUE WILL BE JAN/FEB 2026
You are using an out of date browser. It may not display this or other websites correctly.
You should upgrade or use an alternative browser.
You should upgrade or use an alternative browser.
HMS Victory - CalderCraft 1:72
- Thread starter paulv1958
- Start date
- Watchers 76
-
- Tags
- caldercraft jotika victory
 quick update
About to start 2nd planking so there will be a delay ( 45 per side + cutouts)
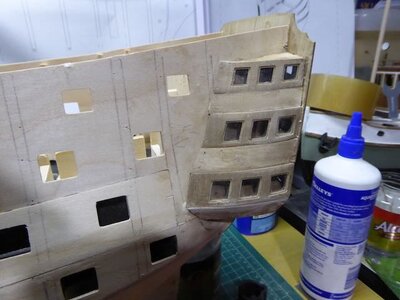
I have completed the stern galleries & mid cannon desk planking.
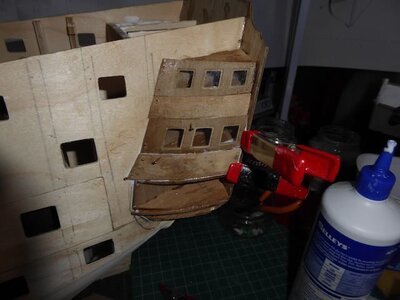
The galleries appeared to be daunting even from the instructions but once the order was worked out, it was quite simple and eveything slotted in nicely:
1. dry fit & pin lower gallery support
2. Dry fit and pin upper rear gallery
3. Dry fit side gallery templates & some site floor templates),
4. Mark side template position with pencil
6. Remove everything
5. Glue side templates & allow to dry
6.Glue lower gallery to hull and side templates
7. Glue rear upper gallery to lower, hull & side templates ( gives natural rear gallery curve)
8. Snap fit fit & glue side gallery floors
9 Add addtional side flooring / window supports ( note plans as to positioning of floor as it is alternate per floor)
The windows & separattors weret then slightly bent,pinning & glues into place and were easily fitted with a little beveling at leading edge.
The acetate for the windows stuck quite firmly with just PVA and left no fogging or marks.
I also then re removed stern post and part keel that was pinned to allow lower under gallery area postioning.
This is to allow sanding back to keel witdth of second planking at stern.
The lower stern gallery area was wet & heat curved to match hull.
The deck planking material was excellent and was cleanly fininshed. The coloring of the tanganika is great complaitred to the white/cream veneer of other providers.
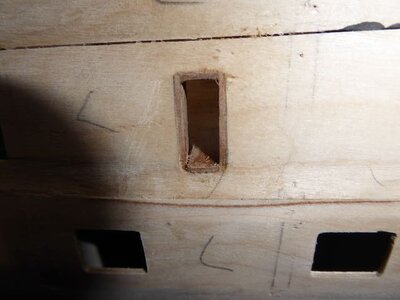
The hardest part was the fitting of the door lining as instructions were not clear as to the internal use. Once the penyy droppe that this was to block off viewing directly inside the thin hull panels and to represent the actual thickness of the hull walls it made sence. 1mm x 16mm is hard to cut as it spits so take care and sand back to external hull shape carefully.
The kit looks very bare at present as there is no second planking and its all pale. It well and truely firs the expression "the bones of the ship"
The galleries assembly process
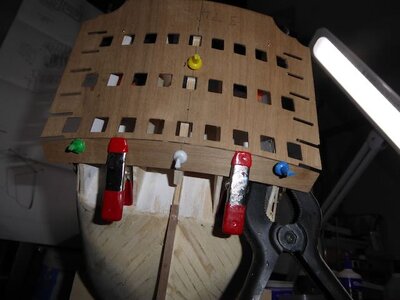

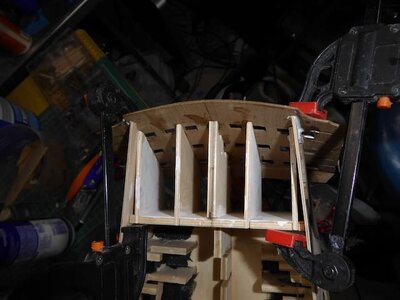
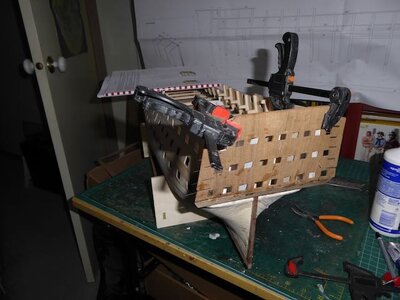
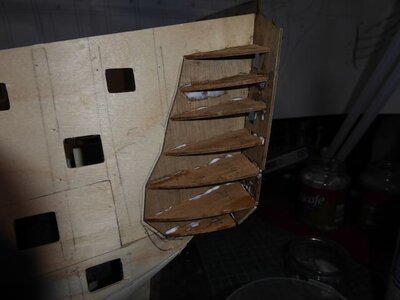
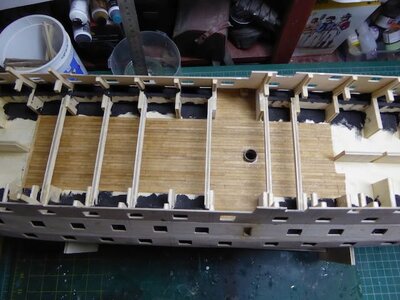
The middle gun decking ,4 butt shift ( The area will only be visible through stairways), but it looks great.
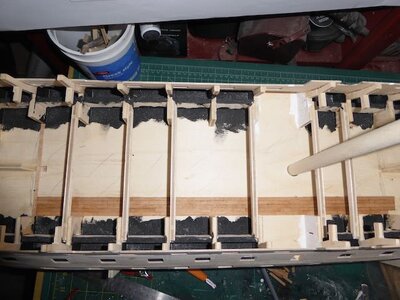
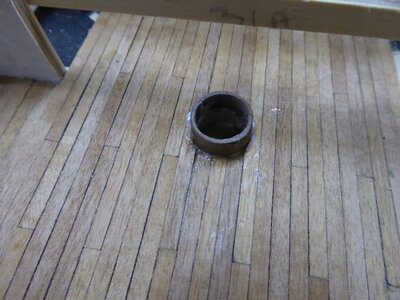
Main mast support added and sapped to allow for angle of main mast
Rar galleries completed
doorway lined( will be coved by hatchway arch & decorated sidewalls later)
See you after 2nd planking......zzz
Video link
Good morning Paul. Your approach here is fantastic- man the Caldercraft kit is awesome. Good buy.Your prep for the second planking looks spot on so your are ready for something brilliant. Cheers Grantquick update
About to start 2nd planking so there will be a delay ( 45 per side + cutouts)
I have completed the stern galleries & mid cannon desk planking.
The galleries appeared to be daunting even from the instructions but once the order was worked out, it was quite simple and eveything slotted in nicely:
1. dry fit & pin lower gallery support
2. Dry fit and pin upper rear gallery
3. Dry fit side gallery templates & some site floor templates),
4. Mark side template position with pencil
6. Remove everything
5. Glue side templates & allow to dry
6.Glue lower gallery to hull and side templates
7. Glue rear upper gallery to lower, hull & side templates ( gives natural rear gallery curve)
8. Snap fit fit & glue side gallery floors
9 Add addtional side flooring / window supports ( note plans as to positioning of floor as it is alternate per floor)
The windows & separattors weret then slightly bent,pinning & glues into place and were easily fitted with a little beveling at leading edge.
The acetate for the windows stuck quite firmly with just PVA and left no fogging or marks.
I also then re removed stern post and part keel that was pinned to allow lower under gallery area postioning.
This is to allow sanding back to keel witdth of second planking at stern.
The lower stern gallery area was wet & heat curved to match hull.
The deck planking material was excellent and was cleanly fininshed. The coloring of the tanganika is great complaitred to the white/cream veneer of other providers.
The hardest part was the fitting of the door lining as instructions were not clear as to the internal use. Once the penyy droppe that this was to block off viewing directly inside the thin hull panels and to represent the actual thickness of the hull walls it made sence. 1mm x 16mm is hard to cut as it spits so take care and sand back to external hull shape carefully.
The kit looks very bare at present as there is no second planking and its all pale. It well and truely firs the expression "the bones of the ship"
The galleries assembly process
View attachment 304207
View attachment 304206View attachment 304204View attachment 304203View attachment 304202View attachment 304201
The middle gun decking ,4 butt shift ( The area will only be visible through stairways), but it looks great.
View attachment 304200
Main mast support added and sapped to allow for angle of main mast
View attachment 304199
View attachment 304198
Rar galleries completed
View attachment 304197
doorway lined( will be coved by hatchway arch & decorated sidewalls later)
View attachment 304196
See you after 2nd planking......zzz
Video link
New images soon.
After 300 hours I have just completed phase 1 of 3 phases of 2nd planking. Keel to Mid Whale bottom ( Lower gun ports / entryway). Keel and Stern post added back.
The kit provides great qaulity walnut strips, very cleanly cut & fininshed. Only issue was marked colour and banding of some strips if you chose to hull natural. Lots of sorting would be needed ( As it is not the case in this build, there was no issue with this for me.)
Note If you do not like planking, DO NOT buy this Kit. I suspect there will be nearly 500 hours all up for 2nd planking alone.
If planking "Floats your boat" then you will be in heaven!.
On to the next phase... Lower Gun ports to just below Upper Gun desk. We stop there and have to do other stuff before coming back. (The evil gun port Lining!).
I will be watching. Saw the You Tube kit analysis.
LOL. sorry, but couldn’t help but get a chuckle out of that one.Note If you do not like planking, DO NOT buy this Kit.
Cheers Donnie, at 150 planks of 1.1m each its a 1 & 1/2 Football Fields worth!
Still 2600 copper plates beats that!
What have I gotten myself into!
Still 2600 copper plates beats that!
What have I gotten myself into!
- Joined
- Oct 15, 2017
- Messages
- 1,191
- Points
- 443

Hi Paul, I've enjoyed watching your journey so far. I realized, watching your approach to addressing tasks, we think somewhat alike. I too have the Caldercraft version of HMS Victory in dry dock. I'm not sure I will ever put it into a slipway as I've been preoccupied with other things for a while. That aside, I have a question for you.
If you will be installing copper plates as a finished layer on the hull, is there a reason to install 2 layers of planking prior to that? Is there a way you can achieve the same planking thickness of the 2 layers with one, cutting your efforts in half? I did an unboxing of this kit quite a while ago, but don't recall the planking elements specifically.
I'm a curious cat!
Thanks.
Hi Ken
By the time you sand the first layer to shape, the hull can become flexible in some of the lower area. The 2nd planking is also the first planking from the lower gunports up, so there will be a difference in thickness if you only single plank the kit below the ports. The upper planking is madatory so it would not make sense to do it all.
Single planking with just the lime wood ( softwood) would not provide enough surface strength to prevent denting etc. IF you were to single plank, then you would need a lot harder wood that will b difficult to work with at the bow.
The hull is quite easy to plank and NO soaking was required to shape the planks. I disuse up all the 750 nails provided on the first layer ( 15 per plank)
Whilst it is a long process, its not laborious and a couple per night over 2 months will see both layers done( It did in my case). There is approx 60 strips all up of the line and 120 of the walnut to complete the outer hull.
This is a long term build kit,
Take your time and enjoy.
 some boring 2nd planking images
The 2nd planking starts at the bottom of the middle whale position and works it way to the keel
The planking went on easily although shaping to 1/2 width from bulkhead 5 to bow needed to be done for planks to the waterline.
After this they could be done from the keel up.
Images show the slow processof adding the planks. The were cut where they would be covered by whales or copper plated.
As previously stated no soaking was done and the planks easlily bent with little effort. They were glued in place with contact adheasive. No nails were used.
There were several stealers at both the bow and stern. The galleries butted up perfectly to the thickness of the 1mm planking.
The planking suprisingly at midship and stern was a exact count with no spacing or thin planks to be cut.
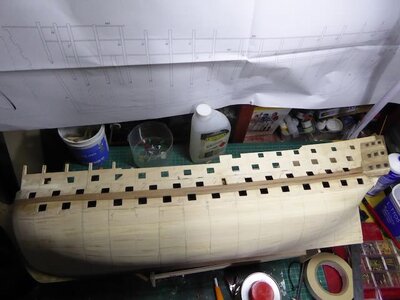
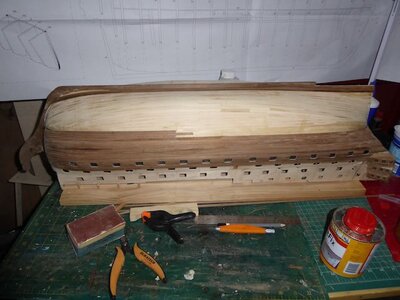
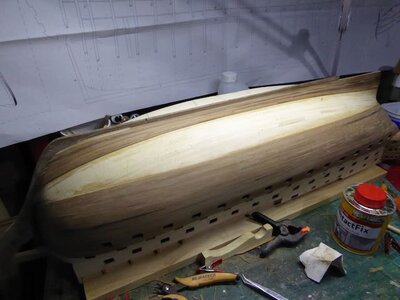
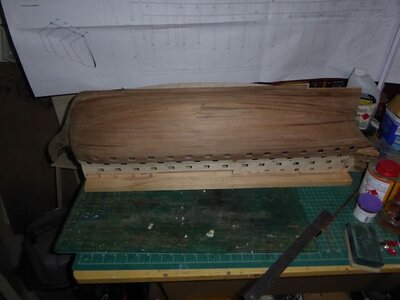
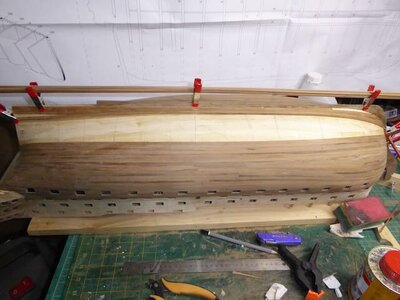

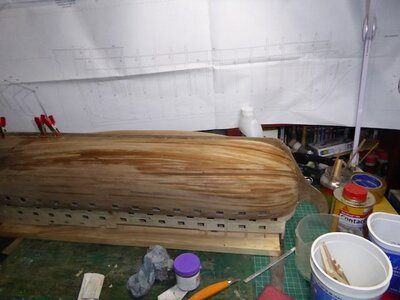
The last image was dampened by cloth to show the variations in colour of the walnut strips.
As it is copper-ed and painted this did not matter.
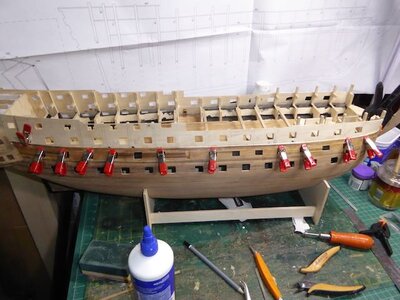
The hull was then turned over and planking was taken to the upper gun desk gun port level.
The 2nd planking as per the manual now pauses so that the upper gun deck, inner gun ports and deck planking is completed first.
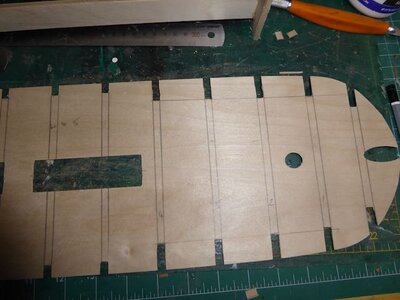
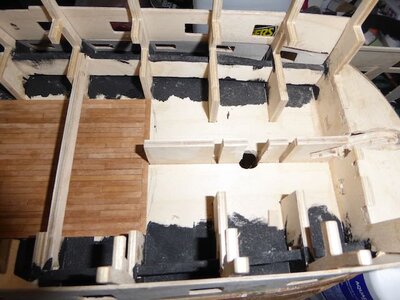
The upper desk was then added. As this deck sits level with the unplanked gunports show, it is wider than the top of the ship. As such eith the deck must be spit in two ( not preferred) or the accurately cut slots need to be depend from their size to the depth of the bukhead supports ( 20mm) so that they may be cleared without breaking the thin ply ( And Yep I cracked it on the edge.) 3mm also need to be removed on both sides to allow it to drop into place on the lower supports. This gap is covered by the inner ginports & planking so it not an issue.
Deck slots cut to 20mm deep 5 from bow & 8 from stern
Bulkhead supports to be cleared by slots
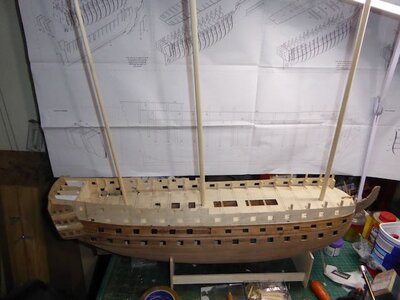
Upper gun deck in place. Deck glued & nailed. Masts added to ensure alignment
So far its been a lot of fun. 85 days effort in total hours at 8h per day measured ( No I did not spend 8 a day). Accumilated Hours of work so far 684.
See you in the next post ( deck planking, inner gunports,)
Tks all for watching appreciated comments.
Very nicely done!some boring 2nd planking images
The 2nd planking starts at the bottom of the middle whale position and works it way to the keel
The planking went on easily although shaping to 1/2 width from bulkhead 5 to bow needed to be done for planks to the waterline.
After this they could be done from the keel up.
Images show the slow processof adding the planks. The were cut where they would be covered by whales or copper plated.
As previously stated no soaking was done and the planks easlily bent with little effort. They were glued in place with contact adheasive. No nails were used.
There were several stealers at both the bow and stern. The galleries butted up perfectly to the thickness of the 1mm planking.
The planking suprisingly at midship and stern was a exact count with no spacing or thin planks to be cut.
View attachment 310116
View attachment 310115View attachment 310114
View attachment 310112
View attachment 310111
View attachment 310110
View attachment 310109
The last image was dampened by cloth to show the variations in colour of the walnut strips.
As it is copper-ed and painted this did not matter.
The hull was then turned over and planking was taken to the upper gun desk gun port level.
View attachment 310108
The 2nd planking as per the manual now pauses so that the upper gun deck, inner gun ports and deck planking is completed first.
The upper desk was then added. As this deck sits level with the unplanked gunports show, it is wider than the top of the ship. As such eith the deck must be spit in two ( not preferred) or the accurately cut slots need to be depend from their size to the depth of the bukhead supports ( 20mm) so that they may be cleared without breaking the thin ply ( And Yep I cracked it on the edge.) 3mm also need to be removed on both sides to allow it to drop into place on the lower supports. This gap is covered by the inner ginports & planking so it not an issue.
Deck slots cut to 20mm deep 5 from bow & 8 from stern
View attachment 310107
Bulkhead supports to be cleared by slots
View attachment 310106
Upper gun deck in place. Deck glued & nailed. Masts added to ensure alignment
View attachment 310105
So far its been a lot of fun. 85 days effort in total hours at 8h per day measured ( No I did not spend 8 a day). Accumilated Hours of work so far 684.
See you in the next post ( deck planking, inner gunports,)
Tks all for watching appreciated comments.
Tks All.
I hit my first big ( not really) hurdle last night. I test fitted the internal walls with the gun ports and they did not align at the bottom. The sides and tops did but the bottoms did not. Panic set in, had I done all the gun ports wrong?
There was no mention in the manual other than make sure aligned sides, top & bottom.
A closer inspection showed that the ports were not square as per the external ones. I had a re read of the build log in the Keith Julier book and low and behold he had the same issue. In his case the lower edge of the gun ports was 2mm higher on the internal pattern. Guess what so is mine!.
I am now going to make up an upper gun deck cannon assembly and measure Centre of the gun port before I cut away. Easy fix once planked, but a gotcha.
Cheers
- Joined
- Oct 15, 2017
- Messages
- 1,191
- Points
- 443

Really nice work Paul. I appreciate your dedication and discipline performing such an exciting task like planking. Seriously, when I do any planking, prior to the final layer of planking, I inadvertently discover I have A.D.D. (Attention Deficit Disorder)! But I've learned to recognize when it's starting and then put planking aside for a bit and focus on something else. The profile on your hull looks great.
..
..
some boring 2nd planking images
The 2nd planking starts at the bottom of the middle whale position and works it way to the keel
The planking went on easily although shaping to 1/2 width from bulkhead 5 to bow needed to be done for planks to the waterline.
After this they could be done from the keel up.
Images show the slow processof adding the planks. The were cut where they would be covered by whales or copper plated.
As previously stated no soaking was done and the planks easlily bent with little effort. They were glued in place with contact adheasive. No nails were used.
There were several stealers at both the bow and stern. The galleries butted up perfectly to the thickness of the 1mm planking.
The planking suprisingly at midship and stern was a exact count with no spacing or thin planks to be cut.
View attachment 310116
View attachment 310115View attachment 310114
View attachment 310112
View attachment 310111
View attachment 310110
View attachment 310109
The last image was dampened by cloth to show the variations in colour of the walnut strips.
As it is copper-ed and painted this did not matter.
The hull was then turned over and planking was taken to the upper gun desk gun port level.
View attachment 310108
The 2nd planking as per the manual now pauses so that the upper gun deck, inner gun ports and deck planking is completed first.
The upper desk was then added. As this deck sits level with the unplanked gunports show, it is wider than the top of the ship. As such eith the deck must be spit in two ( not preferred) or the accurately cut slots need to be depend from their size to the depth of the bukhead supports ( 20mm) so that they may be cleared without breaking the thin ply ( And Yep I cracked it on the edge.) 3mm also need to be removed on both sides to allow it to drop into place on the lower supports. This gap is covered by the inner ginports & planking so it not an issue.
Deck slots cut to 20mm deep 5 from bow & 8 from stern
View attachment 310107
Bulkhead supports to be cleared by slots
View attachment 310106
Upper gun deck in place. Deck glued & nailed. Masts added to ensure alignment
View attachment 310105
So far its been a lot of fun. 85 days effort in total hours at 8h per day measured ( No I did not spend 8 a day). Accumilated Hours of work so far 684.
See you in the next post ( deck planking, inner gunports,)
Tks all for watching appreciated comments.
There are no boring images to my way of thinking. Each image reveals how shipwrights tackle their problems. The more information I have the better able I am to avoid some problems and craft a better model.
Upper gun deck now completed
The process was quite simple and straight fwd.
The inner gun port templates have a notch at the top with sufficient leeway to move left and right to allow inner side alignment with the outer gun port template.
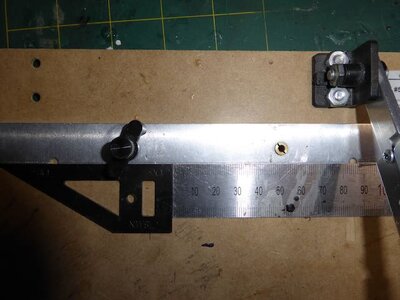
To make this easy when gluing, I found that the leftover ply from the ship support cradle had three long sections that were the exact width of the gun ports. I cut these out and this allwed me to align the ports vertically for gluing
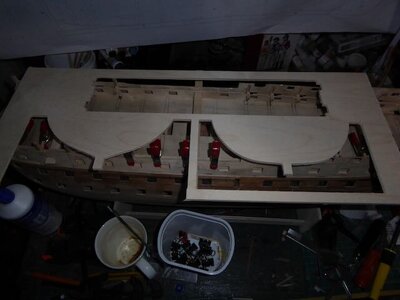
The templates were then glued into postion and clamped for drying
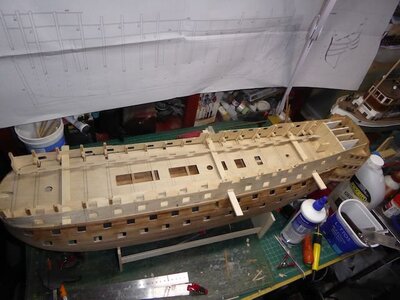
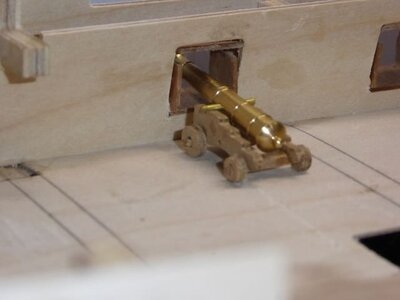
When dry I measured the lower lip of the internal gun port template and although correct at the bown and stern was correct however the middle ports were up to 2mm higher on the center ports. I made up one gun carriage and placed and it was correct on the ends bit as expected wrong in the centre.
It was simple to cut these down to match the external port edges with a excacto.
These were then lined and re checked with the cannons to be correct.
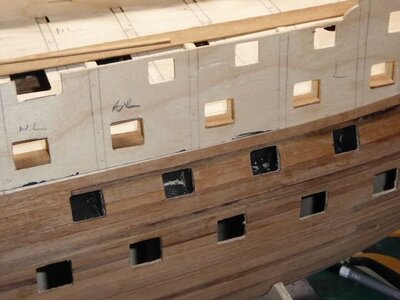
The ports were then painted with Jotika Admiratly paint Red Occur ( Jotika Victory Paint set)
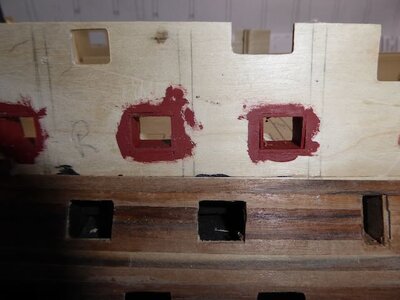
The 2nd planking was then continued up to the upper deck level and again stopped.
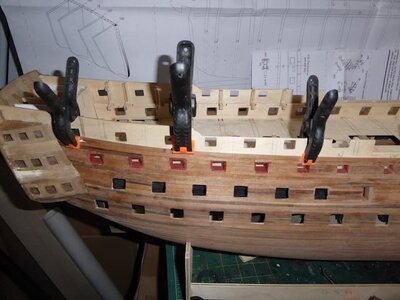
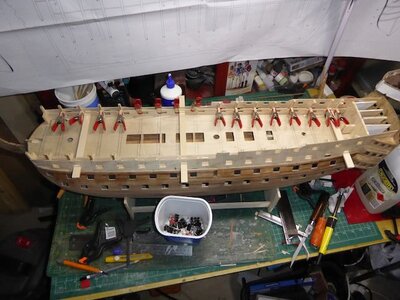
Next the centre line of the deck was drawn in and a single full length plank placed and glued and allowd to dry
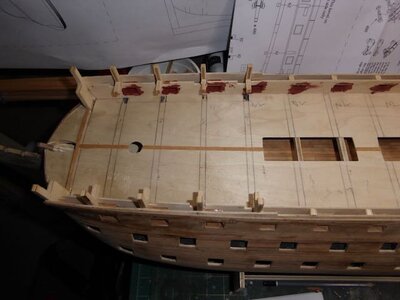
The rest of the planks ( a LOT!!) were cut to 85mm as per the mnaual to allow a 4 but shift ( done either side of the central planl
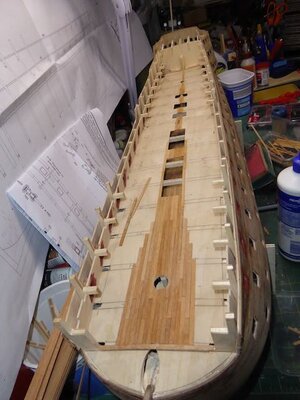
The deck was then completed, sanded and a coat of matt sanding sealer was added ( Still wet hence the gloss)
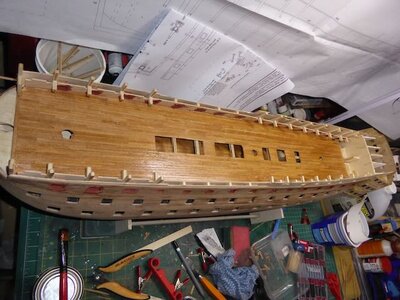
The internal gunport planking is next, then its flip over and the whales....
Till next time......
The process was quite simple and straight fwd.
The inner gun port templates have a notch at the top with sufficient leeway to move left and right to allow inner side alignment with the outer gun port template.
To make this easy when gluing, I found that the leftover ply from the ship support cradle had three long sections that were the exact width of the gun ports. I cut these out and this allwed me to align the ports vertically for gluing


The templates were then glued into postion and clamped for drying

When dry I measured the lower lip of the internal gun port template and although correct at the bown and stern was correct however the middle ports were up to 2mm higher on the center ports. I made up one gun carriage and placed and it was correct on the ends bit as expected wrong in the centre.
It was simple to cut these down to match the external port edges with a excacto.
These were then lined and re checked with the cannons to be correct.


The ports were then painted with Jotika Admiratly paint Red Occur ( Jotika Victory Paint set)

The 2nd planking was then continued up to the upper deck level and again stopped.

Next the centre line of the deck was drawn in and a single full length plank placed and glued and allowd to dry

The rest of the planks ( a LOT!!) were cut to 85mm as per the mnaual to allow a 4 but shift ( done either side of the central planl


The deck was then completed, sanded and a coat of matt sanding sealer was added ( Still wet hence the gloss)

The internal gunport planking is next, then its flip over and the whales....
Till next time......
Learning much from your posts. The pictures show me three things, first what tools/supplies you use, second techniques for using those tools and, third the work in progress photos show me how to do things.This year we relocate to another state further south. That will be the time for me to start my HMS Victory.Upper gun deck now completed
The process was quite simple and straight fwd.
The inner gun port templates have a notch at the top with sufficient leeway to move left and right to allow inner side alignment with the outer gun port template.
To make this easy when gluing, I found that the leftover ply from the ship support cradle had three long sections that were the exact width of the gun ports. I cut these out and this allwed me to align the ports vertically for gluing
View attachment 312239
View attachment 312241
The templates were then glued into postion and clamped for drying
View attachment 312240
When dry I measured the lower lip of the internal gun port template and although correct at the bown and stern was correct however the middle ports were up to 2mm higher on the center ports. I made up one gun carriage and placed and it was correct on the ends bit as expected wrong in the centre.
It was simple to cut these down to match the external port edges with a excacto.
These were then lined and re checked with the cannons to be correct.
View attachment 312237
View attachment 312238
The ports were then painted with Jotika Admiratly paint Red Occur ( Jotika Victory Paint set)
View attachment 312236
The 2nd planking was then continued up to the upper deck level and again stopped.
View attachment 312235
Next the centre line of the deck was drawn in and a single full length plank placed and glued and allowd to dry
View attachment 312234
The rest of the planks ( a LOT!!) were cut to 85mm as per the mnaual to allow a 4 but shift ( done either side of the central planl
View attachment 312233
View attachment 312232
The deck was then completed, sanded and a coat of matt sanding sealer was added ( Still wet hence the gloss)
View attachment 312231
The internal gunport planking is next, then its flip over and the whales....
Till next time......
Very nice!Upper gun deck now completed
The process was quite simple and straight fwd.
The inner gun port templates have a notch at the top with sufficient leeway to move left and right to allow inner side alignment with the outer gun port template.
To make this easy when gluing, I found that the leftover ply from the ship support cradle had three long sections that were the exact width of the gun ports. I cut these out and this allwed me to align the ports vertically for gluing
View attachment 312239
View attachment 312241
The templates were then glued into postion and clamped for drying
View attachment 312240
When dry I measured the lower lip of the internal gun port template and although correct at the bown and stern was correct however the middle ports were up to 2mm higher on the center ports. I made up one gun carriage and placed and it was correct on the ends bit as expected wrong in the centre.
It was simple to cut these down to match the external port edges with a excacto.
These were then lined and re checked with the cannons to be correct.
View attachment 312237
View attachment 312238
The ports were then painted with Jotika Admiratly paint Red Occur ( Jotika Victory Paint set)
View attachment 312236
The 2nd planking was then continued up to the upper deck level and again stopped.
View attachment 312235
Next the centre line of the deck was drawn in and a single full length plank placed and glued and allowd to dry
View attachment 312234
The rest of the planks ( a LOT!!) were cut to 85mm as per the mnaual to allow a 4 but shift ( done either side of the central planl
View attachment 312233
View attachment 312232
The deck was then completed, sanded and a coat of matt sanding sealer was added ( Still wet hence the gloss)
View attachment 312231
The internal gunport planking is next, then its flip over and the whales....
Till next time......


