Your comment about how to solve your problem is the kind of insight I am after.Very nice!
-

Win a Free Custom Engraved Brass Coin!!!
As a way to introduce our brass coins to the community, we will raffle off a free coin during the month of August. Follow link ABOVE for instructions for entering.
-

PRE-ORDER SHIPS IN SCALE TODAY!
The beloved Ships in Scale Magazine is back and charting a new course for 2026!
Discover new skills, new techniques, and new inspirations in every issue.
NOTE THAT OUR FIRST ISSUE WILL BE JAN/FEB 2026
You are using an out of date browser. It may not display this or other websites correctly.
You should upgrade or use an alternative browser.
You should upgrade or use an alternative browser.
HMS Victory - CalderCraft 1:72
- Thread starter paulv1958
- Start date
- Watchers 76
-
- Tags
- caldercraft jotika victory
Cheers All .
And frpom the State of Minnesota-"You Betcha".Cheers All .
Ja, sure!And frpom the State of Minnesota-"You Betcha".
Good morning Paul. Awesome work. Great Video, instructive. This is the first time I have seen contact adhesive used and it looks like a good way to lay that second plank. Cheers GrantUpper gun deck now completed
The process was quite simple and straight fwd.
The inner gun port templates have a notch at the top with sufficient leeway to move left and right to allow inner side alignment with the outer gun port template.
To make this easy when gluing, I found that the leftover ply from the ship support cradle had three long sections that were the exact width of the gun ports. I cut these out and this allwed me to align the ports vertically for gluing
View attachment 312239
View attachment 312241
The templates were then glued into postion and clamped for drying
View attachment 312240
When dry I measured the lower lip of the internal gun port template and although correct at the bown and stern was correct however the middle ports were up to 2mm higher on the center ports. I made up one gun carriage and placed and it was correct on the ends bit as expected wrong in the centre.
It was simple to cut these down to match the external port edges with a excacto.
These were then lined and re checked with the cannons to be correct.
View attachment 312237
View attachment 312238
The ports were then painted with Jotika Admiratly paint Red Occur ( Jotika Victory Paint set)
View attachment 312236
The 2nd planking was then continued up to the upper deck level and again stopped.
View attachment 312235
Next the centre line of the deck was drawn in and a single full length plank placed and glued and allowd to dry
View attachment 312234
The rest of the planks ( a LOT!!) were cut to 85mm as per the mnaual to allow a 4 but shift ( done either side of the central planl
View attachment 312233
View attachment 312232
The deck was then completed, sanded and a coat of matt sanding sealer was added ( Still wet hence the gloss)
View attachment 312231
The internal gunport planking is next, then its flip over and the whales....
Till next time......
I’ve heard, however, that you have to be extremely careful since the contact part of the name is quite literal. There’s not much adjustment after you lay it down. Just repeating what others have said because I have no personal experience with it.Good morning Paul. Awesome work. Great Video, instructive. This is the first time I have seen contact adhesive used and it looks like a good way to lay that second plank. Cheers Grant
It gives more play than CA and the can is a lot cheaper to use. If you can lay tape, you can use contact. It leaves no residue or stain and rubs off exterrnal surfaces with your fingers. Its great for the thin veneer type 2nd layers and the fiddly fill bits. I would not use for 1st planking or major wood joining, still use the good old PVA for that.
I live in south Minneapolis suburbs where we say, "You betchyall!"Ja, sure!
Good evening Vic- that is such a South African saying. “Ja for sure.”Cheers GrantJa, sure!
It’s also Nord Dakota where the Admiral is from.Good evening Vic- that is such a South African saying. “Ja for sure.”Cheers Grant
Its a Swedish/Norwegian thing here in Minnesota. Is it something to do with seafaring people?It’s also Nord Dakota where the Admiral is from.
It’s a Norwegian and German thing in North Dakota. Dutch are West Germanic speakers too.
Greetings all
A lot done but not much done.
The hull has now been completed and ready for external painting job 1.
The inner balwalks have been planked and painted
The Whales added ( Not obvious due to the planking & whales beinf both walnut. Its only obvious when you get close)
Gunport linings done with only 3 ratlers refusing to shakeout of hull. ( Quite suprised how easy it was in the end.)
Paint lines & water lines added by painters & tamia masking tape.
Now to a bit of relaxing paining before its COPPER time!
Adding the first inner ballwalk plank ( pre painted)

Adding piece by piece
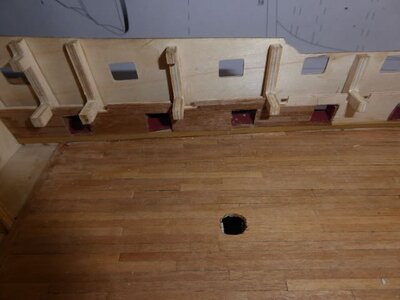
Upper desck supports put temp in place to make sure inner planks are cut correctly to fit
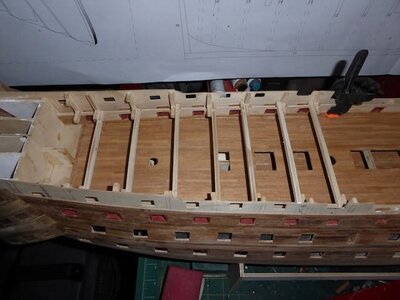
Painted

Adding the whales ( Position measured directly off plan. Upper two whales are 1 x 3.5mm x 3 each, lower is one 1 x 4x.5mm & the other 4 1 x 4mm std planking. These were also contact adhesive laid. Once on laid they are hard to see at a distance. ( the light lank is not missing its juts that colour on hull
The Actual plans ( not the Kit ones or suggested method) have the whales consisting of cut stock laid end and butted up. I had considered this, but at the size & thickness ( 1mm) and when painted and sanded it becomes invisible at this size. After due consideration the effort for me and my eyesight it would not have justified the final result ( at 1.48 yep but at 1:72 no)
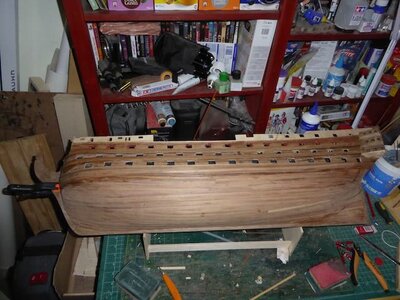
The gun ports were fairly easy in the end. I did the vertcle sides first ( the middle gun port level was easy as one side of the ports lined up with the internal bulkheads so was easy to fix in place.) I used PVA contrary to suggested CA(Quick hold but fragile). Using the special applicator, the amount of glue and the lightness of the cut piece held in place till the PVA dried.
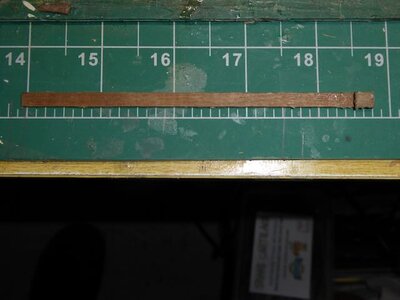
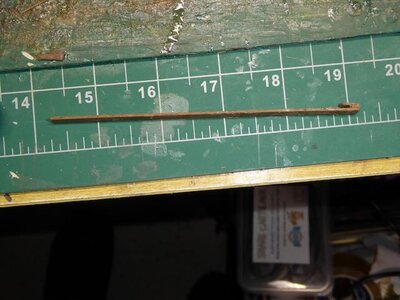

Once the glue had dried for one side the other was added. The bottoms where then simply then pressed into position and held byt the sides and slight over length pressure. Once these were dry, it was flip the hull and repeat for the port tops. I was lucky and only dropped 4 into the hull ( 2 shook back out, so I still have 2 rattlers!. In the end it was a fun process with very little vocalization!
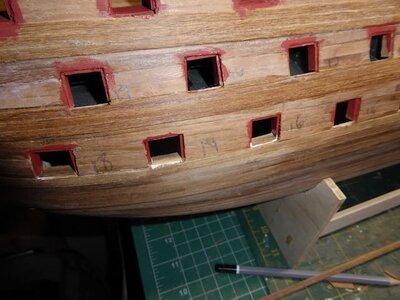
Finally the paint separation & waterlines have been marled on the hull. The lines do not follow the whales or the gunpurts and vary significantly in size from on end to the other. These postions other than the waterline are not any of the plans but are deriveded from a series of photos in the build instructions.
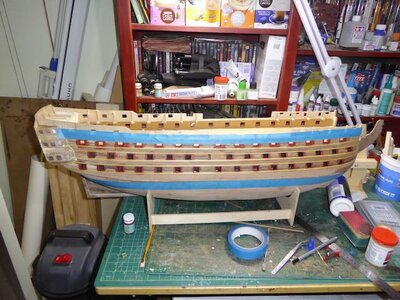
Moe fun to come. Still having a great time 856 hours in ...... to go
A lot done but not much done.
The hull has now been completed and ready for external painting job 1.
The inner balwalks have been planked and painted
The Whales added ( Not obvious due to the planking & whales beinf both walnut. Its only obvious when you get close)
Gunport linings done with only 3 ratlers refusing to shakeout of hull. ( Quite suprised how easy it was in the end.)
Paint lines & water lines added by painters & tamia masking tape.
Now to a bit of relaxing paining before its COPPER time!
Adding the first inner ballwalk plank ( pre painted)

Adding piece by piece

Upper desck supports put temp in place to make sure inner planks are cut correctly to fit

Painted

Adding the whales ( Position measured directly off plan. Upper two whales are 1 x 3.5mm x 3 each, lower is one 1 x 4x.5mm & the other 4 1 x 4mm std planking. These were also contact adhesive laid. Once on laid they are hard to see at a distance. ( the light lank is not missing its juts that colour on hull
The Actual plans ( not the Kit ones or suggested method) have the whales consisting of
 cut stock laid end and butted up. I had considered this, but at the size & thickness ( 1mm) and when painted and sanded it becomes invisible at this size. After due consideration the effort for me and my eyesight it would not have justified the final result ( at 1.48 yep but at 1:72 no)
The gun ports were fairly easy in the end. I did the vertcle sides first ( the middle gun port level was easy as one side of the ports lined up with the internal bulkheads so was easy to fix in place.) I used PVA contrary to suggested CA(Quick hold but fragile). Using the special applicator, the amount of glue and the lightness of the cut piece held in place till the PVA dried.


Once the glue had dried for one side the other was added. The bottoms where then simply then pressed into position and held byt the sides and slight over length pressure. Once these were dry, it was flip the hull and repeat for the port tops. I was lucky and only dropped 4 into the hull ( 2 shook back out, so I still have 2 rattlers!. In the end it was a fun process with very little vocalization!

Finally the paint separation & waterlines have been marled on the hull. The lines do not follow the whales or the gunpurts and vary significantly in size from on end to the other. These postions other than the waterline are not any of the plans but are deriveded from a series of photos in the build instructions.

Moe fun to come. Still having a great time 856 hours in ...... to go
Last edited:
Hello Paul,
you are making great progress with the build. Are you planning on painting the model in the new Victory colour scheme ?
I was unsure when they changed the colour of the ship, but now I like it.
cheers buddy.
you are making great progress with the build. Are you planning on painting the model in the new Victory colour scheme ?
I was unsure when they changed the colour of the ship, but now I like it.
cheers buddy.
I like the Mustard Yellow from the Jotika paint set. Still prefer the Mustard Yellow to the Fleshy PINK!. All those years yellow then a change. I'm a 9 planet man not 8 & a rock.! There's tradition and then there's politically correct wokeness. ( and the BBC!)Hello Paul,
you are making great progress with the build. Are you planning on painting the model in the new Victory colour scheme ?
I was unsure when they changed the colour of the ship, but now I like it.
cheers buddy.
Good morning Paul. A whole lot of progress performed spot on. Looking great. Cheers GrantGreetings all
A lot done but not much done.
The hull has now been completed and ready for external painting job 1.
The inner balwalks have been planked and painted
The Whales added ( Not obvious due to the planking & whales beinf both walnut. Its only obvious when you get close)
Gunport linings done with only 3 ratlers refusing to shakeout of hull. ( Quite suprised how easy it was in the end.)
Paint lines & water lines added by painters & tamia masking tape.
Now to a bit of relaxing paining before its COPPER time!
Adding the first inner ballwalk plank ( pre painted)
View attachment 316401
Adding piece by piece
View attachment 316406
Upper desck supports put temp in place to make sure inner planks are cut correctly to fit
View attachment 316407
Painted
View attachment 316404
Adding the whales ( Position measured directly off plan. Upper two whales are 1 x 3.5mm x 3 each, lower is one 1 x 4x.5mm & the other 4 1 x 4mm std planking. These were also contact adhesive laid. Once on laid they are hard to see at a distance. ( the light lank is not missing its juts that colour on hull
The Actual plans ( not the Kit ones or suggested method) have the whales consisting ofcut stock laid end and butted up. I had considered this, but at the size & thickness ( 1mm) and when painted and sanded it becomes invisible at this size. After due consideration the effort for me and my eyesight it would not have justified the final result ( at 1.48 yep but at 1:72 no)
View attachment 316405
The gun ports were fairly easy in the end. I did the vertcle sides first ( the middle gun port level was easy as one side of the ports lined up with the internal bulkheads so was easy to fix in place.) I used PVA contrary to suggested CA(Quick hold but fragile). Using the special applicator, the amount of glue and the lightness of the cut piece held in place till the PVA dried.
View attachment 316414View attachment 316413View attachment 316412
Once the glue had dried for one side the other was added. The bottoms where then simply then pressed into position and held byt the sides and slight over length pressure. Once these were dry, it was flip the hull and repeat for the port tops. I was lucky and only dropped 4 into the hull ( 2 shook back out, so I still have 2 rattlers!. In the end it was a fun process with very little vocalization!
View attachment 316403
Finally the paint separation & waterlines have been marled on the hull. The lines do not follow the whales or the gunpurts and vary significantly in size from on end to the other. These postions other than the waterline are not any of the plans but are deriveded from a series of photos in the build instructions.
View attachment 316402
Moe fun to come. Still having a great time 856 hours in ...... to go
- Joined
- Apr 20, 2020
- Messages
- 6,241
- Points
- 738

Dear Paul.Greetings all
A lot done but not much done.
The hull has now been completed and ready for external painting job 1.
The inner balwalks have been planked and painted
The Whales added ( Not obvious due to the planking & whales beinf both walnut. Its only obvious when you get close)
Gunport linings done with only 3 ratlers refusing to shakeout of hull. ( Quite suprised how easy it was in the end.)
Paint lines & water lines added by painters & tamia masking tape.
Now to a bit of relaxing paining before its COPPER time!
Adding the first inner ballwalk plank ( pre painted)
View attachment 316401
Adding piece by piece
View attachment 316406
Upper desck supports put temp in place to make sure inner planks are cut correctly to fit
View attachment 316407
Painted
View attachment 316404
Adding the whales ( Position measured directly off plan. Upper two whales are 1 x 3.5mm x 3 each, lower is one 1 x 4x.5mm & the other 4 1 x 4mm std planking. These were also contact adhesive laid. Once on laid they are hard to see at a distance. ( the light lank is not missing its juts that colour on hull
The Actual plans ( not the Kit ones or suggested method) have the whales consisting ofcut stock laid end and butted up. I had considered this, but at the size & thickness ( 1mm) and when painted and sanded it becomes invisible at this size. After due consideration the effort for me and my eyesight it would not have justified the final result ( at 1.48 yep but at 1:72 no)
View attachment 316405
The gun ports were fairly easy in the end. I did the vertcle sides first ( the middle gun port level was easy as one side of the ports lined up with the internal bulkheads so was easy to fix in place.) I used PVA contrary to suggested CA(Quick hold but fragile). Using the special applicator, the amount of glue and the lightness of the cut piece held in place till the PVA dried.
View attachment 316414View attachment 316413View attachment 316412
Once the glue had dried for one side the other was added. The bottoms where then simply then pressed into position and held byt the sides and slight over length pressure. Once these were dry, it was flip the hull and repeat for the port tops. I was lucky and only dropped 4 into the hull ( 2 shook back out, so I still have 2 rattlers!. In the end it was a fun process with very little vocalization!
View attachment 316403
Finally the paint separation & waterlines have been marled on the hull. The lines do not follow the whales or the gunpurts and vary significantly in size from on end to the other. These postions other than the waterline are not any of the plans but are deriveded from a series of photos in the build instructions.
View attachment 316402
Moe fun to come. Still having a great time 856 hours in ...... to go
great progress, Looking Wonderful
Video up of whales / gun ports.
Working on 3000 copper plates ( about 800 in...). Easy to do but slow going to prevent CA sickeness. (About 50 a day over 2-3 hours spread). For AUS members I purchased Shane's Shed 'CA' glue on his ebay store. Great value & quality glue. HE has thin, med, thick, Xtra thick and Ultra Thiick in 50gm bottles for around $12au per bottle.
Working on 3000 copper plates ( about 800 in...). Easy to do but slow going to prevent CA sickeness. (About 50 a day over 2-3 hours spread). For AUS members I purchased Shane's Shed 'CA' glue on his ebay store. Great value & quality glue. HE has thin, med, thick, Xtra thick and Ultra Thiick in 50gm bottles for around $12au per bottle.
Nice progress! I just bought this kit myself although I have put it away for a while as I'm building my first kit at the moment and want to build a couple more before I attempt the Victory. I have been following your videos on YouTube from the start and only just found this log to follow along with also. I guess that makes me a stalker 
I, too, have this kit. I am waiting to relocate to another state before I start. The advantage is that I can start a shop organized to building rather than my existing conglomeration in a crowded bedroom.Nice progress! I just bought this kit myself although I have put it away for a while as I'm building my first kit at the moment and want to build a couple more before I attempt the Victory. I have been following your videos on YouTube from the start and only just found this log to follow along with also. I guess that makes me a stalker


