Ah, those old bonesGood evening Heinrich....Thankfully not....I think Going for a spin on MX track would not be a good idea anymore
-

Win a Free Custom Engraved Brass Coin!!!
As a way to introduce our brass coins to the community, we will raffle off a free coin during the month of August. Follow link ABOVE for instructions for entering.
-

PRE-ORDER SHIPS IN SCALE TODAY!
The beloved Ships in Scale Magazine is back and charting a new course for 2026!
Discover new skills, new techniques, and new inspirations in every issue.
NOTE THAT OUR FIRST ISSUE WILL BE JAN/FEB 2026
You are using an out of date browser. It may not display this or other websites correctly.
You should upgrade or use an alternative browser.
You should upgrade or use an alternative browser.
HMS Victory Mantua 1:78 (first build) by Grant Tyler [COMPLETED BUILD]
- Thread starter GrantTyler
- Start date
- Watchers 102
Good morning. I am over blocks. So started on the Main stay. I gave making the mouse the proper way a go:
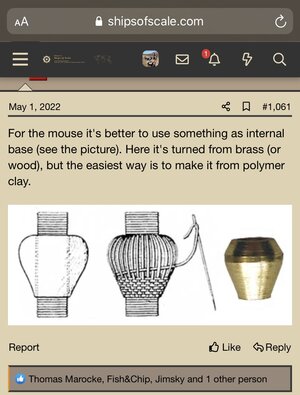
I don’t have clay or any turning tools so used some needle files and sandpaper to shape the internal base from a left over walnut dowel.
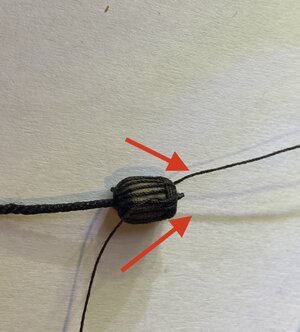
A couple of mistakes I picked up too late: the internal base should be more angled as per arrows. My first weaves just followed over under pattern however they should be a basket weave.
Served the mainstay and made the loop.
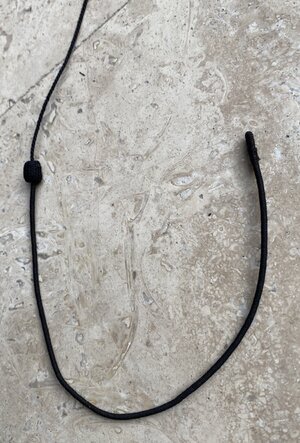
And here is the squeaky little fellow:
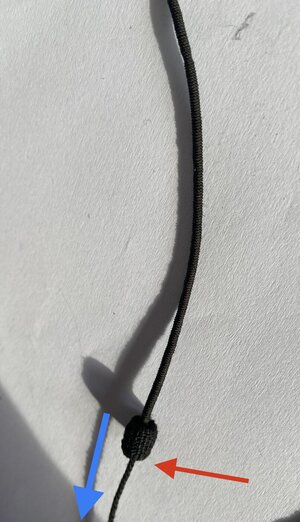
Blue arrow- stay will be seized below the mouse. Red arrow - the weave pattern was out. These while not perfect are sooooooo much better than the previous rats nest I made. I now have to redo the mouses’ (mice

 ) on the Mizzen stays. No wonder I run out of thread
 .
.
Cheers Grant

I don’t have clay or any turning tools so used some needle files and sandpaper to shape the internal base from a left over walnut dowel.

A couple of mistakes I picked up too late: the internal base should be more angled as per arrows. My first weaves just followed over under pattern however they should be a basket weave.
Served the mainstay and made the loop.

And here is the squeaky little fellow:

Blue arrow- stay will be seized below the mouse. Red arrow - the weave pattern was out. These while not perfect are sooooooo much better than the previous rats nest I made. I now have to redo the mouses’ (mice


 ) on the Mizzen stays. No wonder I run out of thread
 .
.Cheers Grant
Grant, your caged part is much thicker than the stay itself. From the mousing down the step also slandered. 3 inches if I'm not mistaken. Convert to your scale. The mousing blank is put on the stay, and then the mousing itself is woven. Drill a hole in the workpiece with a diameter slightly larger than the diameter of the stay. Put the workpiece on the rest of the mast (toothpick, needle file) and insert this design into a screwdriver, drill, drill machine. Give the desired shape, similar to a pear.Good morning. I am over blocks. So started on the Main stay. I gave making the mouse the proper way a go:
View attachment 314984
I don’t have clay or any turning tools so used some needle files and sandpaper to shape the internal base from a left over walnut dowel.
View attachment 314983
A couple of mistakes I picked up too late: the internal base should be more angled as per arrows. My first weaves just followed over under pattern however they should be a basket weave.
Served the mainstay and made the loop.
View attachment 314981
And here is the squeaky little fellow:
View attachment 314982
Blue arrow- stay will be seized below the mouse. Red arrow - the weave pattern was out. These while not perfect are sooooooo much better than the previous rats nest I made. I now have to redo the mouses’ (mice

) on the Mizzen stays. No wonder I run out of thread
.
Cheers Grant
- Joined
- Jan 9, 2020
- Messages
- 10,566
- Points
- 938

That little task awaits me in the not-too-distant future as well. As Sasha said, it has to have more of a pear shape, but I will keep my mouth shut until I have tried doing it myself. In the meantime, your effort is commendable my friend!
Hello Sahsa. Thanks for these steps. With me it is a bit of trial and error. Yes I will redo this one and I did notice the shape incorrect. I am just happy that I believe I can make these and even this practice one came out better than my previous. I do need to buy a magnifying glass and holder. It is rather hit and miss sometimes without. Cheers GrantGrant, your caged part is much thicker than the stay itself. From the mousing down the step also slandered. 3 inches if I'm not mistaken. Convert to your scale. The mousing blank is put on the stay, and then the mousing itself is woven. Drill a hole in the workpiece with a diameter slightly larger than the diameter of the stay. Put the workpiece on the rest of the mast (toothpick, needle file) and insert this design into a screwdriver, drill, drill machine. Give the desired shape, similar to a pear.
Hello Heinrich. See my reply to Sasha. Yep I am happy I can make these. My trial one showed what I have to do to get them right. It did take a while however was fun seeing what to do and what not. Cheers “redo Tyler”That little task awaits me in the not-too-distant future as well. As Sasha said, it has to have more of a pear shape, but I will keep my mouth shut until I have tried doing it myself. In the meantime, your effort is commendable my friend!
Grant, of course, will get better each time. When I was building the "Phoenix" brigantine (link in my signature) by trial and error, I wove a dozen musings. As a result, the smallest was on the stay 0.6 mm, and the largest on the stay 1 mm.Hello Sahsa. Thanks for these steps. With me it is a bit of trial and error. Yes I will redo this one and I did notice the shape incorrect. I am just happy that I believe I can make these and even this practice one came out better than my previous. I do need to buy a magnifying glass and holder. It is rather hit and miss sometimes without. Cheers Grant
Another do-over coin to you Grant.Hello Heinrich. See my reply to Sasha. Yep I am happy I can make these. My trial one showed what I have to do to get them right. It did take a while however was fun seeing what to do and what not. Cheers “redo Tyler”
I keep bookmarks of portions of your build for reference when I get to any rigging issues I may have. Thanks for your excellent photos and descriptions as you move forward with your build.
Thanks Sasha, Paul , Heinrich and Ron. Sometimes we have to share the issues we have can’t all be good “sailing”. I’m going to try attach the inner shape to a small needle file and use a dremel sanding bit. I used this to tapper the yards (much bigger I know) and got those good. Sometimes being a tad lazy may just help  . I will share the progress good or horrid
 . Cheers Grant
 . Cheers Grant
You know you've entered a new space in the hobby when your 'friends' become the sirens... 

Now you have to know how to weave as well? Is there no end to the number of skills you have to acquire for this ship modelling larkServed the mainstay and made the loop.
I now have to redo the mouses’ (mice

) on the Mizzen stays. No wonder I run out of thread
.

I don't know much about mouses/mice so can't comment there but the serving of your mainstay looks spot on Grant, very tidy. I can also see why you'll be needing a lot of thread for your rigging
Good morning Paul....and I thought sirens where beautiful..... I can see some challenges ahead- I have to significantly reduce the size of the trial mouse and then the weaving will be exponentially more intricate. My smallest thread is 0.2mm which I think is also too large. Thanks guys I appreciate it massivelyYou know you've entered a new space in the hobby when your 'friends' become the sirens...
 . My friends the sirens
Good morning Mark- your turn is comingNow you have to know how to weave as well? Is there no end to the number of skills you have to acquire for this ship modelling lark
I don't know much about mouses/mice so can't comment there but the serving of your mainstay looks spot on Grant, very tidy. I can also see why you'll be needing a lot of thread for your rigging
 . These little rodents are a challenge for sure. Cheers Grant
Good morning- as promised the mouse. This is for the Main stay which is 1.5mm. Slightly out of scale. Ropes and sizes a discussion for another day.
The reasonable, bad and ugly. .
.
These things are small. Using Grants maths this mouse to my scale is 3mm long, 3.5 at widest point.( Rounded UP ).These will be tiny for the Mizzen top stay for sure.
Shaped using needle file from a 4mm dowel left over.
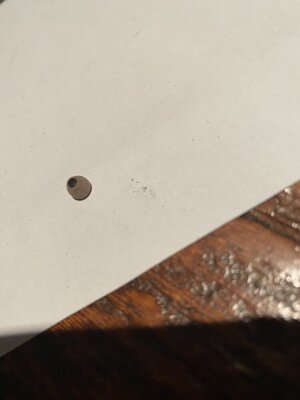
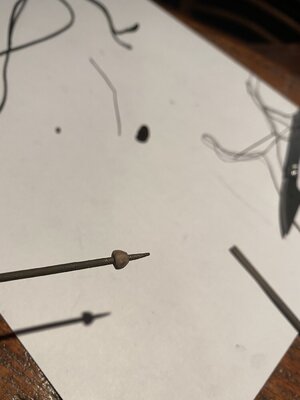
Grants tips- what not to do
Get good thread- I did not have small enough so used cotton. It is too weak and creates explicit language.
Get the base shape correct! In my view one should exaggerate the pear shape on the base more as the weaving changes the shape. It also widens the mouse out of proportion. This May be Grants rookie skill level. (Is my 2nd attempt at a proper mouse- boy probably need 100 to get this right)
The longitudinal thread lines must be odd in number as this creates the basket weave pattern by just going over/under.
Don’t skip a line- pattern changes (I did a couple of times)
Have a good magnifying system(Grants eyes are good but not that good)
Don’t wrap the longitudinal thread tightly as when you get near the top (especially using cotton) it breaks when inserting needle- this is the UGLy. .
.
I couldn’t follow Sasha ( @Alexander74 )steps completely as I served the stay up to the mouse previously and then will serve the balance after the mouse is on. (I did not have it in myself to redo the stay serving as well)I do see Sasha logic and it will be better to follow his advice. Next time Sasha
Never did I think.....attempt 2 and still not pear enough. I’m going to run with this and hopefully as I redo my Mizzen rats nest a mouse will appear more and more tidy. Still way better than how I made them previously.
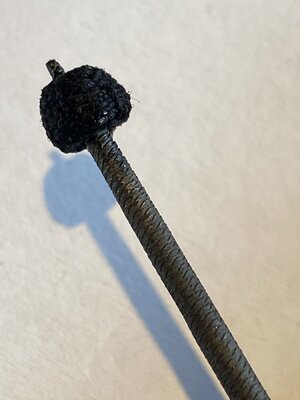
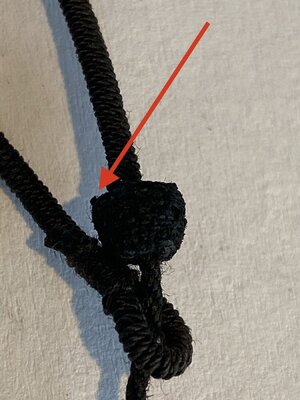
Red arrow where the thread broke.
Some thread fuzz- flame will sort out. My biggest disappointment is the of shape- needs to be more pear shape in my view.
Cheers Grant
The reasonable, bad and ugly.
These things are small. Using Grants maths this mouse to my scale is 3mm long, 3.5 at widest point.( Rounded UP
 ).These will be tiny for the Mizzen top stay for sure.
Shaped using needle file from a 4mm dowel left over.


Grants tips- what not to do

Get good thread- I did not have small enough so used cotton. It is too weak and creates explicit language.
Get the base shape correct! In my view one should exaggerate the pear shape on the base more as the weaving changes the shape. It also widens the mouse out of proportion. This May be Grants rookie skill level. (Is my 2nd attempt at a proper mouse- boy probably need 100 to get this right)
The longitudinal thread lines must be odd in number as this creates the basket weave pattern by just going over/under.
Don’t skip a line- pattern changes (I did a couple of times)
Have a good magnifying system(Grants eyes are good but not that good)
Don’t wrap the longitudinal thread tightly as when you get near the top (especially using cotton) it breaks when inserting needle- this is the UGLy.
 .
.I couldn’t follow Sasha ( @Alexander74 )steps completely as I served the stay up to the mouse previously and then will serve the balance after the mouse is on. (I did not have it in myself to redo the stay serving as well)I do see Sasha logic and it will be better to follow his advice. Next time Sasha

Never did I think.....attempt 2 and still not pear enough. I’m going to run with this and hopefully as I redo my Mizzen rats nest a mouse will appear more and more tidy. Still way better than how I made them previously.


Red arrow where the thread broke.
Some thread fuzz- flame will sort out. My biggest disappointment is the of shape- needs to be more pear shape in my view.
Cheers Grant
Very nice, Grant. You've done a really great job with your Victory so far, very impressive.
Thanks Tobias. Been a fun ride of learning for sure. Interesting hobby this for sureVery nice, Grant. You've done a really great job with your Victory so far, very impressive.
- Joined
- Aug 30, 2020
- Messages
- 676
- Points
- 353

I could look at these images for ages, beautiful,Good morning. Over the past while, when I was “over” rigging my Mizzen I added blocks and shrouds to the main mast. An absolute pleasure doing these with mast not seated. Even made some unusual double blocks for the top mast without calling my Victory any inappropriate namesHere are some pics.
View attachment 314383View attachment 314384View attachment 314385View attachment 314385View attachment 314386View attachment 314387View attachment 314388
I was chuffed that my mast mods worked an everything fitted. Not 100% accurate however a significant improvement from the kit with resources available.
Cheers Grant


