This is excellent work, you write in one of your reports you have glued on Clou, do you mean the sanding primer if yes I would be interested in how strong the bond is and what glue you used? Maybe I also misunderstood -> translation problem.Glued en the first layer of CLOU.
The stern post need to be adjust. Did a new repair on it because I re-done the wing transom.
The pictures
View attachment 363237View attachment 363238View attachment 363239View attachment 363240View attachment 363241View attachment 363242
-

Win a Free Custom Engraved Brass Coin!!!
As a way to introduce our brass coins to the community, we will raffle off a free coin during the month of August. Follow link ABOVE for instructions for entering.
-

PRE-ORDER SHIPS IN SCALE TODAY!
The beloved Ships in Scale Magazine is back and charting a new course for 2026!
Discover new skills, new techniques, and new inspirations in every issue.
NOTE THAT OUR FIRST ISSUE WILL BE JAN/FEB 2026
You are using an out of date browser. It may not display this or other websites correctly.
You should upgrade or use an alternative browser.
You should upgrade or use an alternative browser.
Hohenzollernmodell 1660-1670 Scale 1/75 POF build by Stephan Kertész (Steef66)
- Thread starter Steef66
- Start date
- Watchers 57
-
- Tags
- 1:75 dutch two-decker pof
- Joined
- Aug 8, 2019
- Messages
- 5,569
- Points
- 738

No I sand de Clou down, I think Jimsky or Uwe glued on Clou. I use Pattex White glue.This is excellent work, you write in one of your reports you have glued on Clou, do you mean the sanding primer if yes I would be interested in how strong the bond is and what glue you used? Maybe I also misunderstood -> translation problem.
No I sand de Clou down, I think Jimsky or Uwe glued on Clou. I use Pattex White glue.
 , because I have already made a few attempts and the result was not convincing. Thanks Stephan for your quick reply.
- Joined
- Aug 8, 2019
- Messages
- 5,569
- Points
- 738

In the Dutch forum there was an discussion about the 'Tingel'and how it was mount. I used the program on witsenscheepsbouw.nl and there it is not right clear to see in the building stages how it was done. Luckily Mathias Noback mentioning the right way how it was done.
Here the text how it was mount on the keel
Witse:
"Als de kimmen geboeit zyn , leght men een gat in de plank , en neemt een paffer , de Tingel by de kiel ; men leght de zelve meetende of het binnen en buiten even in t gemeen wat verder van de kiel , als de wydt is ; daar na tekent men met de paffer kiel boven de kiel - gang komt , dit noemt by de kiel langs op de plank wat daar af men het Lok - gat , of Waterlozing , ' t geen moet , neemt dan de plank af , en lynt met aan 7 , op de plaat by V , is te zien ..."
Ab Hoving writes about the ‘tingel’ in his book about “Nicolaes Witsens * Scheeps-Bouw-Konst Open Gestelt”:
Deze ‘tingel’ was in doorsnee driehoekig stuk hout, dat met de scherpe kant van de kiel af, op de kielgang werd bevestigd, zodanig, dat er tussen de kiel en de ‘tingel’ een ruime goot overbleef, waardoorheen het lekwater kon stromen en waarin de onderkanten van de pompen stonden. De bovenkant van de ‘tingel’ kwam zo hoog als de bovenkant van de kiel, zodat de bevestiging van de kielgang aan de buikstukken ook steviger was. De ontstane goot langs de kiel noemde men het ‘lockgat’.
Translate in English:
This 'tingel' was a medium-sized triangular piece of wood, which was attached to the keel gangway with the sharp side facing away from the keel, in such a way that a wide gutter was left between the keel and the 'tingel', through which the leaking water could flow and in which the lower ends of the pumps stood. The top of the 'tingel' came as high as the top of the keel, so that the attachment of the keel gangway to the floor pieces was also more solid. The resulting gutter along the keel was called the 'lockgat'.
I made a drawing to show it
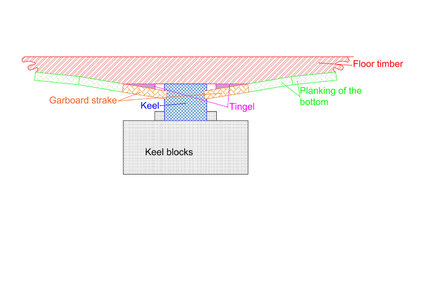
I will look if I can change it, but on the other hand it will no mare visible after the planking. Knowing the right way is almost more important then the building.
Thanks @matthiasnoback
Here the text how it was mount on the keel
Witse:
"Als de kimmen geboeit zyn , leght men een gat in de plank , en neemt een paffer , de Tingel by de kiel ; men leght de zelve meetende of het binnen en buiten even in t gemeen wat verder van de kiel , als de wydt is ; daar na tekent men met de paffer kiel boven de kiel - gang komt , dit noemt by de kiel langs op de plank wat daar af men het Lok - gat , of Waterlozing , ' t geen moet , neemt dan de plank af , en lynt met aan 7 , op de plaat by V , is te zien ..."
Ab Hoving writes about the ‘tingel’ in his book about “Nicolaes Witsens * Scheeps-Bouw-Konst Open Gestelt”:
Deze ‘tingel’ was in doorsnee driehoekig stuk hout, dat met de scherpe kant van de kiel af, op de kielgang werd bevestigd, zodanig, dat er tussen de kiel en de ‘tingel’ een ruime goot overbleef, waardoorheen het lekwater kon stromen en waarin de onderkanten van de pompen stonden. De bovenkant van de ‘tingel’ kwam zo hoog als de bovenkant van de kiel, zodat de bevestiging van de kielgang aan de buikstukken ook steviger was. De ontstane goot langs de kiel noemde men het ‘lockgat’.
Translate in English:
This 'tingel' was a medium-sized triangular piece of wood, which was attached to the keel gangway with the sharp side facing away from the keel, in such a way that a wide gutter was left between the keel and the 'tingel', through which the leaking water could flow and in which the lower ends of the pumps stood. The top of the 'tingel' came as high as the top of the keel, so that the attachment of the keel gangway to the floor pieces was also more solid. The resulting gutter along the keel was called the 'lockgat'.
I made a drawing to show it

I will look if I can change it, but on the other hand it will no mare visible after the planking. Knowing the right way is almost more important then the building.
Thanks @matthiasnoback
Interesting way
I know from the english and french ships, that the floor timber had the full size connected also to the sides of the keelson,
and they cut a rectangle opening / tunnel for the dewatering of the bilge
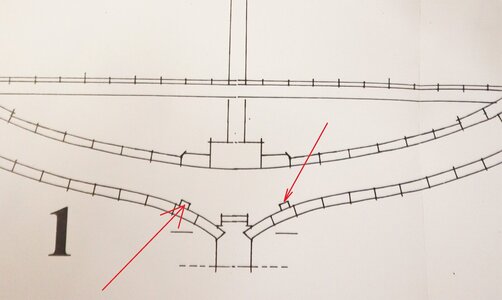
I guess from stability it is more rigged connection between the floor timbers and keel / keelson
I know from the english and french ships, that the floor timber had the full size connected also to the sides of the keelson,
and they cut a rectangle opening / tunnel for the dewatering of the bilge

I guess from stability it is more rigged connection between the floor timbers and keel / keelson
- Joined
- Aug 8, 2019
- Messages
- 5,569
- Points
- 738

@Tobias
Post in thread 'HMS GRANADO - full hull - POF kit by CAF in 1:48 - by Uwe' https://shipsofscale.com/sosforums/...of-kit-by-caf-in-1-48-by-uwe.9488/post-298051
It was @Uwek who used glue on Clou
Post in thread 'HMS GRANADO - full hull - POF kit by CAF in 1:48 - by Uwe' https://shipsofscale.com/sosforums/...of-kit-by-caf-in-1-48-by-uwe.9488/post-298051
It was @Uwek who used glue on Clou
- Joined
- Sep 3, 2021
- Messages
- 5,190
- Points
- 738

More rigid maybe, but definitely more undrainable water between the two frame cutouts.Interesting way
I know from the english and french ships, that the floor timber had the full size connected also to the sides of the keelson,
and they cut a rectangle opening / tunnel for the dewatering of the bilge
View attachment 364368
I guess from stability it is more rigged connection between the floor timbers and keel / keelson
you are right - at this time the space between two frames was open, so much more bilge water was standing in these areas, which was not good for the durabaility of the ship structure.More rigid maybe, but definitely more undrainable water between the two frame cutouts.
With the years the shipwrights filled step by step more and more thes gaps with filling wood. At the end the area next to the keel were completely filled with frame wood and filling wood, so there were only small channels (like shown in my cross section, in which the bilge water water was drained towards the pumps
- Joined
- Sep 3, 2021
- Messages
- 5,190
- Points
- 738

Essentially becoming a variation on the "tingel" solution.you are right - at this time the space between two frames was open, so much more bilge water was standing in these areas, which was not good for the durabaility of the ship structure.
With the years the shipwrights filled step by step more and more thes gaps with filling wood. At the end the area next to the keel were completely filled with frame wood and filling wood, so there were only small channels (like shown in my cross section, in which the bilge water water was drained towards the pumps
- Joined
- Oct 15, 2017
- Messages
- 1,191
- Points
- 443

Every time I read your build log I shake my head with amazement Stephan. This is the first time I've ever seen someone install a garboard strake with no frames or bulkheads in place. Plus, your Frankenstein wood bender is proof of your endless imagination. I'm starting to think you could make a nuclear reactor from parts in someone's garage. 


Please don't give him ideas...Every time I read your build log I shake my head with amazement Stephan. This is the first time I've ever seen someone install a garboard strake with no frames or bulkheads in place. Plus, your Frankenstein wood bender is proof of your endless imagination. I'm starting to think you could make a nuclear reactor from parts in someone's garage.
- Joined
- Aug 8, 2019
- Messages
- 5,569
- Points
- 738

Thanks Ken. I can tell you this is level 10 in planking.Every time I read your build log I shake my head with amazement Stephan. This is the first time I've ever seen someone install a garboard strake with no frames or bulkheads in place. Plus, your Frankenstein wood bender is proof of your endless imagination.
And I like the name Frankenstein woodbender

You know a howtoo YouTube movie?I'm starting to think you could make a nuclear reactor from parts in someone's garage.
- Joined
- Aug 8, 2019
- Messages
- 5,569
- Points
- 738

- Joined
- Aug 8, 2019
- Messages
- 5,569
- Points
- 738

Everybody thanks for the compliments, likes, jokes and visit to my log.
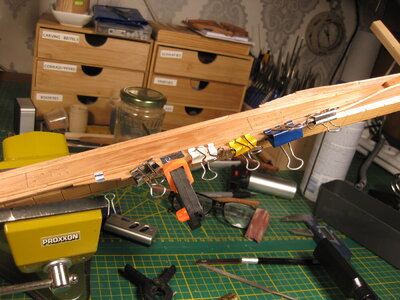
Working on the layer of the planking of the floor. Difficult to shape the curves in the wood and glue it. Good clamps are essential. So I made A few of my own. Need more to make, maybe 4 to come. The wood I use is??? but I can tell you it is hard, so hard you can make a sharp knife of it.
Drying of the glue with the old clamps I have:
Now with the first clamp, wat is a 100% upgrade:
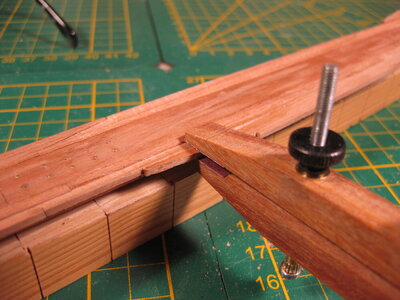
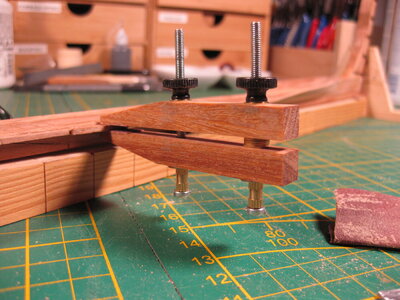
The clamp:
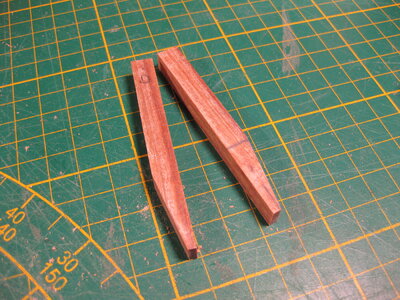
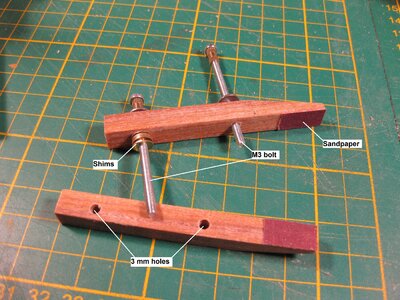
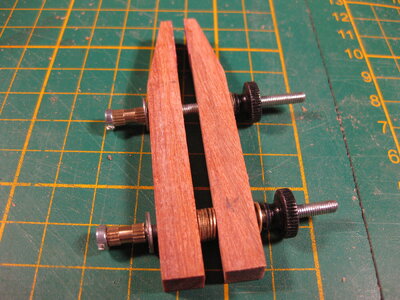
The shims are to even the clamp. Normaly this type of clamp got thread inside the clamp, On this way with only holes in the wood and 2 bolts and nuts I can clamp it without.
And a picture of the first layer of the planks of the floor
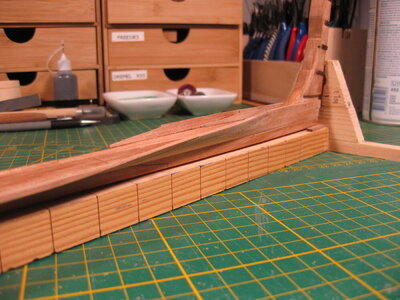
It goes very slow.
Thanks for watching
Working on the layer of the planking of the floor. Difficult to shape the curves in the wood and glue it. Good clamps are essential. So I made A few of my own. Need more to make, maybe 4 to come. The wood I use is??? but I can tell you it is hard, so hard you can make a sharp knife of it.
Drying of the glue with the old clamps I have:

Now with the first clamp, wat is a 100% upgrade:


The clamp:

The shims are to even the clamp. Normaly this type of clamp got thread inside the clamp, On this way with only holes in the wood and 2 bolts and nuts I can clamp it without.


And a picture of the first layer of the planks of the floor

It goes very slow.
Thanks for watching
This is high-school nerve wrecking planking, Stephan. With very useful clamps.Everybody thanks for the compliments, likes, jokes and visit to my log.
Working on the layer of the planking of the floor. Difficult to shape the curves in the wood and glue it. Good clamps are essential. So I made A few of my own. Need more to make, maybe 4 to come. The wood I use is??? but I can tell you it is hard, so hard you can make a sharp knife of it.
Drying of the glue with the old clamps I have:
View attachment 364754
Now with the first clamp, wat is a 100% upgrade:
View attachment 364755
View attachment 364757
The clamp:
View attachment 364758
The shims are to even the clamp. Normaly this type of clamp got thread inside the clamp, On this way with only holes in the wood and 2 bolts and nuts I can clamp it without.
View attachment 364759
View attachment 364760
And a picture of the first layer of the planks of the floor
View attachment 364756
It goes very slow.
Thanks for watching
Regard, Peter
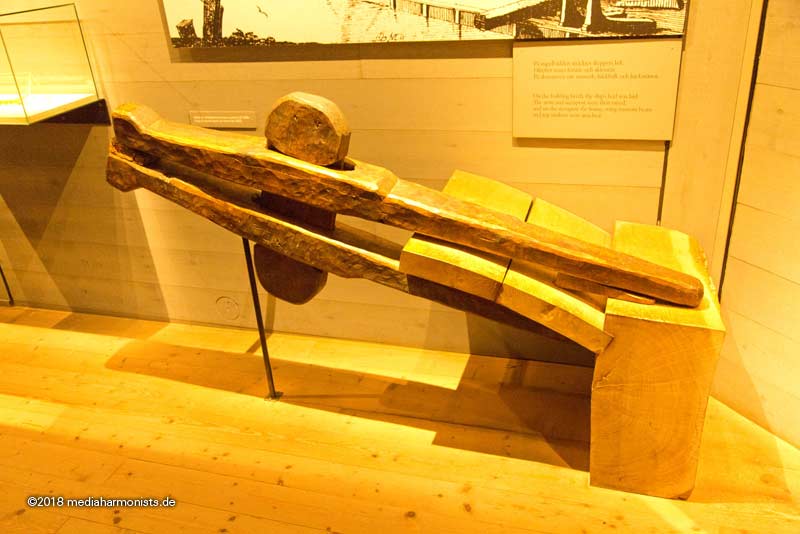
Your new clamp as used on the Vasa...Everybody thanks for the compliments, likes, jokes and visit to my log.
Working on the layer of the planking of the floor. Difficult to shape the curves in the wood and glue it. Good clamps are essential. So I made A few of my own. Need more to make, maybe 4 to come. The wood I use is??? but I can tell you it is hard, so hard you can make a sharp knife of it.
Drying of the glue with the old clamps I have:
View attachment 364754
Now with the first clamp, wat is a 100% upgrade:
View attachment 364755
View attachment 364757
The clamp:
View attachment 364758
The shims are to even the clamp. Normaly this type of clamp got thread inside the clamp, On this way with only holes in the wood and 2 bolts and nuts I can clamp it without.
View attachment 364759
View attachment 364760
And a picture of the first layer of the planks of the floor
View attachment 364756
It goes very slow.
Thanks for watching
- Joined
- Aug 8, 2019
- Messages
- 5,569
- Points
- 738

This is high-school nerve wrecking planking, Stephan. With very useful clamps.
Regard, Peter
Thanks guys, yes they where used in the old days. In Dutch the name is 'boeitangen' I will find the English name.Your new clamp as used on the Vasa...
- Joined
- Aug 8, 2019
- Messages
- 5,569
- Points
- 738

I found a link to the part of Nicolaes Witsen book where he explains how the hull was build by the Dutch. In English and free to download.
LINK
Boeitangen are called in English 'boei'clamp There is again no specific English word.
The method I use is the shell first method, in Dutch 'schaalbouw' or 'Zaanse bouwwijze'
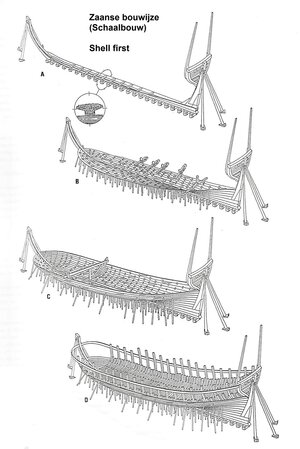
It seems to be a very difficult methode to use in model building. And I will therefore also include a few cut-outs from the earlier line plan I made in AutoCAD . I will keep these as a template every now and then along the planks to see if I am still in the right direction. A builder used to do this out of his experience and knowledge. I don't have that. I hope this will work out for me. In any case, it is very instructive to understand these methods of building. And taking you along in my adventure.
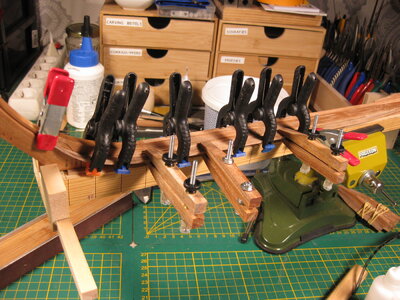
The first layer of the floor planking is on one side ready, the glue needs to dry but the planks are in place. I sock the wood in water and form them with my 'Frankenstein-woodbender' to the right form. Such that when I glue the board there is no tension on the board.
Thanks for visiting
LINK
Boeitangen are called in English 'boei'clamp There is again no specific English word.
The method I use is the shell first method, in Dutch 'schaalbouw' or 'Zaanse bouwwijze'

It seems to be a very difficult methode to use in model building. And I will therefore also include a few cut-outs from the earlier line plan I made in AutoCAD . I will keep these as a template every now and then along the planks to see if I am still in the right direction. A builder used to do this out of his experience and knowledge. I don't have that. I hope this will work out for me. In any case, it is very instructive to understand these methods of building. And taking you along in my adventure.
The first layer of the floor planking is on one side ready, the glue needs to dry but the planks are in place. I sock the wood in water and form them with my 'Frankenstein-woodbender' to the right form. Such that when I glue the board there is no tension on the board.

Thanks for visiting
- Joined
- Aug 8, 2019
- Messages
- 5,569
- Points
- 738

I hope to learn you something about building a Dutch ship. The Vasa is build like this and that is noticed on the way the hull planks are ordened. Better say not ordened.Ahhhhh, I'm learning new things. I was not aware that Dutch ships were constructed by laying some courses of hull planks then followed by floor timbers.I love this site!


