
Great details on the interior Jan, add s a lot to the kit.

-

SUBSCRIBE TO SHIPS IN SCALE TODAY!
The beloved Ships in Scale Magazine is back and charting a new course for 2026!
Discover new skills, new techniques, and new inspirations in every issue.
NOTE THAT OUR NEXT ISSUE WILL BE MARCH/APRIL 2026 -

Win a Free Custom Engraved Brass Coin!!!
As a way to introduce our brass coins to the community, we will raffle off a free coin during the month of August. Follow link ABOVE for instructions for entering.
You are using an out of date browser. It may not display this or other websites correctly.
You should upgrade or use an alternative browser.
You should upgrade or use an alternative browser.
Kolderstok. Fluyt in oak
- Thread starter janzwart
- Start date
- Watchers 29
-
- Tags
- fluit kolderstok
- Joined
- Apr 10, 2020
- Messages
- 146
- Points
- 213

Update 14
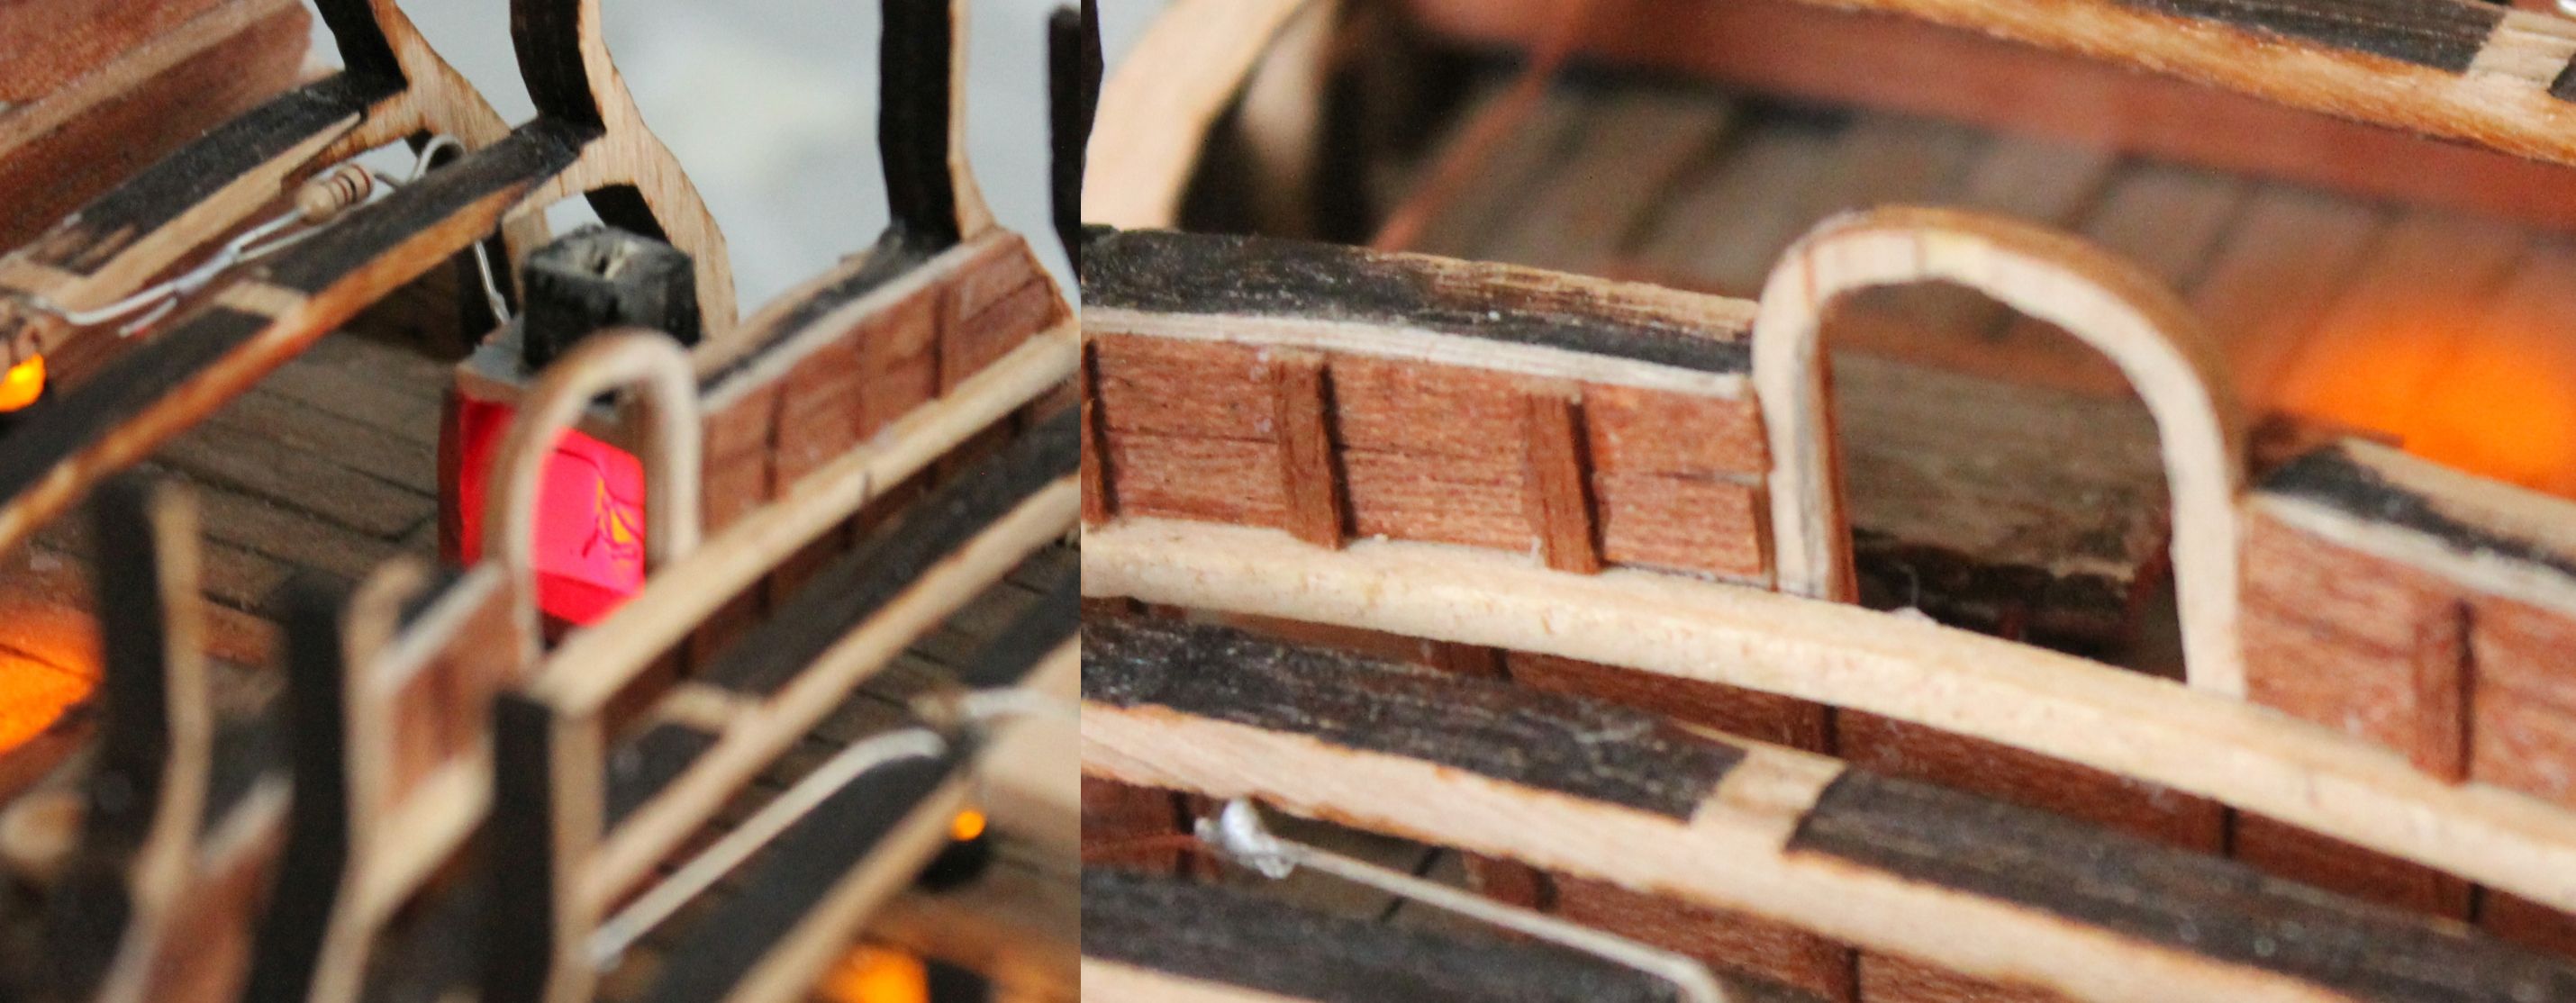
The next job is to fit the trusses above the orlopdeck. But this deck is also somewhat visible, so various things will be fitted. At least lighting, and that needs wiring. And lighting needs testing.
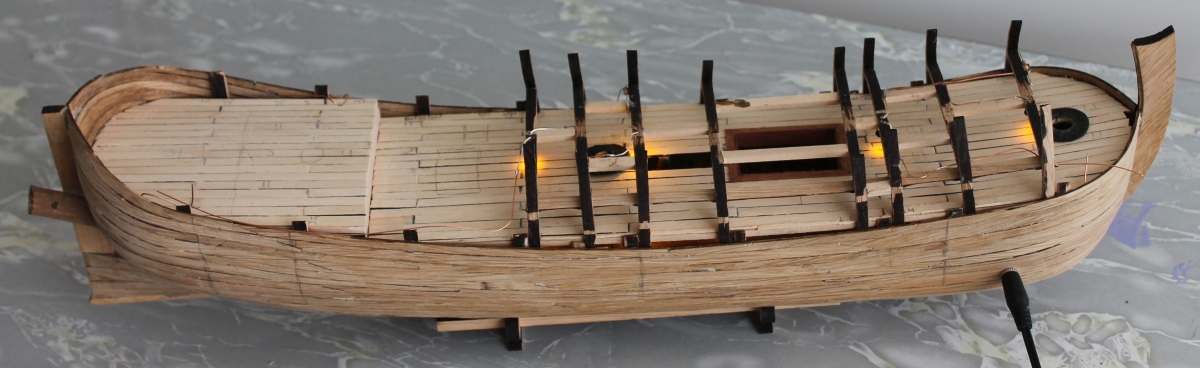
Everything works, so we can move on.
Before applying the wiring, I haven't fixed the deck beams to the model yet. It's easier to apply that when you can reach everywhere. Therefore, I secured the deck beams together with longitudinal beams so the whole thing can still come off. In doing so, I obviously took into account the hatches in the deck. No beam can run under those, of course. I therefore also had to adjust the location of the trusses slightly. I suspect that can't do any harm because the ship's sides run parallel there.
At one point I realised that when the side is cut out that then the trusses for the opening are gone and so the deck beams no longer have any support. Those will then be floating on the deck planks. Does not seem desirable to me. So I glued an oak batten under the deck beams as far as possible on the outside. On both sides outside the opening still under two beams. Hopefully this will give sufficient support.
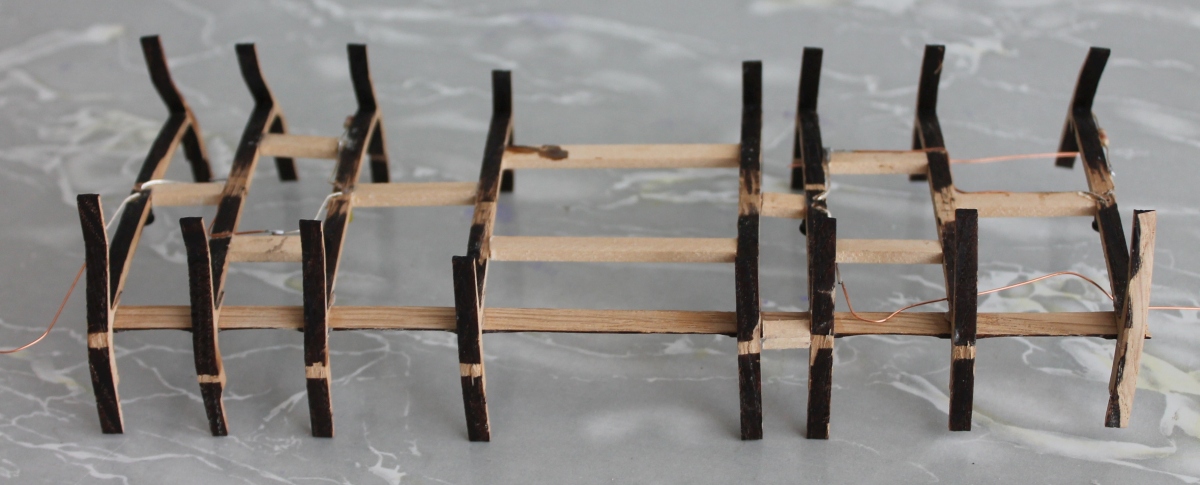
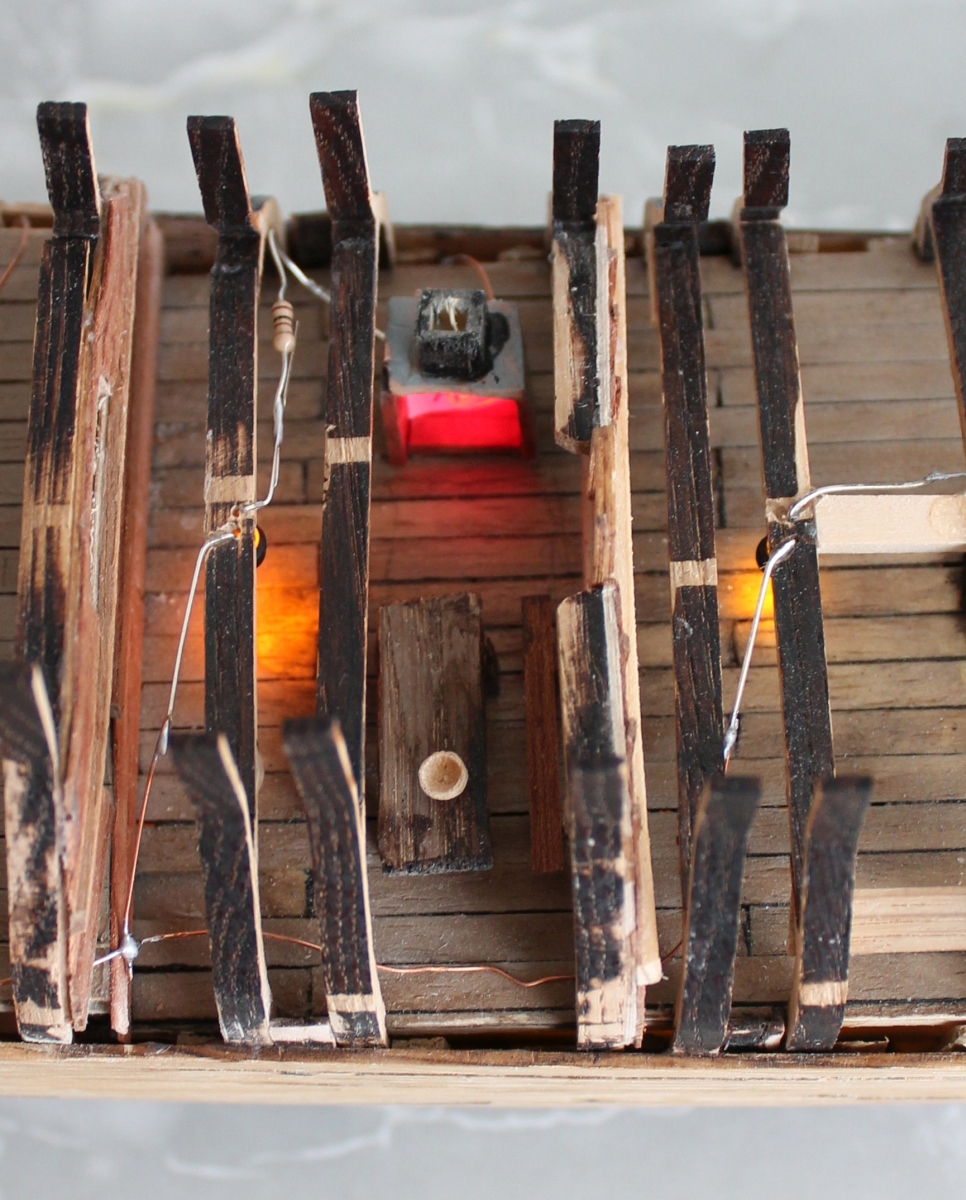
At these trusses, so detached from the model it is easier to fit the wiring for the LEDs, keeping in mind the sightlines, so they stay out of view as much as possible.
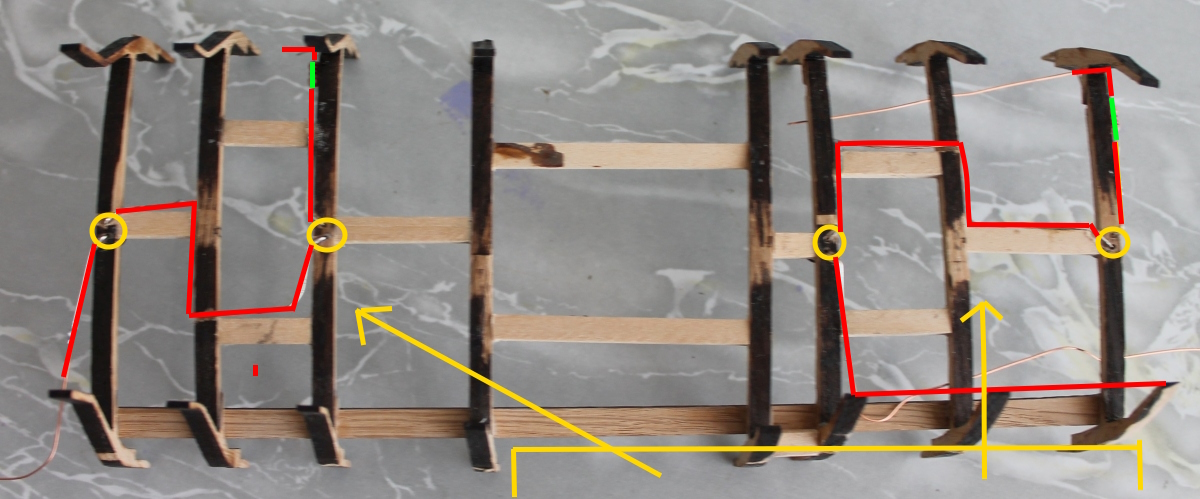
Here you can see the wiring in red. Yellow circles are the LEDs, Green are the resistors. The yellow line at the bottom is the location of the opening with the yellow arrows as sight lines. So you should not see any wiring through the sight lines.
Furthermore, the crew quarters are located on this deck. To indicate that, I am going to hang a couple of hammocks. It is also easier this way.
The space between deck and higher deck is only 18 mm here. So 18 x 72 = 130 cm. Enough to lie in your hammock.
To be continued
The next job is to fit the trusses above the orlopdeck. But this deck is also somewhat visible, so various things will be fitted. At least lighting, and that needs wiring. And lighting needs testing.
Everything works, so we can move on.
Before applying the wiring, I haven't fixed the deck beams to the model yet. It's easier to apply that when you can reach everywhere. Therefore, I secured the deck beams together with longitudinal beams so the whole thing can still come off. In doing so, I obviously took into account the hatches in the deck. No beam can run under those, of course. I therefore also had to adjust the location of the trusses slightly. I suspect that can't do any harm because the ship's sides run parallel there.
At one point I realised that when the side is cut out that then the trusses for the opening are gone and so the deck beams no longer have any support. Those will then be floating on the deck planks. Does not seem desirable to me. So I glued an oak batten under the deck beams as far as possible on the outside. On both sides outside the opening still under two beams. Hopefully this will give sufficient support.
At these trusses, so detached from the model it is easier to fit the wiring for the LEDs, keeping in mind the sightlines, so they stay out of view as much as possible.
Here you can see the wiring in red. Yellow circles are the LEDs, Green are the resistors. The yellow line at the bottom is the location of the opening with the yellow arrows as sight lines. So you should not see any wiring through the sight lines.
Furthermore, the crew quarters are located on this deck. To indicate that, I am going to hang a couple of hammocks. It is also easier this way.
The space between deck and higher deck is only 18 mm here. So 18 x 72 = 130 cm. Enough to lie in your hammock.
To be continued
Last edited:
- Joined
- Apr 10, 2020
- Messages
- 146
- Points
- 213
Update 15
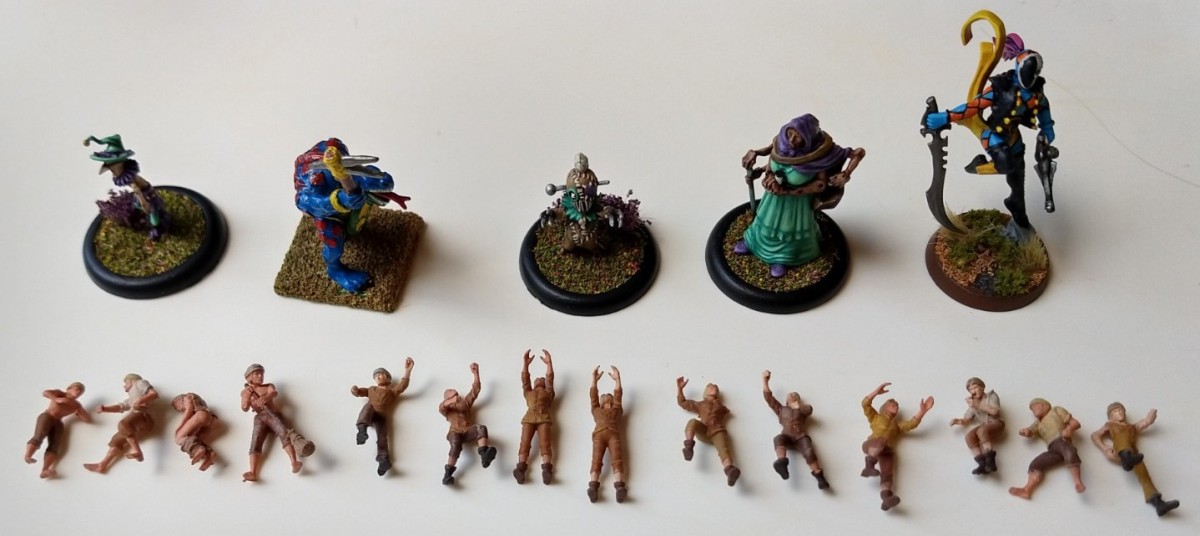
Last week, my youngest grandson turned 1. My daughter once left for Wales for the beautiful scenery and "stuck" there. So we had to go to Wales to celebrate. However, my son-in-law is an artist at painting fantasy and science-fiction figures. A few weeks ago, I sent him my figurines with a request to paint them. These figurines were very willingly printed by Bert Mogelin at my request and in the desired position and size. See also Mogelin.nl.
Thanks again Bert.
And so I was able to celebrate the birthday and also collect my figurines.
Among other things, the following works of art were assembled (about 6 parts) and painted by him.
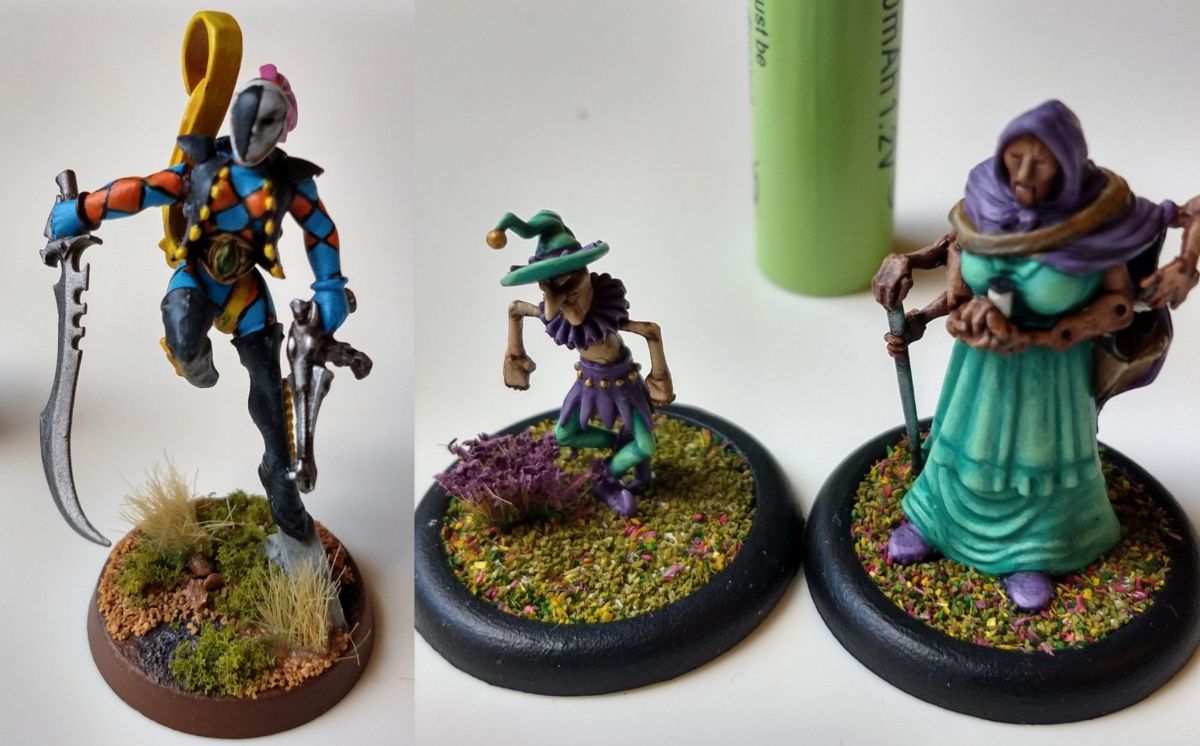
All my figurines and a few of his together:
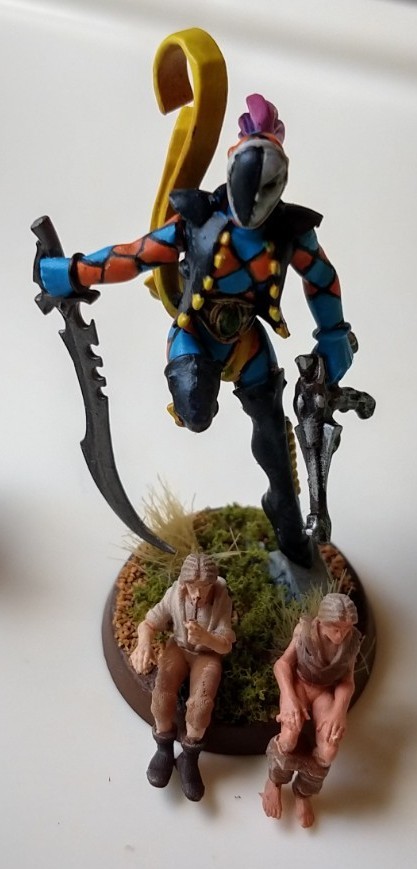
Two seated figurines. If they knew what was behind them they didn't sit so quietly.
On the model, I want to depict daily life on board as well as possible. Daily life takes place on the deck directly above the hold. The deck there is 18 mm high so 1.30 m. Similar to the low deck on the Batavia in Batavialand. (Leliestad)
So not very comfortable, but enough to hang a hammock and climb in it.
Or to have something to eat at a table.
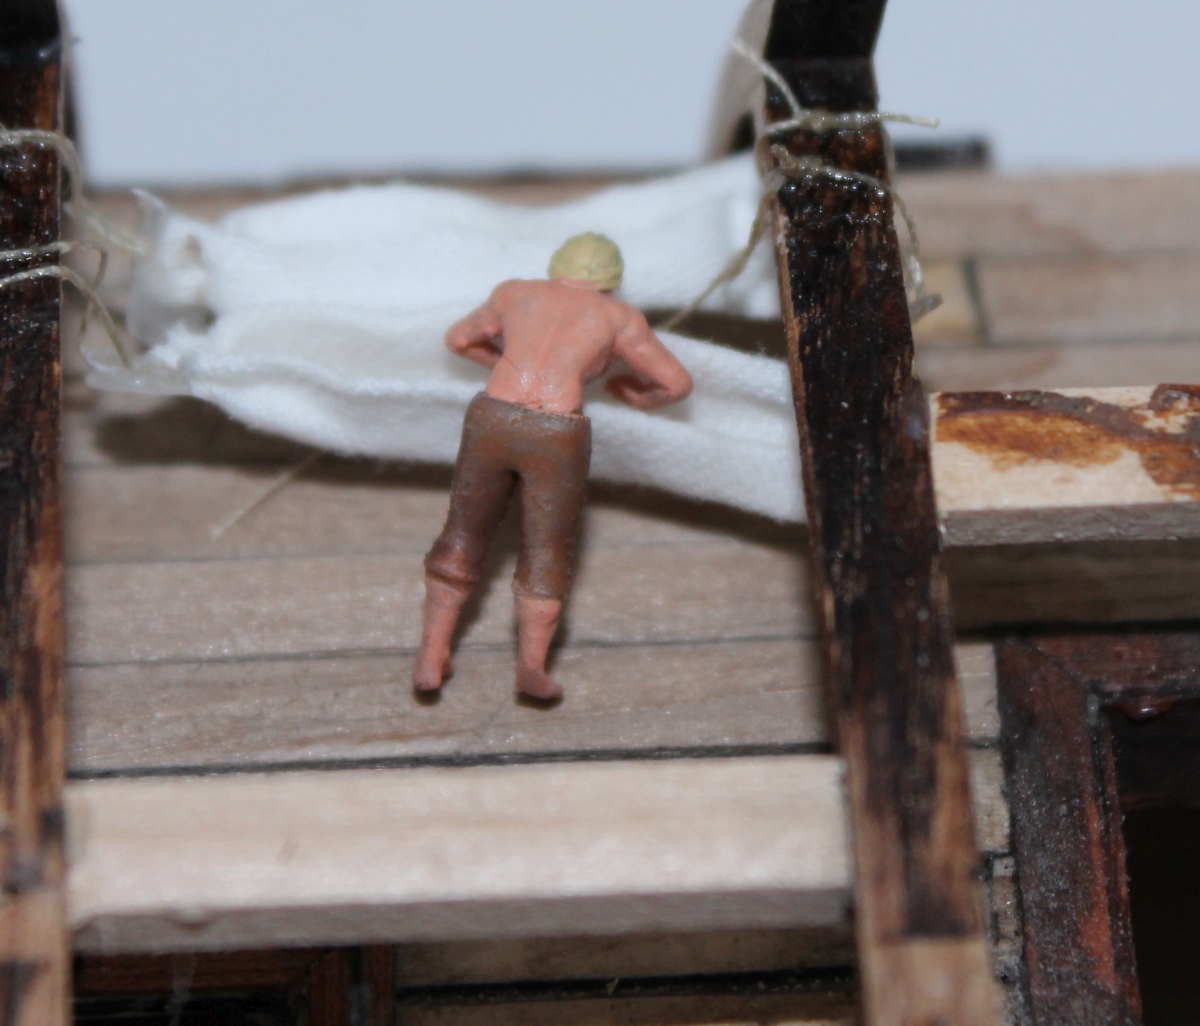
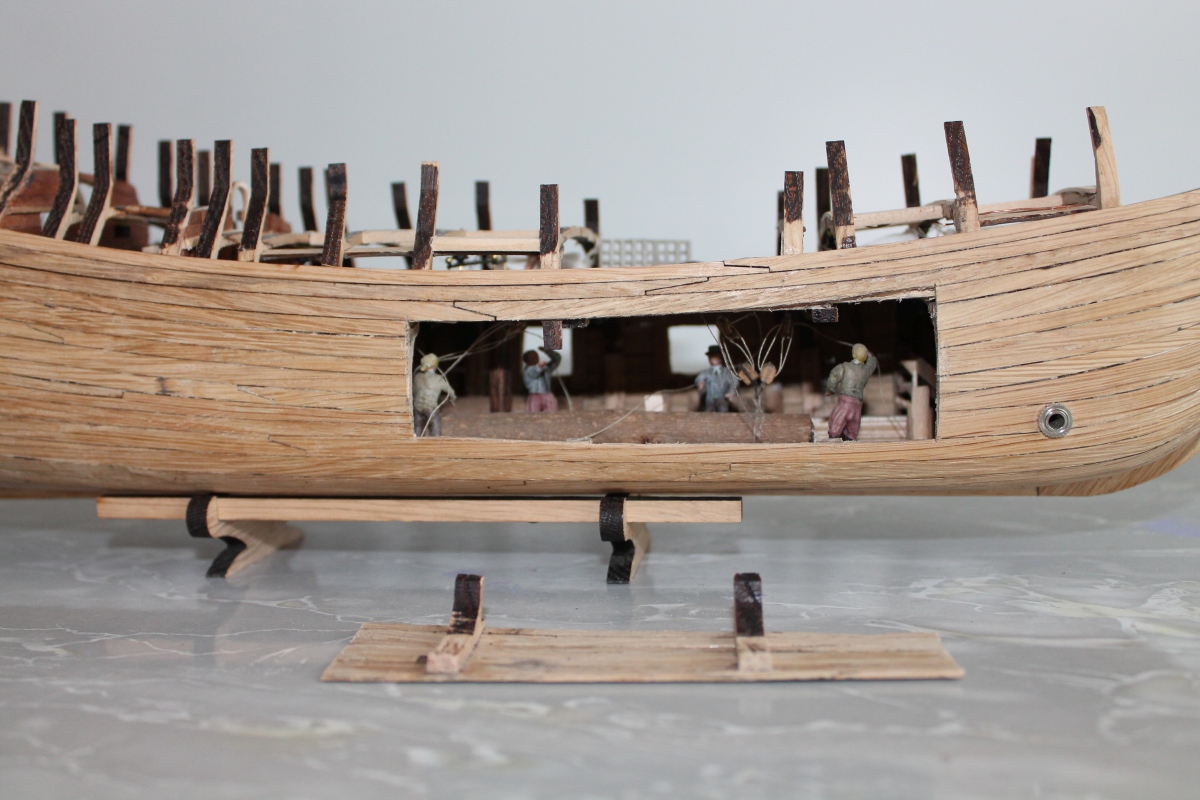
One of the activities on board is visiting the loo. Or the loo or convenience, whatever you call it. The model does not have a galleon so there is nothing there. Therefore, I suppose some kind of convenience was present with a bucket to be emptied regularly. A figure is printed in a seated position with his trousers on his heels and sitting at ease.
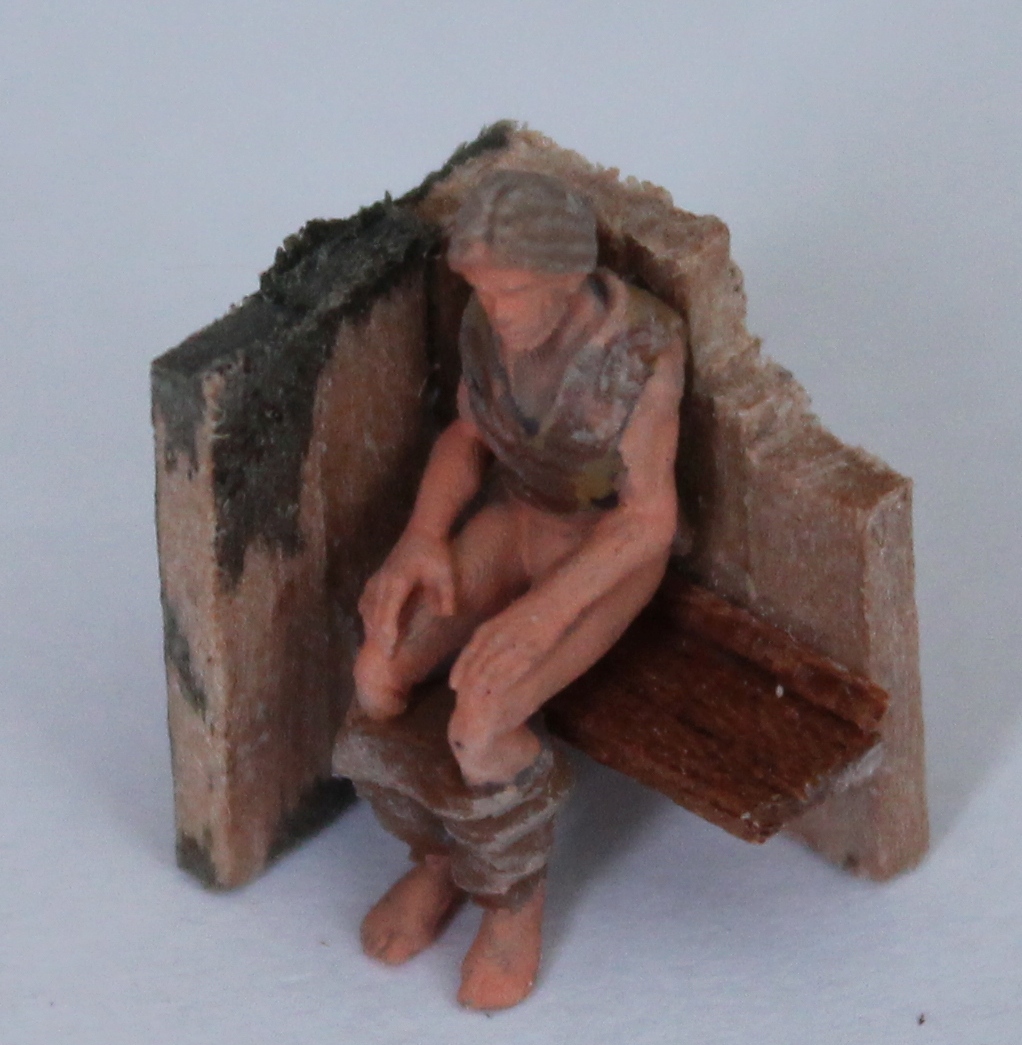
One corner on that deck I want to screen off a bit for convenience where then the figure would sit with his trousers on his heels. That will be tricky for a while because the figure is 18mm high. So he is sitting with his head against the deck, but also behind a deck beam. So I need to come up with something for that.
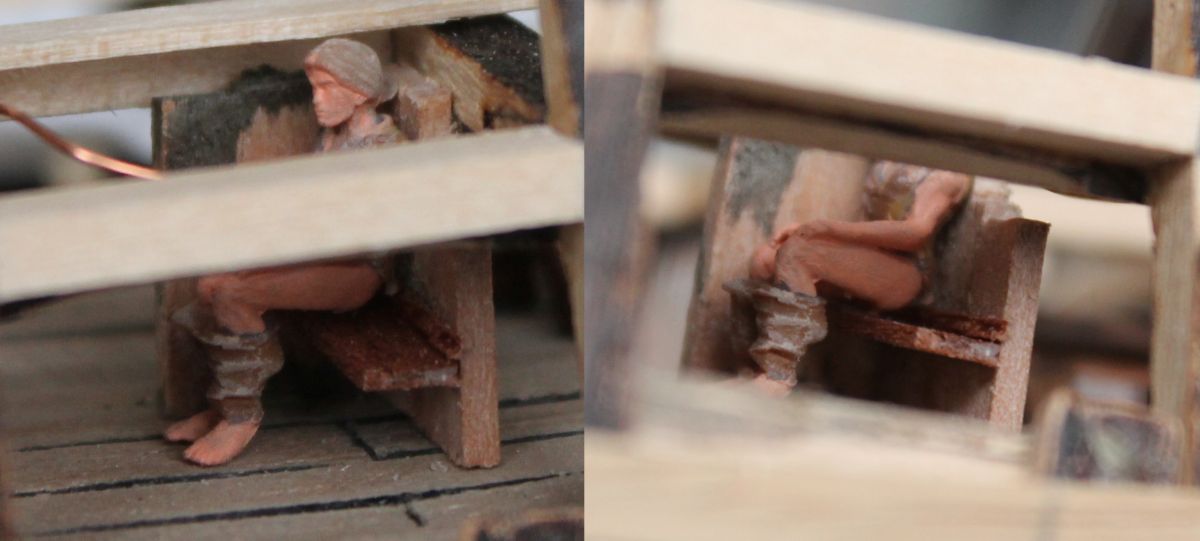
Left: Seen from above through the deck, which isn't there yet, and right seen through the side opening with a deck beam in sight. I might remove that deck beam there as soon as I can.
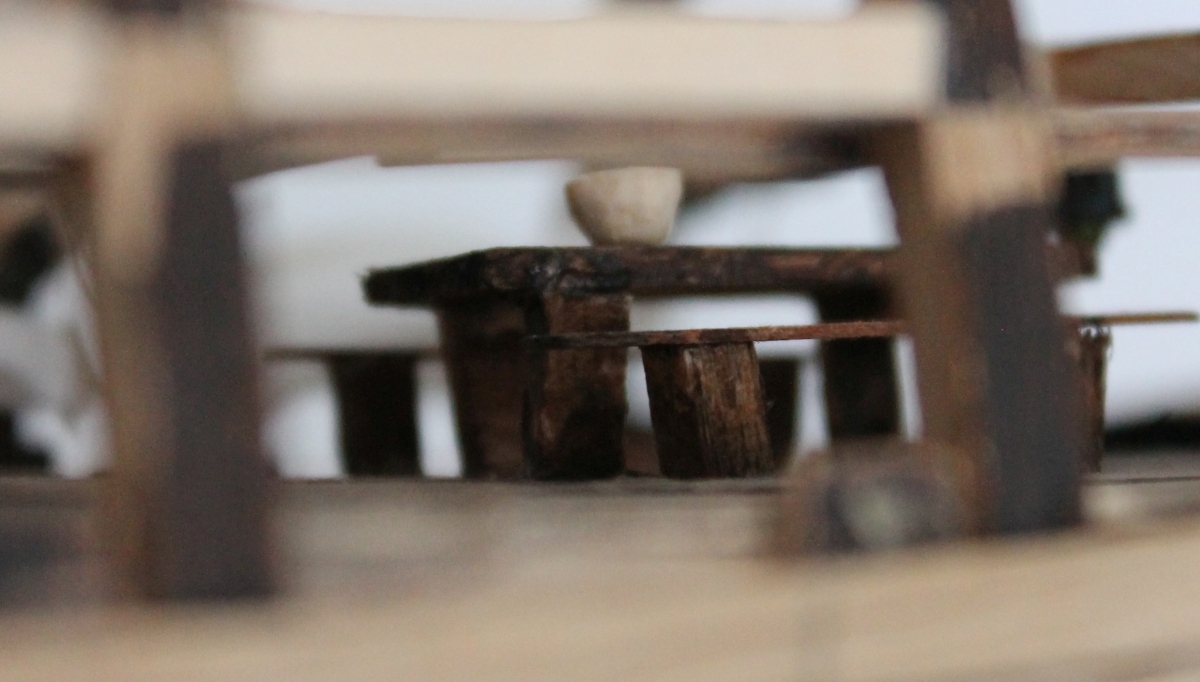
Furthermore, I have another seated figure that is supposed to represent the captain. He sits in the cabin behind a table with a map and some more furniture.
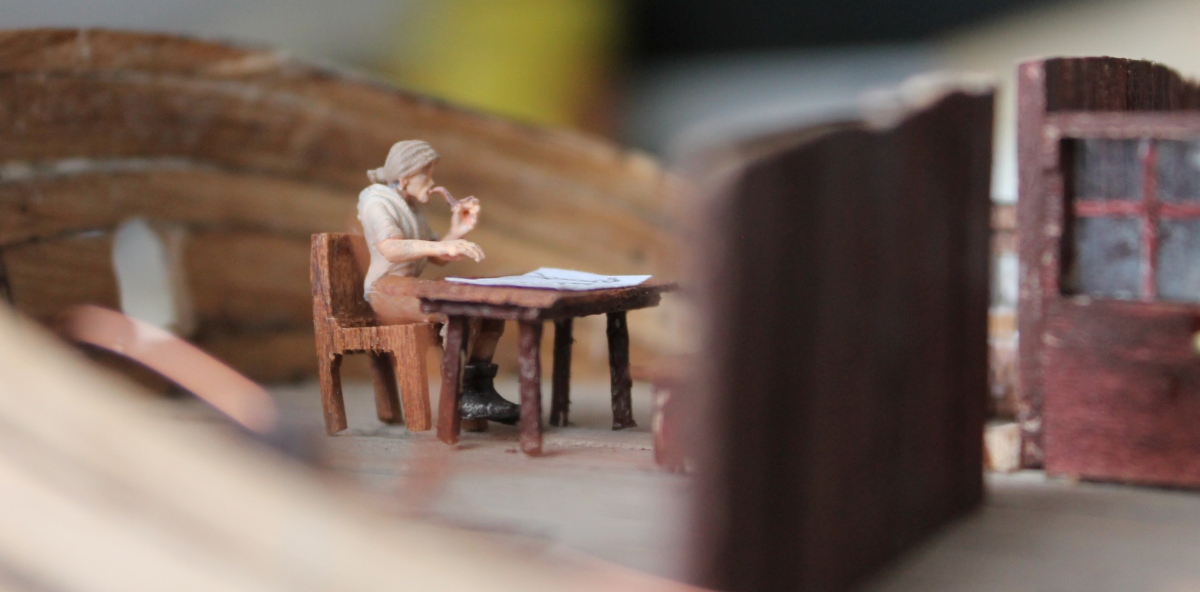
Here well seen from above and below from the side as seen through the side opening.
Here you can also see the open door to the cabin on the right and the cabin window can be seen on the left.
I can't put these figures in until the trusses are also in place, then I can align the figures on them.
And right in front of the cabin there will be two men operating the tiller with hoists. All visible through the rear opening. The other figures are to brighten up the deck.
To be continued
Last week, my youngest grandson turned 1. My daughter once left for Wales for the beautiful scenery and "stuck" there. So we had to go to Wales to celebrate. However, my son-in-law is an artist at painting fantasy and science-fiction figures. A few weeks ago, I sent him my figurines with a request to paint them. These figurines were very willingly printed by Bert Mogelin at my request and in the desired position and size. See also Mogelin.nl.
Thanks again Bert.
And so I was able to celebrate the birthday and also collect my figurines.
Among other things, the following works of art were assembled (about 6 parts) and painted by him.
All my figurines and a few of his together:
Two seated figurines. If they knew what was behind them they didn't sit so quietly.
On the model, I want to depict daily life on board as well as possible. Daily life takes place on the deck directly above the hold. The deck there is 18 mm high so 1.30 m. Similar to the low deck on the Batavia in Batavialand. (Leliestad)
So not very comfortable, but enough to hang a hammock and climb in it.
Or to have something to eat at a table.
One of the activities on board is visiting the loo. Or the loo or convenience, whatever you call it. The model does not have a galleon so there is nothing there. Therefore, I suppose some kind of convenience was present with a bucket to be emptied regularly. A figure is printed in a seated position with his trousers on his heels and sitting at ease.
One corner on that deck I want to screen off a bit for convenience where then the figure would sit with his trousers on his heels. That will be tricky for a while because the figure is 18mm high. So he is sitting with his head against the deck, but also behind a deck beam. So I need to come up with something for that.
Left: Seen from above through the deck, which isn't there yet, and right seen through the side opening with a deck beam in sight. I might remove that deck beam there as soon as I can.
Furthermore, I have another seated figure that is supposed to represent the captain. He sits in the cabin behind a table with a map and some more furniture.
Here well seen from above and below from the side as seen through the side opening.
Here you can also see the open door to the cabin on the right and the cabin window can be seen on the left.
I can't put these figures in until the trusses are also in place, then I can align the figures on them.
And right in front of the cabin there will be two men operating the tiller with hoists. All visible through the rear opening. The other figures are to brighten up the deck.
To be continued
Last edited:
- Joined
- Apr 20, 2020
- Messages
- 6,415
- Points
- 738

wonderful work, well doneUpdate 15
Last week, my youngest grandson turned 1. My daughter once left for Wales for the beautiful scenery and "stuck" there. So we had to go to Wales to celebrate. However, my son-in-law is an artist at painting fantasy and science-fiction figures. A few weeks ago, I sent him my figurines with a request to paint them. These figurines were very willingly printed by Bert Mogelin at my request and in the desired position and size. See also Mogelin.nl.
Thanks again Bert.
And so I was able to celebrate the birthday and also collect my figurines.
Among other things, the following works of art were assembled (about 6 parts) and painted by him.

All my figurines and a few of his together:


Two seated figurines. If they knew what was behind them they didn't sit so quietly.
On the model, I want to depict daily life on board as well as possible. Daily life takes place on the deck directly above the hold. The deck there is 18 mm high so 1.30 m. Similar to the low deck on the Batavia in Batavialand. (Leliestad)
So not very comfortable, but enough to hang a hammock and climb in it.

Or to have something to eat at a table.

One of the activities on board is visiting the loo. Or the loo or convenience, whatever you call it. The model does not have a galleon so there is nothing there. Therefore, I suppose some kind of convenience was present with a bucket to be emptied regularly. A figure is printed in a seated position with his trousers on his heels and sitting at ease.

One corner on that deck I want to screen off a bit for convenience where then the figure would sit with his trousers on his heels. That will be tricky for a while because the figure is 18mm high. So he is sitting with his head against the deck, but also behind a deck beam. So I need to come up with something for that.

Left: Seen from above through the deck, which isn't there yet, and right seen through the side opening with a deck beam in sight. I might remove that deck beam there as soon as I can.
Furthermore, I have another seated figure that is supposed to represent the captain. He sits in the cabin behind a table with a map and some more furniture.

Here well seen from above and below from the side as seen through the side opening.

Here you can also see the open door to the cabin on the right and the cabin window can be seen on the left.
I can't put these figures in until the trusses are also in place, then I can align the figures on them.
And right in front of the cabin there will be two men operating the tiller with hoists. All visible through the rear opening. The other figures are to brighten up the deck.
To be continued

Hi Jan, the figurines look great. Hope to see your model in Amsterdam on the 30st of September.
PS on some fluyt wrecks the loo was found in the rear corner of the great stern cabin with a pipe outside. Actually on the fluit I am building this was not found "yet" so maybe here a bucket "the 17th century porta potti" was used.
PS on some fluyt wrecks the loo was found in the rear corner of the great stern cabin with a pipe outside. Actually on the fluit I am building this was not found "yet" so maybe here a bucket "the 17th century porta potti" was used.
From research work of Swedish archeologist Niklas Eriksson it seems that on the smaller Fluyt schepen the complete crew was housed in the great cabin and galley in front of it and the small cabin on the upper deck.Maarten, It will certainly be present on the 30th.
I didn't know where the loo was in absence of a galjoen. So I choose a position visible.
Was it a closed cabin in the captains cabin or just an open bank. That is not very plesant.
On some of the wrecks he investigated the loo was located in the great cabin I don t know if this was in a separate enclosed space but back in the 17th century it was quite normal this was just in plain sight. From the French king Louis the 14th it was even known that his toilet visits were publicly accesible for high ranking people. To us 400 years later unthinkable.
I will look in my files if I can find the part about the toilets on the fluyt schepen.
- Joined
- Apr 10, 2020
- Messages
- 146
- Points
- 213
Update 16
Following update 15, Maarten gave me this comment:
From research work of Swedish archaeologist Niklas Eriksson it seems that on the smaller Fluyt ships the complete crew was housed in the great cabin and galley in front of it and the small cabin on the upper deck.
On some of the wrecks he investigated the loo was located in the great cabin I don t know if this was in a separate enclosed space but back in the 17th century it was quite normal this was just in plain sight. From the French king Louis the 14th it was even known that his toilet visits were publicly accesible for high ranking people. To us 400 years later unthinkable.
I will look in my files if I can find the part about the toilets on the fluyt ships.
Research by Swedish archaeologist Niklas Eriksson shows that on the smaller Fluyt ships, the entire crew was housed in the large cabin with galley in front and the small cabin on the upper deck.
I don't know if the loo was in a separate enclosed space within the cabin, but in the 17th century it was quite normal for this to just be in plain sight. French king Louis the 14th was even known to have his toilet visits publicly accessible to high-ranking people. Unthinkable for us 400 years later.
This did make me think whether I am doing it right here. That's why I only let the hammocks hang, for which a height of 1.6m is not such an objection. This is a pretty big flute (almost 34m). Or 113 feet, 160 load and 20 eaters. (According to tables from "The Flute Ship" by Andre Wegener Sleeswijk.
And 20 men living in the cabin is a bit much anyway so possibly hammocks in the low room anyway.
Then on the bit of deck in front there won't be much to see and possibly I'll leave that closed. I can decide later.
Then to mention a bit of progress.
I made a galley with a red fire in it.
And in front of the galley is a table with two benches. A more logical place. On the model, this remains visible because of the door in front of it.
In the little round arch will later come an open door. Looking to portside you can see the galley and to starboard you can see the table where another man will sit. Next to the door, the bulkhead is already in place.
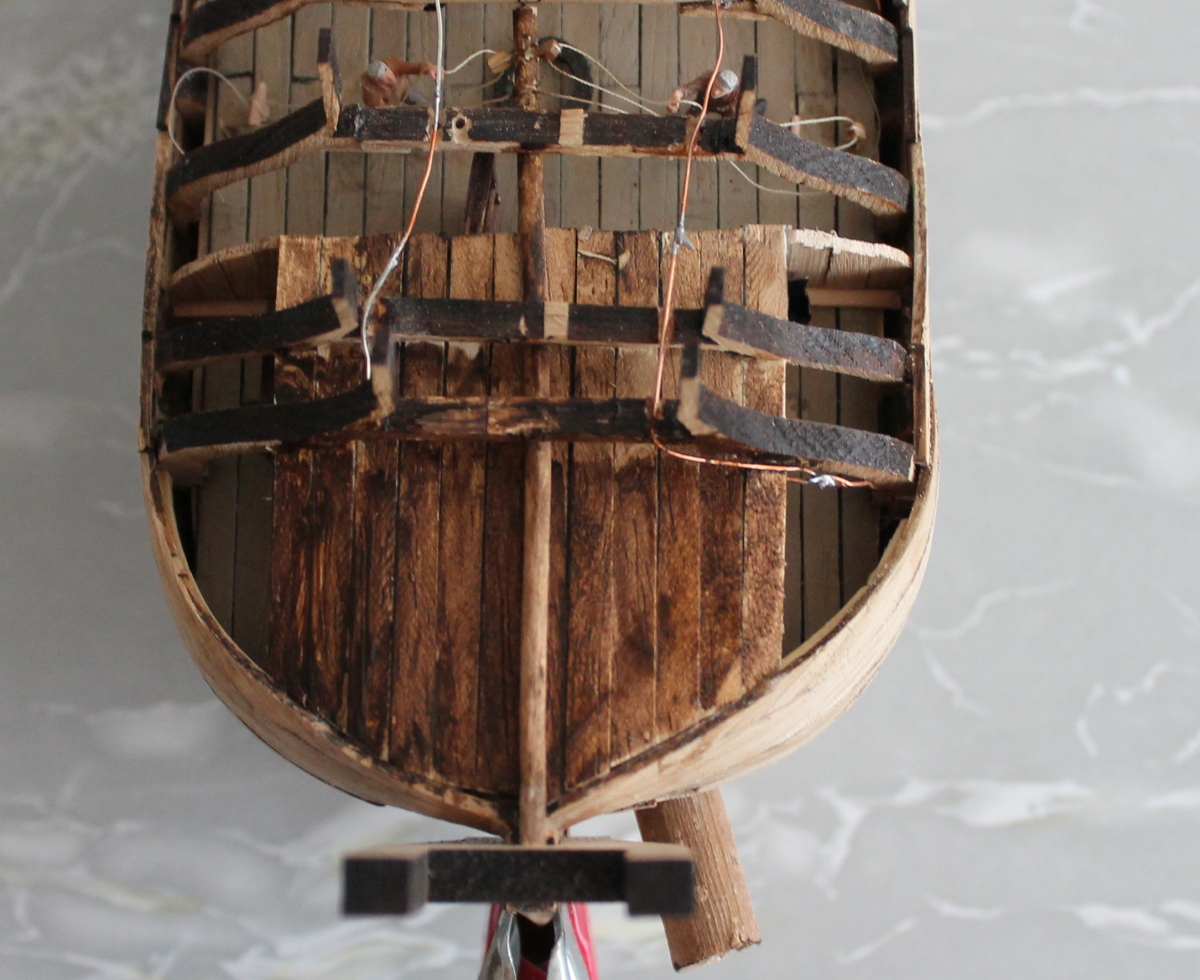
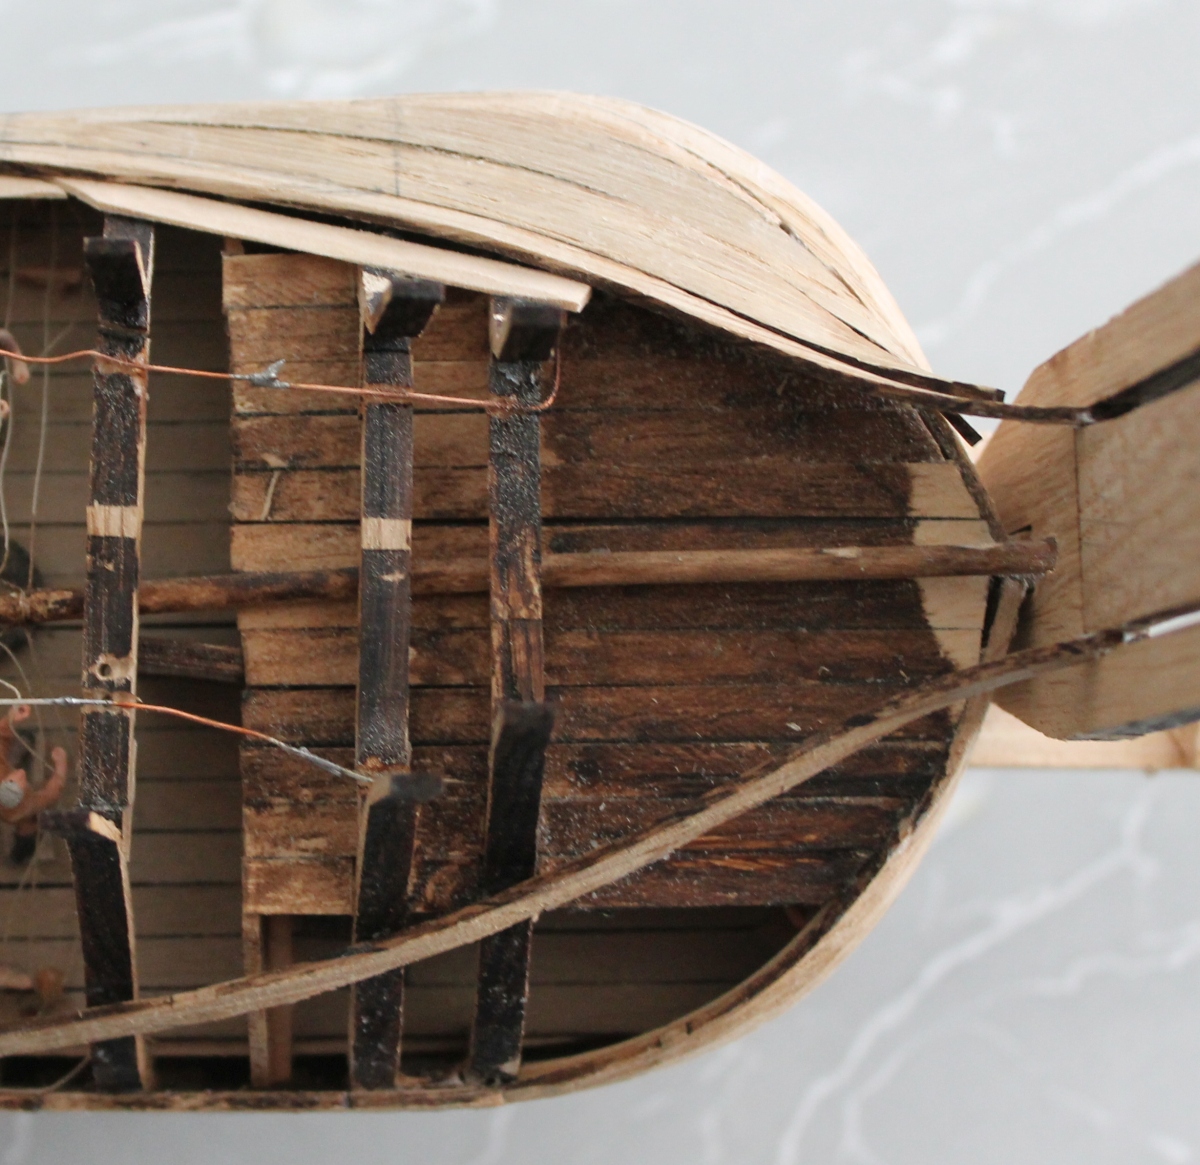
According to the manual, this is the time to determine the height of the aft struts and correct them if necessary.
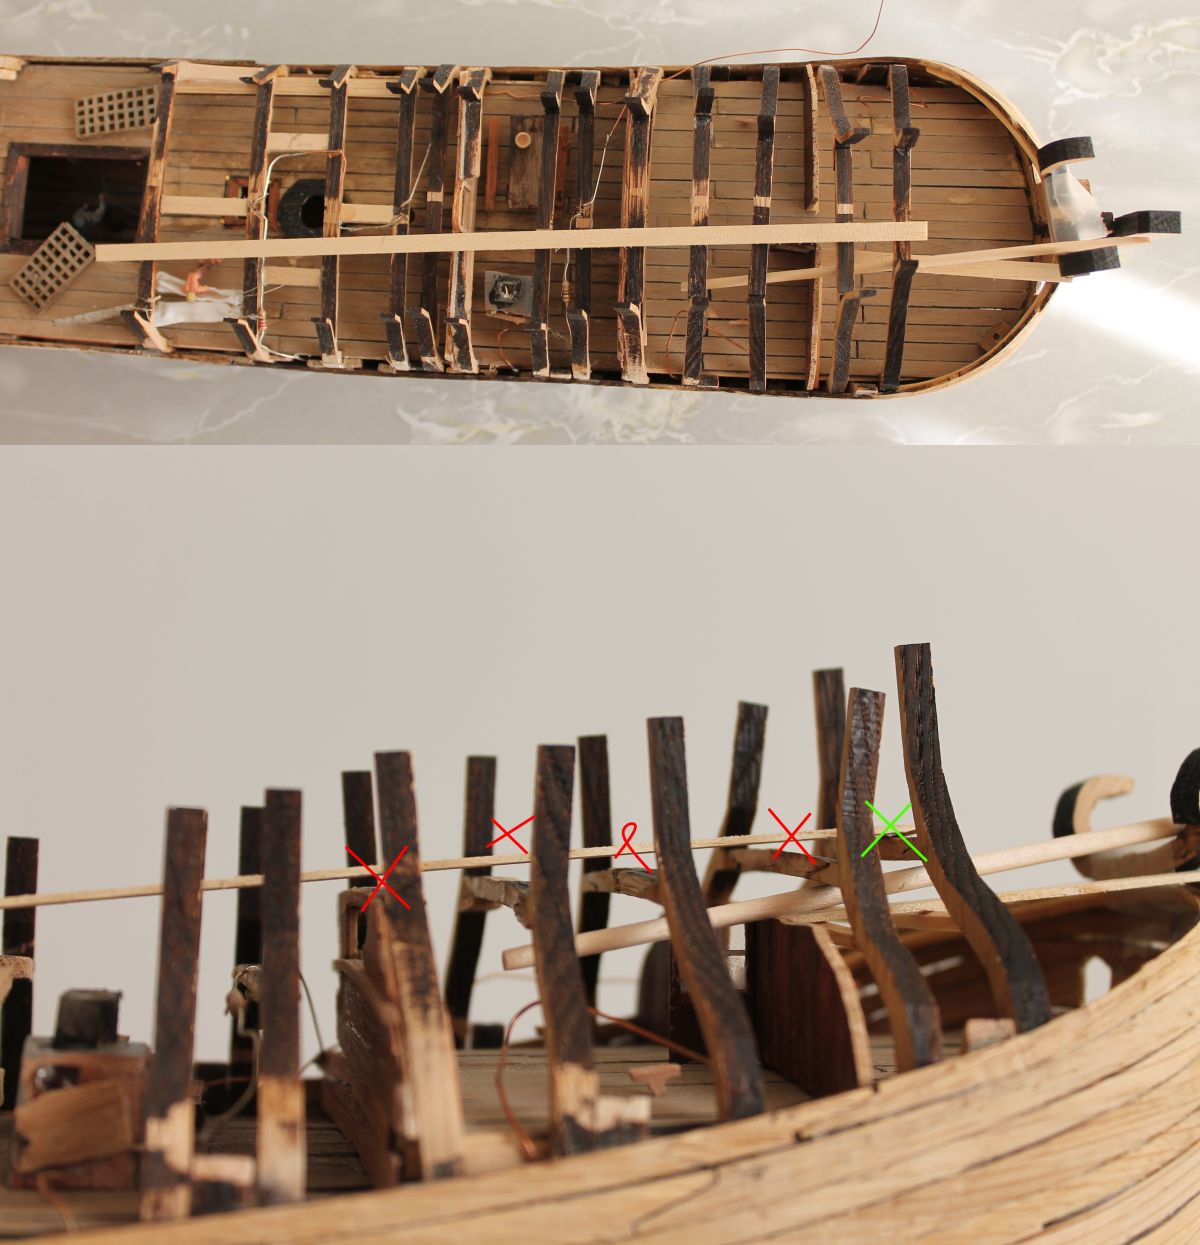
This should be done by laying a batten from truss 6 to the last truss. The batten should just all touch the last rafters. The bottom photo shows an opening at the red crosses. And at the last green cross, the batten is on top. So that last strut should be a bit lower. But that will be a bit linky.
Here you can see a bit of how it should be. Everything is still loose.
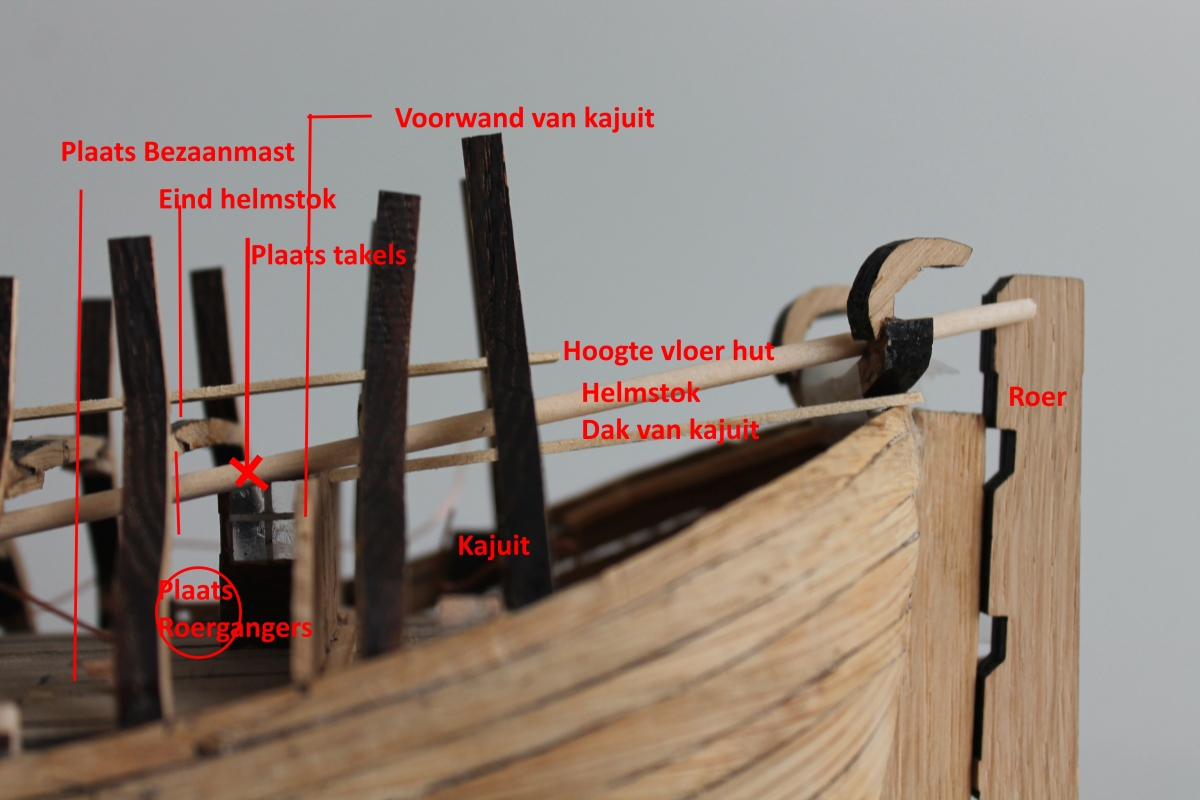
The tiller runs from the rudder to just in front of the mizzen mast, on the far left. It ends in front of the mizzen and after the forward wall of the cabin. Two hoists are attached to that piece, which the helmsmen can use to operate the tiller.
From the top of the forward wall of the cabin, the ceiling runs to the top of the stem, just below the hen hole.
The batten at the top of the stuts is the floor of the uppercabin. Between this floor and the lowercabin ceiling, the tiller moves back and forth.
It looks like it can all just be done, now just realise it.

The front struts are already fixed and they line up reasonably well. The last ones are still loose, but that will be a lot trickier. These have broken a couple of times and have had to glue again. Presumably that is why the shape is not quite as it should be. A few are firmly out of alignment. If it gets too bad, I cut the top off and glue it to the inner wall of the bulwark later. Then it will be back in line anyway.
For now, we have some work to do. I hope to have this completed by 30 Sept for the meeting in the Scheepvaartmuseum. And possibly by then I will also have the open piece in the front open again.
To be continued.
Following update 15, Maarten gave me this comment:
From research work of Swedish archaeologist Niklas Eriksson it seems that on the smaller Fluyt ships the complete crew was housed in the great cabin and galley in front of it and the small cabin on the upper deck.
On some of the wrecks he investigated the loo was located in the great cabin I don t know if this was in a separate enclosed space but back in the 17th century it was quite normal this was just in plain sight. From the French king Louis the 14th it was even known that his toilet visits were publicly accesible for high ranking people. To us 400 years later unthinkable.
I will look in my files if I can find the part about the toilets on the fluyt ships.
Research by Swedish archaeologist Niklas Eriksson shows that on the smaller Fluyt ships, the entire crew was housed in the large cabin with galley in front and the small cabin on the upper deck.
I don't know if the loo was in a separate enclosed space within the cabin, but in the 17th century it was quite normal for this to just be in plain sight. French king Louis the 14th was even known to have his toilet visits publicly accessible to high-ranking people. Unthinkable for us 400 years later.
This did make me think whether I am doing it right here. That's why I only let the hammocks hang, for which a height of 1.6m is not such an objection. This is a pretty big flute (almost 34m). Or 113 feet, 160 load and 20 eaters. (According to tables from "The Flute Ship" by Andre Wegener Sleeswijk.
And 20 men living in the cabin is a bit much anyway so possibly hammocks in the low room anyway.
Then on the bit of deck in front there won't be much to see and possibly I'll leave that closed. I can decide later.
Then to mention a bit of progress.
I made a galley with a red fire in it.
And in front of the galley is a table with two benches. A more logical place. On the model, this remains visible because of the door in front of it.
In the little round arch will later come an open door. Looking to portside you can see the galley and to starboard you can see the table where another man will sit. Next to the door, the bulkhead is already in place.
According to the manual, this is the time to determine the height of the aft struts and correct them if necessary.
This should be done by laying a batten from truss 6 to the last truss. The batten should just all touch the last rafters. The bottom photo shows an opening at the red crosses. And at the last green cross, the batten is on top. So that last strut should be a bit lower. But that will be a bit linky.
Here you can see a bit of how it should be. Everything is still loose.
The tiller runs from the rudder to just in front of the mizzen mast, on the far left. It ends in front of the mizzen and after the forward wall of the cabin. Two hoists are attached to that piece, which the helmsmen can use to operate the tiller.
From the top of the forward wall of the cabin, the ceiling runs to the top of the stem, just below the hen hole.
The batten at the top of the stuts is the floor of the uppercabin. Between this floor and the lowercabin ceiling, the tiller moves back and forth.
It looks like it can all just be done, now just realise it.
The front struts are already fixed and they line up reasonably well. The last ones are still loose, but that will be a lot trickier. These have broken a couple of times and have had to glue again. Presumably that is why the shape is not quite as it should be. A few are firmly out of alignment. If it gets too bad, I cut the top off and glue it to the inner wall of the bulwark later. Then it will be back in line anyway.
For now, we have some work to do. I hope to have this completed by 30 Sept for the meeting in the Scheepvaartmuseum. And possibly by then I will also have the open piece in the front open again.
To be continued.
Last edited:
The fire in the galley is a nice touch Jan.
- Joined
- Apr 10, 2020
- Messages
- 146
- Points
- 213
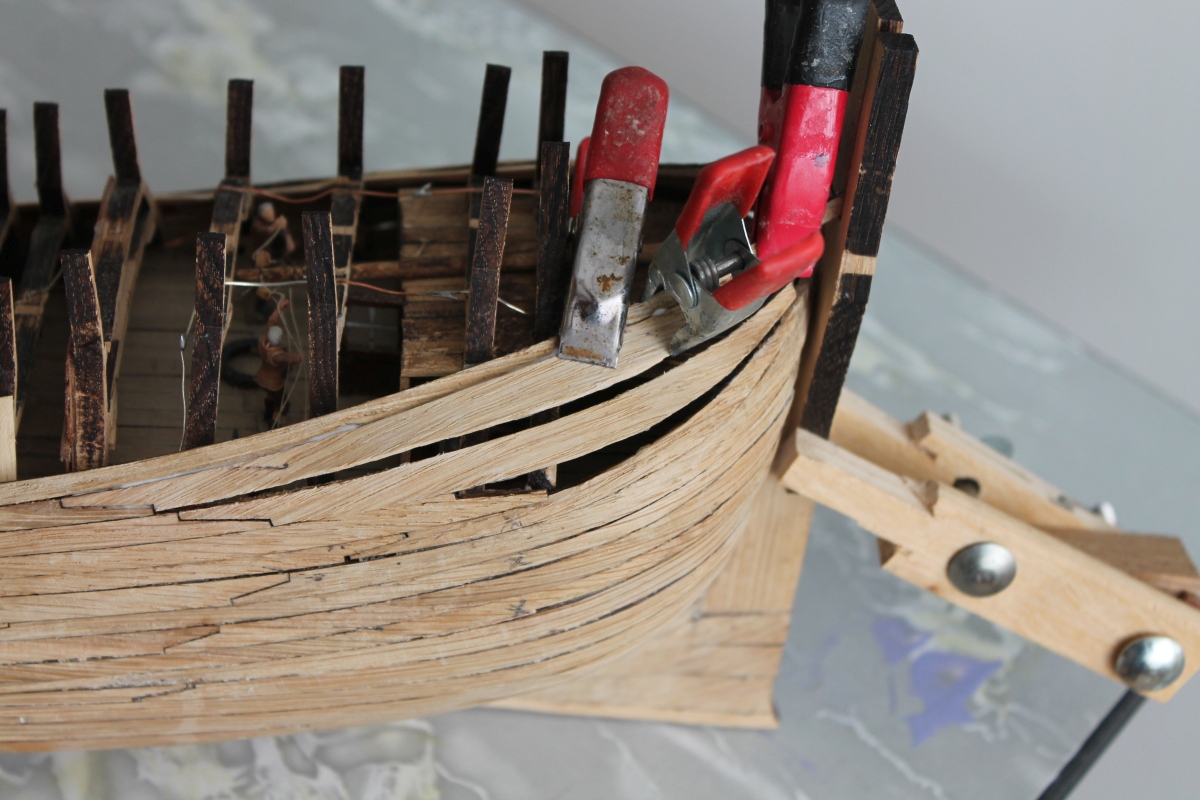
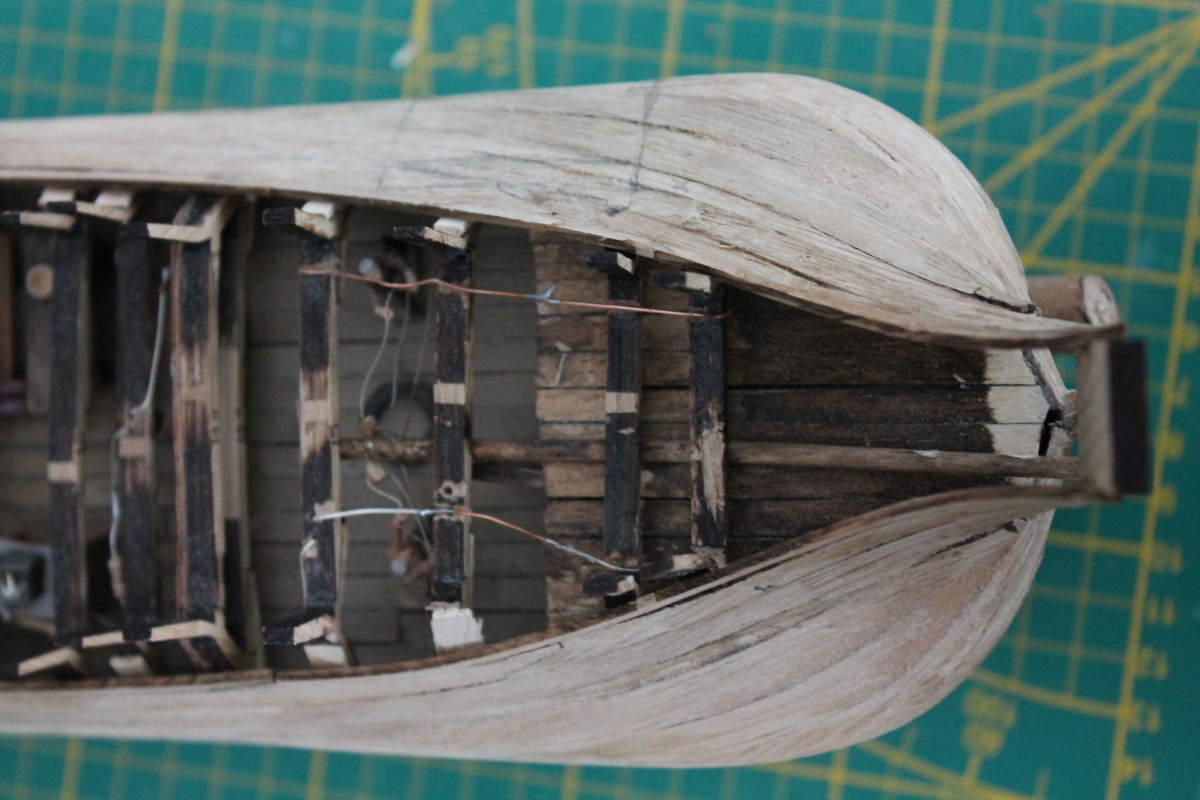
Update 18.
After a "ship museum" hiatus, we are back in full swing. And now it's the stern's turn. This is a bit trickier than usual because of my own modifications especially the tiller.
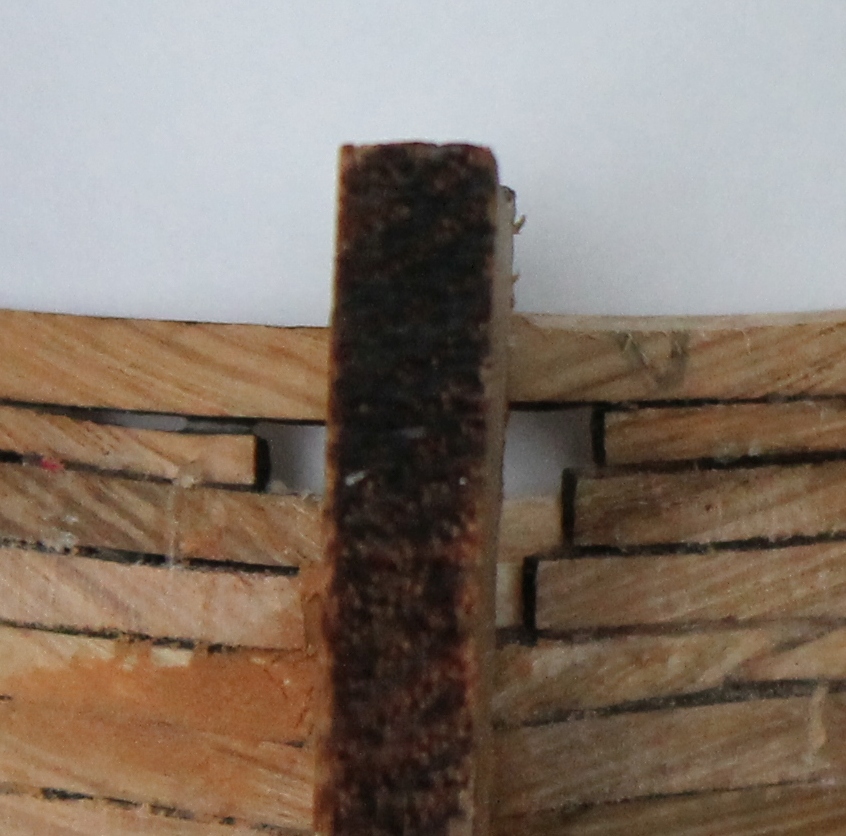
First of all, the ceiling of the cabin has been fitted. Here you can see the top of the ceiling which is colored with vanDijks brown. This roof remains somewhat visible through the hemp hole so it needs to be colored. You can see the tiller running across the roof here.
On the stem beam is a tuning fork-shaped attachment to hold the rising side battens in place. But the tiller has to go through that.
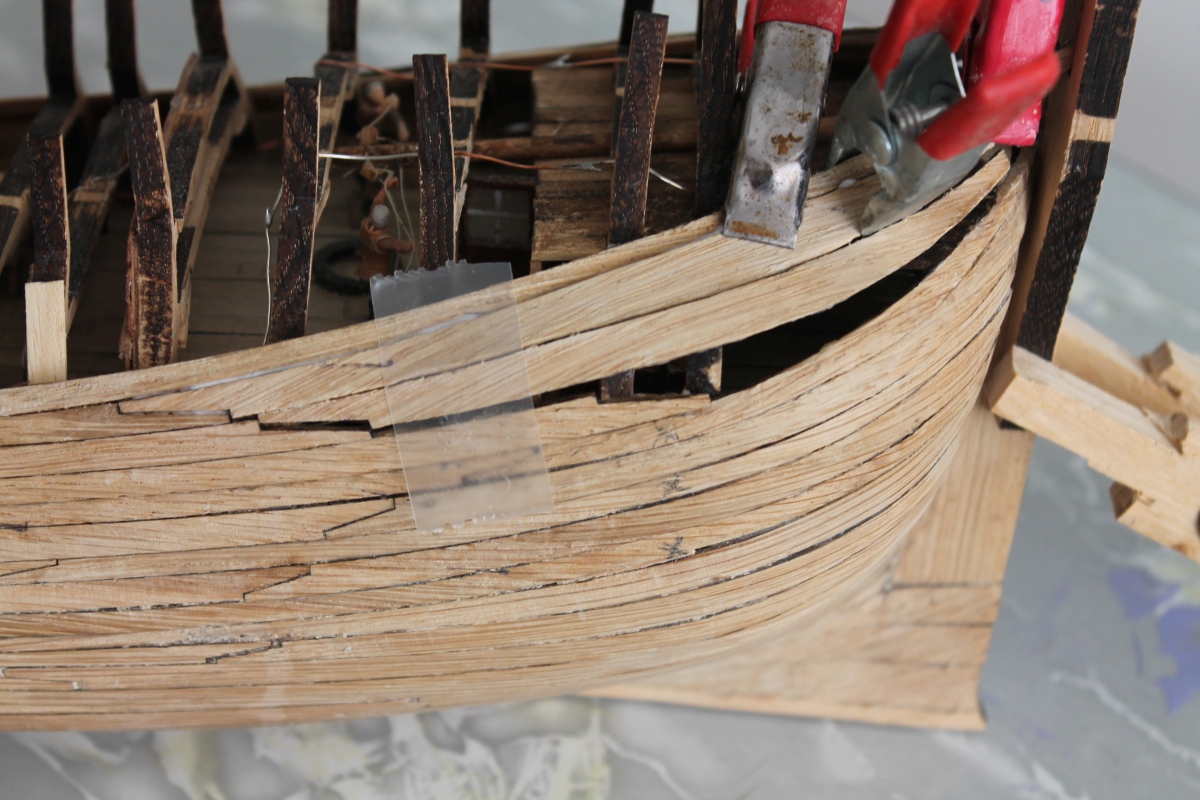
I forgot that under the tiller there also needs to be the sill of the tiller hole frame. Here it is still loose. Here you can also see the two side battens held by the attachment.
The space between these two auxiliary battens and the skin battens applied so far must be filled with three oddly shaped battens that will form the "hips" of the flute.
This way it still looks like something but ..........
Seen from a different angle?
Where is that supposed to go?
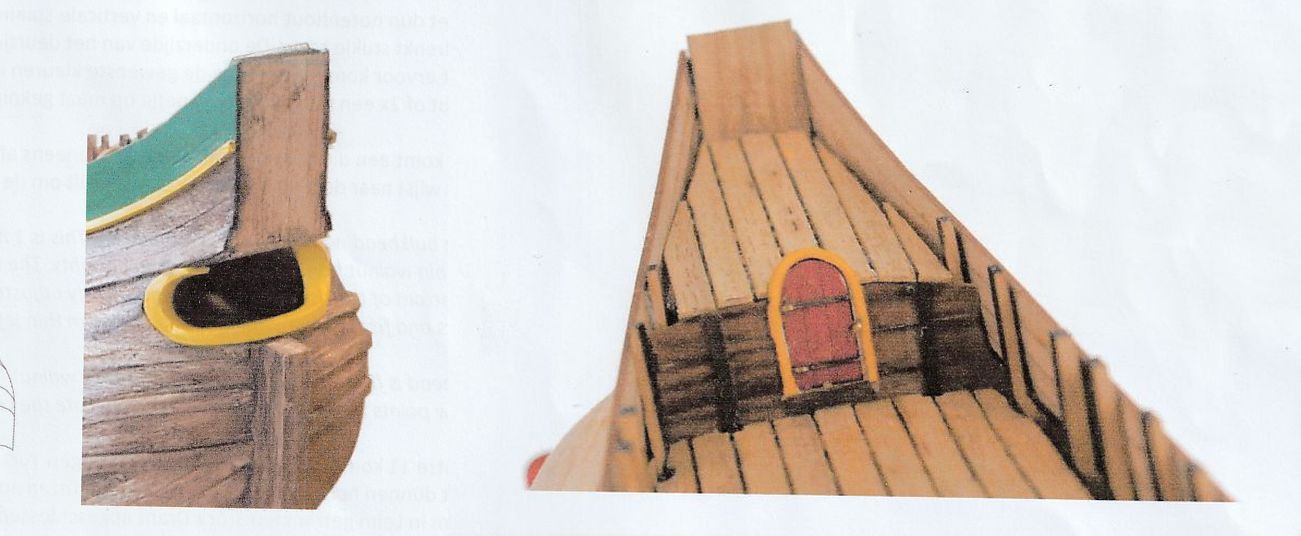
I'm going to think about this for a while. But fortunately we had a "Maritime Museum" where *Hans* also attended and so we have an example.
But still .........
To be continued.
Translated with www.DeepL.com/Translator (free version)
After a "ship museum" hiatus, we are back in full swing. And now it's the stern's turn. This is a bit trickier than usual because of my own modifications especially the tiller.
First of all, the ceiling of the cabin has been fitted. Here you can see the top of the ceiling which is colored with vanDijks brown. This roof remains somewhat visible through the hemp hole so it needs to be colored. You can see the tiller running across the roof here.
On the stem beam is a tuning fork-shaped attachment to hold the rising side battens in place. But the tiller has to go through that.
I forgot that under the tiller there also needs to be the sill of the tiller hole frame. Here it is still loose. Here you can also see the two side battens held by the attachment.
The space between these two auxiliary battens and the skin battens applied so far must be filled with three oddly shaped battens that will form the "hips" of the flute.
This way it still looks like something but ..........
Seen from a different angle?
Where is that supposed to go?
I'm going to think about this for a while. But fortunately we had a "Maritime Museum" where *Hans* also attended and so we have an example.
But still .........
To be continued.
Translated with www.DeepL.com/Translator (free version)
Last edited:
You’re at a complex and interesting part, Jan. Looking forward to the next steps.Update 18.
After a "ship museum" hiatus, we are back in full swing. And now it's the stern's turn. This is a bit trickier than usual because of my own modifications especially the tiller.
First of all, the ceiling of the cabin has been fitted. Here you can see the top of the ceiling which is colored with vanDijks brown. This roof remains somewhat visible through the hemp hole so it needs to be colored. You can see the tiller running across the roof here.

On the stem beam is a tuning fork-shaped attachment to hold the rising side battens in place. But the tiller has to go through that.

I forgot that under the tiller there also needs to be the sill of the tiller hole frame. Here it is still loose. Here you can also see the two side battens held by the attachment.

The space between these two auxiliary battens and the skin battens applied so far must be filled with three oddly shaped battens that will form the "hips" of the flute.
This way it still looks like something but ..........

Seen from a different angle?
Where is that supposed to go?

I'm going to think about this for a while. But fortunately we had a "Maritime Museum" where *Hans* also attended and so we have an example.

But still .........
To be continued.
Translated with www.DeepL.com/Translator (free version)
Regards, Peter
- Joined
- Apr 10, 2020
- Messages
- 146
- Points
- 213
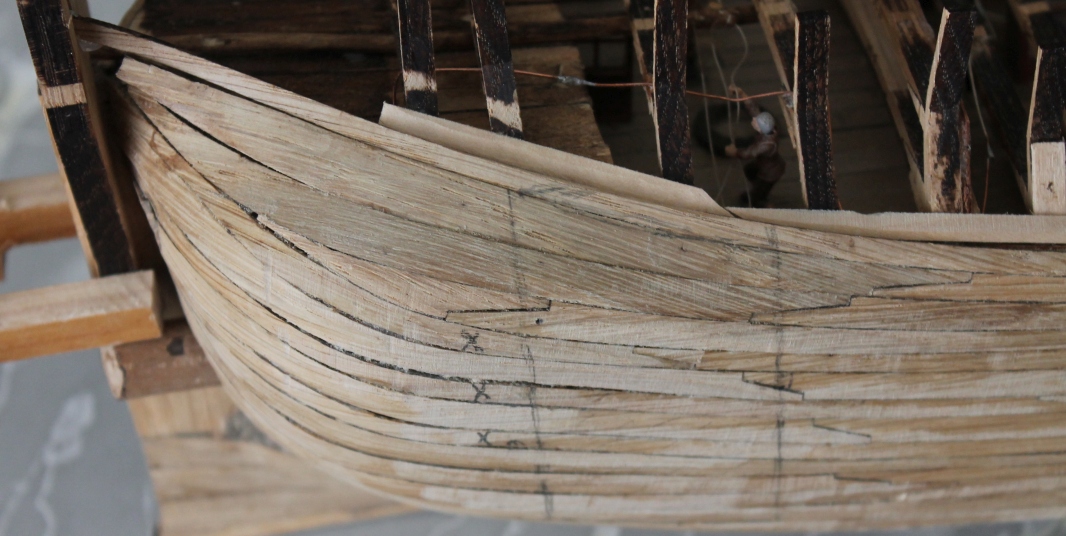
Update 19.
After some fiddling, the top 2 of the 3 battens are on. Quite close. There is still a gap left which is too small for the third moulded batten. So I made it to size for this.
Then this is the result:
This will do.
The other hip also done, but I didn't like it so I took that one off again. (no photo of it). But we are moving on again.
To be continued.
Translated with www.DeepL.com/Translator (free version)
Last edited:
Hi Jan. You are now at a very delicate part. A lot of (double?) curved planks. Respect for chosen to do a re-do.Update 19.
After some fiddling, the top 2 of the 3 battens are on. Quite close. There is still a gap left which is too small for the third moulded batten. So I made it to size for this.

Then this is the result:


This will do.
The other hip also done, but I didn't like it so I took that one off again. (no photo of it). But we are moving on again.
To be continued.
Translated with www.DeepL.com/Translator (free version)
Regards, Peter
- Joined
- Apr 10, 2020
- Messages
- 146
- Points
- 213
Update 20
A lot has happened in the past week.
Just a few pictures of the state of affairs.
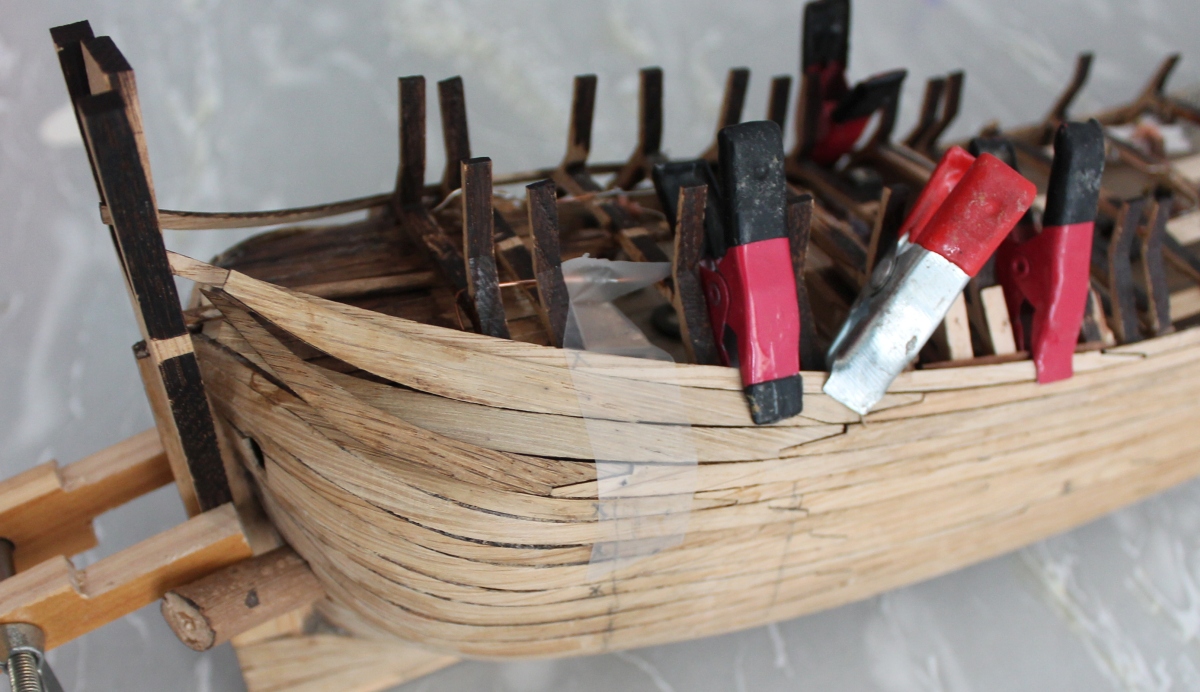
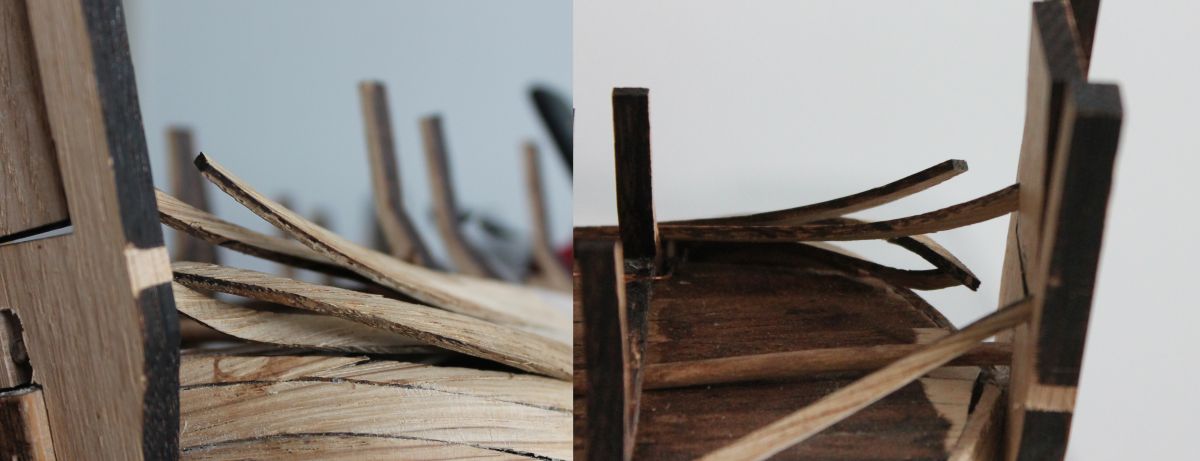
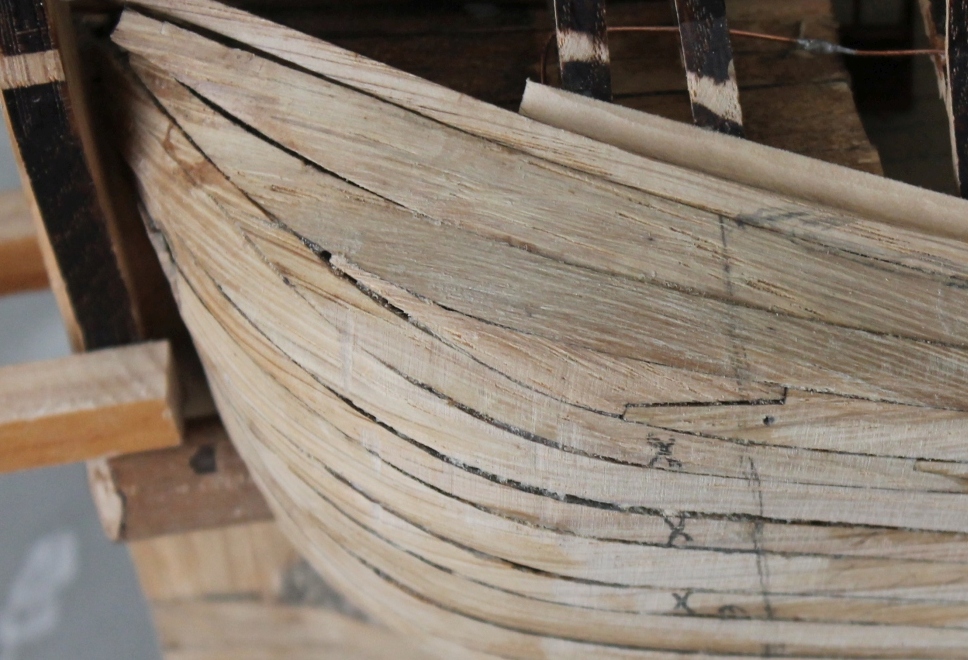
It is clear here that closing the hips is not easy
This did create space between the rafters and the skin. Filled that space with laths.
After applying the hips, planking further up went fairly easily. Unfortunately, I was under the impression that the hemp hole had to be made in later, so I paid no attention to that.
One thing I did notice was that the skin slats to the left and right of the heelboard came out unevenly. I adjusted that by loosening the right-hand battens on equal height and reattaching them.
In the end this was the result.
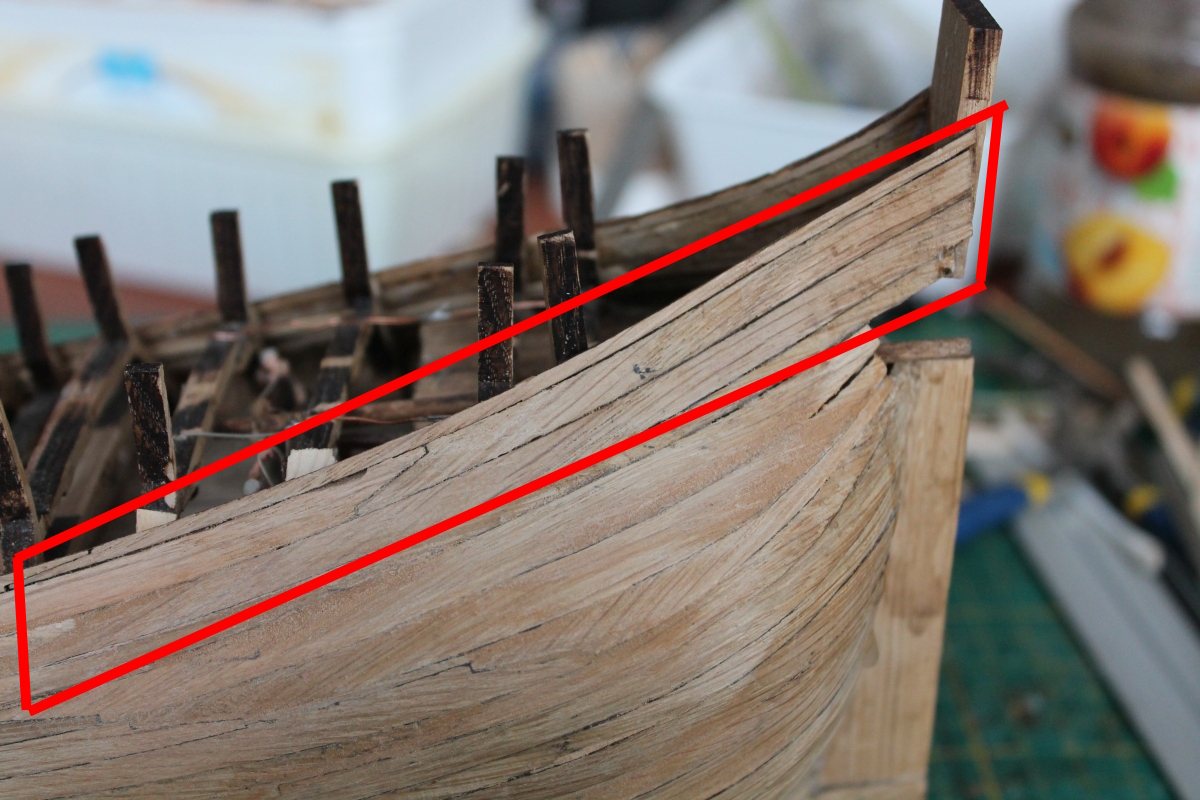
That looks nice but .........
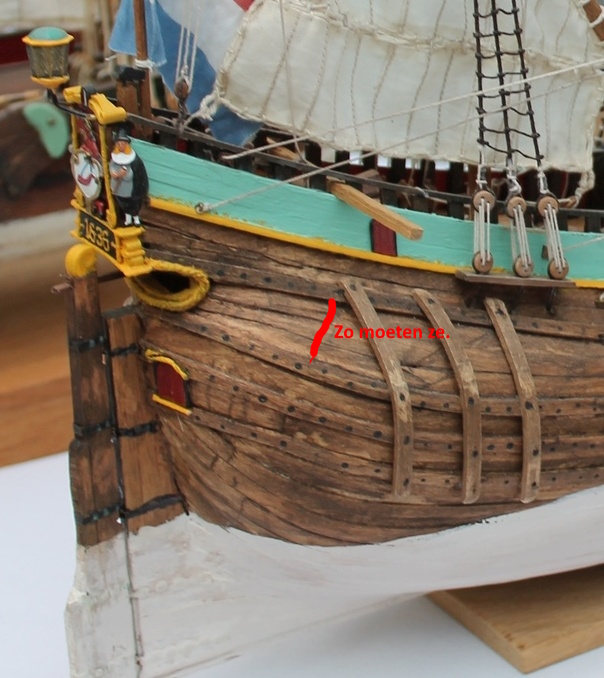
Compare this with the building description:
Then you can see that the hemp hole is neatly in there but the top of the bulwark is straight, while in mine there is a clear slinger.
With crank, the planks of the bulwark will be slightly longer. And because these are laser cut they will be slightly too short at the bow. And so that's right.
This could be solved if *Hans* gives his cutting files a little oversize. Then future builders can adjust the length themselves.
I filled it up with kneadable wood.
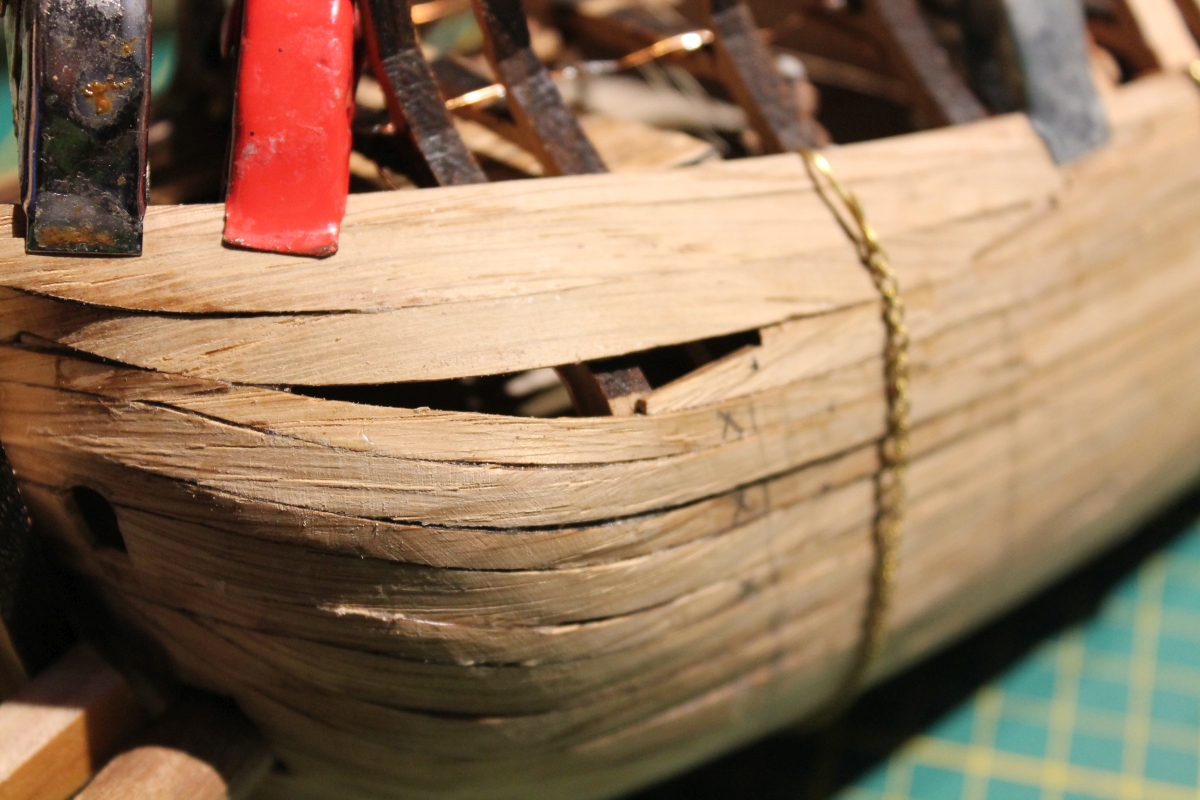
There is only one good solution for the stern: Starting over !!!!!!!! from the first hull batten ending against the heelboard. And then first make the hen hole in it.
I am going to loosen the part shown below and return it with the proper shape AND a hemp hole.
To be continued.
Translated with www.DeepL.com/Translator (free version)
.
.
A lot has happened in the past week.
Just a few pictures of the state of affairs.
It is clear here that closing the hips is not easy
This did create space between the rafters and the skin. Filled that space with laths.
After applying the hips, planking further up went fairly easily. Unfortunately, I was under the impression that the hemp hole had to be made in later, so I paid no attention to that.
One thing I did notice was that the skin slats to the left and right of the heelboard came out unevenly. I adjusted that by loosening the right-hand battens on equal height and reattaching them.
In the end this was the result.
That looks nice but .........
Compare this with the building description:
Then you can see that the hemp hole is neatly in there but the top of the bulwark is straight, while in mine there is a clear slinger.
With crank, the planks of the bulwark will be slightly longer. And because these are laser cut they will be slightly too short at the bow. And so that's right.
This could be solved if *Hans* gives his cutting files a little oversize. Then future builders can adjust the length themselves.
I filled it up with kneadable wood.
There is only one good solution for the stern: Starting over !!!!!!!! from the first hull batten ending against the heelboard. And then first make the hen hole in it.
I am going to loosen the part shown below and return it with the proper shape AND a hemp hole.
To be continued.
Translated with www.DeepL.com/Translator (free version)
.
.
Last edited:
- Joined
- Apr 10, 2020
- Messages
- 146
- Points
- 213
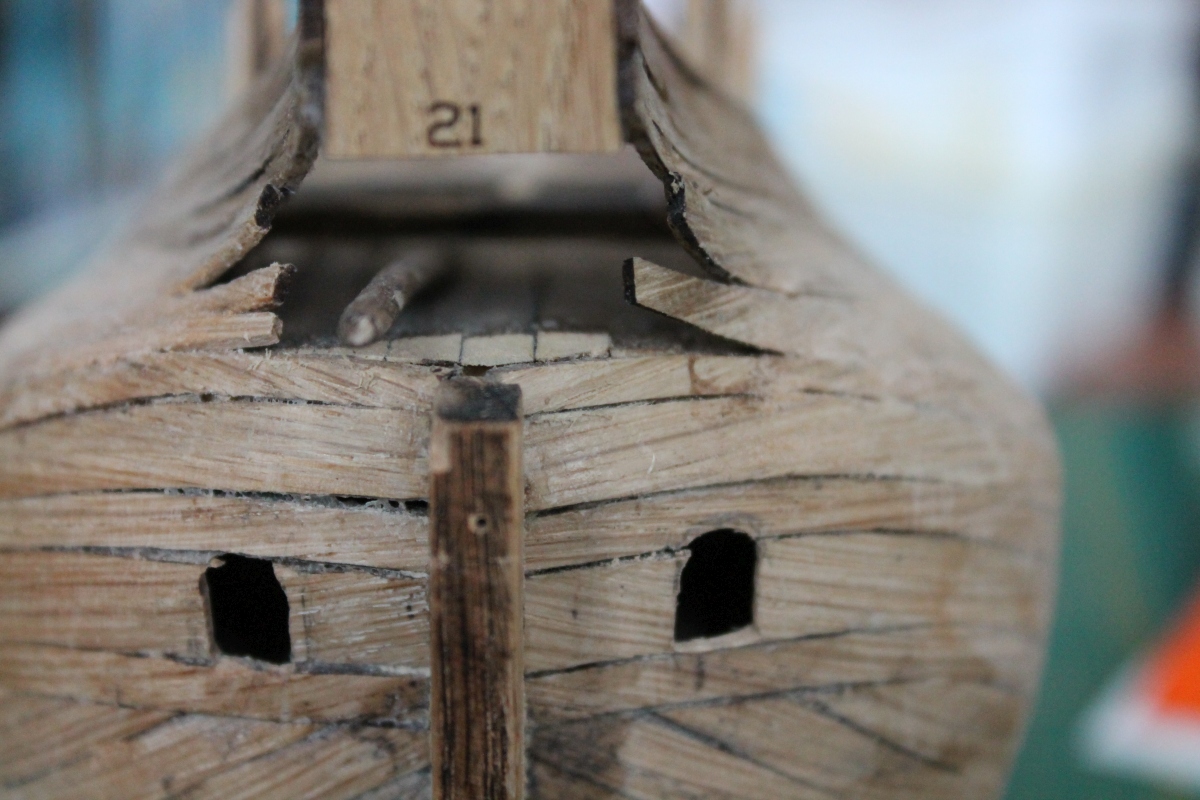
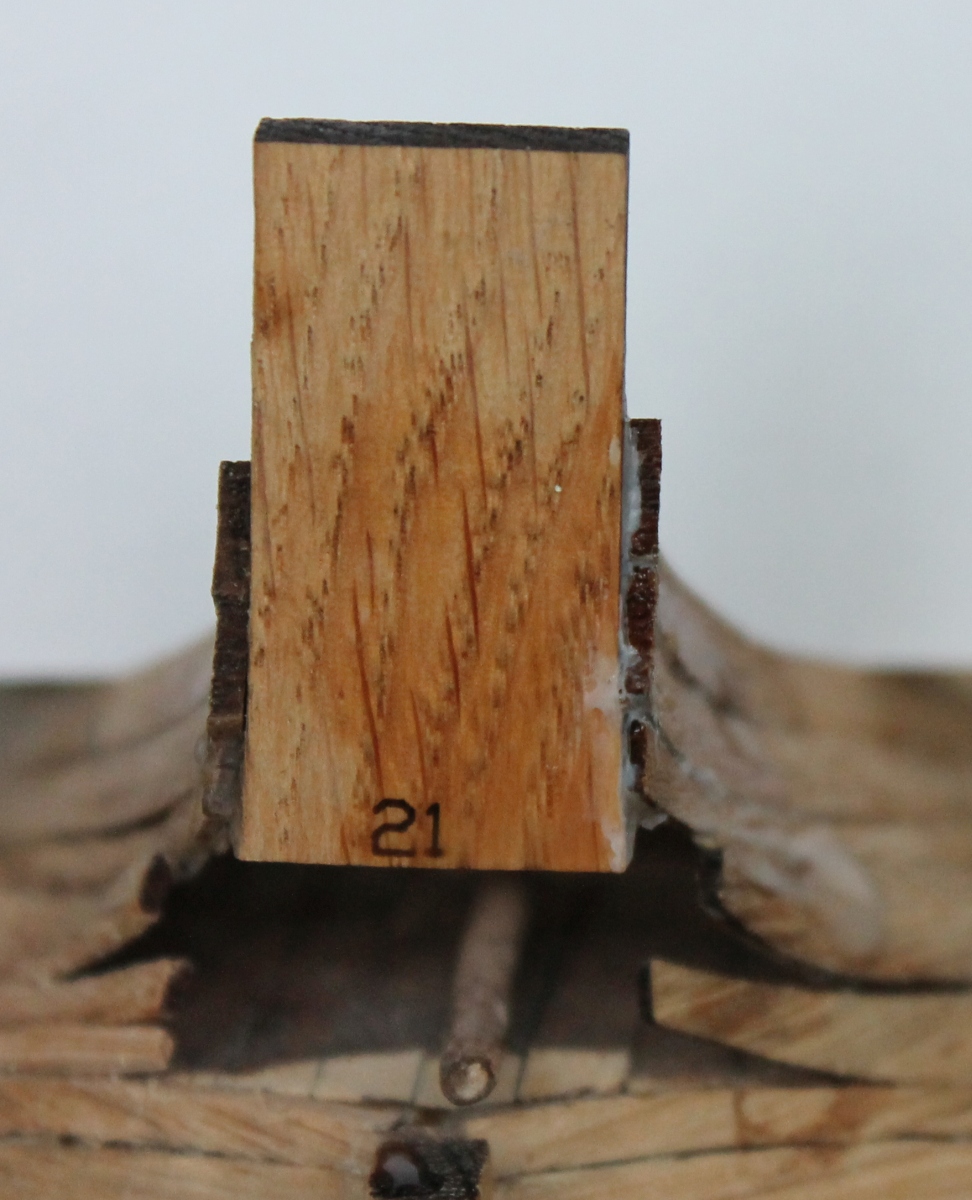
Update 21.
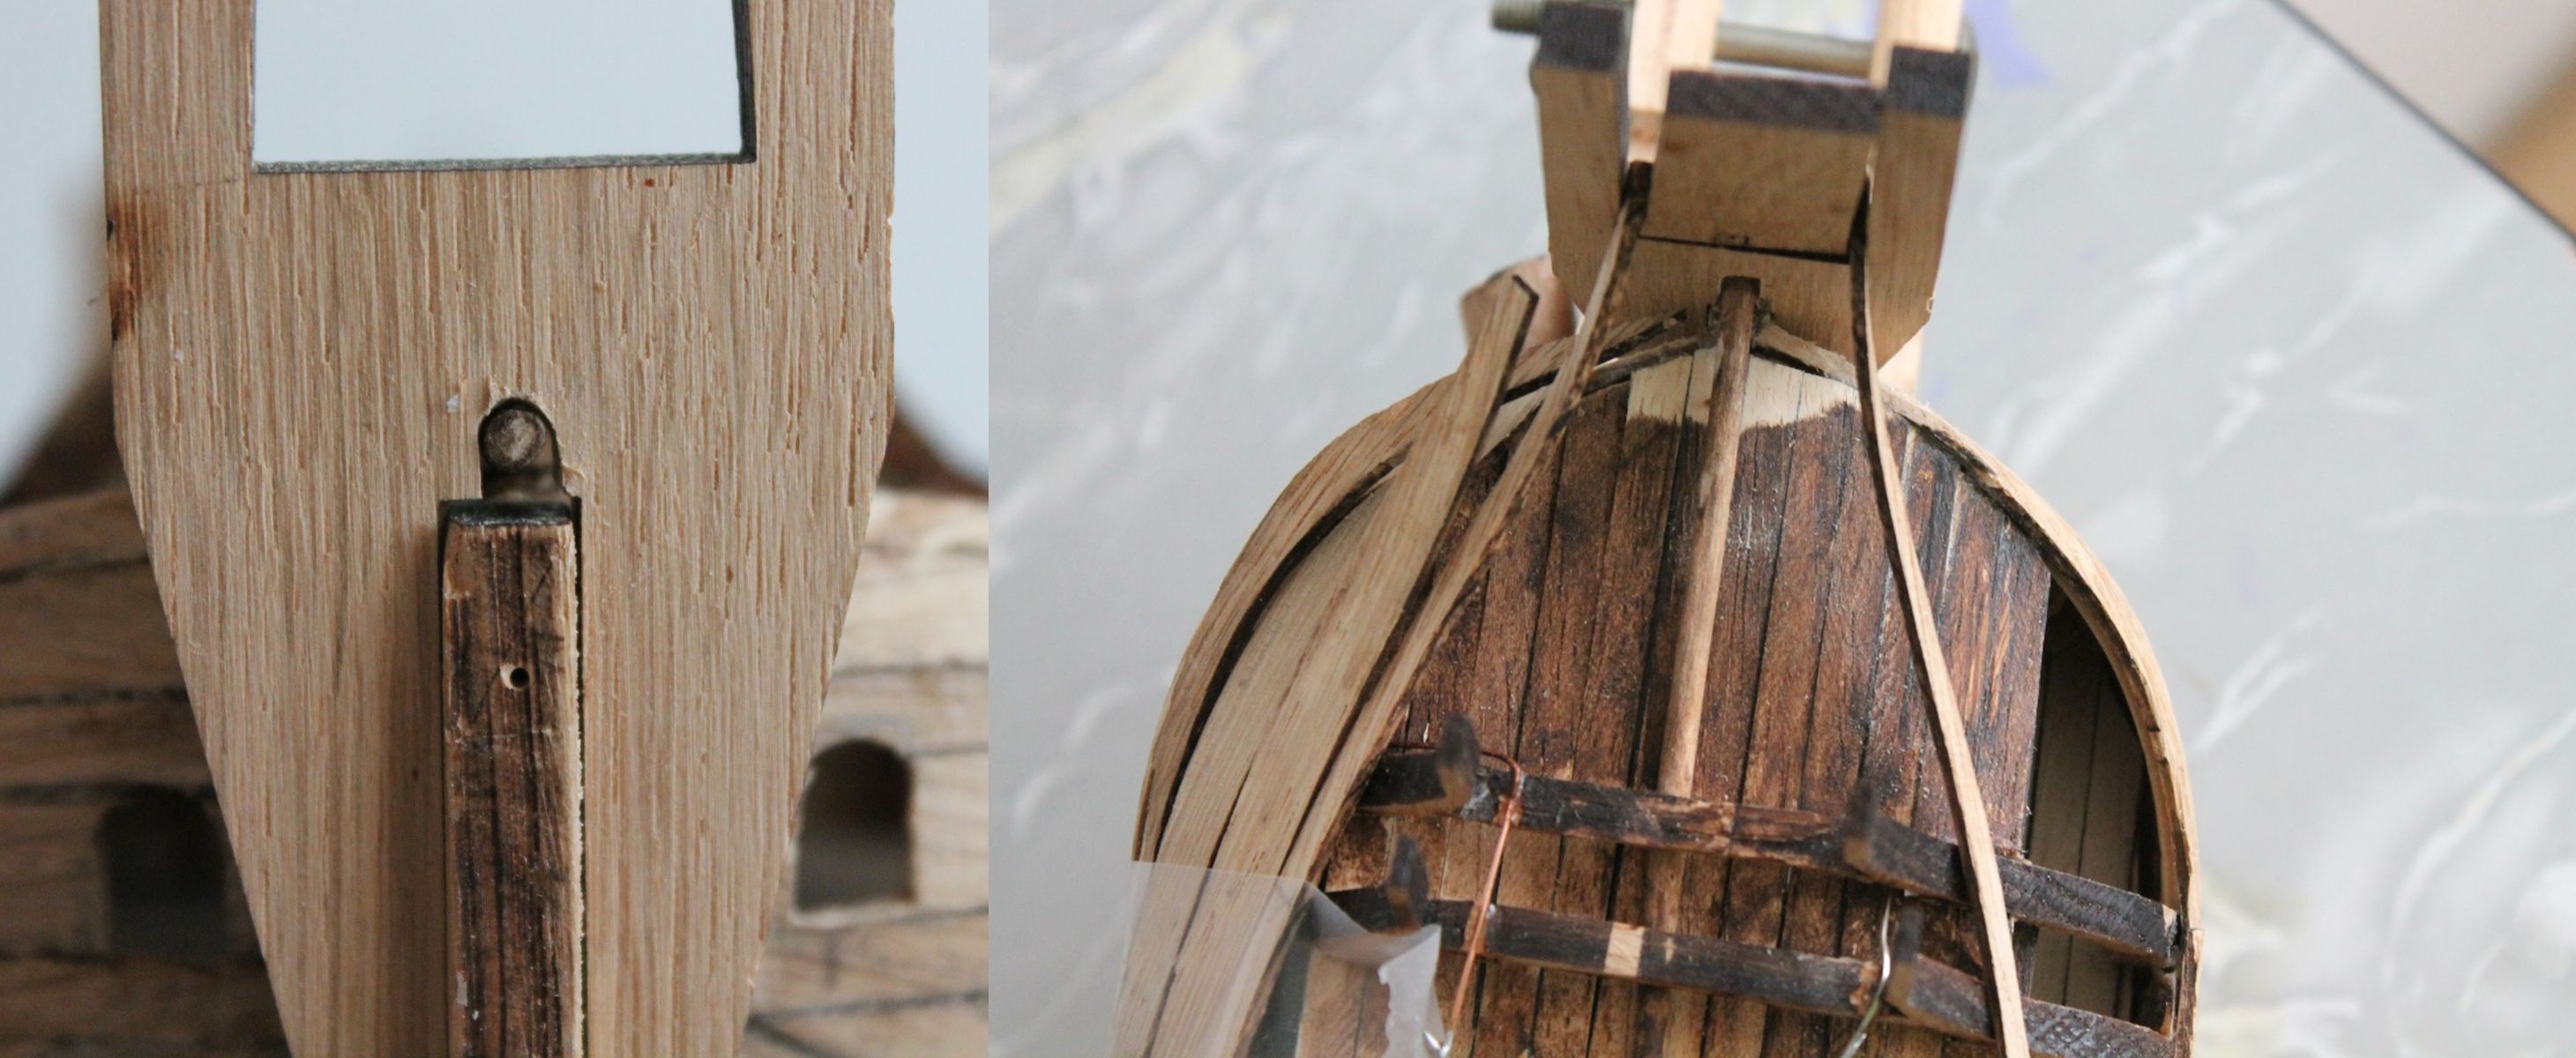
Yes that hemp hole, that knows what.
I was trying to glue those three little parts together in the desired position. What a mess.
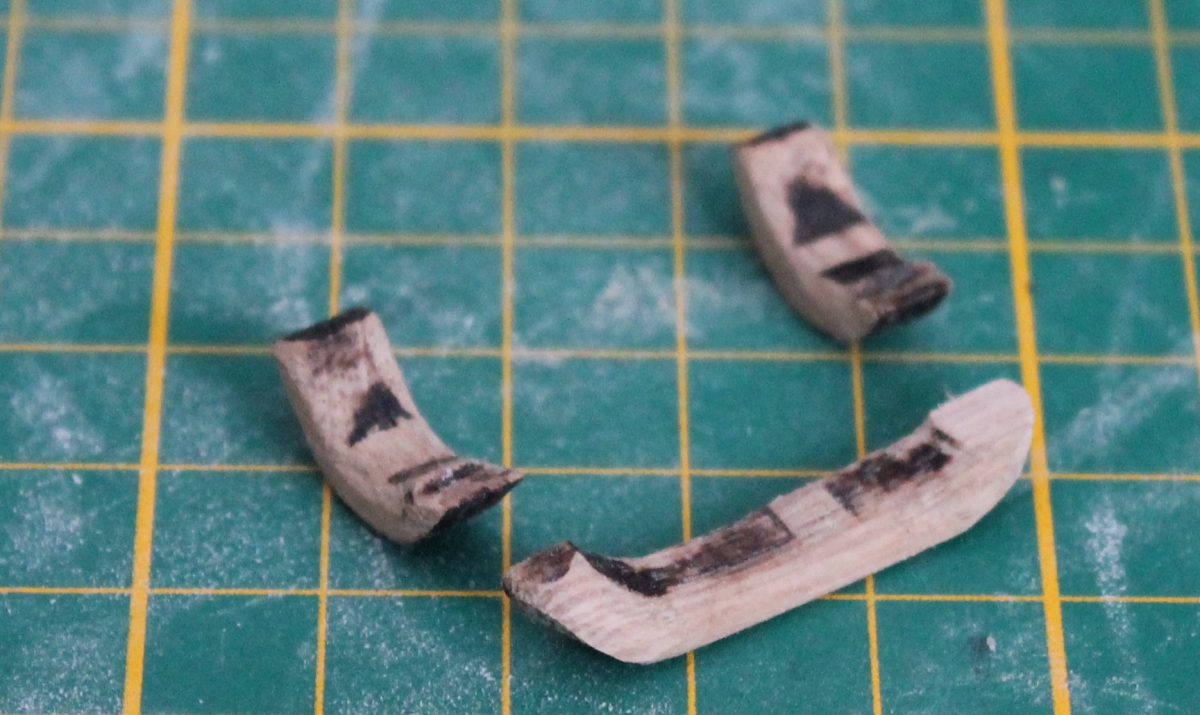
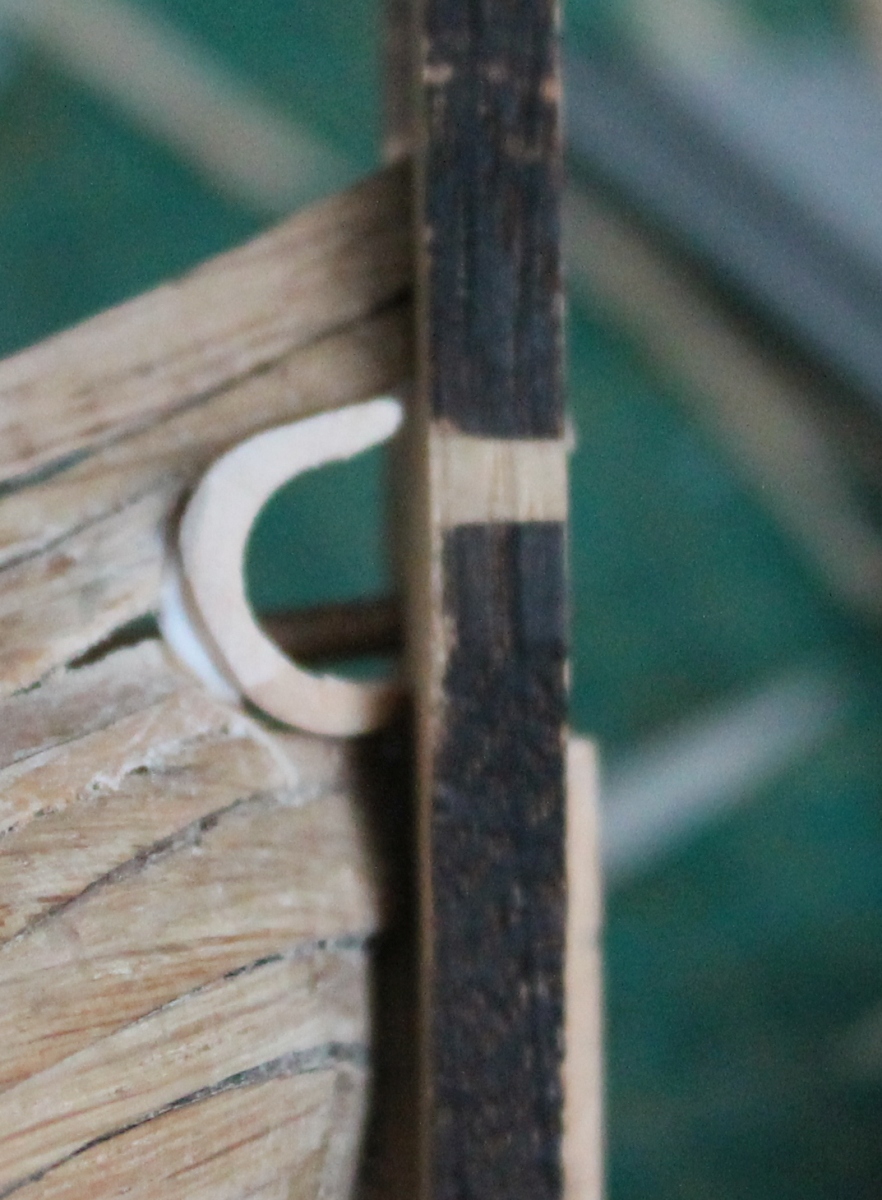
If you glue these two half-rounds vertically to the girder, you get the shape of the hemlock frame, which should look like the yellow window below.

I wanted to try if you could also make this as a whole from a piece of solid. Spruce in this case. Basically the way you would mill a figurine out of a piece of wood.
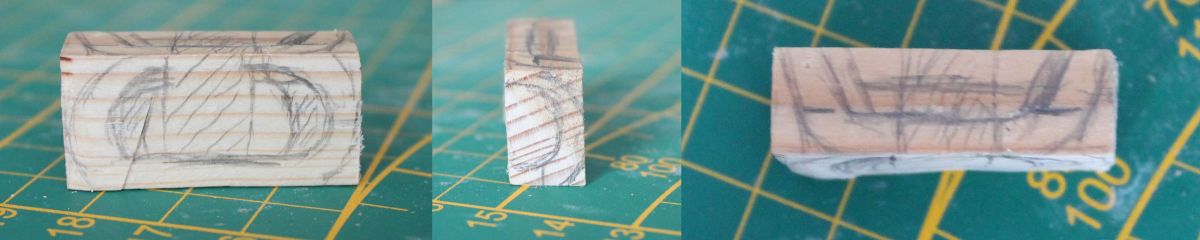
Picked up a piece of wood and marked off on the sides what it should look like from that side.
Fortunately, I have a Proxxon belt sander and you can sand away a chunk of it in no time.
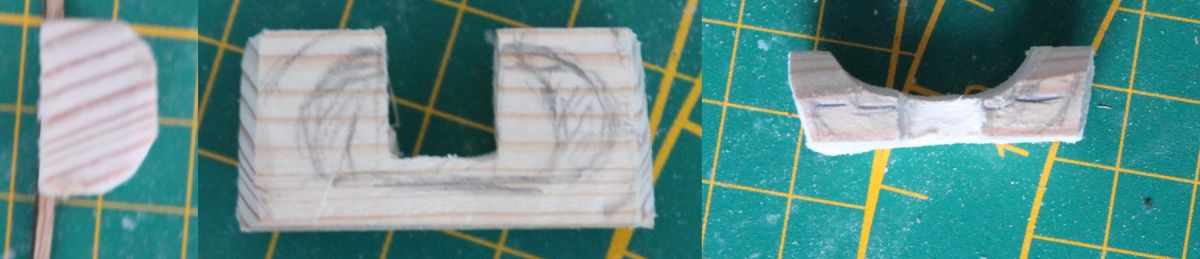
Then it looks like this:

To fit .............
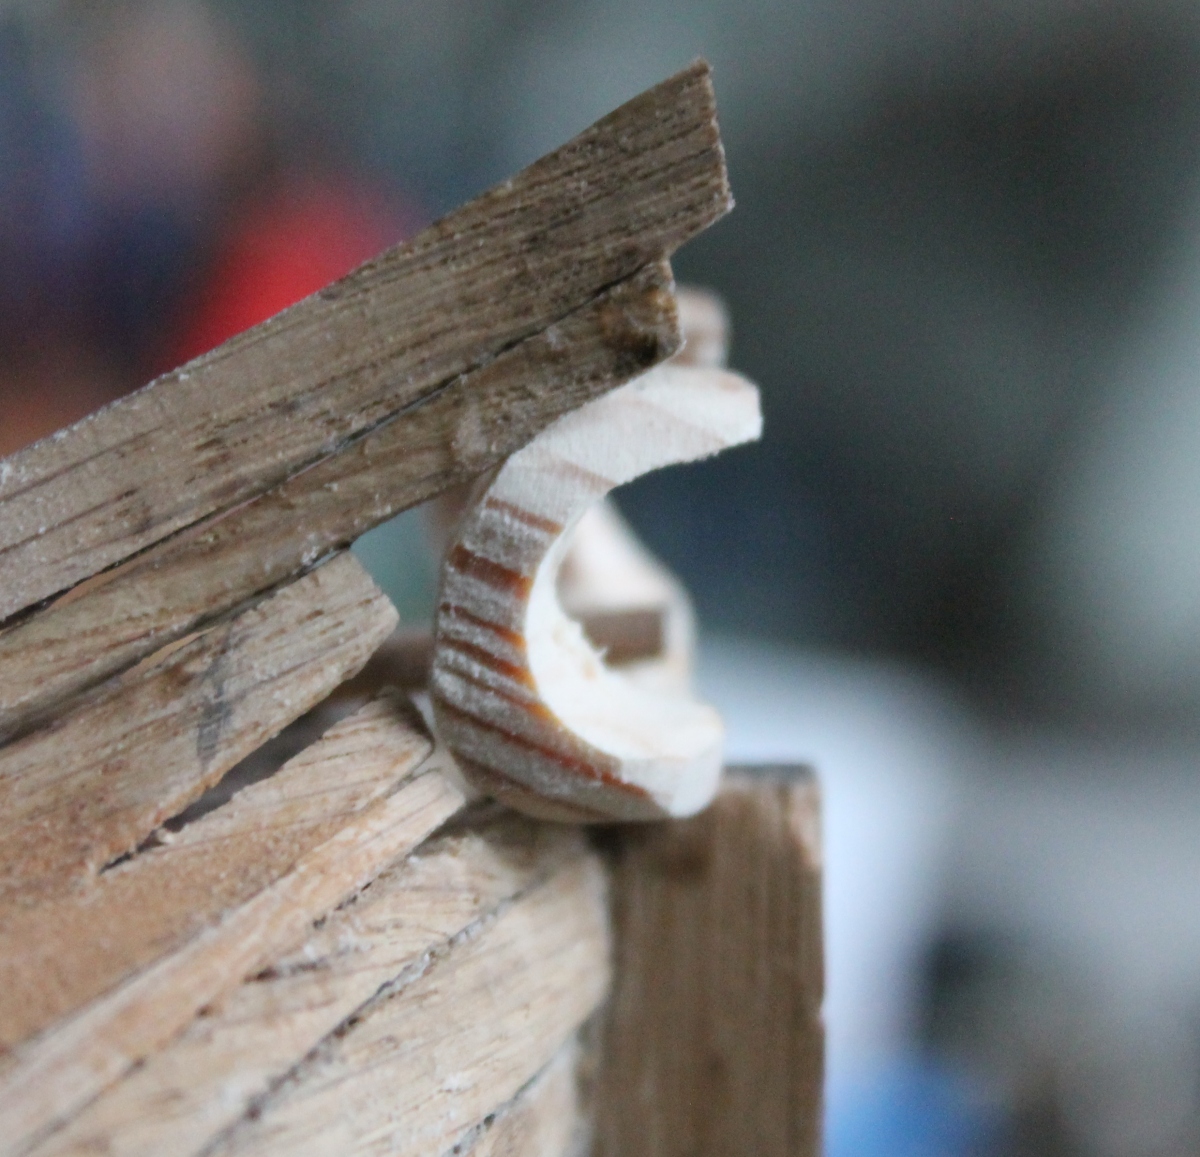
A little too high. It needs to go back a bit more and then it pushes the bar above it up.
Rejected.
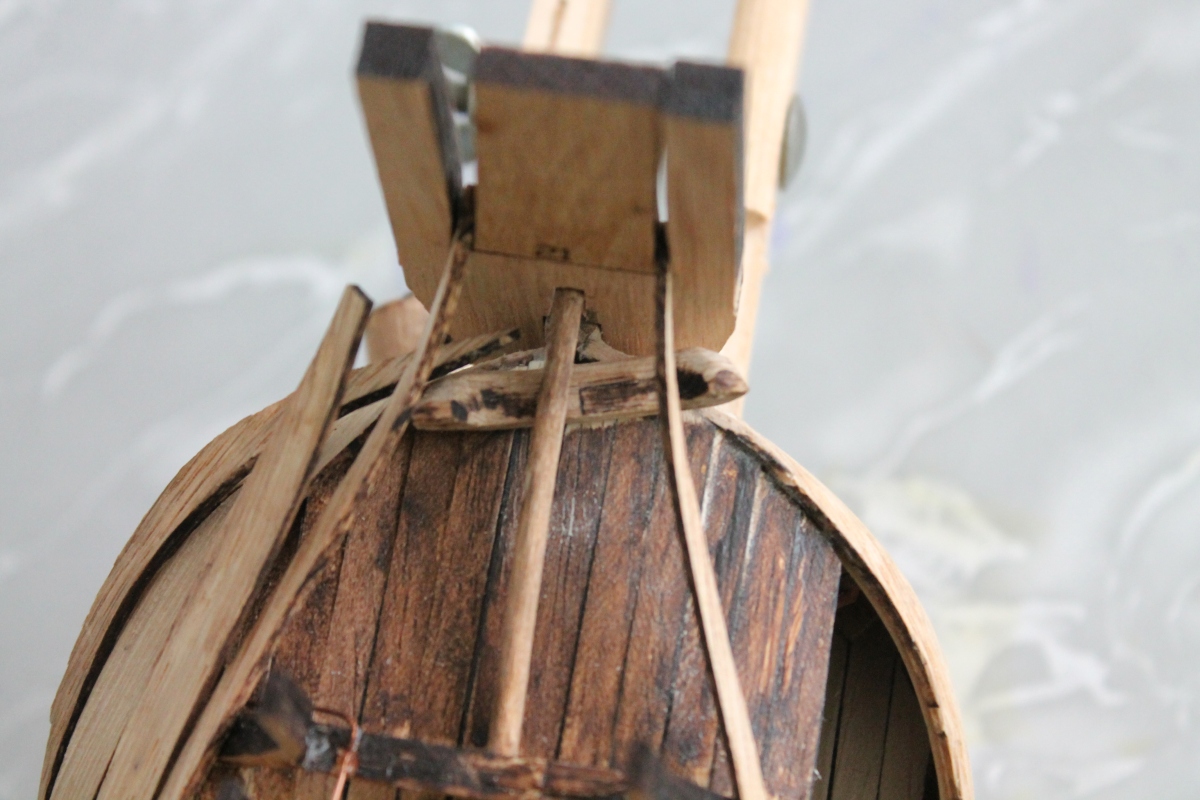
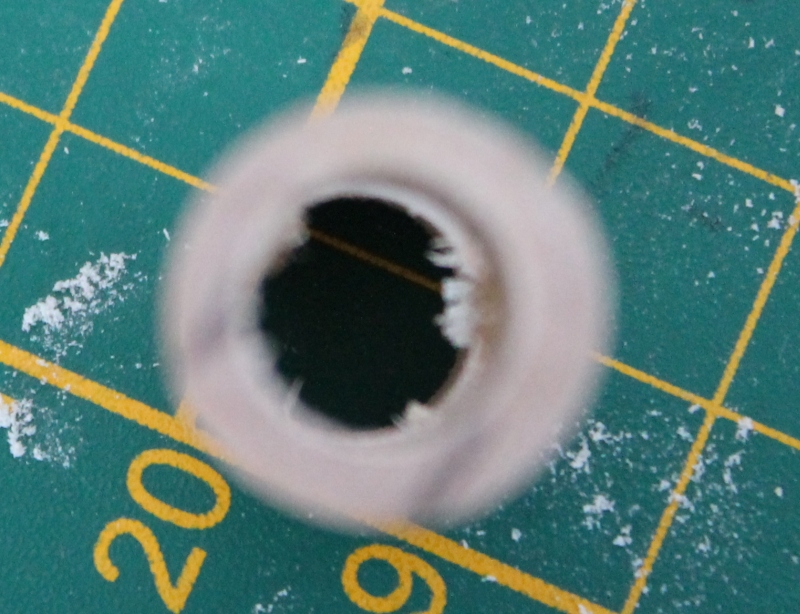
You don't have to start from a piece of square wood, a piece of round wood will do. This should be 15 mm round and then drill a 10 mm hole in the center so that you have a bushing of 15 mm outside and 10 mm inside.
This is not the best photo but here is such a bushing.
After a few similar edits, I can compare them.
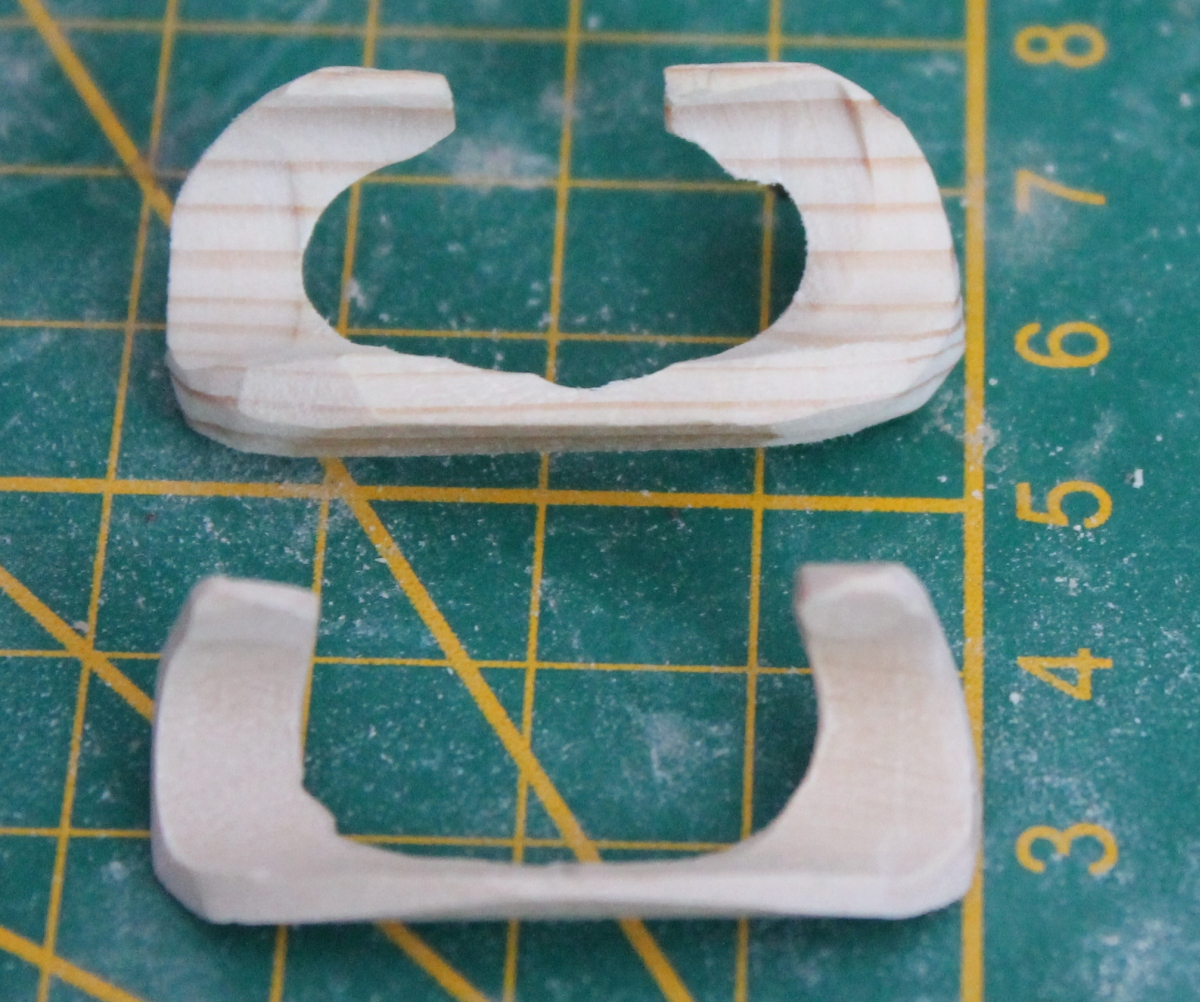
And the second one (the bottom one) now just fit with the "tuning fork" against it as well.
One more crack to fill and then I'll live with it.
Now on to building the other loosened side.
To be continued.
Yes that hemp hole, that knows what.
I was trying to glue those three little parts together in the desired position. What a mess.
If you glue these two half-rounds vertically to the girder, you get the shape of the hemlock frame, which should look like the yellow window below.
I wanted to try if you could also make this as a whole from a piece of solid. Spruce in this case. Basically the way you would mill a figurine out of a piece of wood.
Picked up a piece of wood and marked off on the sides what it should look like from that side.
Fortunately, I have a Proxxon belt sander and you can sand away a chunk of it in no time.
Then it looks like this:
To fit .............
A little too high. It needs to go back a bit more and then it pushes the bar above it up.
Rejected.
You don't have to start from a piece of square wood, a piece of round wood will do. This should be 15 mm round and then drill a 10 mm hole in the center so that you have a bushing of 15 mm outside and 10 mm inside.
This is not the best photo but here is such a bushing.
After a few similar edits, I can compare them.
And the second one (the bottom one) now just fit with the "tuning fork" against it as well.
One more crack to fill and then I'll live with it.
Now on to building the other loosened side.
To be continued.
Last edited:
An eye-catching part that requires the necessary attention. And you do that nicely, Jan.Update 21.
Yes that hemp hole, that knows what.
I was trying to glue those three little parts together in the desired position. What a mess.

If you glue these two half-rounds vertically to the girder, you get the shape of the hemlock frame, which should look like the yellow window below.

I wanted to try if you could also make this as a whole from a piece of solid. Spruce in this case. Basically the way you would mill a figurine out of a piece of wood.
Picked up a piece of wood and marked off on the sides what it should look like from that side.

Fortunately, I have a Proxxon belt sander and you can sand away a chunk of it in no time.

Then it looks like this:

To fit .............

A little too high. It needs to go back a bit more and then it pushes the bar above it up.
Rejected.
You don't have to start from a piece of square wood, a piece of round wood will do. This should be 15 mm round and then drill a 10 mm hole in the center so that you have a bushing of 15 mm outside and 10 mm inside.
This is not the best photo but here is such a bushing.

After a few similar edits, I can compare them.

And the second one (the bottom one) now just fit with the "tuning fork" against it as well.

One more crack to fill and then I'll live with it.
Now on to building the other loosened side.
To be continued.
Regards, Peter