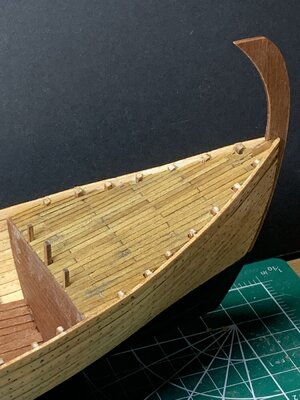
Kyrenia Ship, 290 BCE Reconstruction POF Build Log PT-2 [COMPLETED BUILD]

Yes I know. What you see on the replica, the vertical boards closing the compartment was put there a year ago.
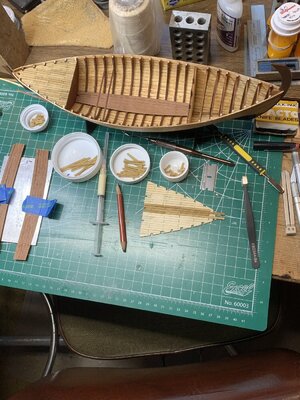
Now to do some multi-tasking between the hold ceiling planks and the Aft Deck Planking:-
Kyrenia Multi Tasking.jpg
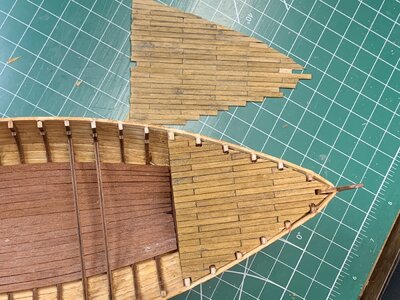
With the hold ceiling in place I put a finish of Watco Finish Oil onto the fore deck and show the aft deck raw planking. Not much difference in tone but to eye there was some added depth with the oilKyrenai For Deck Oiled and Aft Deck Raw.jpgNext is to trim/chop the long aft deck planks from the underside Kyrenai Aft Deck Planked Underside.jpgfor a good fit. Just a first rough pass on the right for comparison with the untouched left side. I will combine new sharp X-acto 11 blades, the single edge razor blade, and a good sharp chisel for inside work of the notches on this present tack. . . don't know if it is starb'd or port for sailing right-of-way but I'll proceed assuming that I have passing rights in any event as when passing to the lee once I obtain "mast-a'beam) of the overtaken windward boat I have right-of-way. I loved the old fleet racing days!!! Rich
 
Have you stained the deck planks? They look very realistic.
I did put a very light stain onto the exterior and interior planking of the hull planks as well as a darker stain onto the frames before putting those into the jig. Hull planking was stained after removal from the jig together with a very light coat of water based Polyurethane. The deck planks have only been given a coating of Watco furniture finish as well as the celing planks in the hold which darkened those a bit but seem to have returned to their original color. Same was done on the two bulkheads planking. I may apply additional coats of oil onto the deck planking to see if I can get the same sense of depth as it showed when the oil had not fully soaked into it. . . after a test piece of course.
I think that I may make two doorways onto the bulkheads as a concept of entry as I cannot actually remove them now. It will be a dry setting to see how it looks. Any door access would interfere with a fully loaded hold though. I may put a very small hatch with cover on the foredeck for an anchor cable to the anchor using the hooked arrow type that you sent.

While waiting for glue to dry and taking a break I am trying to relearn how to play my concertina which is coming back a lot faster than learning to play an Irish tin whistle. Finger button action is a lot easier than the six finger combinations of a tin whistle. Either way those are good breaks from the model.
 
Rich said: "Any door access would interfere with a fully loaded hold though"


Yes you are right, thats another reason I believe those areas were closed. When the ship was loaded the entrance through doors there was impossible!
 
After using a few new sharp X-acto No. 11 blades to "chop" the remaining deck planks I set them in place and followed by trial and error cutting/filing and resizing the subdeck and planks to match the frames I was able to set it in place.
View attachment 264791

Now a bit closer to the kit fore bulkhead closer piece which is not correct to be closed:View attachment 264792
Messis sent me a photo of this same area from a Stbd view showing it should be open:
View attachment 264793
We can see from this what this area should be for accessability. The kit after bulkhead is also closed which is also open. Too late to cut it open and shape the frames. Oh well. . . .
Next I have the after subdeck marked off and cut the planks to length:
View attachment 264794
I also rough trimmed a sheet of midships floor planks (ceiling but incomplete as such) to go onto the frames between the two bulkheads. I may do that allowing the glue to dry while I work on the after deck assembly.
View attachment 264797
One more day's log work done. Rich
Looking good Rich! You are making a lot of progress.
 
Looking good Rich! You are making a lot of progress.
Thank you. I trimmed off too much with the estimated rough trim which left many gaps along the outer edges. Big *@#!!! so I sanded and used my small chisles and files to work off the well adhered planks on both sides of the subdeck to start those over again with some what were much longer than previously. I have scribed along the underside of the planks from the outer top strake for an oversized "do not cut beyond this line" boundary for further small CAREFUL refinement. An unnecessary blunder on my part to continue the old dance of do and redo. Rich
 
Thank you. I trimmed off too much with the estimated rough trim which left many gaps along the outer edges. Big *@#!!! so I sanded and used my small chisles and files to work off the well adhered planks on both sides of the subdeck to start those over again with some what were much longer than previously. I have scribed along the underside of the planks from the outer top strake for an oversized "do not cut beyond this line" boundary for further small CAREFUL refinement. An unnecessary blunder on my part to continue the old dance of do and redo. Rich
Rich, I never plank a deck sheet prior to installation for that reason, and because most decks have a camber that would create a gap between planks. That said, it would be better to install the deck sheet, and then start from the center outward towards the port and starboard sides. When you get to a board that needs to be notched, then you lay it in position next to the frame and make two tiny cuts with an xacto blade using the edge of the frame as your template. Then it’s just a matter of making the notch deep enough, which can be measured from the last full width board. I get exact fits every time this way! ;)
 
Rich, I never plank a deck sheet prior to installation for that reason, and because most decks have a camber that would create a gap between planks. That said, it would be better to install the deck sheet, and then start from the center outward towards the port and starboard sides. When you get to a board that needs to be notched, then you lay it in position next to the frame and make two tiny cuts with an xacto blade using the edge of the frame as your template. Then it’s just a matter of making the notch deep enough, which can be measured from the last full width board. I get exact fits every time this way! ;)
These to decks are flat but you are correct about the procedure. Live and learn. Rich
 
These to decks are flat but you are correct about the procedure. Live and learn. Rich
Center out was my BN procedure for the Foredeck which was only nibbing. For some reason I reversed the procedure on the after deck with those curved planks and closed straight in the middle. ????? Worked there but the foredeck lesson did not sit in as I went from nibbing to "Stantions" Lucky that the model will varely if ever seen from closer than 15 or 20 feet and then from below looking up. Rich
 
Center out was my BN procedure for the Foredeck which was only nibbing. For some reason I reversed the procedure on the after deck with those curved planks and closed straight in the middle. ????? Worked there but the foredeck lesson did not sit in as I went from nibbing to "Stantions" Lucky that the model will varely if ever seen from closer than 15 or 20 feet and then from below looking up. Rich
After the mistake of placing the outermost planks onto the subdeck, off of the model and not on a mounted subdeck to custom cut each plank as it engaged the stantntion/frame top, I had a now predicable problem of very small triangular pieces breaking off most of the time requiring those to be edge glued with fast adhesive in place for trimming and shaping sanding to continue. Dean's recommended system would have avoided this repetative and poorly executed deck at the edges.
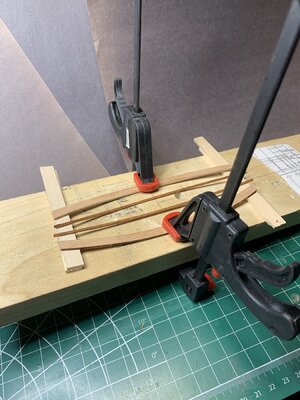
So while waiting for repairs to set I moved a following step of preparing some interior side members, two of which are very thick compared to others and too a lot of soaking, heat bending and are cooling/setting in an improvised jig:
Kyrenia Bending some interior side members.jpg
These will be stained as the other structural members a darker tone before installation. The other two were small in size and bent easily and have been stained.
Next was the fitting and adhesion of the after deck under some weight:
Kyrenia Setting the After Deck.jpg
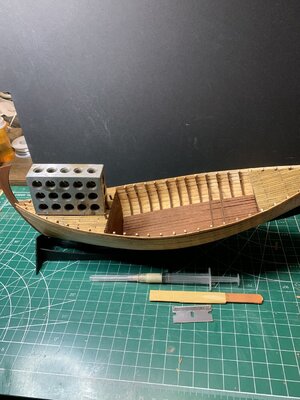
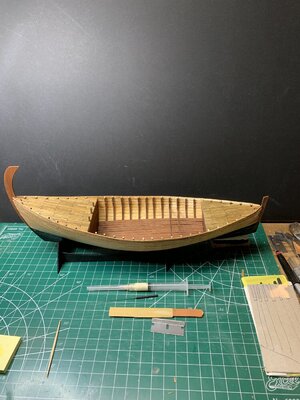
Removing the weight we can see both decks for comparison:
Kyrenia Decks set.jpg
Now rotating the hull 180 deg. here is a closer view of the after-Kyrenia After Deck.jpgdeck and associated upper bulkhead.
Kyrenia After Deck.jpg
That will receive a coat of Poly after the four interior side members are stained and set when all four longitudinal members and the deck can be done at the same time.
Rich
 
After using a few new sharp X-acto No. 11 blades to "chop" the remaining deck planks I set them in place and followed by trial and error cutting/filing and resizing the subdeck and planks to match the frames I was able to set it in place.
View attachment 264791

Now a bit closer to the kit fore bulkhead closer piece which is not correct to be closed:View attachment 264792
Messis sent me a photo of this same area from a Stbd view showing it should be open:
View attachment 264793
We can see from this what this area should be for accessability. The kit after bulkhead is also closed which is also open. Too late to cut it open and shape the frames. Oh well. . . .
Next I have the after subdeck marked off and cut the planks to length:
View attachment 264794
I also rough trimmed a sheet of midships floor planks (ceiling but incomplete as such) to go onto the frames between the two bulkheads. I may do that allowing the glue to dry while I work on the after deck assembly.
View attachment 264797
One more day's log work done. Rich
Hi Rich,
I am a bit late to the party again.
Interesting boat, quite a few challenges thrown in, well done looking forward to seeing the rest of this build.

Cheers,
Stephen.
 
After the mistake of placing the outermost planks onto the subdeck, off of the model and not on a mounted subdeck to custom cut each plank as it engaged the stantntion/frame top, I had a now predicable problem of very small triangular pieces breaking off most of the time requiring those to be edge glued with fast adhesive in place for trimming and shaping sanding to continue. Dean's recommended system would have avoided this repetative and poorly executed deck at the edges.
So while waiting for repairs to set I moved a following step of preparing some interior side members, two of which are very thick compared to others and too a lot of soaking, heat bending and are cooling/setting in an improvised jig:
View attachment 265284
These will be stained as the other structural members a darker tone before installation. The other two were small in size and bent easily and have been stained.
Next was the fitting and adhesion of the after deck under some weight:
View attachment 265285
Removing the weight we can see both decks for comparison:
View attachment 265287
Now rotating the hull 180 deg. here is a closer view of the after-View attachment 265288deck and associated upper bulkhead.
View attachment 265288
That will receive a coat of Poly after the four interior side members are stained and set when all four longitudinal members and the deck can be done at the same time.
Rich
Looks much better Rich! Good job! ;)
 
Yes I know. What you see on the replica, the vertical boards closing the compartment was put there a year ago.
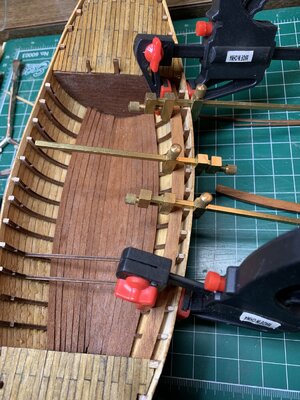
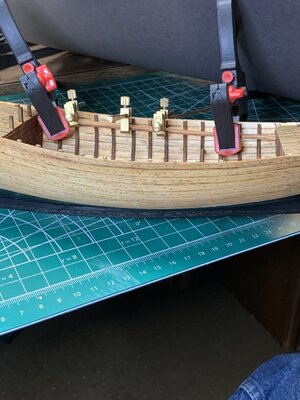
Very little done today on the model other than setting the inner wale which is not given a name but only a number and called a reinforcing member. The slight curve that I bent into the laser cut piece worked out to match the support brackets in the cut frames.
First is a top view with my clamps holding it for glue adhesion until tomorrow:
Kyrenia Inner Wale Setting Plan View.jpg
Now an attempted side view to see the set of the piece onto those brackets:
Kyrenia Inner Wale Setting SIde View.jpg
The curve matched better than I thought it may as it was an eyeballed and not measured approach. While it matches the brackets I noted that it did not precisely follow the hull planking edge line.
One more tomorrow. Rich
 
Very little done today on the model other than setting the inner wale which is not given a name but only a number and called a reinforcing member. The slight curve that I bent into the laser cut piece worked out to match the support brackets in the cut frames.
First is a top view with my clamps holding it for glue adhesion until tomorrow:
View attachment 265449
Now an attempted side view to see the set of the piece onto those brackets:
View attachment 265450
The curve matched better than I thought it may as it was an eyeballed and not measured approach. While it matches the brackets I noted that it did not precisely follow the hull planking edge line.
One more tomorrow. Rich
In consideration of faux deck planking nailing, I am not going to do that as the kit frames spacing does not match the deck pieces lengths so any plank end nailing would not find beams. I did not think about that planking lengths' revisions before time. Lesson for the future. Rich
 
Very little done today on the model other than setting the inner wale which is not given a name but only a number and called a reinforcing member. The slight curve that I bent into the laser cut piece worked out to match the support brackets in the cut frames.
First is a top view with my clamps holding it for glue adhesion until tomorrow:
View attachment 265449
Now an attempted side view to see the set of the piece onto those brackets:
View attachment 265450
The curve matched better than I thought it may as it was an eyeballed and not measured approach. While it matches the brackets I noted that it did not precisely follow the hull planking edge line.
One more tomorrow. Rich
Dear Rich
it's looks wonderful work and the result is great Thumbsup:)
 
Dear Rich
it's looks wonderful work and the result is great Thumbsup:)
Thank you. I keep working as the winds carry my tack along. ;) Sometimes it is ahead wind that luffs my sails and I have to ware around backwards to proceed windward again from that astern position but headway is the goal. Rich (PT-2)
 
Good work Rich! The lines of the ship are clearly showing with the decks installed and once all the interior fitments have been placed, she will be a looker!
 
Back
Top