-

Win a Free Custom Engraved Brass Coin!!!
As a way to introduce our brass coins to the community, we will raffle off a free coin during the month of August. Follow link ABOVE for instructions for entering.
-

PRE-ORDER SHIPS IN SCALE TODAY!
The beloved Ships in Scale Magazine is back and charting a new course for 2026!
Discover new skills, new techniques, and new inspirations in every issue.
NOTE THAT OUR FIRST ISSUE WILL BE JAN/FEB 2026
You are using an out of date browser. It may not display this or other websites correctly.
You should upgrade or use an alternative browser.
You should upgrade or use an alternative browser.
La Créole 1827 by archjofo - Scale 1/48 - French corvette
Wie cool ist das denn?
Great metal works - absolutely amazing
Great metal works - absolutely amazing
What a beautiful fine peace a metal work, Johan. That’s ‘Art’!Continuation: Equipping the yards - studding sail boom irons
After initial problems and a failed attempt, I set out with new courage to make another one. Probably to avoid the mistakes of the first attempt, such as brazing the fine parts of the hinges too much heat, so that they then ultimately become brittle and break off (see picture). In principle, it would also have been possible to make these joints with soft solder. However, for reasons of strength, I chose brazing.
View attachment 357199
On the next picture I show a photo collage, where single steps for making the studding sail boom iron are shown.
View attachment 357201
On the next picture you can see the studding sail boom iron still in uncleaned condition after brazing. The outer ring is still missing the hint of a hinge, which I will fix with soft solder.
View attachment 357200
Here a picture with spar:
View attachment 357202
And finally the result for the two inner studding sail boom irons of the fore topsail yard.
View attachment 357204
Making the outer studding sail boom irons should be much easier.
To be continued ...
Regards, Peter
- Joined
- Nov 10, 2019
- Messages
- 479
- Points
- 373

@Tobias
@Mirek
@Uwek
@Peter Voogt
Hello,
thanks for the nice comments.
Continuation: For topsail yard - studding sail boom iron
In the meantime I also made the outer studding sail boom irons for the fore topsail yard. Like the inner irons, they were made of brass strips with a width of 1.3 mm and a thickness of 0.25 mm. For brazing with a silver brazing paste I fix the pre-prepared parts on a ceramic plate, as already shown several times.
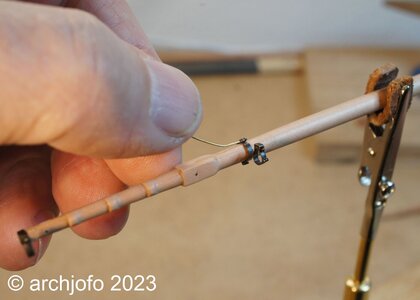
With the following picture I show how the assembly of the inner studding sail boom irons is done. The brass wire ø 0.4 mm, which still has to be shortened, takes over the function of a safety pin.
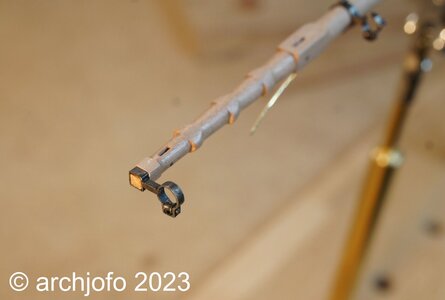
The next picture shows the outer iron of the fore topsail yard. The end of the yardarm is square with dimensions 2.2 / 2.2 mm.
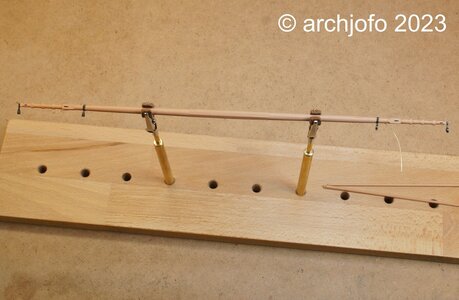
In order to be able to carry out the assembly and rigging work on the yards comfortably, I made myself this holding device.
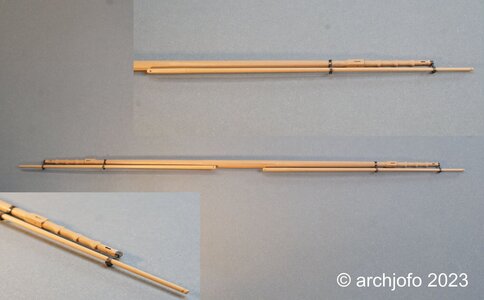
And finally, an overview of the construction status of the fore topsail yard, with the studding sail booms, which in the meantime has each received a hole at the octagonal end. At the outer end, a notch has been added for fastening the blocks.
The next step is the studding sail boom irons for the main topsail yard, the dimensions of which are somewhat larger.
To be continued ...
@Mirek
@Uwek
@Peter Voogt
Hello,
thanks for the nice comments.
Continuation: For topsail yard - studding sail boom iron
In the meantime I also made the outer studding sail boom irons for the fore topsail yard. Like the inner irons, they were made of brass strips with a width of 1.3 mm and a thickness of 0.25 mm. For brazing with a silver brazing paste I fix the pre-prepared parts on a ceramic plate, as already shown several times.
With the following picture I show how the assembly of the inner studding sail boom irons is done. The brass wire ø 0.4 mm, which still has to be shortened, takes over the function of a safety pin.

The next picture shows the outer iron of the fore topsail yard. The end of the yardarm is square with dimensions 2.2 / 2.2 mm.

In order to be able to carry out the assembly and rigging work on the yards comfortably, I made myself this holding device.

And finally, an overview of the construction status of the fore topsail yard, with the studding sail booms, which in the meantime has each received a hole at the octagonal end. At the outer end, a notch has been added for fastening the blocks.

The next step is the studding sail boom irons for the main topsail yard, the dimensions of which are somewhat larger.
To be continued ...
Hallo Johann, absolutely perfect. The best I've ever seen.
Johann, the caliber of your work is breathtaking.
Hallo Johann,
Just PERFECT!!!
I'm following your building reports with great interest!
All The Best!
Kirill
Just PERFECT!!!
I'm following your building reports with great interest!
All The Best!
Kirill
- Joined
- Nov 10, 2019
- Messages
- 479
- Points
- 373

@pianoforte
@dockattner
@shota70
@kirill4
@Mirek
Hello friends of modeling,
thank you very much for your interest and for the praising comments. It is always a pleasure when there is interest in our work.
Continuation: Main topsail yard - studding sail boom iron - Cercle de bout-dehors de vergue
I continued with the studding sail boom irons for the main topsail yard. Since I had thoughtlessly started to make the rings, I forgot to make the bulge for the rollers. Since these rings were already soldered, I tried to solder on this bulge, which then also worked quite well and the even result became more precise.
As they say: the proof of the pudding is in the eating ...
The following picture shows the rings with the parts to be soldered on.
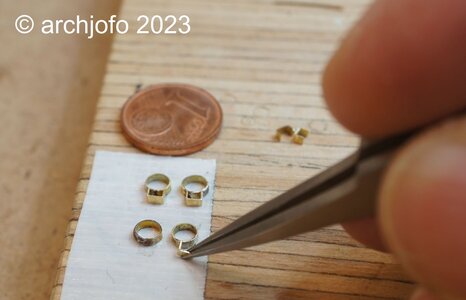
Here on this picture you can see my " soldering station ".
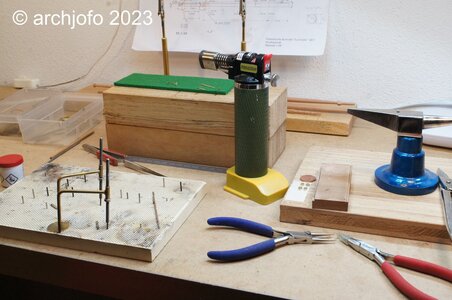
On the ceramic hole plate you can fix the parts to be soldered quite well.
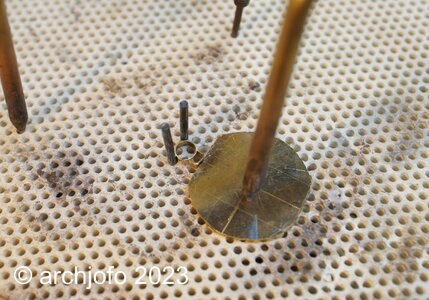
The jeweler's saw is then used to remove the segments of the rings that are not necessary.
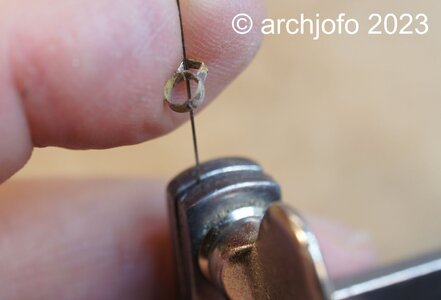
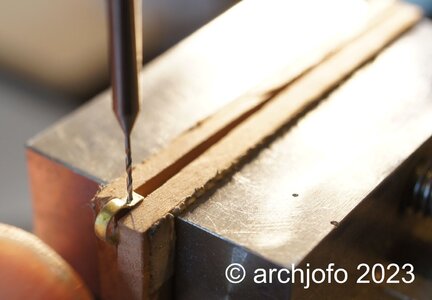
The next picture shows the drilling of the roller bearings with a 0.5 mm drill.
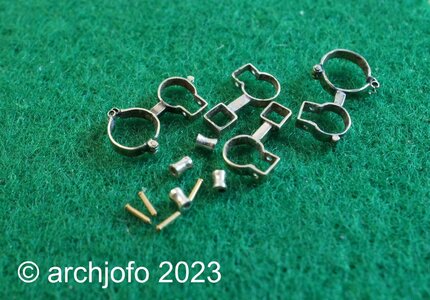
In the picture, all studding sail boom iron for the main topsail yard are united before blacking. The inside diameters of the spar hangers for the fore topsail yard are 2.7 mm, while those for the main topsail yard are 3.2 mm.
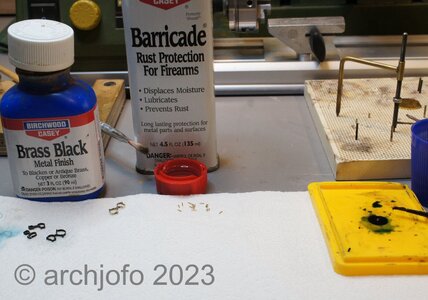
For blackening, I still use Brass Black, as I have had very good experiences with this agent. I coat the parts with a brush until they get the desired coloration. This proven method of working allows me to use the agent very sparingly.
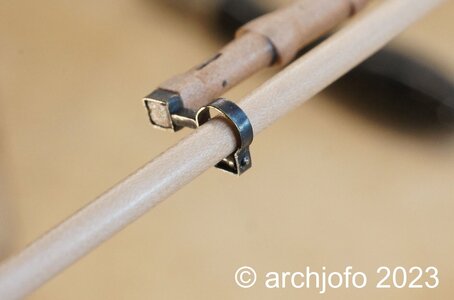
The last two pictures show the studding sail boom irons already mounted to the main topsail yard.
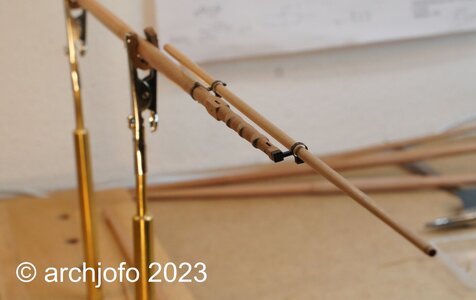
Next, I make the irons for the fore yard. At the same time, I'm researching other equipment for the yards, such as attachment of the footropes, jackstays - yes or no, and so on.
See you soon ...
@dockattner
@shota70
@kirill4
@Mirek
Hello friends of modeling,
thank you very much for your interest and for the praising comments. It is always a pleasure when there is interest in our work.
Continuation: Main topsail yard - studding sail boom iron - Cercle de bout-dehors de vergue
I continued with the studding sail boom irons for the main topsail yard. Since I had thoughtlessly started to make the rings, I forgot to make the bulge for the rollers. Since these rings were already soldered, I tried to solder on this bulge, which then also worked quite well and the even result became more precise.
As they say: the proof of the pudding is in the eating ...
The following picture shows the rings with the parts to be soldered on.

Here on this picture you can see my " soldering station ".

On the ceramic hole plate you can fix the parts to be soldered quite well.

The jeweler's saw is then used to remove the segments of the rings that are not necessary.

The next picture shows the drilling of the roller bearings with a 0.5 mm drill.

In the picture, all studding sail boom iron for the main topsail yard are united before blacking. The inside diameters of the spar hangers for the fore topsail yard are 2.7 mm, while those for the main topsail yard are 3.2 mm.

For blackening, I still use Brass Black, as I have had very good experiences with this agent. I coat the parts with a brush until they get the desired coloration. This proven method of working allows me to use the agent very sparingly.

The last two pictures show the studding sail boom irons already mounted to the main topsail yard.


Next, I make the irons for the fore yard. At the same time, I'm researching other equipment for the yards, such as attachment of the footropes, jackstays - yes or no, and so on.
See you soon ...
Last edited:
I am speechless……. Unbelievable what you make, Johann. My respect!@pianoforte
@dockattner
@shota70
@kirill4
@Mirek
Hello friends of modeling,
thank you very much for your interest and for the praising comments. It is always a pleasure when there is interest in our work.
Continuation: Main topsail yard - studding sail boom iron - Cercle de bout-dehors de vergue
I continued with the studding sail boom irons for the main topsail yard. Since I had thoughtlessly started to make the rings, I forgot to make the bulge for the rollers. Since these rings were already soldered, I tried to solder on this bulge, which then also worked quite well and the even result became more precise.
As they say: the proof of the pudding is in the eating ...
The following picture shows the rings with the parts to be soldered on.
View attachment 359240
Here on this picture you can see my " soldering station ".
View attachment 359241
On the ceramic hole plate you can fix the parts to be soldered quite well.
View attachment 359242
The jeweler's saw is then used to remove the segments of the rings that are not necessary.
View attachment 359243
The next picture shows the drilling of the roller bearings with a 0.5 mm drill.
View attachment 359244
In the picture, all studding sail boom iron for the main topsail yard are united before blacking. The inside diameters of the spar hangers for the fore topsail yard are 2.7 mm, while those for the main topsail yard are 3.2 mm.
View attachment 359246
For blackening, I still use Brass Black, as I have had very good experiences with this agent. I coat the parts with a brush until they get the desired coloration. This proven method of working allows me to use the agent very sparingly.
View attachment 359247
The last two pictures show the studding sail boom irons already mounted to the main topsail yard.
View attachment 359248
View attachment 359249
Next, I make the goggles for the fore yard. At the same time, I'm researching other equipment for the yards, such as attachment of the footropes, jackstays - yes or no, and so on.
See you soon ...
Regards, Peter.
Hello Johann, an absolute WOW effect. I am floored by this absolutely accurate work and was secretly looking forward to these great pictures, because they play your whole build from the beginning. Great admiration.
- Joined
- Oct 17, 2020
- Messages
- 1,691
- Points
- 488

@pianoforte
@dockattner
@shota70
@kirill4
@Mirek
Hello friends of modeling,
thank you very much for your interest and for the praising comments. It is always a pleasure when there is interest in our work.
Continuation: Main topsail yard - studding sail boom iron - Cercle de bout-dehors de vergue
I continued with the studding sail boom irons for the main topsail yard. Since I had thoughtlessly started to make the rings, I forgot to make the bulge for the rollers. Since these rings were already soldered, I tried to solder on this bulge, which then also worked quite well and the even result became more precise.
As they say: the proof of the pudding is in the eating ...
The following picture shows the rings with the parts to be soldered on.
View attachment 359240
Here on this picture you can see my " soldering station ".
View attachment 359241
On the ceramic hole plate you can fix the parts to be soldered quite well.
View attachment 359242
The jeweler's saw is then used to remove the segments of the rings that are not necessary.
View attachment 359243
The next picture shows the drilling of the roller bearings with a 0.5 mm drill.
View attachment 359244
In the picture, all studding sail boom iron for the main topsail yard are united before blacking. The inside diameters of the spar hangers for the fore topsail yard are 2.7 mm, while those for the main topsail yard are 3.2 mm.
View attachment 359246
For blackening, I still use Brass Black, as I have had very good experiences with this agent. I coat the parts with a brush until they get the desired coloration. This proven method of working allows me to use the agent very sparingly.
View attachment 359247
The last two pictures show the studding sail boom irons already mounted to the main topsail yard.
View attachment 359248
View attachment 359249
Next, I make the irons for the fore yard. At the same time, I'm researching other equipment for the yards, such as attachment of the footropes, jackstays - yes or no, and so on.
See you soon ...
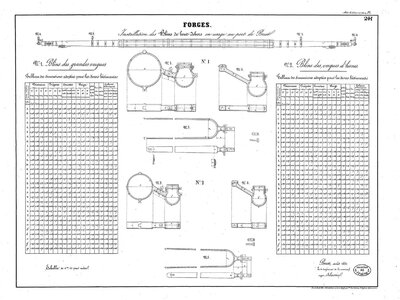
Good morning, I hope to please you with this image
- Joined
- Aug 8, 2019
- Messages
- 5,584
- Points
- 738

I don't think you please him. When this image is true, it looks like we got here a re-do.Good morning, I hope to please you with this image
just joking Frank
- Joined
- Nov 10, 2019
- Messages
- 479
- Points
- 373

Thanks for that, but I just wanted to point out that I already knew it.I just wanted to be of help
All good!


