LE ROCHEFORT

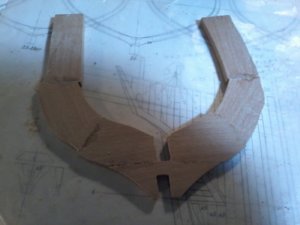
FRAME No.19 sanded down to within 3mm now making sure it is the same all aroun exterior and interior, will take the top timber a little more off., what do yo think GILLES it was a time consuming thing it could have gone much faster if i would have used a 6ogrit drum in my drmell did that to get some sanded then switched to a 220 grit for the rest of it the 220 really gives a nice finish even went over the frame with finger to see if any high or low spot there 20200323_232139.jpg
 
Good!
Do not do anything more to this frame: keep the paper as is, on top. I will come back in a while and explain how you can transfer the lines to the back of the frame.
"This frame probably does not need any beveling at this point as it is fairly close to the master frame: it only has a very slight bevel between the front and back faces."

This is, of course, unless someone else comes up with an idea before I share mine.

So, in the meantime... to other members,
At this point, the frame could have been built any other way, It is complete with the the 2 layers assembled, the edges have been squared.

In order to shape the bevels.
As a practice exercise for frames that will need to be beveled prior to installation onto the keel:
the goal is to transfer lines to the back of this frame.
So go at it and share your experience on this particular subject. Thank you.

Again and as always, other members may have other solutions to be applied considering the context of this build and the work that has already been done.

Don will not redo his frames for the sake of transferring the needed lines. The solution must apply to this particular situation. Thank you.


G.
 
Last edited:
There are different ways to transfer the lines onto the back of the frame while doing your best to align the pattern with the front of the frame: here are 2 of them.

The first method would require copying or reproducing the entire frame pattern onto thick / stiff paper (card stock or such), then cut out the desired profile, in this case the lines relevant to the back of the frame. You would need to cut this pattern right to the line (no extra space around), then either glue the pattern to the back surface or trace around the pattern, making sure everything is lined up with the lines on the front face. Due to eyesight issues, this may not be ideal

The second method is mostly based on how I build my own frame, which, again, is described here:
It is a bit more simple and given your situation, it may be more suitable.
Using the link above, you would need to follow:
- step 2 a) tracing the frame pattern onto a sheet of tracing paper. You need to use a fairly soft lead pencil - HB pencil will work. Make sure you extend the joint lines past the width of your frame as shown in the image included in the link.
then,
- jump to step 6 where you would glue the entire frame surface (back of the frame) to the pattern you just traced. For that you would need to use some kind of white glue (I use all purpose craft glue for that).

In both cases, You do have to make sure that the notches, the contour lines and the all the joint lines seen at the front of the frame match all the extended joint lines, the notch as well as the lines at the top of the frame on the tracing paper.

The last steps would be to let the glue dry completely and then rip the paper off the surface, Just pull the paper off, no solvent. Once the paper has been removed, you should still have the lines printed on a thin layer of the glue. You can then work the bevels, then cleanup the frame by removing the paper from the front face and the thin layer of glue, including the lines, from the back face.

To make sure it works for you, You could easily do a test using a small piece of tracing paper with some lines traced on it, glued to a piece of lumber and ripped from it before doing this to the frame.

Again and as always, other members may have other solutions keeping in mind the context of this build and the work that has already been done.

G.

PS: Now that you have built your frames the way you wanted, the "difficult and silly way" as per some very smart people on here, you are set to continue building your ship.
The rest of the construction should be straightforward, even to them. From here forward, I am certain that there are more simple ways to proceed compared to what I can offer. So let these smart, helpful members take over from here, as far as the building process in concerned, I can still help you with reading the plans if needed. These people should know who they are from past exchanges in this log and yesterdays request for help elsewhere ... others may join in as well. Good luck.
 
Last edited:
Hi Don,
Frame looks good, almost looks like it was made using blanks. Thumbsup
I applaud you for doing everything you can to succeed. You have come a long way in the past number of weeks.

Regards.
G.
 
ALL THAKS TO YOU MY FRIEND ALL THANKS, IT IS NOT EVERYONE WHO HAS THE PATIENCE TO KEEP EXPLAING SOMETHING THAT SOMEONE CAN NOT GRASP AT THE TIME, BRAVO TO YOU. Don
 
Hello Don, Yes you have come a long way and that is for sure. I still can not understand why you are making your frames assembly so difficult. If you went back to your Halifax build, taped your plans to the back of a piece of glass, fit and glue up your framing pieces you will achieve a much easier and a much more enjoyable way in order to build your ship. I am not criticizing you in any way, just trying to let you know there is a much easier and more enjoyable way to build all of those ship frames, [ my two cents worth] I am just trying to make things easier for you that's all.
Gilles has been very patient and helped you a great deal with very much improved results, keep up the great work and above all enjoy your hobby.
Regards Lawrence
 
Hi Lawrence, REMEMBER MY HALIFAX WAS A SEMI-KIT FROM LUMBERYARD, it was enjoyable, ALSO LAWRENCE, age has taken some toll on me, so I have to adapt, also it really is not that dificult right now to do the frames most go to gether quit easily, also first scratc build as a complete project, this was my GOAL FROM THE START to FIND AND FINALLY UNDERSTAND HOW THE FRAMES GO TOGETHE , my blanford frames were a disaster total had to plank it almost to keel, so this is a training and learning experience for me, THIS TIME IT IS NOT THE RESULT BUT THE PROCESS, SAME GOES FOR BEVELING NEVER COULD DO IT PROPERLY, IF YOU NOTICE ON MY LAS PICTURE WITH THE JOINTS IT LOOKS A LOT LIKE A HAHN TYPE BLANK, so i call in a semi blank and my real interest in ship modeling right at this time is hull construction, i want to understand it as best i can, with my remodeling of my work shop when i can use my home made spindel sander the sanding will be much quicker, right now I CAN PREPARE A FRAME FROM PATTERN TO MILLING NOTCHES IS one day per frame, SANDING THE FRAME TO A PRLIMANARY SHAPE GOES QUICK I USE 2 DREMELLS ONE WIT A 60 grit THEN ONE WITH A 220 grit, your sugestion and your method is what GILLES WAS AFTER, i am open to all sugestions and methods, now i am trying to learn how best to line up the firsst and the second layer of the double frame the first layer goes very quickly and as the picture shows joints now with my disk sander ar coming out quite well now to line up the second layerni am doing it but do not like the method, sometimes OK sometimes not, but with dry fitting and some work i can get it to work, and i have to be extremly carefull that the top timber not only line up but at the same height, keep the ideas flowing, just to make a pointthis is the first build that i have concentrated on just one project and not at least 2 going, futer problems that i for see and hope it not is a BIG ONE THAT IS INSTALLING FRAMES ONTO KEEL, AS I SAID BEFORE AND I DO NOT COMPLAIN, I CAN NOT CUT A JIG JUST KNOW WAY EYE SIGHT , HAND BRAIN EYE COORDATION, NOW CAN NOT STAND WITHOUT HOLDING ON TO SOMETHING, so i have to adapt, and believe me i am really totlly grateful to JESUS FOR GIVING ME WHAT I HAVE, i have ordered the small building slip/jig from HOBBY WORLD I have the large one but it is to big for my work area and i need space for my chair to move around, so lots to do but it is fun really it issuggestions an methods are what we are looking for so THANK YOU LAWRENCE AND KEEP IT COMING, one other thing i am out of material and have 7 more frames to go there are a total of 32, so what i will be concentrating on is bevels and getting the meat dow to 3mm on all frames. SORRY FOR THE LONG THREAD. Don
 
Hi Lawrence, REMEMBER MY HALIFAX WAS A SEMI-KIT FROM LUMBERYARD, it was enjoyable, ALSO LAWRENCE, age has taken some toll on me, so I have to adapt, also it really is not that dificult right now to do the frames most go to gether quit easily, also first scratc build as a complete project, this was my GOAL FROM THE START to FIND AND FINALLY UNDERSTAND HOW THE FRAMES GO TOGETHE , my blanford frames were a disaster total had to plank it almost to keel, so this is a training and learning experience for me, THIS TIME IT IS NOT THE RESULT BUT THE PROCESS, SAME GOES FOR BEVELING NEVER COULD DO IT PROPERLY, IF YOU NOTICE ON MY LAS PICTURE WITH THE JOINTS IT LOOKS A LOT LIKE A HAHN TYPE BLANK, so i call in a semi blank and my real interest in ship modeling right at this time is hull construction, i want to understand it as best i can, with my remodeling of my work shop when i can use my home made spindel sander the sanding will be much quicker, right now I CAN PREPARE A FRAME FROM PATTERN TO MILLING NOTCHES IS one day per frame, SANDING THE FRAME TO A PRLIMANARY SHAPE GOES QUICK I USE 2 DREMELLS ONE WIT A 60 grit THEN ONE WITH A 220 grit, your sugestion and your method is what GILLES WAS AFTER, i am open to all sugestions and methods, now i am trying to learn how best to line up the firsst and the second layer of the double frame the first layer goes very quickly and as the picture shows joints now with my disk sander ar coming out quite well now to line up the second layerni am doing it but do not like the method, sometimes OK sometimes not, but with dry fitting and some work i can get it to work, and i have to be extremly carefull that the top timber not only line up but at the same height, keep the ideas flowing, just to make a pointthis is the first build that i have concentrated on just one project and not at least 2 going, futer problems that i for see and hope it not is a BIG ONE THAT IS INSTALLING FRAMES ONTO KEEL, AS I SAID BEFORE AND I DO NOT COMPLAIN, I CAN NOT CUT A JIG JUST KNOW WAY EYE SIGHT , HAND BRAIN EYE COORDATION, NOW CAN NOT STAND WITHOUT HOLDING ON TO SOMETHING, so i have to adapt, and believe me i am really totlly grateful to JESUS FOR GIVING ME WHAT I HAVE, i have ordered the small building slip/jig from HOBBY WORLD I have the large one but it is to big for my work area and i need space for my chair to move around, so lots to do but it is fun really it issuggestions an methods are what we are looking for so THANK YOU LAWRENCE AND KEEP IT COMING, one other thing i am out of material and have 7 more frames to go there are a total of 32, so what i will be concentrating on is bevels and getting the meat dow to 3mm on all frames. SORRY FOR THE LONG THREAD. Don
Hello Don, Sorry for being so blunt, I am truly just trying to help you out. By using your disk sander and your miter gage your joints will come to you much easier, speed is not a question here we are both retired so this is not a job but an enjoyable hobby to pass away many enjoyable hours.
As far as age goes I am not that far behind you so really you can not use that one, but a nice try.
I would suggest that you do not come that close to the line when beveling your frames, just in case they are off a bit, leave a little extra wood there to even out the hull shape, also tilt you table on your spindle sander, will make this task much easier.
Regards Lawrence
 
HI LAWRENCE, NO PROBLEM AT ALL THIS IS WHAT I AM LOOKING FOR THIS WILL HELP ME ON MY SCRATCH BUILD JOURNEY, right now a problem occured last night and today with my latest frame, good timing for that, my first layer went like clock work joints just tight did not take long at all, now the problem and i really have to study what GILLES IS SAYING, my second layer was a huge problem, this is what i was saying before som good some not so good requiring work lots of dry fitting so i finally got correct, i lined up the keel notches but could not get both sides of the 2nd layer to line up, it was like a hit and miss thing so i really need to get some more info. from GILLES AND OTHERS PLEASE CHIP IN guys, will send you a PM. THANKS Don
 
Hello Don, I do hope that I have not offended you in any sort of a way, just trying to help. I know that 3 or 4 trips per day to my work shop in the basement sure makes my old legs scream at times, but I try to push that aside and make fewer trips, the trick is to remember to get things done with fewer trips. spend most of my time siting in my Old Ship Yard and that dose help.
Regards Lawrence
 
Don,
One of the problem is that in the past few weeks, I have explained in details how to build frames. They may not be built the way some people here would like you to build them but.....
At no point, have I indicated to build 1 layer, put it aside, then build the second layer, and put it aside as well. Now you are left with 2 separate layers needing to be assembled / glued together to make 1 full frame.

2 questions:

Do you have the lines (paper templates) on both layers?

Do you have tracing paper?

G.
 
Hi Lawrence,

Your post is very familiar and follows recent posts from others and unfortunately, it somewhat triggers a strong reaction in me. This comes up every once in a while and I have had this argument many times before, so my reply is not especially addressed to you… I just get a bit pissed in these cases.

Anyhow, I do not have the intension of picking a fight with anyone here (although I am certain Mrs Hanks will find an appropriate “smiley” for the content below), but I am sure he and a couple other members are expecting it, so I just need to respond one last time…

I still cannot understand why you are making your frames assembly so difficult.


What I personally still do not understand is the fact that some people are so obstinate into thinking that making frames any other way than what they know is more difficult. Honestly… is it?
Especially if one actually follows the guidance given including all the steps in sequence.


If you went back to your Halifax build, taped your plans to the back of a piece of glass, fit and glue up your framing pieces you will achieve a much easier and a much more enjoyable way in order to build your ship.


Refer to the reply above and add the following comment:

Making frames the way Don is trying to make them is not more difficult. The joint lines still have to be angled accurately for a good butt-fit to the part next to it, the notches still have to be cut, etc…. Yes you may assemble the whole frame template to make it one piece before the next step. Eventually, the frame pattern still needs to be transferred to the assembled blanks. Then, the contour of the frame still needs to be cut. Then the frame still needs to be beveled where needed. Then, Don still needs to make sure that all this is done fairly accurately, and for some reasons Don has listed, either way, he still needs to make his frames oversized to compensate for some probable errors.

So honestly, someone, please explain to me why is one technique more difficult than the other. The steps are the same and on top of everything else, please tell me what the difference is between Don’s last photo (above) and what some say is the easier way: the blank method.

It looks pretty much the same to me…

Furthermore,

Who the heck is to say that one way of making frames is more enjoyable one way or the other?

What does one really mean by that?


I am not criticizing you in any way, just trying to let you know there is a much easier and more enjoyable way to build all of those ship frames, [ my two cents worth] I am just trying to make things easier for you that's all.


There are 2 ways to avoid the “pain” of building frames.

1) have them laser cut or move on to build a kit. Curtom lasercutting will not avoid assembly and everything needing to be done after that.

2) I you want to still scratch build your ship, accept the fact that building frames is boring, repetitive, monotonous, a pain in ass and that you need to pay attention to what you do while following certain steps.

It does not matter what technique you use. Using that other technique, cutting dozens of blanks to correct angles is just as painful. Assembling the blanks is just as painful. Cutting the entire frame pattern in 1 piece is just as painful. Cutting the frame to final shape is just as painful. Beveling the sides of frame that need it is just as painful.


Again,

I am not entirely sure why some people think their way is easier, more enjoyable and whatever other adjective one may add, than the other. To me it is just different, as it requires the same basic steps, the same attention to details and it will give the same results, the same “enjoyment”. If I may make a suggestion… try the other way sometimes.

There seems to be a “cultural” divide on this subject and that is unfortunate.

In any case, “blanks” or not, Don’s frames are pretty much done. The 2 layers only need to be assembled. Form there ….. we will see.

Furthermore, one would find that making frames while following given guidance is actually quite enjoyable. Again as long as it is done following steps in proper sequence: and I would add, the same would apply to the other method.

It would be easy to mess-up using either method.


Just my 2 cents.
 
Last edited:
Gilles I do not do it that way i do the first layer as shown the second layer is put together like you do in a brick fashion FOOT, FUTTOCKS, TOP TIMBERS, I never do them like two layers , PATTERNS ON BOTH SIDES, just like i show in pictures, NEED YOUR HELP TO continue this. THANKS Don
 
I admit that I am confused, some photos (like the last one) shows 1 layer completely assembled and no second layer and no paper pattern in sight.

So right now, your frames are all 2 layers glued together and patterns on 2 layers ? Yes?

1 set of paper patterns is glued to the top layer. Where is the second set of paper pattern? The back side?
Just to make sure ( visually), can you please post 2 photos of the same frame: 1 showing the top layer then flip the frame for the 2nd photo to show the back side. Thank you.
 
Last edited:
Hi Lawrence,

Your post is very familiar and follows recent posts from others and unfortunately, it somewhat triggers a strong reaction in me. This comes up every once in a while and I have had this argument many times before, so my reply is not especially addressed to you… I just get a bit pissed in these cases.

Anyhow, I do not have the intension of picking a fight with anyone here (although I am certain Mrs Hanks will find an appropriate “smiley” for the content below), but I am sure he and a couple other members are expecting it, so I just need to respond one last time…


What I personally still do not understand is the fact that some people are so obstinate into thinking that making frames any other way than what they know is more difficult. Honestly… is it?
Especially if one actually follows the guidance given including all the steps in sequence.


Refer to the reply above and add the following comment:

Making frames the way Don is trying to make them is not more difficult. The joint lines still have to be angled accurately for a good butt-fit to the part next to it, the notches still have to be cut, etc…. Yes you may assemble the whole frame template to make it one piece before the next step. Eventually, the frame pattern still needs to be transferred to the assembled blanks. Then, the contour of the frame still needs to be cut. Then the frame still needs to be beveled where needed. Then, Don still needs to make sure that all this is done fairly accurately, and for some reasons Don has listed, either way, he still needs to make his frames oversized to compensate for some probable errors.

So honestly, someone, please explain to me why is one technique more difficult than the other. The steps are the same and on top of everything else, please tell me what the difference is between Don’s last photo (above) and what some say is the easier way: the blank method.

It looks pretty much the same to me…

Furthermore,

Who the heck is to say that one way of making frames is more enjoyable one way or the other?

What does one really mean by that?


There are 2 ways to avoid the “pain” of building frames.

1) have them laser cut or move on to build a kit. Curtom lasercutting will not avoid assembly and everything needing to be done after that.

2) I you want to still scratch build your ship, accept the fact that building frames is boring, repetitive, monotonous, a pain in ass and that you need to pay attention to what you do while following certain steps.

It does not matter what technique you use. Using that other technique, cutting dozens of blanks to correct angles is just as painful. Assembling the blanks is just as painful. Cutting the entire frame pattern in 1 piece is just as painful. Cutting the frame to final shape is just as painful. Beveling the sides of frame that need it is just as painful.


Again,

I am not entirely sure why some people think their way is easier, more enjoyable and whatever other adjective one may add, than the other. To me it is just different, as it requires the same basic steps, the same attention to details and it will give the same results, the same “enjoyment”. If I may make a suggestion… try the other way sometimes.

There seems to be a “cultural” divide on this subject and that is unfortunate.

In any case, “blanks” or not, Don’s frames are pretty much done. The 2 layers only need to be assembled. Form there ….. we will see.

Furthermore, one would find that making frames while following given guidance is actually quite enjoyable. Again as long as it is done following steps in proper sequence: and I would add, the same would apply to the other method.

It would be easy to mess-up using either method.


Just my 2 cents.
Hello Gilles, Sorry to rile you up so, this was not at all my attention, Don PM me asking for some input on building the frames for his ship, this I gave to the best of my knowledge. I in no way tried to imply that my way was the only way, merely giving Don a few choices to build his ship as he prefers.
Regards Lawrence
 
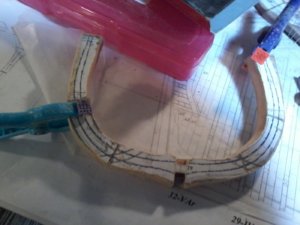
GILLES am I doing this wrong MY PROCEDURE IS TO DO THE FIRST LAYER complete using pins, as i can not stand, once that is done on my master sheet with wax paper to glue , forgot to say i mill the notches first on both layers so i set my mill up once, in order to do the notches i have to first make saw cuts (JAPANESE SAW) because of a lot of meat to much to mill after saw cut i then use the mill,, forgot before that i use my pen brush in blue to define the edges then use calipers and draw the outne oversize by 6.5 mm then intial sanding with with both layers glued to gether soon i will start sanding like i showed the picture of i will do this reducing the frme to 3mm, then pray for bevels, i have explained why i am doing this in afew posts this is what i anticipated when i started this i want to do this correctly it is a learning priocess for all my futer build scratch or kit or semi scratch after many failed attempts at doing frames right now this is the way ichoose to do them. others have other ways,it is what works, i think in the future i will have enough experience to not have to leave so much meat on the frames but now this works for me the whole frame procees from start to finish is one day per frame with preps for the next day frame, please guys lets learn enjoy our hobby and have fun. Don
 
Gilles I WILL TAKE A PICTURE OF THE FRAME I AM WORKING ON I WILL SHOW BOTH SIDES SO YOU CAN SEE THE WAY I AM DOING THIS GIVE ME A MINUTE the frame is at the stage for the first sanding it is rough this is done with a 60 grit sander in my dremell after getting to shape i rhen switch to 220 grit give me a minute and i will post picture., Don SORRY FOR THE CONFUSION GUYS MY BAD
 
Back
Top