I certainly will. THANKS AGAIN Don
-

Win a Free Custom Engraved Brass Coin!!!
As a way to introduce our brass coins to the community, we will raffle off a free coin during the month of August. Follow link ABOVE for instructions for entering.
-

PRE-ORDER SHIPS IN SCALE TODAY!
The beloved Ships in Scale Magazine is back and charting a new course for 2026!
Discover new skills, new techniques, and new inspirations in every issue.
NOTE THAT OUR FIRST ISSUE WILL BE JAN/FEB 2026
You are using an out of date browser. It may not display this or other websites correctly.
You should upgrade or use an alternative browser.
You should upgrade or use an alternative browser.
LE ROCHEFORT
- Thread starter donfarr
- Start date
- Watchers 37
-
- Tags
- ancre le rochefort
Hallo Gilles,Don,
If you are willing to do a bit of reading, please follow this link:
Where you can open a PDF document in english "The SlipwayModel building | photography
gkorent.wixsite.com
(the red PDF)". Open the document, scroll down to page 75 and you will find a lot of information about building frames. The ship is different than what you are building but the information can still be applied.
The French version of the document "Gazette" is more complete and in there, one must scroll down to page 67 to find the same info.
Please keep in mind that these were published in 2004 / 5. As I was building the ship then, I kept writing such docs until 2007 but never published them or released them to the public. Unfortunately everything was later lost. These docs were found online a while back.
Update: I have added 5 separate docs (grey PDFs) in the link above. All together they include everything that is shown in the single French red doc (Gazette)
2nd Update: For the complete set in French, English and Italian see the following link:
Where you can just choose each issue in each language.
G.
many many thanks for putting these PDFs together and make them available for the public here in SOS.
These docs will help a lot of people very much - I know them already from 2004/2005, but it is very good to republish them in this way.
Great help and information
YES A GREAT HELP, THANKS AGAIN Don
another update this is so i know if i am on the right track, this is showing frame No.1 first part of double frame, i am on the line for the exterior both front and rear are matching very well, but the lower futtocks on the exterior side are quite apart from the drawings do not know why and i don not want to sand more as I AM ON THE LINE and do not ruin it again, help please again thanks to all for the great help much appreciated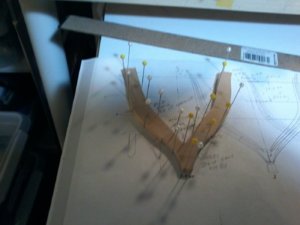
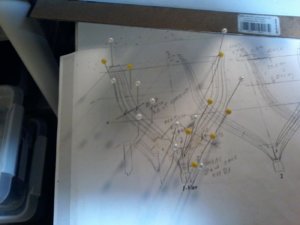
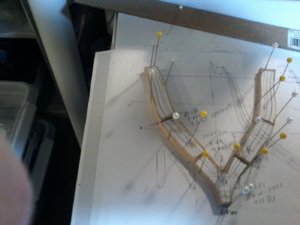
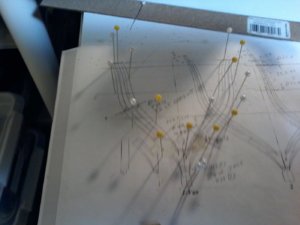


Don
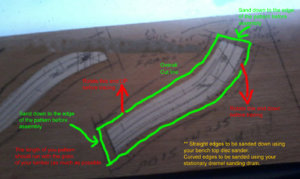
Your parts are still way oversize on internal and external faces.You cannot get these edges to align with the drawings with this extra on the outside.Only way to line them up is to draw lines on the end of each piece where the joins are using a square.These should be the outside lines.Align each piece individually one at a time and draw lines around the edges.This will enable you to set the pieces in their true position.The pasted on drawings will then be truly in line with the plan below.
Kind Regards
Nigel
Hi NIGEL, NOT QUITE UNDERSTANDING WHAT YOU MEAN BY DRAW LINES ON THE END OF EACH PIECE, AND DO I HAVE TO REMAKE FRAME No.1 OR JUST SAND IT DOWN TO THE LINE AND HOW TO GET THE PAPER PATTERNS TO BE CUT ACCURATLY, MOST OF MY FRAMES DO LINE UP BOTH SIDES THE ONES THAT DO NOT ARE BEING RE MADE, SORRY FOR HAVING A MENTAL BLOCK ON THIS, YOUR HELP IS TRULY GREAT AND GIVES ME CONFIDENCE TO KEEP ON PLUGGING ON THIS. THANKS AGAIN Don
OOPS I do align each piece individually but do not understand about drawing the lines, i draw the joint lines on the paper patterens as yo see in the pictures, NIGEL THIS IS A MAJOR ITEM FOR ME TO LEARN HOW TO CUT THE PATTERENS ACCURATLY this will help me in all of my future scratch builds just invaluble help. THANKS AGAIN SO MUCH Don
- Joined
- Feb 18, 2019
- Messages
- 717
- Points
- 353

Hi Don,
My suggestion in regards to frame making is to start with the mid-ship frames and work your way out towards front and back as the bevels get steeper in these areas. By the time you have the mid frames made, you should have enough practice and comprehension of the process that steeper bevels should become easier. Again, the process is the same for every frame.
Another point is that you should carefully transfer each individual frame onto tracing paper showing all the pattern lines of a particular frame. You will find that it should make it easier: no distractions such as notes, markings and other frame cross-over. One sheet of paper = one frame. Use the tracing paper transfer to build each frame. When assembling the frame, glue each part of the back face of the frame to the tracing paper sheet (using craft white glue), assemble each part of the frame using your regular wood glue or whatever you like to use. Build your complete frame atop the tracing paper and you will end up with your frame back face automatically showing your bevel lines when you flip the frame over..
One way to practice tracing, cutting and assembling the frames (in 2 layers) is to use foam-core material. Once you have cut and assembled the frame, you can practice on transferring the bevel lines, especially on the back side of the frame. Foam-core is usually 3/16 in thickness and you can actually practice cutting the bevels as well (in 3D)
Hope it helps.
G
Hi Don
I have done a sketch to show you what I meant.Lines are drawn on the ends of each futtock to position over the drawing as you have left meat on both inside and outside.
Cutting your Patterns a few mm outside the lines makes it easier to see to cut out rather than following the cut edge of paper.Also using a highlighting pen,go over the outermost lines on the pattern.You will be less likely to follow the wrong line with the saw.
Kind Regards
Nigel
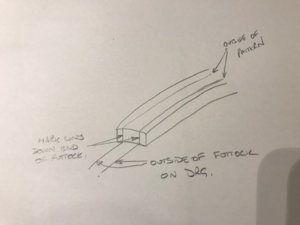

OK THANKS FOR THE RIGHT INFORMATION, ON FRAME No.1 should i sand to the lines or do another one also what i do I do not know if this causes a problem, I cut my futtocks quite wide and then shape them with dremells to the line with just slightly wide. THANKS AGAIN Don
Don
Are you using the Dremel freehand or in the stand?If freehand,that will cause issues.You need to cut a hole in a board just bigger than the sanding drum then clamp it to the standbase.The machine can then be set so the bottom of the drum is JUST below the top face.In this manner,the frame is always flat to the table and the drum is always vertical.
Kind Regards
Nigel
if he is using a Dremel drill stand it has a hole in the base just to use as you describe just need to set sanding drum to proper depth
Ed
Ed
if he is using a Dremel drill stand it has a hole in the base just to use as you describe just need to set sanding drum to proper depth
Ed
Hi Ed
Yes that would work provided it is close clearance to the drum otherwise you run the risk of trapping the frame in the gap,or the part rocking into the gap.
Kind Regards
Nigel
THANKS ALL, NIGEL I have A FEW ITEMS AS DESCRIBED I HAVE A HOME MADE DEVICE THAT I GOT FROM EBAY QUITE A FEW YEARS AGO BUT NEVER USED, I ALSO HAVE A DREMELL WORK STATION BUT TEND TO AGREE WITH NIGEL NOT SURE ABOUT THAT BUT MAYBE ONE OF THE OLDER DRMELLDRILL PRESSES WILL WORK I WILL SHOW PICTURES OF THE DEVICE THAT I GOT TOMORROW, I HAVE ALWAYS WAS AFRAID I WOULD DESTROY THE FRAMES, BUT WILL DEFINATLY GIVE IT A TRY, I WONDER IF THIS PROCEDURE WOULD BE OK, TO USE A DRMELL FREE HAND TO GET IT TO SHAPE USING A COURSE DRUM AND FINISHING IT WITH A FINE DRUM ON THE SPINDEL MAYBE I WILL GET THERE ONE DAY HOPEFULLY WITH HELP, ALSO NIGEL HOW TO DO THE FRAME No.1 TO DO IT OVER OR TO SAND IT DOWN TO THE OUTSIDE LINES OF THE DRAWING, NOT SURE BUT WILL DO SHOW A DO OVER OF FRAME No.6 to see if i have got it. THANKS ALL Don
Hello Don, As the suggestion, you can employ your existing device - Luthier's Friend Sanding Station. It is already have a sanding drum.
Don
If you draw lines square on the end of the futtocks you can place each piece on the drawing individually then draw around the outside.You can fit the pieces together then without sanding the excess off.Sand when joined together but leave 1mm extra just in case.
You cannot sand these parts by hand with the Dremel,you cannot keep the edges square,If they are not square you will have issues trying to line the parts up.
Kind Regards
Nigel
AGAIN TO ALL A VERY BIG THANKS, AND YES JIM MY POOR MANS THICKNESS SANDER WOULD WORK, ABOUT THE QUESTION OF DESTRYING THE FRAME WITCH IS THE REASEON THAT I HAVE NOT TRIED IT YET HOW DO YOU CONTROL THE FRAME, AS I HAVE COMPANY TODAY MY MIDDEL SON and DAUGHTER=IN-LAW ARE VISITING ME FROM NEW ORLEANS THEY LEAVE THIS AFTERNOON SO I WILL SHOW WHAT I HAVE. THANKS AGAIN Don
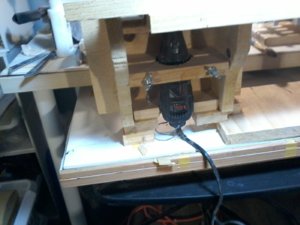
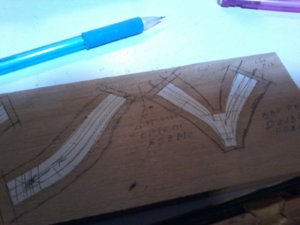
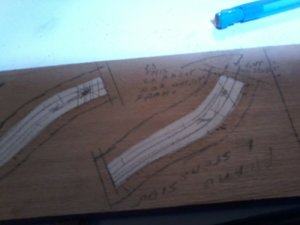
hi all, not doing to much on the Le Rochefort the last few days, as my middel son and family was here for a GREAT VISIT woderful to have them, now back to the hobby shop, progress pictures showing my attempt at frame No.1 the aft side not sure if i am doing it right i think i am close to understanding the first 5 frames using what NIGEL SUGGESTED hope i understand it, also showing the HOME MADE SPINDAL SANDER that i got quite a few years ago and i made it into a spindel sander the top is plexiglass my MAIN QUESTION USING THIS FOR FRAMES IS WILL IT DESTROY THE FRAME, what speed to use and what grit to use, ONE OTHER THING A VERY BIG THANK YOU TO GILLES ON THE PDFs OF THE GROSS VENTURE GROUP BUILD HE MADE AVAILABLE THE WHOLE SERIS ON IT WONDERFULL HIGHLY RECOMENDED FOR ANY INTERMEDIATE SCRATCH BUILDER TACKLING A FRENCH SHIP MOST ALL TYPES JUST SUPER, THANKS AGAIN GILLES, AGAIN NEED SOME HELP ON THE FRAMES TO VERIFY IF I AM DOING THEM CORECTLY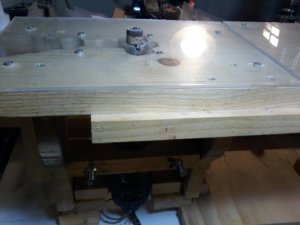


Don
Firstly I would lower the Dremel a little.Those Dremel sanding drums are soft.You need the frame to be touching the middle of the drum not the bottom as it is set up.You shouldn't destroy the frames, I would you a coarse grit and very light pressure,this will give you the most control and preserve the bearings in the Dremel.
Regarding the patterns,you are still cutting to the outside line rather than cutting the pattern out bigger leaving the black line to follow.You have clearly cut inside this line on the crutch(v shaped piece).That is why I suggested cutting the patterns big.In addition the futtocks that are almost straight should be running along the board.As you have it,the grain is not running along the pieces
Kind Regards
Nigel
- Joined
- Feb 18, 2019
- Messages
- 717
- Points
- 353


