
GOT IT THANKS AGAIN GILLES, i will wait for your answer to FRAME No.2, have plenty more to do. THANKS AGAIN Don

-

SUBSCRIBE TO SHIPS IN SCALE TODAY!
The beloved Ships in Scale Magazine is back and charting a new course for 2026!
Discover new skills, new techniques, and new inspirations in every issue.
NOTE THAT OUR NEXT ISSUE WILL BE July/August 2026 -

Win a Free Custom Engraved Brass Coin!!!
As a way to introduce our brass coins to the community, we will raffle off a free coin during the month of August. Follow link ABOVE for instructions for entering.
You are using an out of date browser. It may not display this or other websites correctly.
You should upgrade or use an alternative browser.
You should upgrade or use an alternative browser.
LE ROCHEFORT
- Thread starter donfarr
- Start date
- Watchers 37
-
- Tags
- ancre le rochefort
- Joined
- Oct 23, 2018
- Messages
- 988
- Points
- 403

Don, Gilles,
thanks for this really interesting cursus. I decided to give this small model a try and ordered the book. After finishing my current model I will start the build.
thanks for this really interesting cursus. I decided to give this small model a try and ordered the book. After finishing my current model I will start the build.
Last edited:
- Joined
- Feb 18, 2019
- Messages
- 732
- Points
- 353
Don,
This is what I though and had written before I edited my reply yesterday, but here is the answer from Gérard:
Original reply:
"L'orientation est simple à déterminer sachant que l'observateur est placé dans le bateau. Si on supprime les lignes discontinues qui embrouillent un peu le dessin mais qui sont nécessaires, on constate que c'est bien la couche arrière qui comporte le bout d'allonge"
Translated:
The orientation is easy to understand knowing that the viewer is located inside the hull. If we omit the dotted lines, necessary but complicating the drawing, we see that the top timber extension is indeed located on the back layer.
and an image that will clarify this for you:

If I may make another suggestion, use the clean copy (original) to study the plan.
If there is something you do not quite get, make an extra copy of the part of the plan that is causing you trouble. Then, using coloured highlighters figured out the proper definition of the lines. It may take 1 or 2 copies to confirm the meaning of the lines, but it will help.
G
This is what I though and had written before I edited my reply yesterday, but here is the answer from Gérard:
Original reply:
"L'orientation est simple à déterminer sachant que l'observateur est placé dans le bateau. Si on supprime les lignes discontinues qui embrouillent un peu le dessin mais qui sont nécessaires, on constate que c'est bien la couche arrière qui comporte le bout d'allonge"
Translated:
The orientation is easy to understand knowing that the viewer is located inside the hull. If we omit the dotted lines, necessary but complicating the drawing, we see that the top timber extension is indeed located on the back layer.
and an image that will clarify this for you:
If I may make another suggestion, use the clean copy (original) to study the plan.
If there is something you do not quite get, make an extra copy of the part of the plan that is causing you trouble. Then, using coloured highlighters figured out the proper definition of the lines. It may take 1 or 2 copies to confirm the meaning of the lines, but it will help.
G
Last edited:
- Joined
- Feb 18, 2019
- Messages
- 732
- Points
- 353
Don, Gilles,
I decided to give this small model a try and ordered the book. After finishing my current model I will start the build.
That is great! A while ago, I was looking at building this ship, but opted for something else instead. I may still get the monograph as it sure would be handy to assist Don: especially for the more intricate steps: some the problems may come from the interpretation of the plans. It seems that Le Rochefort is a good project. Considered as more or less an entry-level project, one must still understand that scratch building anything poses some challenges. The main thing is getting fun out of "frustrating situations"..... In the long run, it is YOUR work of art.... no matter what.
G
Many Thanks to Gilles and also Gérard for this clarification, explanation and also especially the new sketch, in which the lines are explained in detail with the grey visualisation - Great helpDon,
This is what I though and had written before I edited my reply yesterday, but here is the answer from Gérard:
Original reply:
"L'orientation est simple à déterminer sachant que l'observateur est placé dans le bateau. Si on supprime les lignes discontinues qui embrouillent un peu le dessin mais qui sont nécessaires, on constate que c'est bien la couche arrière qui comporte le bout d'allonge"
Translated:
The orientation is easy to understand knowing that the viewer is located inside the hull. If we omit the dotted lines, necessary but complicating the drawing, we see that the top timber extension is indeed located on the back layer.
and an image that will clarify this for you:
View attachment 129290
If I may make another suggestion, use the clean copy (original) to study the plan.
If there is something you do not quite get, make an extra copy of the part of the plan that is causing you trouble. Then, using coloured highlighters figured out the proper definition of the lines. It may take 1 or 2 copies to confirm the meaning of the lines, but it will help.
G

WELCOME CHRISTIAN, looking forward to your build on this to me a GREAT LEARNING PROCESS, with GILLES help can move forward with it, it is a interesting build, AGAIN AS I STATED PREVIOUSLY IN ANOTHER THREAD THIS IS WHAT 3-D INSTRUCTIONS IS ALL ABOUT again in a matter of a couple of minutes got it, THANKS AGAIN GILLES FOR POSTING THIS, and for all the HELP, one picture showing bow side of frame No.1 i left some meat on both sides as GILLES sugested all I want to do is right now is to establish a PLEASING CURVE to the frame as some of mine look to jagged close at top but still enough meat there
Attachments
- Joined
- Feb 18, 2019
- Messages
- 732
- Points
- 353
all I want to do is right now is to establish a PLEASING CURVE to the frame as some of mine look to jagged close at top but still enough meat there
Good...
Now a couple more notes you may have been able to put to use earlier:
a) What are you using to glue the paper to the wood? Some sort of contact cement?
When you do a cut out of the pattern from the plan, do not cut right to the line, leave paper meat as well. Paste the paper including the paper meat onto your wood. Then cut the part as far as you want from the line. When time comes to sand the edges at the joints and closer to the line around (inside and outside of the frame), the paper with extra meat will come off with the wood. When the frame is assembled and the paper is not needed anymore, you can scrape it off.
b) as far as the top of the frame timbers are concerned, you do not have to cut right to the line either. You can leave extra length. Eventually, you trim it off. when your framing is complete and you are ready to install your top rails.
G.
PS: Just think of building your ship as a kit, do not get intimidated. The only difference being that YOU are the one in charge of fabricating the parts. At this stage, fabrication of the frames, be conservative and leave yourself room for error.
Last edited:
Hi Gilles, I use elmers rubber cement, I have been leaving a lot of meat on the pattern will post picture tomorrow showing how much i leave. THANKS AGAIN Don
Two things determine how close to the line you should cut. The first, everyone knows: How good are you with a scroll saw? The second is even more important: How good are the plans? The most talented guy with a scroll saw is going to have problems with poorly drawn plans.

Hello,
Dozens of "Rochefort" have been built, no one to date has reported graphic errors in this monograph. The problem is to be found elsewhere.
GD
Dozens of "Rochefort" have been built, no one to date has reported graphic errors in this monograph. The problem is to be found elsewhere.
GD
- Joined
- Feb 18, 2019
- Messages
- 732
- Points
- 353
Point made. Content removed
G
G
Last edited:
Hallo Gérard,Hello,
Dozens of "Rochefort" have been built, no one to date has reported graphic errors in this monograph. The problem is to be found elsewhere.
GD
as I understood nobody directly mentioned, that the drawings of the Rochefort have graphic errors. The comment by Dave was surely related in general.
I can fully underline the words by GillesTwo things determine how close to the line you should cut. The first, everyone knows: How good are you with a scroll saw? The second is even more important: How good are the plans? The most talented guy with a scroll saw is going to have problems with poorly drawn plans.
The plans, having been published by one of the best authors around, would be some of the best to be found anywhere, I would think of many other reasons, and those would be directly related to the modeler.
Due to the fact, that I have all monographies made until now by Gérard, I have the full conviction -> these are really one of the best quality drawings available on the market. See herefore all my Planset Reviews I made already!!
But you are right in general - when you have not the best quality material, it is hard to get good or very good results.
- Joined
- Feb 18, 2019
- Messages
- 732
- Points
- 353
Two things determine how close to the line you should cut. The first, everyone knows: How good are you with a scroll saw? The second is even more important: How good are the plans? The most talented guy with a scroll saw is going to have problems with poorly drawn plans.
Now that I had time to get a bit of sleep since my last post and reflect on it, I would like to add the following.
To anyone who follows this this particular"build log" and is familiar with its content (if only one takes into account the photos posted), in this context, this comment, and every word in it, are completely inappropriate.
It is clear that there is an issue with building the ships frames.
And to keep on being constructive....
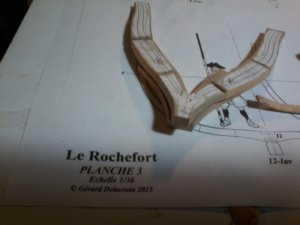
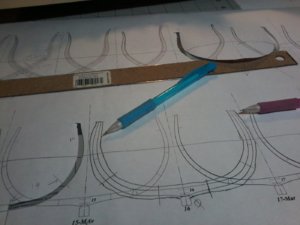
If we compare this image (the plan)

with this image: the end product dating back to a post on Jan 3

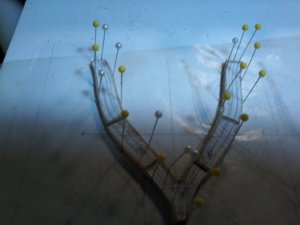
or this image, dating to a yesterday's post

very little progress has been made, and I very much believe it has little to do with the tools or the plans.
Now, the following image shows a few issues directly related to the construction of the frame itself.

Please note that there are a few other "things" that could be and have been said in regards to improving the process used and the comprehension of said process by the modeler.
To end this post, I will just add that, again, in the context of this log, Mr DocBlake, your comment is quite disappointing, if not just plain absurd, not everyone is as talented as you are : some of us need to cut further away from the line. It is that simple....
At this stage, even if one was to assume that scroll saw work or the plan was the issue, the goal would be to pleasingly make the assembled parts fit the bad plan.
At least we (well... mostly Don) would get somewhere.....
Your comment may have been made in a "general manner of speaking", but shows no relevance to the matter at hand.
Again, like I said in my original reply, it would seem that Don (the modeler) is having issues with this process. Keeping your comments relevant may result in actually offering HELP instead of being annoying.
And again, respectfully yours.
G.
Last edited:
WOW!!! My comment was simply a general statement and was in no way a criticism of anyone or anyone’s work. It wasn’t even intended to refer to this particular build. Anyone who has bothered to read anything I’ve had to say would know that my comments are consistently respectful and constructive. Sorry if you don’t see it that way. Maybe it’s best for me to just stop posting anything on this forum

Perhaps after a month of trying unsuccessfully to assemble a frame, with some of the most talented help in the world, it might be time for Donfarr to throw in the towel and get some experience building frames from a commercial kit before attempting this more complicated scratch building. While Doc Blake's comment was indeed intended as more generalized, mine is not. Sorry, Don, but model building this complex is a progressive learning adventure. You seem to have bitten off more than you can chew.
I hope my comment was relevant and constructive.
I hope my comment was relevant and constructive.
WOW what happened, the plans and MONOGRAPH ARE EXCELLENT, the problems I am having with the frames are my doing as this is the first frames that I have done from scratch i am getting better at doing the joints at one time i was cutting the joints by hand, then following DOC BLAKES advice i got the DISK SANDER and after setting the table square the joints are much better, as far as the plans and monograph are concerned they are GREAT my problem is not caused by the plans or the mnograph but me getting use to the plans and type of ship (FRENCH) witch is different then what i am used to also getting used to working from plans and monograph in a different langage and going back to the wonderful translation it takes some getting use to, now I am comfortable doing that it just took some time, I SINCERLY HOPE THAT THIS LOG IS NOT AFFECTING THE HELP THAT I AM GETTING FROM from all members of SOS and i am very greatful to GILLES FOR HIS PATIENCE AND GREAT HELP, now more pictures and one big question, I think I have been working under a misconception after going back to the monograph and plans including GILLES FRAME DETAILS ON THE GROS VENTURE WITCH SIDE FACES THE STEM ( WHAT I CALL THE SHORT SIDE OF THE FLOOR TIMBERES and does it reverse going to the stern after doing MIDSHIP FRAME No.16 and my pictures showing how much meat is on the patteren the line that i cut to is my pencil guide on the patteren, also trying to avoid doing frame No.1 for the 6th time qustion on the lines forming the frames and conforming how and what certain lines on the plans are, AND GILLES ALL THE FRAMES THAT WERE DONE WITH BAD JOINTS ARE BEING RE DONE SO PLEASE CONTINUE TO HELP ME AND OTHER FIRST TIME SCRATCH BUILDERS ON SOS I AM GOING TO DO THIS RIGHT AND I WITH HELP WILL GET IT RIGHT

Attachments
I have stopped the making frame No.1 until I am satisfied that i understand what to do and going to the midship FRAME No.16 and guys PLEASE LET US CONTINUE WITH WHAT WE ALL LOVE BEST WITCH IS SHIP MODELING AND LET US PUT THIS MISUNDERSTANDING TO BED PLEASE. THANKS Don PS GILLES THERE ON THE LAST PICTURE THERE IS NO GAP AT THE JOINT LINES LOOK Will show the back side of frame No.1 so you can see and yes i am having some dificulty in drawing the lines on the patteren to get a pleasing curve but getting better at it
NO MIKE I DO NOT GIVE UP THIS EASILY NOT GOING TO GIVE IT UP YOU CAN ONLY LEARN FROM YOUR MISTAKES YES THIS IS A NEW ADVENTURE FOR ME AND NOT EVERYONE IS A MASTER BUILDER< AND WEATHER YOU KNOW IT OR NOT AGE DOES HAVE SOMETHING TO DO WITH MY SKILLS AT 82 I WILL HAVE TO ACCEPT CERTAIN LIMITATIONS TO WHAT I CAN PRODUCE, to me the joy to me is the process and it keeps my mind active as my DOCTOER SAYS, AND YES I WILL CONTINUE THIS BUILD AS LONG AS I GET THE HELP I NEED, we all produce the best we can and it is the JOURNEY THAT MATTERS MOST I CAN NEVER ACHIEVE THE ABILITIES OF YOU OR DOC, GILLES, UWE ETC. I DO NOT STRIVE TO I JUST WANT TO DO MY BEST AND ENJOY THE ADVENTURE and MIKE REMEMBER MY INTERMEDIATE BUILDERS ARE THE LIFE BLOOD OF THIS HOBBY DO YOU SUGGEST THAT WE ALL STOP TRYING TO BETTER OURSELVES and staying stanget just to continue building MID WEST PRODUCTS AT SKILL LEVEL ONE WHY and i am trying to keep my cool here and not get upset but as GILLES SAID PLEASE BE CONSTRUCTIVE AND NOT TEAR DOWN SOMEONES EFFORT NOW DONE. Don
I am attempting to be constructive and help you Don. You seem to be having problems understanding and visualizing scratch built frame construction. Instead of doing the same frames over and over with little progress, you might be better off to step back for only a moment. Go get one of the many practicums that teaches frame construction and get some experience with that under your belt and then come back to LeRochefort. This has nothing to do with age. It only has to do with lack of experience. You are an intermediate builder attempting a more advanced technique. My suggestion is that you use a well written practicum to learn the proper way to scratch build a frame and not depend upon the confusing instructions Gilles is providing you. There is a much easier way to learn this skill than the road you are currently on. Good luck. ")
- Joined
- Dec 3, 2018
- Messages
- 2,450
- Points
- 538

Great work anyway Don, I like your build log very well, I like all the information and techniques explained here.
It is certainly also helpful for others who want to build a model in this way.
The Hahn method I'm going to build on is somewhat different, but there are a lot of stuff to learn here.
All information is good information
Regards-
It is certainly also helpful for others who want to build a model in this way.
The Hahn method I'm going to build on is somewhat different, but there are a lot of stuff to learn here.
All information is good information
Regards-