LE ROCHEFORT

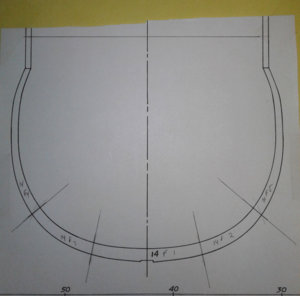
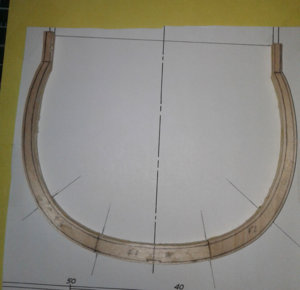
This is not a frame from Rochefort but it may help you to visualize flipping the 1st layer upside down.

This also not the way I personally make my frames.
Just posting these few images to try to find a solution for you.


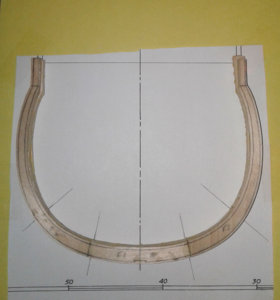
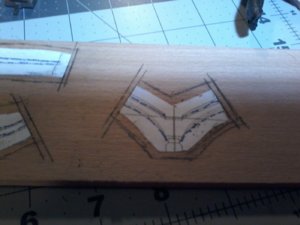
Frame guiding template used to line-up the 2 layers.
20200325_190128 copy.jpg

Layer one shown face up with contour lines place over the template.

20200325_221322 copy.jpg

Layer 1 flipped upside down no contour lines visible: the side with the lines is now in contact with the template.

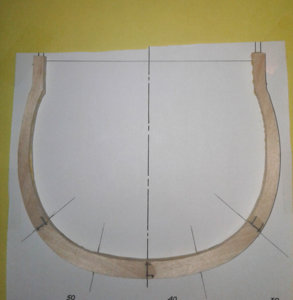
20200325_190217 copy.jpg

The 2nd layer is getting ready to be glued on top of the 1st layer

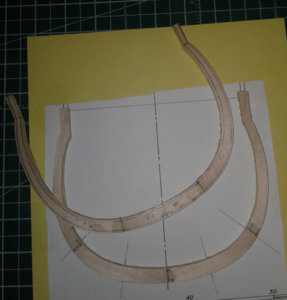
20200325_190359 copy.jpg

The second layer is lined-up with the 1st layer and glued on top.

20200325_190418 copy.jpg

G
 
Last edited:
OK GILLES, I think if you look at my post No. 483 the first layer the one with the horizanal cut is put together OVER BTHE PLAN WITH PINS, then glued while over the plans with the pins using WAX PAPER when dry take it up, the picture with the vertical cut is the second layer that i dry fit i over the back side the picture showing the joint using the keel notch of the first layer as a gide i the mark the join line and line up the blue lines, I SURE HOPE I AM EXPLAINING MY SELF. Don
 
OH I SEE WHAT YOU ARE DOING I DO EVERY THING EXACTLY AS YOU SHOW IT BUT REPEAT BUT I DO NOT DO THE 2 layers complete then attach them, i tried that once it turned out horrible my fault, i do the first layer complete but the second layer individual piecs FLOOR TIMBER, FUTTOCK, TOP TIMBER WILL SHOW YOU THA ON ANOTHER FRAME TOMORROW, I WILL TRY tHAT AGAIN.
 
The photos do not show how I build my frames.
I just took the photos to try to understand how you do it or help you find a solution.
 
Last edited:
Ok so basically, you build the first layer, let it dry. Then flip that 1st layer upside down So the lines are now in contact with the wax paper, and then try to line up the 2nd layer piece by piece using the notch and joint lines from the 1st layer. Right?
 
ok looking at your procdure i have a question this maybe the answer, let s say the first layer is put together over the plans with the joint lines extended can i the take the second layer ( INDIVUDAL PIECES, FLOOR, FUTTOCK, TOP TIMBER A ND LINE THE JOINT LINES UP ALL WHILE ON THE PLANE I HOPE I AM EXPLAING IT RIGHT THAT WOULD GIVE ME PLENTY OF REFRECE POINT AND I CAN RIG UP SOMETHING WHERE I CAN STAND UP OR LOOK STRAIGHT DOWN, I DID EXPLAIN THAT I CA NOT STAND UNSUPORTED BUT I HAVE A HIGH CHAIR WHERE I CAN SIT AND SEE TH TOP, CAN THIS WORK. Don
 
AL MOST RIGHT BUT THAT IS WHAT I AM GOING TO DO IF YOU THINK THAT WILL WORK THEN I CAN HAVE A LOT OF REFRENCE POINTS MY MISTAKE WAS NOT DOING THE SECOND LAYER OVER THE PLANS WITH THE FIRST LAYER PINNED DOEW WILL THA WORK WITH ROUGH EXTENDED MEAT IF YOU SA YES I WILL TRY THAT ONE TOMORROW, as i have only enough material for one more frame i will make it frame No.27, after that I WILL BE SANDING ALL THE FRAMES I HAVE DONE TO THE 3mm like i showed before, then you tell me what is next BEVELS OH BOY DO INHAVE TO LEARN THIS FOR 10 YEARS I CAN NOT UNDERSTAND HOW TO BEVEL BOY DO I NEED YOU ON THAT BUT PLEASE HAVE PATICE WITH ME ON THAT one, what do you think, i will explain to you by pm what i am trying to accomplish with this hopefully some members will gain by this hope so, BOY WHAT A HELP YOU ARE. and you have to pardon my grammer and spelling right now my hand eye brain coordination is off right now and need drops for my eyes, full of saw dust wear head ban with lights but the dust still gets in i have a WEN INFILTRATIO SYSTEM IT WORK BUT NOT COMPLETLY. Don PS I WILL PM YOU
 
I really think that you should not attempt to bevel the frames individually. Especially when leaving that much meat on the frames.
I think you should do that once all the frames and filling pieces have been installed. The hull should be solid enough. And if you are afraid it won't be solid enough, you can always install some battens / strips at the top, inside to reinforce the structure.
You will need the extra meat as you may have some issues with frame alignment if you are not confident about the placement of the notches: as a result, some of the frames may slightly be shifted to one side or the other when installed on the keel. having the extra meat around the frames should help compensate for that.
 
I THINK YOU ARE CORECT AS LONG AS I CAN GET THE PROCEDURE DOWN AS TO WHAT I HAVE TO DO AND I HAVE SOME SMALL PURCHASE FOR SANDING ESPECIALLY INTERIOR ALSO SOME PERMA GRIP SANDING SETS, WILL SHOW THEM LATTER. Don
 
Don
I have not chimed in yet on both threads yet,as I said via PM a lot going on last couple of days at work re COVID 19.I will add though,I am with Giles,bevel after assembly.I am putting some thought into a response and trying to visualise how I would do things if I had your physical limitations.I have HAVS,Carpel Tunnel and Cubical tunnel syndrome in both hands/arms.After initial diagnosis,I had a break from modelling thinking I couldn't continue but then took stock of how I went about processes and re-evaluated how I did things.This is why I am trying to put myself in your shoes.

You are clearly determined to not let your disabilities beat you,that is admirable.I think that this is less about how you assemble the frames and more about thinking of how you can improve your accuracy given the disabilities you mention.I would say firstly you need a bigger drum than the Dremel provides to profile the frames inside.The nearer the radius of the drum to the inside radius of the frames the easier it is to follow the line on your pattern.
Fairing the hull inside,Permagrit tools are great,I have some,but are not ideal to shape the hull inside.Cutting some softwood blocks to slightly tighter than the inside line of the hull and gluing sandpaper to them is an easier way to fair the frames inside.I will illustrate this process on my build at a later date.

This is why I say,I agree with Giles,in view of your disabilities,beveling after assembly will yield a more favourable result.As Giles said,you can glue a myriad of temporary timber to the frame to stiffen it to sand,I would bevel after assembly if building this model,it is faster and easier in the long run.Remember my build has frames 17.5mm thick and there is probably 10sq metres of hull to fair inside and out.That is why I have done some bevelling out of the jig.

I will give some further thought to the issues you are having currently and post again as I am now at home for a few days(locked down:rolleyes:)

Kind Regards

Nigel
 
I THINK YOU ARE CORECT AS LONG AS I CAN GET THE PROCEDURE DOWN AS TO WHAT I HAVE TO DO AND I HAVE SOME SMALL PURCHASE FOR SANDING ESPECIALLY INTERIOR ALSO SOME PERMA GRIP SANDING SETS, WILL SHOW THEM LATTER. Don

Don,
That was an interesting evening eh!

Hopefully you have not disposed of your bad frames, so you can practice beveling those to get some experience.
And if you have sent them to the trash bin, maybe you have some scrap wood to somehow make a couple extra frames for practice.
G
 
To again set the context of this log straight...
This has been Don's goals and wishes since the beginning of his adventure into the construction of this small ship:
As stated at the start of his log and as written in his own words yesterday:

"Ok here goes some members do not understand what I am trying to accomplish even though I explained that at the beginning. Some people do not read the whole: me included.
My goal is simple on this build: it is not the complete build that I am aiming for. If I stopped right now I be would 85% what I am trying to do this build. It is not the end but the journey: THE LEARNING FOR ANOTHER SCRATCH BUILD, to understand the basics of items that I have been having problems with LIKE FRAME CONSTRUCTION, BEVELING, USING MY MILL, understanding and reading plans both ENGLISH TYPE AND FRENCH.

There is no 74 gun ship for me not even close, do not want anything to do with that just not my skill level and never will be.


I like the different framing of the different countries method of ship building: so different types of framing intrigues me like the FLUCCA, and other types of vessels at 82 years (APRIL) I WOULD NEVER LIVE LONG ENOUGH TO DO A WAR SHIP PERIOD so if I can learn to do proper frame construction, proper beveling, location and marking off of wales, different deck placement and some modest interior work like visual furniture but: THAT IS SCONDARY TO EVERY THING ELSE. If and I hope so I can complete this, it is icing on the cake and I am getting the confidence that I think I will complete this build. REMEMBER I HAVE ALREADY MADE THE KEEL STRUCTURE COMPLETE ALSO THE KEELSON, AND SOME STERN TIMBERS ALONG WITH THE HAWSE TIMBERS WITCH I WILL HAVE TO REDO NOT ENOUGH MEAT LEFT ON THEM, and my main concern is no jig I just can not physically make one anymore but I do have the large building slip, and I have ordered a smaller one so as to make it easier to work on. Don".

So to anyone willing to help him fulfill his goals and wishes, please remember and understand what he wrote.

Up to this point, Don's has been building frames the way he wanted. He is certainly well aware of the other way: the way many have suggested here and elsewhere.
He shared his wishes, his goals as well as his physical limitations at the very beginning of his project. If it was only the fact that he wanted to build his ship any way possible, he may have chosen another method: but he wanted to gain experience in building his ship the "so-called difficult" way: including doing it right side up - so get ready for it.
It has been his decision. He asked for help privately as well as publicly, I accepted and as it turns out have been one of the few to stick with him.


Yes, we all have different ways of doing things. I will never consider myself as an expert in anything, so , contrary to what people may think, the way I work is neither the only way nor the right way. I am just another guy ... offering some guidance and following the modeler's wish.

The most important point is that methods need to be adapted to his limitations: methods do not have to be discarded because of his limitations: however silly some may think it is.
Don is willing to go through the "pain", the "difficulties" associated with building a ship. He is to be commanded for that.
It happens to be the technique he wants to use so it is the technique we "owe" to help him with, while remembering the goals HE has set.

Sorry for the long post. I am just hoping that members / readers / helpers will finally understand and offer guidance according to his wishes to COMPLEMENT the work he has done so far. As one will have noticed, there is a lot of improvisation going on in this log. A lot of questions, a lot of text and explanations resulting in a lot of confusion (the number of posts from last night illustrate that perfectly).


So please offer help if you can while keeping all this in mind.

Thank you.
G
 
quickly need and i will be back, i have all my old frames, keeping them in case needed i will post typical picture the the have very littl meat on them and yes i have a lot of materials here some warped to much to use but good to use for samples if needed. do will be back on site soon. THANKS Don
 
THANK YOU GUYS AND ALL GREAT TO BE PART OF THIS SOS GROUP A WORLD WIDE FORUM FROM MANY COUNTRIES, WORLD LEADERS SHOULD GIVE THIS A VIEW, THIS IS THE AWAY THINGS SHOULD WORK, THANKS TO ALL WHO HAVE CHIPPED IN CONTINUE PLEASE Don
 
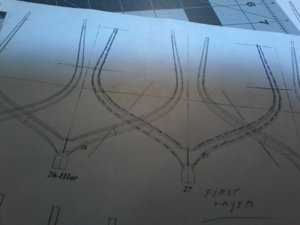
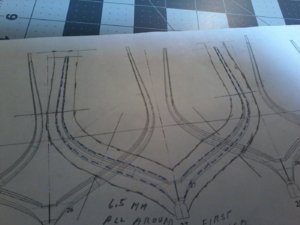
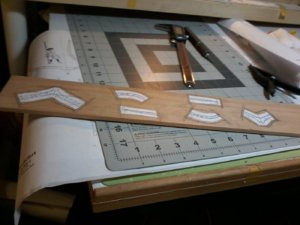
Hi all now showing pictures of FRAME No.27, i am showing tha steps i take for a complet DOUBLE FRAME what i am show is what we call the first layer this faces the stern, yo see the first steps highlighting the the lines o the frame plan then the step of adding meat to the frame on the pattern, all the overage is 6.5mm done with my calipers now this step to some may be seen as redundent for some reason maybe someone cantell us if just take the outline in any fashion freehand without using the calipers the frames are not right, with this so far the frame fist layer comes out quite good do not know why maybe enentually i will not have to do that, but for now yes the next step is the cutting of patterns and rubber cemeting to the board witch is beech using all beech for frames nice material (LUMBERYARD) now on the board you will notice the second layer floor timber this is done for areso when i prpare for the keel and keelson notches i only need to set the mill one tim so i do them at the same time the double lines at the joints are for over cut to be sanded on the disk sander, i will show latter how i have to do the notches, and you will see why i have to do it the way i do, i will show how i do the first layer will do latter as always please comment and critisims more then welcome chime in guys
 
Back
Top