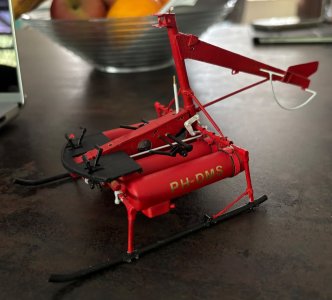
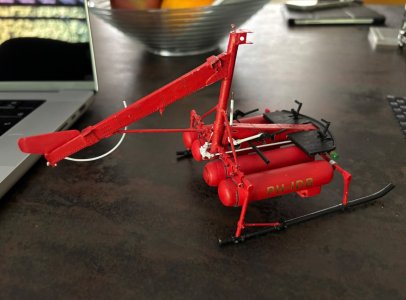
This little jewel will be worth all the time and effort you have invested; it's just amazing Johan!
-

Win a Free Custom Engraved Brass Coin!!!
As a way to introduce our brass coins to the community, we will raffle off a free coin during the month of August. Follow link ABOVE for instructions for entering.
-

PRE-ORDER SHIPS IN SCALE TODAY!
The beloved Ships in Scale Magazine is back and charting a new course for 2026!
Discover new skills, new techniques, and new inspirations in every issue.
NOTE THAT OUR FIRST ISSUE WILL BE JAN/FEB 2026
- Home
- Forums
- Ships of Scale Build Logs
- Super Detailing Static Models / Other Genres
- Historical Trailways, Guns, Aircraft, and Cars
You are using an out of date browser. It may not display this or other websites correctly.
You should upgrade or use an alternative browser.
You should upgrade or use an alternative browser.
- Joined
- Sep 3, 2021
- Messages
- 5,196
- Points
- 738

Wow! That's quite wonderful modeling!
In real in scale 1:1 it’s a complex part rods and pivot points. In your scale even more, Johan. And it’s functional! Just a. Big WOW. And a clever solution for the switch.
Regards, Peter
Thank y'all for your supportive remarks, it's part of being able to continue.This little jewel will be worth all the time and effort you have invested; it's just amazing Johan!
The mechanisms are complex and labor intensive. Plus there's quite a bit of deduction necessary, due to little information. In one of the documents I also found a toil rotor drive, driven by cables and pullies, now that would be interesting to build...
- Joined
- Sep 3, 2021
- Messages
- 5,196
- Points
- 738

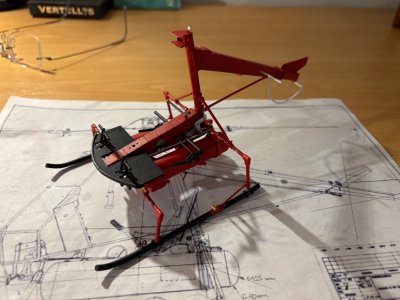
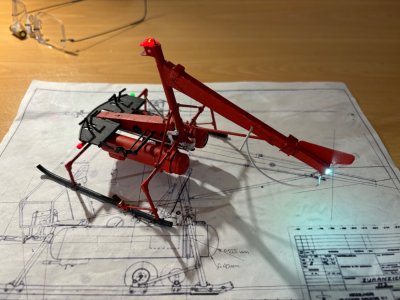
After gathering my courage, again, I decided to connect the lights through the switch to the power supply. It was quite a tedious affair; I had to and solder and temporary attach the center tanks and stow the surplus wires in the RH center tank. After a few hours I could test the lights and lo and behold, light! This also means the center tanks are permanently attached.
Below a few pictures with the center tanks installed and with lights off and on
Tanks installed:
Lights on:
And a view from below looking up:
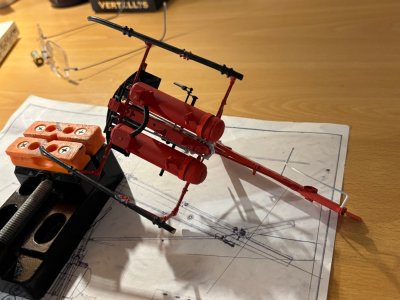
Below a few pictures with the center tanks installed and with lights off and on
Tanks installed:

Lights on:

And a view from below looking up:

- Joined
- Jul 18, 2024
- Messages
- 475
- Points
- 323

Oh man, she's really lovely. Well done indeed.
Well done, Johan! It took some time but the light are on and the wires …….. uuh …. no wires visible.After gathering my courage, again, I decided to connect the lights through the switch to the power supply. It was quite a tedious affair; I had to and solder and temporary attach the center tanks and stow the surplus wires in the RH center tank. After a few hours I could test the lights and lo and behold, light! This also means the center tanks are permanently attached.
Below a few pictures with the center tanks installed and with lights off and on
Tanks installed:
View attachment 528352
Lights on:
View attachment 528350
And a view from below looking up:
View attachment 528351
Regards, Peter
Looks fantastic Johan! 
- Joined
- Jul 18, 2024
- Messages
- 475
- Points
- 323

Brilliant. Are you going to weather it once you’re done? Or keep it factory new? Reason I’m asking, is that in earlier images it looks like the red has some (perfect) browning to it. Just a thought.
It’s all in the details, different on the left and right! Very nice, Johan.Registrations added to the two outer tanks and temporarily installed those to check appearances. So far, so good:
View attachment 529062
View attachment 529063
Regards, Peter.
- Joined
- Sep 3, 2021
- Messages
- 5,196
- Points
- 738

Not sure yet whether or not I’ll weather her once completed. In the earlier stages of the build I was experimenting a bit with some primers and one of those shone through quite aggressively and was subsequently abandoned.Brilliant. Are you going to weather it once you’re done? Or keep it factory new? Reason I’m asking, is that in earlier images it looks like the red has some (perfect) browning to it. Just a thought.
As far as weathering is concerned, there are no pictures of high time Kolibries, do I don’t have the foggiest how that could have looked.
And of course you caught it…It’s all in the details, different on the left and right! Very nice, Johan.
Regards, Peter.

- Joined
- Sep 3, 2021
- Messages
- 5,196
- Points
- 738

Despite the "heat wave" currently over our country (32C/90F) I booked some more progress. All four tanks are now permanently installed, as well as the instrument panel and the 6V battery. Also the system for the tail rotor pitch control is complete up till the rotor mast. Also applied two semi gloss clear coats on the tanks, center box, instrument panel and battery.
Attention has shifted towards the two seats. The first items of interest are the backrest. These are fabricated from dia 1mm frame and 0,3mm brass sheet. Tonight I soldered the frame to the backrest. The backrest still needs some TLC, but I am not entirely disappointed with the current outcome.
View looking fwd, lights on. The 1:48 monstrosity just in front of the 1:24 model.
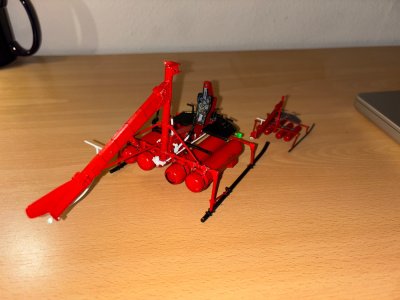
Detail view, looking forward, with a nice view on the instrument panel, with the battery just in front of the instrument panel and a close-up view of the tail rotor pitch control system.
Before being able to complete the pivot installation I had to modify the upper pivot fitting the provide clearance to the pin in the upper lever.
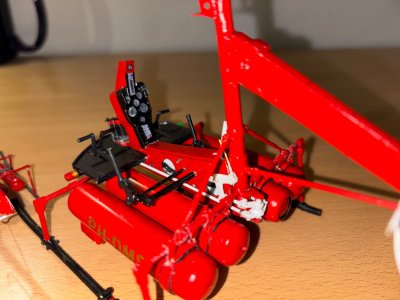
View looking up/aft. Distinguishable are the nav light installations to the bottom of the floor and the two control rods, coming from the pedals. Unfortunately, the torsion shafts are not so apparent, but, they're still there.
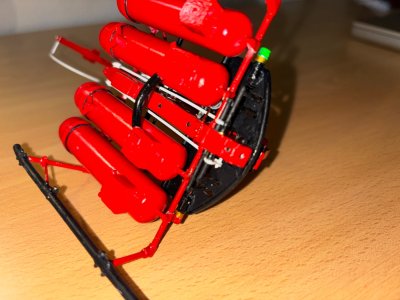
This last picture shows the backrest, still rather crude, dimensions 27mm by 22mm. Up next is the seat itself. Unfortunately details of the seat are very sparse, so this will require quite some AL-FI.
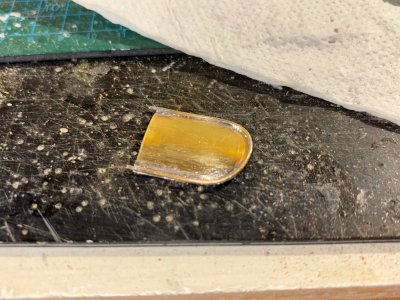
Attention has shifted towards the two seats. The first items of interest are the backrest. These are fabricated from dia 1mm frame and 0,3mm brass sheet. Tonight I soldered the frame to the backrest. The backrest still needs some TLC, but I am not entirely disappointed with the current outcome.
View looking fwd, lights on. The 1:48 monstrosity just in front of the 1:24 model.

Detail view, looking forward, with a nice view on the instrument panel, with the battery just in front of the instrument panel and a close-up view of the tail rotor pitch control system.
Before being able to complete the pivot installation I had to modify the upper pivot fitting the provide clearance to the pin in the upper lever.

View looking up/aft. Distinguishable are the nav light installations to the bottom of the floor and the two control rods, coming from the pedals. Unfortunately, the torsion shafts are not so apparent, but, they're still there.

This last picture shows the backrest, still rather crude, dimensions 27mm by 22mm. Up next is the seat itself. Unfortunately details of the seat are very sparse, so this will require quite some AL-FI.

Pretty impressive, my friend!
A technically advanced result, Johan. With a beautiful color combination.Despite the "heat wave" currently over our country (32C/90F) I booked some more progress. All four tanks are now permanently installed, as well as the instrument panel and the 6V battery. Also the system for the tail rotor pitch control is complete up till the rotor mast. Also applied two semi gloss clear coats on the tanks, center box, instrument panel and battery.
Attention has shifted towards the two seats. The first items of interest are the backrest. These are fabricated from dia 1mm frame and 0,3mm brass sheet. Tonight I soldered the frame to the backrest. The backrest still needs some TLC, but I am not entirely disappointed with the current outcome.
View looking fwd, lights on. The 1:48 monstrosity just in front of the 1:24 model.
View attachment 529317
Detail view, looking forward, with a nice view on the instrument panel, with the battery just in front of the instrument panel and a close-up view of the tail rotor pitch control system.
Before being able to complete the pivot installation I had to modify the upper pivot fitting the provide clearance to the pin in the upper lever.
View attachment 529319
View looking up/aft. Distinguishable are the nav light installations to the bottom of the floor and the two control rods, coming from the pedals. Unfortunately, the torsion shafts are not so apparent, but, they're still there.
View attachment 529320
This last picture shows the backrest, still rather crude, dimensions 27mm by 22mm. Up next is the seat itself. Unfortunately details of the seat are very sparse, so this will require quite some AL-FI.
View attachment 529322
Regards, Peter
Excellent welding on the seat back and the colors pop out at you. Your instrument panel is among the best I have seen in terms of crisp realism.
- Joined
- Sep 3, 2021
- Messages
- 5,196
- Points
- 738

I found this on Reddit:
Flight trials in Norfolk, 1959 both for crop spraying and hunting platform. No more details available.
View attachment CEFFE738-EE62-43F5-AB90-1C467D67610E.mp4
Flight trials in Norfolk, 1959 both for crop spraying and hunting platform. No more details available.
View attachment CEFFE738-EE62-43F5-AB90-1C467D67610E.mp4
Hidden treasure!I found this on Reddit:
Flight trials in Norfolk, 1959 both for crop spraying and hunting platform. No more details available.
View attachment 529658
Regards, Peter
- Joined
- Sep 3, 2021
- Messages
- 5,196
- Points
- 738

Pretty impressive, my friend!
A technically advanced result, Johan. With a beautiful color combination.
Regards, Peter
Excellent welding on the seat back and the colors pop out at you. Your instrument panel is among the best I have seen in terms of crisp realism.
Thanks my dear fellow modelers for your kind remarks.
It took a long time, but now, having attached the fuel tanks, I can finally see the little hummingbird materializing. An awful lot of details still need attention, but she starts to look like her full scale grandmother.
As for the colors, mentioned by @Peter Voog, initially I was very much inclined to apply a dark blue topcoat. Not much later I realized that that would not only hide the mistakes I made reasonably well, but also the details I wanted to apply, like rivets.
Since the only surviving H-3 in the Netherlands has a red livery, the change to this color was natural. Combined with the near black for the skids and the floor assembly and the white for the flight controls this led to a remarkably well-balanced color scheme.
- Joined
- Sep 3, 2021
- Messages
- 5,196
- Points
- 738

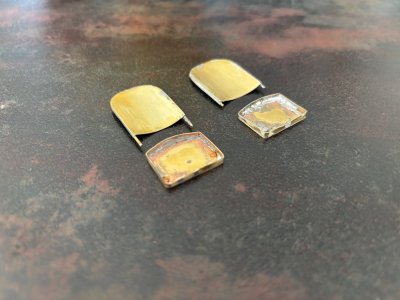
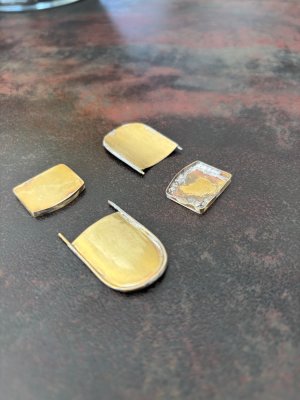
The other night I went about fabricating the parts for the seats. I now have the two backrest and the two seats.
As can be seen quite clearly, soldering is nót my forte. Luckily all my sins will be covered by cushions and fabric.
The seats are made using a small piece of brass sheet and a brass strip of approx 80mmx2mm, folded around the sheet. Soldering came next, but that exercise filled up my swear jar quite handsomely and in no time as well... TBC
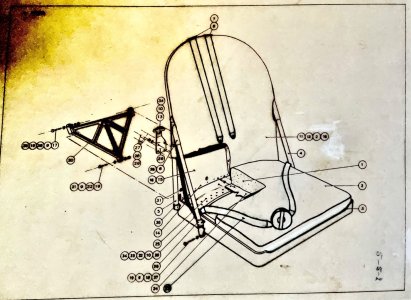
The starting points for the seats were these two pictures, again no dimensions whatsoever, so a lot of guesswork from my side:
A detail of the seat, taken from an isometric, exploded view of the helicopter:
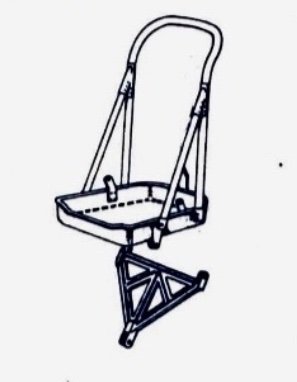
My second source is this picture, with a little more detail:
As can be seen quite clearly, soldering is nót my forte. Luckily all my sins will be covered by cushions and fabric.
The seats are made using a small piece of brass sheet and a brass strip of approx 80mmx2mm, folded around the sheet. Soldering came next, but that exercise filled up my swear jar quite handsomely and in no time as well... TBC


The starting points for the seats were these two pictures, again no dimensions whatsoever, so a lot of guesswork from my side:
A detail of the seat, taken from an isometric, exploded view of the helicopter:

My second source is this picture, with a little more detail:

- Joined
- Jul 18, 2024
- Messages
- 475
- Points
- 323

You are going into a lot of detail! Excellent. And the soldering ... I'm sure I'll need some lessons before I get to solder such parts.
- Joined
- Sep 3, 2021
- Messages
- 5,196
- Points
- 738

Yeh, I basically can't neglect the temptation to add details. Especially the scale, 1:24, makes it possible to add some nice details. My earlier attempt on 1:48 was too small to add details.You are going into a lot of detail! Excellent. And the soldering ... I'm sure I'll need some lessons before I get to solder such parts.


