Very nice symmetry Shota!
-

Win a Free Custom Engraved Brass Coin!!!
As a way to introduce our brass coins to the community, we will raffle off a free coin during the month of August. Follow link ABOVE for instructions for entering.
-

PRE-ORDER SHIPS IN SCALE TODAY!
The beloved Ships in Scale Magazine is back and charting a new course for 2026!
Discover new skills, new techniques, and new inspirations in every issue.
NOTE THAT OUR FIRST ISSUE WILL BE JAN/FEB 2026
You are using an out of date browser. It may not display this or other websites correctly.
You should upgrade or use an alternative browser.
You should upgrade or use an alternative browser.
POF L'Amarante Corvette de 12 canons 1744 1:36 (Ancre Monograph- Gérard Delacroix) By Shota
Looking very good my friend - well done
- Joined
- Apr 20, 2020
- Messages
- 6,241
- Points
- 738

Very nice symmetry Shota!
thank you very much my dear friends for your support and kind wordsLooking very good my friend - well done
- Joined
- Apr 20, 2020
- Messages
- 6,241
- Points
- 738

Mirek, my dear friendWitaj
Nadrabiam zaległości w twojej relacji Shoto PIĘKNIE .Pozdrawiam Mirek
Hello
I'm catching up on your story Shoto BEAUTIFUL. Regards Mirek
I'm flattered that my work interests you and thank you for the support
Hallo Shota, this looks really nice, I really like it.
- Joined
- Mar 1, 2022
- Messages
- 684
- Points
- 308

Hi Shota. Those lights look very nice and the stern, slowly but steadly, is taking life. Amazing project anyway!
- Joined
- Apr 20, 2020
- Messages
- 6,241
- Points
- 738

Hi Shota. Those lights look very nice and the stern, slowly but steadly, is taking life. Amazing project anyway!
Hallo Shota, this looks really nice, I really like it.
my dear friends, I'm happy to know that you like my work, thanks for your kind words and complimentsYou did advance a lot since my last visit and I have to say I like the overall look of the contrasting types of wood. It is ebony if I remember correctly?
It seems bending was not that hard, or was it?
Good morning Shota. You are owning this. Cheers GrantGood evening dear friends
Tonight I finished assembling the back front of the stern, based on the new parts I made.
A few notes; unlike my previous experience, I decided not to press the edge of the frames to the edge of the side beam because it slightly distorts the contour, these I inserted a connection cube 3 mm long.
In addition, in the upper part above the windows I added two width beams in order to maintain the spacing the right one between the beams as well as in order to give additional reinforcement to the construction of the facade.
Obviously I deviated a bit from the plans, but I prefer it that way.
During the last few days I made a new bracket for the ship, you can see it in the pictures. I based myself on the outlines of frames 11, 21 and 39. The hull of the ship sits firmly in it Good night friends
good night everyone
View attachment 469186View attachment 469187View attachment 469188View attachment 469189View attachment 469190View attachment 469191View attachment 469192View attachment 469193
- Joined
- Apr 20, 2020
- Messages
- 6,241
- Points
- 738

Good morning Shota. You are owning this. Cheers Grant
thank you very much my dear friend's for your kind words and complimentsHello Shota,
very nice progress!
Your attention gives energy to the creative process
- Joined
- Apr 20, 2020
- Messages
- 6,241
- Points
- 738

good evening my dear friends
In the last few days I started working on the front part of the bow.
To get an idea of the configuration and the result I'm aiming for, I'll attach a picture from the beautiful work of our friend Giampy65.
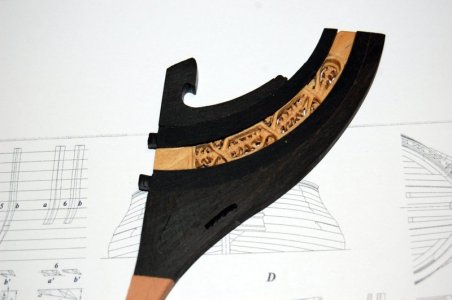
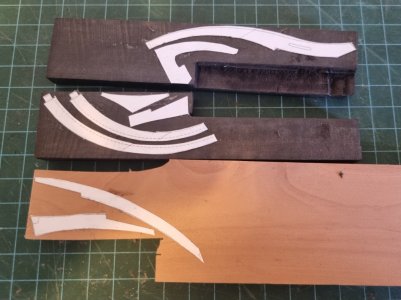
As you noticed, this part consists of 10 parts and three types of wood - pear, ebony and boxwood.
In the original drawing you can see that if one type of wood is used, 8 pieces are enough.

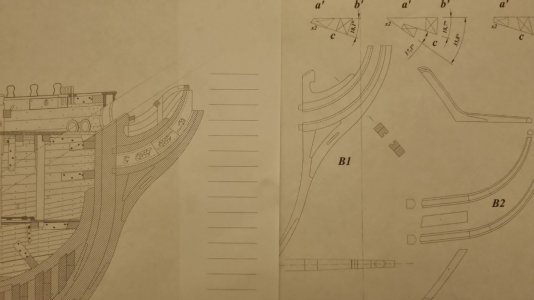
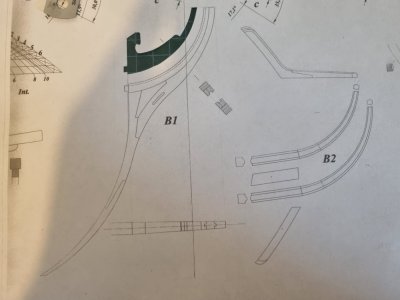
In each choice, maximum precision is required in the interfaces between the parts.
In addition, ebony and boxwood are not found in my country and I am very short on these trees.
For these two reasons, I decided that I would first build this part from poplar wood, and based on the experience and lessons I would gather in the initial process, I would apply it to the process with the three trees.
I'm attaching the photos of the initial test which turned out well, but not one hundred percent accurate.
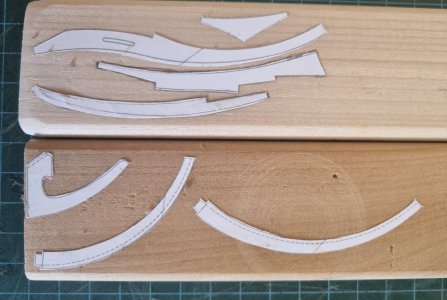
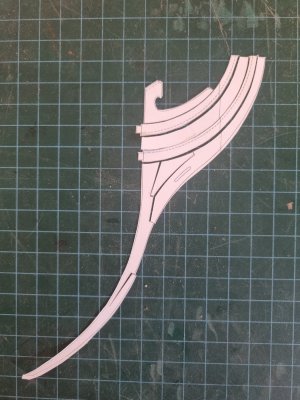
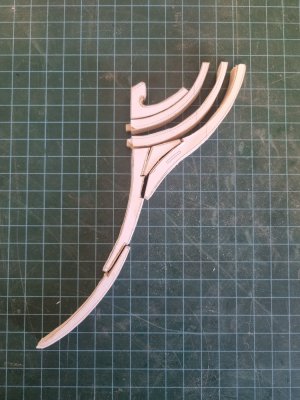
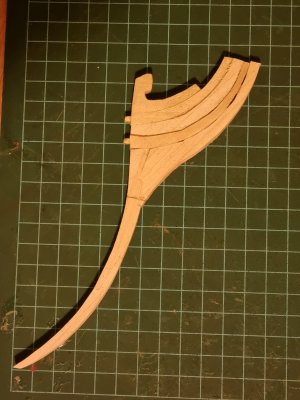
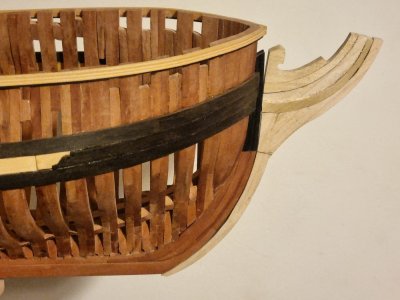
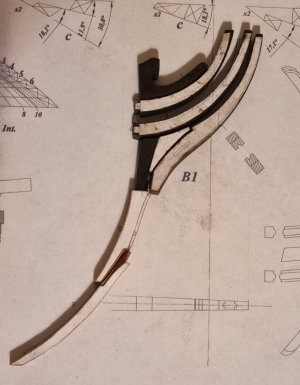
with an emphasis on the upper part on which the front mast rests.
Based on the lessons learned, I proceeded to make the parts from ebony and pear wood.
I would also like to note that almost every part has a different width, where the lower part that connects to the keel is 7.6 mm wide, while the quarter of the bows in the front of the part on the right is 5.6 mm wide.
As you must have noticed, I am in the middle of the work, and I am turning to you with a request for guidance, assistance and advice, which will be most welcome.
The first issue: As you can see in the drawing as well as in the pictures, between the parallel quadrants of the arch is threaded a decoration, the edges of which go into square channels.
The question is what is the correct way to create these canals within the quarters of the arches made of ebony wood. The depth of the channel is about 2.7 and a width of 2.3 mm.
Second question: whether and how it is possible to create the part with the decorations (from boxwood) "trapped" between the two quarters.
I believe hand carving would be quite challenging. I thought of combining laser engraving/cutting of the contours and then carving.
Maybe someone can advise on another method or know someone else who created a 3D file of the part for a printer or cnc. Any help and guidance will be greatly appreciated and thanked.
Last update A good friend of mine (Alexei) from the group in my country prepared the display board for the model . He does amazing work in 3D and cnc. Impress yourself.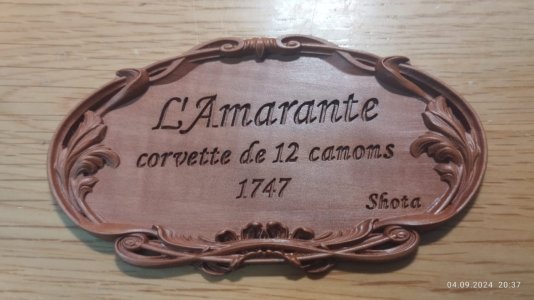
And in the meantime I wish all of us good and fun days with family, friends and hobbies
In the last few days I started working on the front part of the bow.
To get an idea of the configuration and the result I'm aiming for, I'll attach a picture from the beautiful work of our friend Giampy65.

As you noticed, this part consists of 10 parts and three types of wood - pear, ebony and boxwood.
In the original drawing you can see that if one type of wood is used, 8 pieces are enough.


In each choice, maximum precision is required in the interfaces between the parts.
In addition, ebony and boxwood are not found in my country and I am very short on these trees.
For these two reasons, I decided that I would first build this part from poplar wood, and based on the experience and lessons I would gather in the initial process, I would apply it to the process with the three trees.
I'm attaching the photos of the initial test which turned out well, but not one hundred percent accurate.


with an emphasis on the upper part on which the front mast rests.
Based on the lessons learned, I proceeded to make the parts from ebony and pear wood.
I would also like to note that almost every part has a different width, where the lower part that connects to the keel is 7.6 mm wide, while the quarter of the bows in the front of the part on the right is 5.6 mm wide.
As you must have noticed, I am in the middle of the work, and I am turning to you with a request for guidance, assistance and advice, which will be most welcome.
The first issue: As you can see in the drawing as well as in the pictures, between the parallel quadrants of the arch is threaded a decoration, the edges of which go into square channels.
The question is what is the correct way to create these canals within the quarters of the arches made of ebony wood. The depth of the channel is about 2.7 and a width of 2.3 mm.
Second question: whether and how it is possible to create the part with the decorations (from boxwood) "trapped" between the two quarters.
I believe hand carving would be quite challenging. I thought of combining laser engraving/cutting of the contours and then carving.
Maybe someone can advise on another method or know someone else who created a 3D file of the part for a printer or cnc. Any help and guidance will be greatly appreciated and thanked.
Last update A good friend of mine (Alexei) from the group in my country prepared the display board for the model . He does amazing work in 3D and cnc. Impress yourself.

And in the meantime I wish all of us good and fun days with family, friends and hobbies
- Joined
- Aug 8, 2019
- Messages
- 5,569
- Points
- 738

You too ShotaAnd in the meantime I wish all of us good and fun days with family, friends and hobbies
A complex piece of woodwork with all those curved, Shota. It need a lot of attention to get those connections. A solid base for making it in ebony and boxwood.good evening my dear friends
In the last few days I started working on the front part of the bow.
To get an idea of the configuration and the result I'm aiming for, I'll attach a picture from the beautiful work of our friend Giampy65.
View attachment 469887
As you noticed, this part consists of 10 parts and three types of wood - pear, ebony and boxwood.
In the original drawing you can see that if one type of wood is used, 8 pieces are enough.
View attachment 469890View attachment 469891View attachment 469892
In each choice, maximum precision is required in the interfaces between the parts.
In addition, ebony and boxwood are not found in my country and I am very short on these trees.
For these two reasons, I decided that I would first build this part from poplar wood, and based on the experience and lessons I would gather in the initial process, I would apply it to the process with the three trees.
I'm attaching the photos of the initial test which turned out well, but not one hundred percent accurate.
View attachment 469893View attachment 469894View attachment 469895View attachment 469897View attachment 469898View attachment 469899View attachment 469900
with an emphasis on the upper part on which the front mast rests.
Based on the lessons learned, I proceeded to make the parts from ebony and pear wood.
I would also like to note that almost every part has a different width, where the lower part that connects to the keel is 7.6 mm wide, while the quarter of the bows in the front of the part on the right is 5.6 mm wide.
As you must have noticed, I am in the middle of the work, and I am turning to you with a request for guidance, assistance and advice, which will be most welcome.
The first issue: As you can see in the drawing as well as in the pictures, between the parallel quadrants of the arch is threaded a decoration, the edges of which go into square channels.
The question is what is the correct way to create these canals within the quarters of the arches made of ebony wood. The depth of the channel is about 2.7 and a width of 2.3 mm.
Second question: whether and how it is possible to create the part with the decorations (from boxwood) "trapped" between the two quarters.
I believe hand carving would be quite challenging. I thought of combining laser engraving/cutting of the contours and then carving.
Maybe someone can advise on another method or know someone else who created a 3D file of the part for a printer or cnc. Any help and guidance will be greatly appreciated and thanked.
Last update A good friend of mine (Alexei) from the group in my country prepared the display board for the model . He does amazing work in 3D and cnc. Impress yourself.View attachment 469901
And in the meantime I wish all of us good and fun days with family, friends and hobbies
Regards, Peter
Hi Shota,
I’m not sure what level of precision you are shooting for… but I had good success working over a light table. It made it easier to see where to carefully sand to get the best fit. I also made a curved sanding block to assure I was sanding at 90 degrees. It’s tricky to get both sides to look good and that helped. Just some small tips my friend. It’s fun for us to see you skills improve!
I’m not sure what level of precision you are shooting for… but I had good success working over a light table. It made it easier to see where to carefully sand to get the best fit. I also made a curved sanding block to assure I was sanding at 90 degrees. It’s tricky to get both sides to look good and that helped. Just some small tips my friend. It’s fun for us to see you skills improve!
- Joined
- Nov 4, 2020
- Messages
- 501
- Points
- 453

Hello Shota!
you are doing a good job!
I want to give you a little advice that may be useful:
When you cut out the paper shapes that you are going to glue onto the wooden block, leave a little margin beyond the cut line, so it is easier to bring the piece to size by sanding off the excess.
I use lots of photocopies from which I cut out each component....
precision is crucial here to achieve a good result!
- Joined
- Apr 20, 2020
- Messages
- 6,241
- Points
- 738

thank you very much my dear friend for your kind wordsThat is some level of dedication You are showing!!
Cutting all those parts out of a lesser precious wood for a mock-up is a great idea. Not only to anticipate errors but to save on the beautiful box, pear and ebony.
This is the way (the Medlorean)
to improve my abilities and Save rare raw material
- Joined
- Apr 20, 2020
- Messages
- 6,241
- Points
- 738

Hello Shota!
you are doing a good job!
I want to give you a little advice that may be useful:
When you cut out the paper shapes that you are going to glue onto the wooden block, leave a little margin beyond the cut line, so it is easier to bring the piece to size by sanding off the excess.
I use lots of photocopies from which I cut out each component....
precision is crucial here to achieve a good result!
my dear friend Giampy65
Thank you very much for the good advice, I will implement it
I greatly benefit from your quality construction diary, please Continue to enlighten my ways, any guidance will be gladly received
- Joined
- Apr 20, 2020
- Messages
- 6,241
- Points
- 738

my dear friendHi Shota,
I’m not sure what level of precision you are shooting for… but I had good success working over a light table. It made it easier to see where to carefully sand to get the best fit. I also made a curved sanding block to assure I was sanding at 90 degrees. It’s tricky to get both sides to look good and that helped. Just some small tips my friend. It’s fun for us to see you skills improve!
Every bit of your advice is worth gold and diamonds, I welcome them and will apply them later
The smartphone camera is not of sufficient quality
Thanks for the support and words of encouragement


