Santisima Trinidad - Occre Build Log [COMPLETED BUILD]

Re: OcCre Santisima Trinidad Build Log

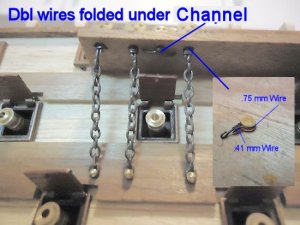
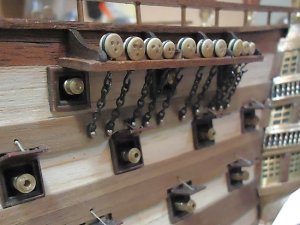
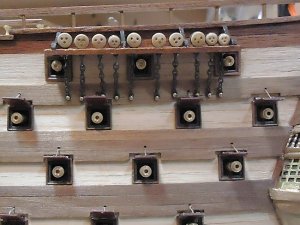
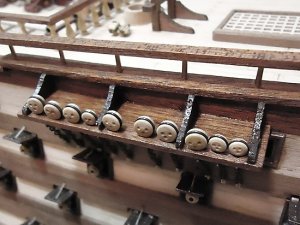
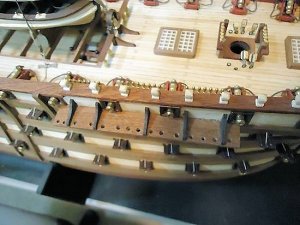
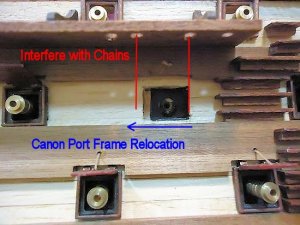
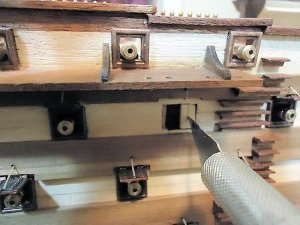
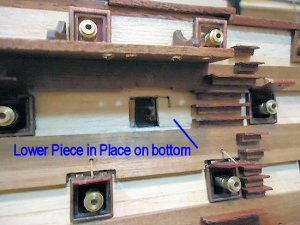
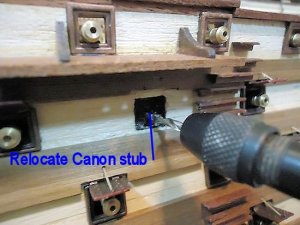
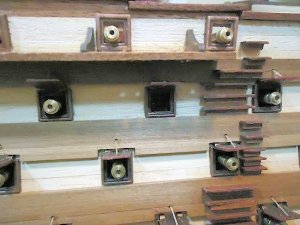
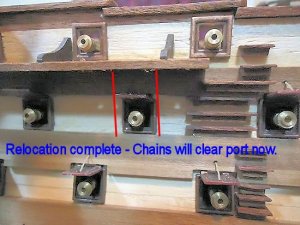
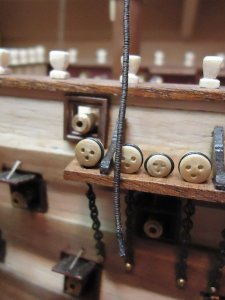
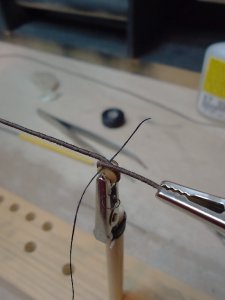
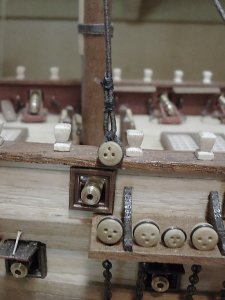
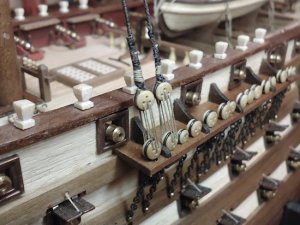
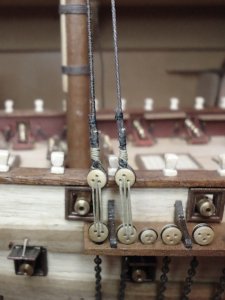
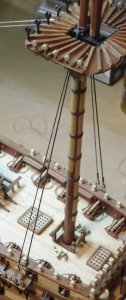
<t>As usual, I either cheat or try to find someway out of a problem. Well, I was wondering the same (how could I secure that dead eye) as per plans there is no chain (it would obviously be in the way of the canon). When I wrapped the wire around the smaller dead eye, I brought both wires to the same length. Inserted my dead eye through the hole like the others, except I folded the wire underneath the chain plate as in the image. I created an insert image to show the other dead eyes in detail. I hope this answers better.</t>
 

Attachments

  • deadeye09.jpg
    deadeye09.jpg
    48.9 KB · Views: 134
Re: OcCre Santisima Trinidad Build Log

<t>I met your "Santissima Trinita" only today ... A really good job, Donnie! From now I will follow it with great pleasure!<br/>
Fair Winds,<br/>
Laerte</t>
 
Re: OcCre Santisima Trinidad Build Log

<t>Thank you Laerte, and Wim - the latest is this:<br/>
I am not 100% Satisfied with this first installation of the Dead Eyes on the Channels, but it is what it is. Trying to get the angles of the chains coming off the Dead eyes is not exactly vertical. Some of the last several chains have a slight angle to them. I had to remove some chains to relocate them with slight angle. Not all are what I would say are positioned exactly perfect. Its one of those things that "if I had to do it again" ordeals. Moving on.</t>
 

Attachments

  • deadeye12.jpg
    deadeye12.jpg
    90.4 KB · Views: 114
Re: OcCre Santisima Trinidad Build Log

<t>I am very sorry for not posting lately. There has been a lot going on as I think I have made notice to all my freinds here. The Admiral is ok with her new dental work. She has a new smile now - and a new BITE (ouch) as well.</t>
 
Re: OcCre Santisima Trinidad Build Log

<t>The latest:</t>
 

Attachments

  • deadeye13.jpg
    deadeye13.jpg
    72.5 KB · Views: 109
  • deadeye14.jpg
    deadeye14.jpg
    111.9 KB · Views: 107
  • deadeye15.jpg
    deadeye15.jpg
    86.1 KB · Views: 108
  • deadeye16.jpg
    deadeye16.jpg
    94.1 KB · Views: 107
  • deadeye17.jpg
    deadeye17.jpg
    91.2 KB · Views: 106
  • deadeye18.jpg
    deadeye18.jpg
    88 KB · Views: 104
Re: OcCre Santisima Trinidad Build Log

<t>I encountered this problem before about a few Canon Port Lids being in the way of the Chains. So, this time, I thought I would document the steps I took in trying to make this correction as painless as possible. I have done others that turned out a little better than this one. The Canon Port Frame had to be shifted to the left about 4mm - if not, then the chain would not pass cleanly to the wales to make its attachment. I hope the series of steps make sense. Some of the more purist will probably cringe at this, but unless a person has a lot of long term experience it could not be caught ahead of time (or) the kit design would have been so perfect as to not allow this to happen. At any rate, it is corrected and moving on.</t>
 

Attachments

  • deadeye19.jpg
    deadeye19.jpg
    80.3 KB · Views: 96
  • deadeye20.jpg
    deadeye20.jpg
    93.4 KB · Views: 96
  • deadeye21.jpg
    deadeye21.jpg
    99.2 KB · Views: 96
  • deadeye22.jpg
    deadeye22.jpg
    79.6 KB · Views: 95
  • deadeye23.jpg
    deadeye23.jpg
    89.1 KB · Views: 95
  • deadeye24.jpg
    deadeye24.jpg
    77.5 KB · Views: 93
  • deadeye25.jpg
    deadeye25.jpg
    93.9 KB · Views: 94
  • deadeye26.jpg
    deadeye26.jpg
    74.5 KB · Views: 97
  • deadeye27.jpg
    deadeye27.jpg
    84.7 KB · Views: 97
  • deadeye28.jpg
    deadeye28.jpg
    83 KB · Views: 96
  • deadeye29.jpg
    deadeye29.jpg
    84 KB · Views: 95
  • deadeye30.jpg
    deadeye30.jpg
    77.2 KB · Views: 95
  • deadeye31.jpg
    deadeye31.jpg
    103.4 KB · Views: 93
Re: OcCre Santisima Trinidad Build Log

<t>Well, it is back to the Mast again. This time is the big event of installting the Mast onto the Hull. There are a few shots that I demonstrate the alignment. I finally got the Dead Eye upper links, chains and fasteners in place. I will blacken the nails later. So, with that said, I am moving on with seeing how I stand with seeing how the Hull and Mast are aligned without any major effort. I do not show the images, but I used a few shims to make the hull aligned and squared in the cradle. This is why I used a Level. (to some, this may seem way out and not necessary). But, it is to me a good exercise while I had the time. <br/>
The later photos show that I suspended a plumb line from the Tree Top of the main mast and I wanted to see initially how the level was. Now, I have not at this time looked at the plans to see if there is any rake or angle to this main mast. I just wanted to see if any gross errors exist. Well, to much my surprise with the mast just put in place in the hull openings, I see that I am pretty good as far as plumb goes. So, with this, I can proceed and take some measurements off the plans to see if the Main Mast has any angle to it, or if it is in fact, straight up and down. After Checking with Plans, it seems like I can go ahead. Even though some suggested not to glue the mast in place, I decided to go ahead with such. I will probably make a false wedge later. I tried to make a real wedge that would actually work, but found to be too frustrating and time consuming. <br/>
I took a lot of level readings and let the glue set overnight. I used a wire and one string to help hold the mast in place since it was a little wobbly in the opening of the hull.</t>
 

Attachments

  • mastplumbing01.jpg
    mastplumbing01.jpg
    98 KB · Views: 115
  • mastplumbing02.jpg
    mastplumbing02.jpg
    70.8 KB · Views: 113
  • mastplumbing03.jpg
    mastplumbing03.jpg
    76.8 KB · Views: 110
  • mastplumbing04.jpg
    mastplumbing04.jpg
    83.4 KB · Views: 111
  • mastplumbing05.jpg
    mastplumbing05.jpg
    67.5 KB · Views: 111
  • mastplumbing06.jpg
    mastplumbing06.jpg
    74.3 KB · Views: 116
  • mastplumbing07.jpg
    mastplumbing07.jpg
    73 KB · Views: 121
  • mastplumbing08.jpg
    mastplumbing08.jpg
    76 KB · Views: 120
  • mastplumbing09.jpg
    mastplumbing09.jpg
    88.1 KB · Views: 121
Re: OcCre Santisima Trinidad Build Log

<t>This starts the beginning of installing the Rigging: Standing Rigging, Running Rigging all broken down to its individual components. The image below only depicts how I wish to secure the Foremast in such a manner so that when I start rigging the Shrouds, the Foremast will remain as stable as possible. I will attempt to rig the Shroud #1 and #2 and then #9 and #10. I will attach a horizontal batten line so as to provide a straight line to go by when rigging the remaining shrouds. If you have the book, "Ship Modeling from Stem to Stern" on page 163 of the "sequence of Masthead, this is the approach most favorable for my application. Of the reading and little research it is nearly impossible to settle on the most accurate way to perform the sequence and also perform the correct single or double method given the period and given this is Spanish of the line ship. So, therefore, I have decided the approach as suggested in the reading material. All my friends that have followed this build should know by now that I try my best to keep things simple and in order and not to complicate an already complicated process. Planning and thinking ahead is the key - but at best, mistakes and things happen.</t>
 

Attachments

  • riggingforemastsupport.jpg
    riggingforemastsupport.jpg
    99.9 KB · Views: 109
Re: OcCre Santisima Trinidad Build Log

<t>The Grand and Glorious day of starting the Foremast Shroud Rigging has begun. Not too sure about how to do this, but I have to start somewhere.</t>
 

Attachments

  • foremastshrouds01.jpg
    foremastshrouds01.jpg
    86.2 KB · Views: 127
  • foremastshrouds02.jpg
    foremastshrouds02.jpg
    71.8 KB · Views: 128
Re: OcCre Santisima Trinidad Build Log

<t>Well, I did not like the serving on the image above, so I redid it with a smaller thread. I used a cross stitch thread and separated the threads into one component. <br/>
The next section demonstrates how I decided to rig the upper deadeye. If you follow the photos, you should be able to see the steps involved. The gap at the deadeye will be closed when the two deadeyes are rigged together and seized.</t>
 

Attachments

  • foremastshrouds05.jpg
    foremastshrouds05.jpg
    75.9 KB · Views: 159
  • foremastshrouds04.jpg
    foremastshrouds04.jpg
    62.8 KB · Views: 158
  • foremastshrouds06.jpg
    foremastshrouds06.jpg
    52.5 KB · Views: 161
  • foremastshrouds07.jpg
    foremastshrouds07.jpg
    53.7 KB · Views: 158
  • foremastshrouds08.jpg
    foremastshrouds08.jpg
    58.1 KB · Views: 159
  • foremastshrouds09.jpg
    foremastshrouds09.jpg
    50.6 KB · Views: 159
  • foremastshrouds10.jpg
    foremastshrouds10.jpg
    60.1 KB · Views: 162
  • foremastshrouds11.jpg
    foremastshrouds11.jpg
    78.6 KB · Views: 159
Re: OcCre Santisima Trinidad Build Log

<t>The latest. I call myself trying to rig the Lanyards per as accurate as I can. Pictures do not lie - I think they look a little better in real life. These are fairly fun to do, Except I am going to have to think of a jig or something to get those dudes in line. The second set was tough as I could not figure out at the time a good method. It is what it is. <br/>
I put CA on the lighter colored .15mm line about 20mm or so that it would be very stiff. This was the only way I could feed that end of Lanyard back through the upper crest of the deadeye and back around again to tie it off.</t>
 

Attachments

  • foremastshrouds13.jpg
    foremastshrouds13.jpg
    71.7 KB · Views: 140
  • foremastshrouds14.jpg
    foremastshrouds14.jpg
    87.1 KB · Views: 137
  • foremastshrouds15.jpg
    foremastshrouds15.jpg
    85.6 KB · Views: 142
  • foremastshrouds16.jpg
    foremastshrouds16.jpg
    117.5 KB · Views: 140
Re: OcCre Santisima Trinidad Build Log

<t>Thank you gentlemen for your fine words of encouragement.</t>
 
Re: OcCre Santisima Trinidad Build Log

<t>Continuation of Rigging the Shrouds.</t>
 

Attachments

  • foremastshrouds18.jpg
    foremastshrouds18.jpg
    73.5 KB · Views: 125
  • foremastshrouds17.jpg
    foremastshrouds17.jpg
    69.2 KB · Views: 128
Re: OcCre Santisima Trinidad Build Log

<t>Well, its not that bad, once you do one. Its getting another one done after you just did one -</t>
 
Re: OcCre Santisima Trinidad Build Log

<t>That is exactley how Rigging Period Ships illistrates them and you are doing a bully, just bully job. And the wrapped lines look absolutely stunning. That is not a easy task to accomplish. Are you using the rigging thread that came w/kit, or are you using another source?<br/>
Rick</t>
 
Re: OcCre Santisima Trinidad Build Log

<t>Well, thank you Rick. I really appreciate the compliments. The main shroud line is .80mm (.0315). The line that I use to serve the .80mm is some cross stitch thread from Hobby Lobby. The brand is DMC #838-color. The overall strand has about 5 individual strands in it, so in order to keep the serving less bulky looking and more to scale, I actually separate the strands into one individual which comes out to be about .14mm (or .0055). I also have the main .80mm (.0315) and the .14mm (.0055) coated with Bees Wax. I also have a small simple jig that has a few dowels w/ Alligator Clips that hold the .80mm line while I wrap (serve) it. I was told that the leading edge of the shroud is served due to Sails coming into contact with the leading edge of the shroud, so therefore lending the necessity of serving that leading shroud. The others in line will not get this treatment (thank goodness). However the other mast will also have the leading done. If I remember, it took me an hour just to do one side (that is up the mast and down - on one side). My arms and shoulders was killing me the next day.</t>
 
Re: OcCre Santisima Trinidad Build Log

<r><QUOTE author="Donnie"><s>
Donnie said:
</s>Well, thank you Rick. I really appreciate the compliments.<br/>
<br/>
The main shroud line is .80mm (.0315). The line that I use to serve the .80mm is some cross stitch thread from Hobby Lobby. The brand is DMC #838-color. The overall strand has about 5 individual strands in it, so in order to keep the serving less bulky looking and more to scale, I actually separate the strands into one individual which comes out to be about .14mm (or .0055). I also have the main .80mm (.0315) and the .14mm (.0055) coated with Bees Wax. I also have a small simple jig that has a few dowels w/ Alligator Clips that hold the .80mm line while I wrap (serve) it. I was told that the leading edge of the shroud is served due to Sails coming into contact with the leading edge of the shroud, so therefore lending the necessity of serving that leading shroud. The others in line will not get this treatment (thank goodness). However the other mast will also have the leading done. If I remember, it took me an hour just to do one side (that is up the mast and down - on one side). My arms and shoulders was killing me the next day.<e>
</e></QUOTE>
Thanks for the info and I will remember your methods, this is the stuff that makes a model pop and not just be a cookie cutter version.<br/>
Thanks for sharing this.<br/>
Rick</r>
 
Re: OcCre Santisima Trinidad Build Log

<t>I do not mean to sound stupid, but what type bees wax are you using, there are many types and some are better than others. Also do you glue the knots as well. I just learned that a type of glue I use is perfect for this, CS Cement. All of the items as shown in photos can be purchased from ModelExpo.<br/>
<br/>
Rick<br/>
<br/>
Alot of guys like using CA for glueing their knots, fast and holds great, problem is that in time, the CA will eat the line and fall apart.</t>
 
Re: OcCre Santisima Trinidad Build Log

<r><QUOTE><s>
</s>I do not mean to sound stupid, but what type bees wax are you using<e>
</e></QUOTE>
No - not all at Rick.<br/>
As a matter of fact, on this subject, you are actually showing me some things I did not know. I promise, if I remember, I got my Bees Wax from Hobby Lobby a long time ago. As I asked the Admiral (that works there) to get me some more --- well, she came home with something totally unfamiliar. They do not carry (what I think is the best). The stuff she brought home (not her fault) was horrible. It was in that small round disk of stuff, I think it is the second photo you show. It is nothing but candle wax - I swear it has to be. It crumbles and falls apart - I threw it away. The little bottle that you show image one seems like it is the way to go. Just as reference, the last bit of wax I have is somewhat very hard. It coats the rigging line with a slight stickyness (which I like) b/c as you are rigging and tieing, the line will NOT loosen and will stay fixed until you can tie a knot in it.<br/>
I saw that ad in M.E. about that rigging line glue - never used - I guess I can buy some to check it out. I do use CA and I was unaware of such claims. That is more info I did not know about and thanks for letting me know. Just about all my knots are simple half hitch with a tad of CA - then I touch the joint with my finger to press the CA into the joint and it dries flat without a gloss. Polyester string is the hardest to put wax on. I am using some Black line that came from Hobby Lobby and it is polyester - and I am not that happy with the way it feels and works with - however, it makes out to be the smoothest seizing and serving. Once you choose your flavor you gotta stick with it. Make changes early if you do not like something - cut it loose and start again. I know I have. <br/>
<br/>
Thanks for the info !!!! <br/>
<br/>
BTW - where do I find that wax on the first image?</r>
 
Back
Top