-

Win a Free Custom Engraved Brass Coin!!!
As a way to introduce our brass coins to the community, we will raffle off a free coin during the month of August. Follow link ABOVE for instructions for entering.
-

PRE-ORDER SHIPS IN SCALE TODAY!
The beloved Ships in Scale Magazine is back and charting a new course for 2026!
Discover new skills, new techniques, and new inspirations in every issue.
NOTE THAT OUR FIRST ISSUE WILL BE JAN/FEB 2026
You are using an out of date browser. It may not display this or other websites correctly.
You should upgrade or use an alternative browser.
You should upgrade or use an alternative browser.
Soleil Royal- Re-engineering Artesania Latina's New Kit by NMBROOK
I love the stairs - great work
All I can say is WOW!!
This is a beautifull stairs Nigel, i can only dream of making work like this

Lemineur’s side and front elevations of how each level of these stairs resolves into each other is pretty confusing. The logic of the thing is much more apparent in three dimensions. It is no easy business to draw these complex structures, let alone build them.
Thanks Guys
Marc, you could say I have an unfair advantage in that I have made several spiral stairs in my day job ranging from 1.2metre radius up to @12metres radius and the set out principles are all the same.
Lemineur shows the treads as not being level and fan from following the deck camber at the bottom to the sheer of the deck above. I disagree with this, it is not natural to walk up steps with treads that aren't level and the surface area does not warrant it for water run off.Also his radial set out was a bit "iffy" and I have set these out how they should be done.
Part of me currently thinks that plain spindles are not befitting of this vessel and wondering if the infill should be gold filigree panels??
Currently googling images of Baroque staircases for inspiration
 Some rather nice railing panels at the Palace of Versailles featuring the Sun King motif, but in 1/65 it would be well beyond me.
Kind Regards
Nigel
Marc, you could say I have an unfair advantage in that I have made several spiral stairs in my day job ranging from 1.2metre radius up to @12metres radius and the set out principles are all the same.
Lemineur shows the treads as not being level and fan from following the deck camber at the bottom to the sheer of the deck above. I disagree with this, it is not natural to walk up steps with treads that aren't level and the surface area does not warrant it for water run off.Also his radial set out was a bit "iffy" and I have set these out how they should be done.
Part of me currently thinks that plain spindles are not befitting of this vessel and wondering if the infill should be gold filigree panels??
Currently googling images of Baroque staircases for inspiration

 Some rather nice railing panels at the Palace of Versailles featuring the Sun King motif, but in 1/65 it would be well beyond me.
Kind Regards
Nigel
- Joined
- Oct 25, 2022
- Messages
- 294
- Points
- 128

Going in to fellow this one, not sure how doable those stairs would be on 1/100 scale. Nice work on them tho.
I’d have to look for it, but Hyatt describes walking up through the afterdecks of the Royal Louis in great detail. Maybe you might find inspiration there.
- Joined
- Oct 25, 2022
- Messages
- 294
- Points
- 128

Are you talking about this document? https://gallica.bnf.fr/ark:/12148/btv1b86069950/f45.item
That’s the one, yes.
Thankyou
I will translate the document this weekend.Lemineur shows thin spindles.These feature on English warships.Baroque style is either chunky spindles or ornate carving/filigree
I have seen pictures of a Baroque staircase in Lviv Ukraine and the folaige design ties in with this vessel.How doable it is in 1/65 I will have to think about it
Kind Regards
Nigel
- Joined
- Oct 25, 2022
- Messages
- 294
- Points
- 128

Your welcome, after seeing all your build pages, I think your carving look good, on my heller kit, I'm planing to use magic sculpt, for me, easier to do than using wood (+I don't have the tools for wood work). I plan to do the figurehead since mine will be 1669 SR.
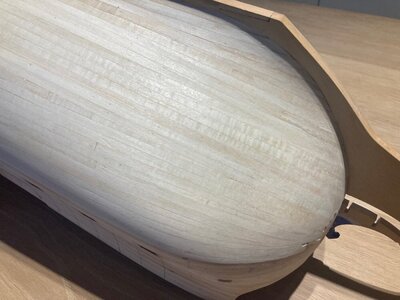
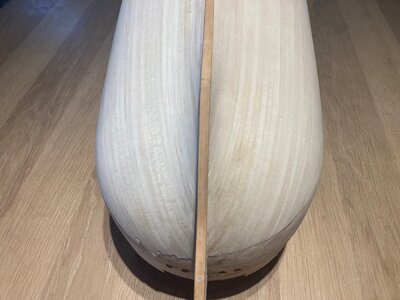
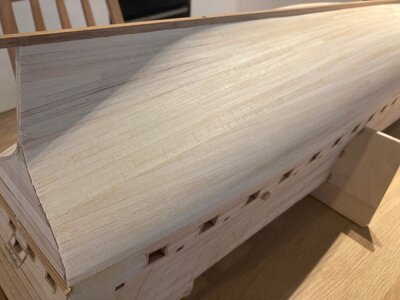
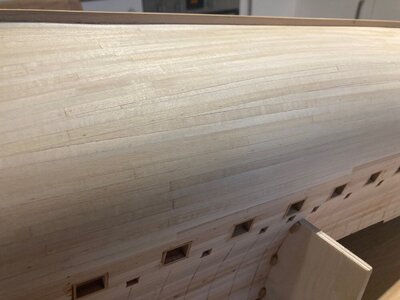
Took a break from detail stuff and laid the second layer of planking on the other side of the hull. Two days work start to finish so quite pleased with myself. No planking rules observed other than keeping clinkering to a minimum. The final layer will be masses of spiling so that will take considerably longer.
The top edge of this layer wants trimming the the line of the lower wale.
Also ordered blocks and ropes for the Carriages of the main gun deck along with some Acrylic paint that I hope matches the hue of boxwood for the Printed Carriages.
Kind Regards
Nigel


The top edge of this layer wants trimming the the line of the lower wale.
Also ordered blocks and ropes for the Carriages of the main gun deck along with some Acrylic paint that I hope matches the hue of boxwood for the Printed Carriages.
Kind Regards
Nigel


Great planking job, Nigel.
And I could add a new word to my vocabulary, spiling
And I could add a new word to my vocabulary, spiling

Nice, clean planking, Nigel! Even if the acrylic color isn’t a perfect match for the boxwood, I would think a thin wash-coat would highlight the printed details and add enough visual interest to shift focus away from any slight color discrepancies.
Nice, clean planking, Nigel! Even if the acrylic color isn’t a perfect match for the boxwood, I would think a thin wash-coat would highlight the printed details and add enough visual interest to shift focus away from any slight color discrepancies.
Precisely my thoughts Marc.There is a fine engraved line depicting the join in the Carriage cheeks, brown wash is required to bring this detail out.In addition I will topcoat with a coat of the varnish I am using on the woodwork to help them blend in
Kind regards
Nigel
Oh, to create a finished hull as clean as your underlayment...
Oh, to create a finished hull as clean as your underlayment...
Thanks Paul, but it isn't perfect. Slight dip where the planking meets the keel in the last picture about quarter of the way along from the left. Nothing a wipe of filler won't sort before the last layer. This is why I quite often scrutinise my work from the pictures I post on here. Things sometimes jump out at you that don't when actually looking at the model itself.
Kind Regards
Nigel
Very good work - a very good basis (and you will need only very small amount of filler)
Your first planking is better than the second planking of most of us (I am speaking about myself )
)
Your first planking is better than the second planking of most of us (I am speaking about myself


